H
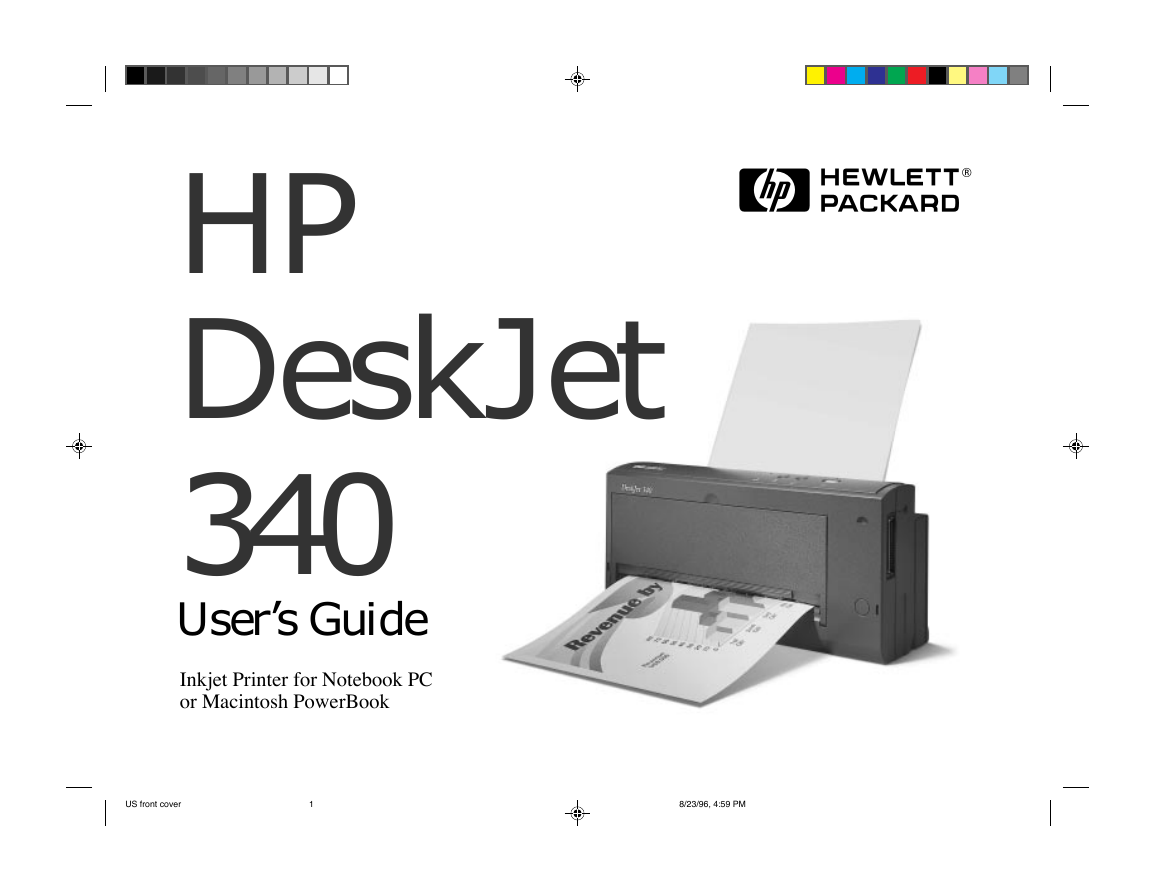
HP
DeskJet
340
User’s Guide
Inkjet Printer for Notebook PC
or Macintosh PowerBook
US front cover
1
8/23/96, 4:59 PM
�
Acknowledgements
Apple, Mac, and Macintosh are registered trademarks of Apple
Computer, Inc.
Microsoft is a US registered trademark of Microsoft Corporation.
Windows is a trademark of Microsoft Corporation.
Panasonic is a registered trademark of Matsushita Electric
Industrial Co., Ltd.
Notice
The information contained in this document is subject to change
without notice.
Hewlett-Packard makes no warranty of any kind with regard to this
material, including, but not limited to, the implied warranties of
merchantability and fitness for a particular purpose.
Hewlett-Packard shall not be liable for errors contained herein or
for incidental or consequential damages in connection with the
furnishing, performance, or use of this material.
No part of this document may be photocopied, reproduced, or
translated to another language without prior written consent of
Hewlett-Packard Company.
Print History
Edition 3
© Copyright 1995 by Hewlett-Packard Company
1150 Depot Road, Singapore 109673
Singapore
Contents
1
The HP DeskJet 340 Printer
Items in the Box ................................................................................................... 1
Printer Buttons and Lights .................................................................................. 1
Travel Tips ............................................................................................................. 1
Proof of Purchase Label ...................................................................................... 1
Getting Started
Connecting the Printer to Your Computer ........................................................ 2
Connecting the Power Adapter .......................................................................... 2
Installing the Print Cartridge .............................................................................. 2
Printing in Color ................................................................................................... 3
Useful Tips for Your Print Cartridge .................................................................. 3
Installing the Portable Sheet Feeder .................................................................. 4
Loading Paper ....................................................................................................... 4
Printing Transparencies, Labels and Special Paper ......................................... 5
Paper Types Not Supported ................................................................................ 5
Feeding Paper Manually ...................................................................................... 5
Installing the Printer Software ........................................................................... 6
Using Battery Power Supply
Installing the Battery Pack .................................................................................. 8
Removing the Battery Pack ................................................................................. 8
Charging the Battery Pack .................................................................................. 8
Maximizing Battery Pack Performance ............................................................. 8
Supplies and Accessories ..................................................................... 9
Printer Specifications
Hardware and Software Compatibility .............................................................. 10
Print Method ......................................................................................................... 10
Black Print Speed ................................................................................................. 10
Color Print Speed ................................................................................................. 10
Resolution ............................................................................................................. 10
Printer Command Language ............................................................................... 10
Built-in Fonts ........................................................................................................ 10
Paper Weight ......................................................................................................... 10
Paper Sizes ............................................................................................................ 10
Paper Handling ..................................................................................................... 10
Power Requirements ............................................................................................ 10
Power Consumption ............................................................................................ 10
I/O Interface .......................................................................................................... 11
Buffer Size ............................................................................................................. 11
Operating Environment ....................................................................................... 11
Weight .................................................................................................................... 11
Dimensions ............................................................................................................ 11
Reliability .............................................................................................................. 11
Product Certifications ......................................................................................... 11
Minimum Margins ................................................................................................. 11
Customer Support ................................................................................ 12
Regulatory Notices ............................................................................... 15
2
3
4
5
6
7
US front cover
2
8/23/96, 4:59 PM
�
The HP DeskJet 340 Printer
The HP DeskJet 340 is a high-quality inkjet printer, giving you 600 x
300 dots per inch text and graphics printing on a variety of paper
types and transparencies. For added convenience, the printer
comes with a portable sheet feeder that can hold up to 30 sheets of
paper.
You can use the HP DeskJet 340 printer with a PC running
Microsoft Windows, or an Apple Macintosh computer if you use the
appropriate cable.
To get the best performance from your printer, refer to:
•
this User’s Guide for details on setting up and operating the
printer
the on-screen help provided with your printer software
•
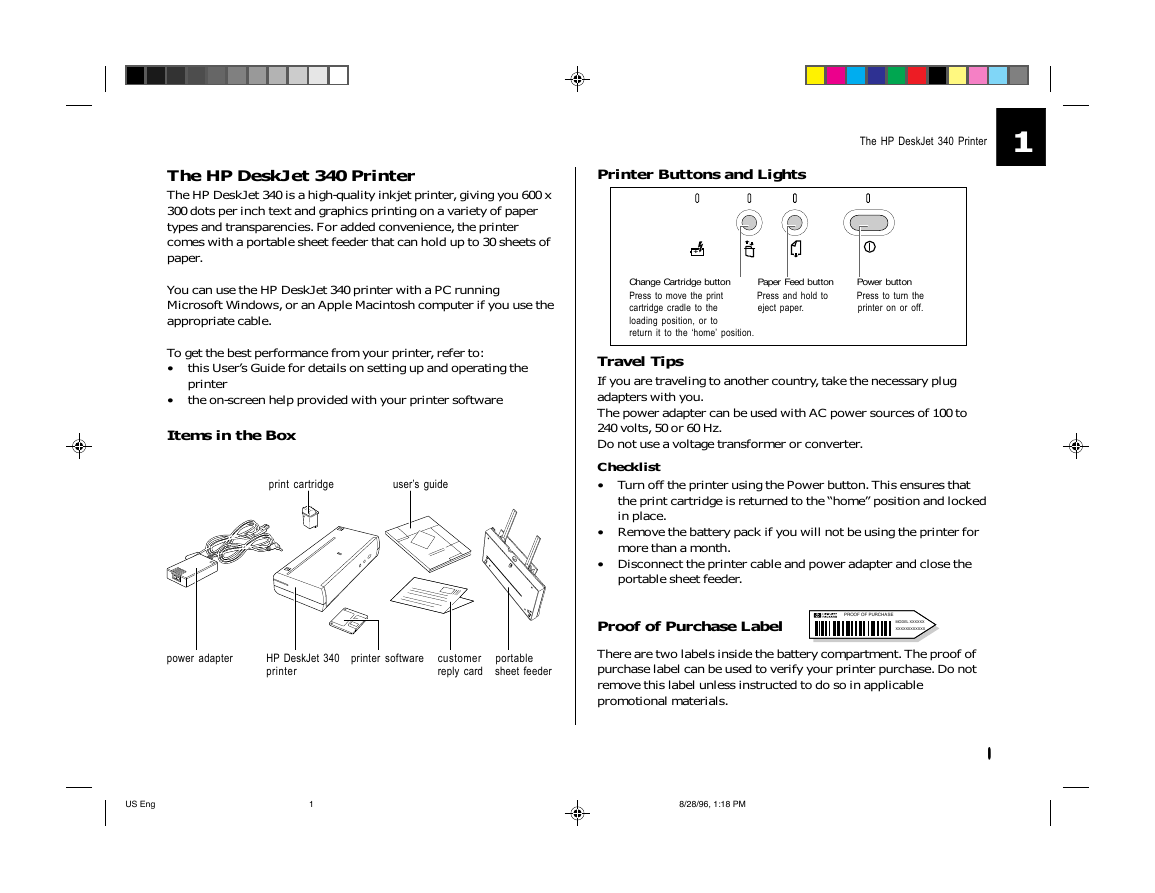
Items in the Box
print cartridge
user’s guide
power adapter
HP DeskJet 340
printer
printer software
customer
reply card
portable
sheet feeder
Printer Buttons and Lights
The HP DeskJet 340 Printer
1
+
Change Cartridge button
Press to move the print
cartridge cradle to the
loading position, or to
return it to the ‘home’ position.
Paper Feed button
Press and hold to
eject paper.
Power button
Press to turn the
printer on or off.
Travel Tips
If you are traveling to another country, take the necessary plug
adapters with you.
The power adapter can be used with AC power sources of 100 to
240 volts, 50 or 60 Hz.
Do not use a voltage transformer or converter.
Checklist
• Turn off the printer using the Power button. This ensures that
the print cartridge is returned to the “home” position and locked
in place.
• Remove the battery pack if you will not be using the printer for
more than a month.
• Disconnect the printer cable and power adapter and close the
portable sheet feeder.
Proof of Purchase Label
PROOF OF PURCHASE
MODEL XXXXXX
XXXXXXXXXXXX
There are two labels inside the battery compartment. The proof of
purchase label can be used to verify your printer purchase. Do not
remove this label unless instructed to do so in applicable
promotional materials.
11111
US Eng
1
8/28/96, 1:18 PM
�
2 Getting Started
Connecting the Printer to Your Computer
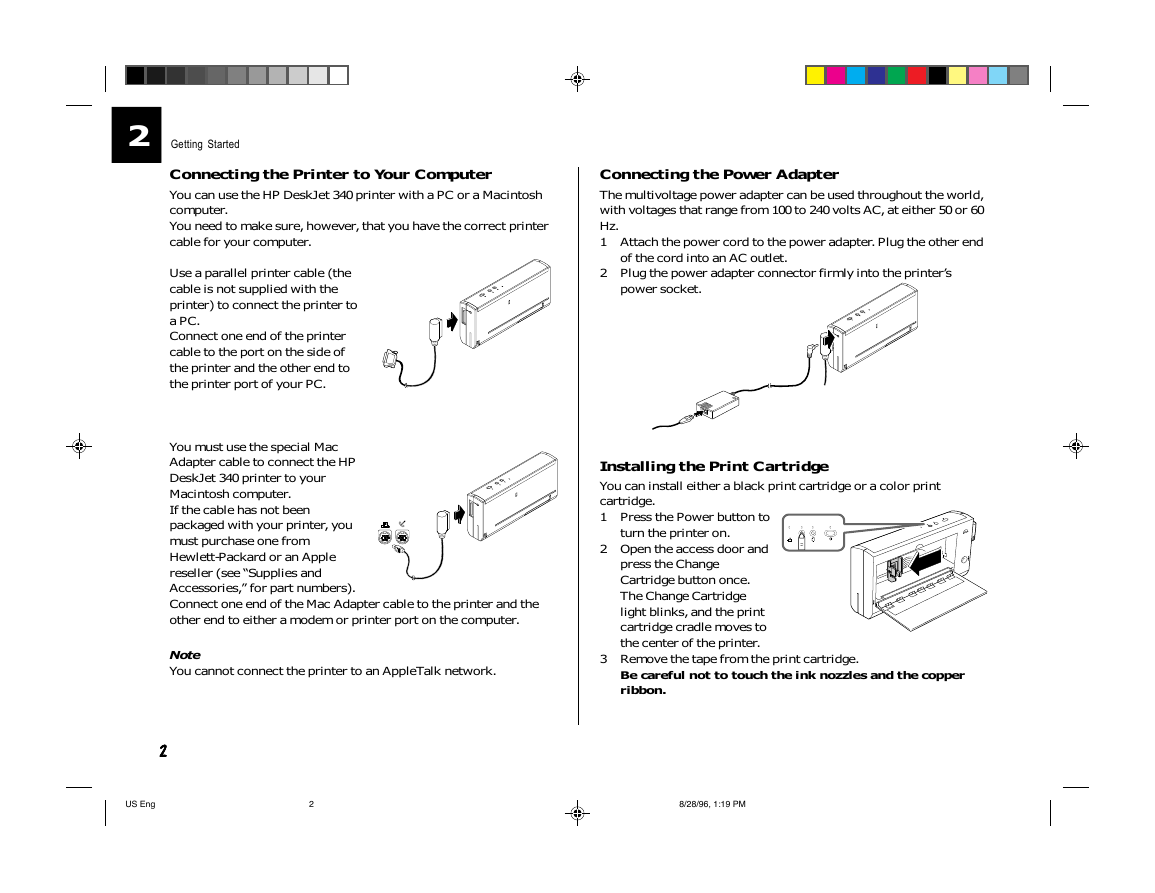
You can use the HP DeskJet 340 printer with a PC or a Macintosh
computer.
You need to make sure, however, that you have the correct printer
cable for your computer.
Use a parallel printer cable (the
cable is not supplied with the
printer) to connect the printer to
a PC.
Connect one end of the printer
cable to the port on the side of
the printer and the other end to
the printer port of your PC.
Connecting the Power Adapter
The multivoltage power adapter can be used throughout the world,
with voltages that range from 100 to 240 volts AC, at either 50 or 60
Hz.
1 Attach the power cord to the power adapter. Plug the other end
of the cord into an AC outlet.
2 Plug the power adapter connector firmly into the printer’s
power socket.
You must use the special Mac
Adapter cable to connect the HP
DeskJet 340 printer to your
Macintosh computer.
If the cable has not been
packaged with your printer, you
must purchase one from
Hewlett-Packard or an Apple
reseller (see “Supplies and
Accessories,” for part numbers).
Connect one end of the Mac Adapter cable to the printer and the
other end to either a modem or printer port on the computer.
Note
You cannot connect the printer to an AppleTalk network.
Installing the Print Cartridge
You can install either a black print cartridge or a color print
cartridge.
1 Press the Power button to
turn the printer on.
2 Open the access door and
+
press the Change
Cartridge button once.
The Change Cartridge
light blinks, and the print
cartridge cradle moves to
the center of the printer.
3 Remove the tape from the print cartridge.
Be careful not to touch the ink nozzles and the copper
ribbon.
22222
US Eng
2
8/28/96, 1:19 PM
�
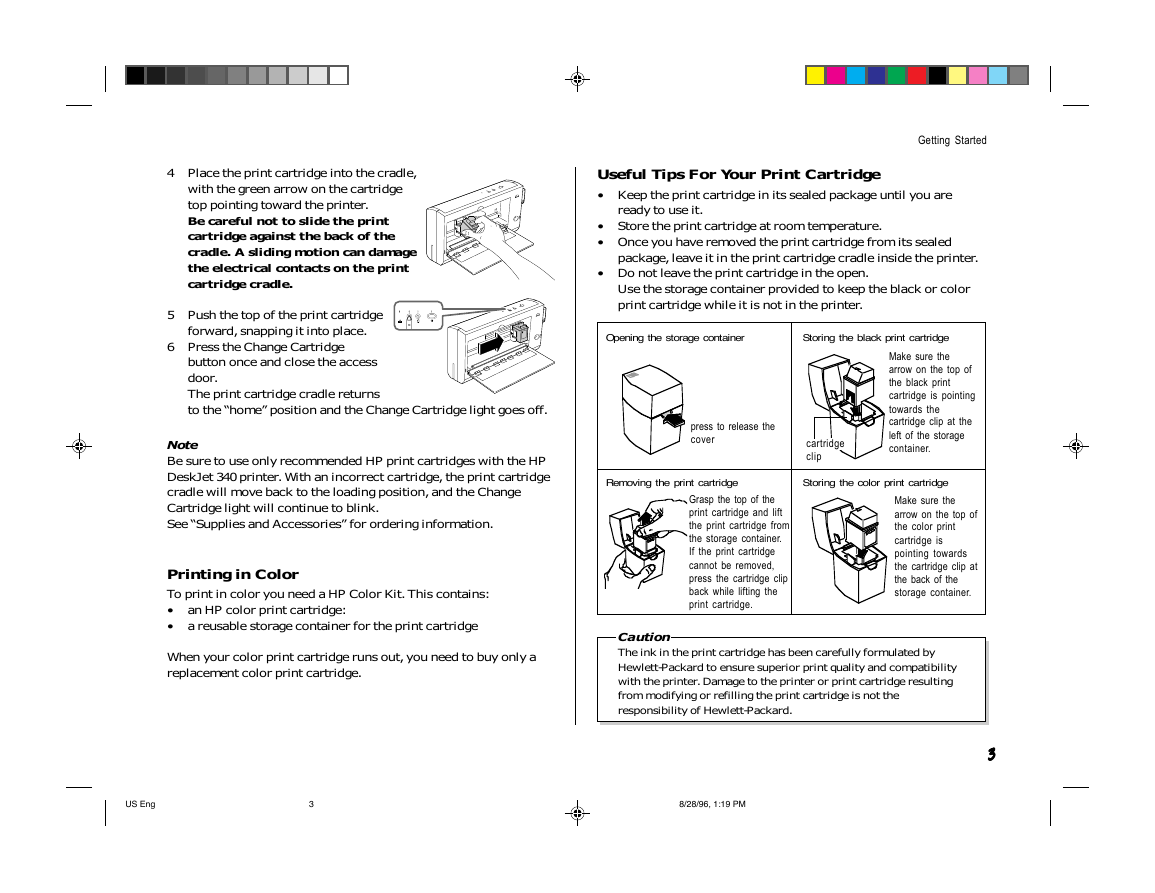
4 Place the print cartridge into the cradle,
with the green arrow on the cartridge
top pointing toward the printer.
Be careful not to slide the print
cartridge against the back of the
cradle. A sliding motion can damage
the electrical contacts on the print
cartridge cradle.
5 Push the top of the print cartridge
+
forward, snapping it into place.
6 Press the Change Cartridge
button once and close the access
door.
The print cartridge cradle returns
to the “home” position and the Change Cartridge light goes off.
Note
Be sure to use only recommended HP print cartridges with the HP
DeskJet 340 printer. With an incorrect cartridge, the print cartridge
cradle will move back to the loading position, and the Change
Cartridge light will continue to blink.
See “Supplies and Accessories” for ordering information.
Printing in Color
To print in color you need a HP Color Kit. This contains:
•
•
an HP color print cartridge:
a reusable storage container for the print cartridge
When your color print cartridge runs out, you need to buy only a
replacement color print cartridge.
Getting Started
Useful Tips For Your Print Cartridge
• Keep the print cartridge in its sealed package until you are
ready to use it.
• Store the print cartridge at room temperature.
• Once you have removed the print cartridge from its sealed
package, leave it in the print cartridge cradle inside the printer.
• Do not leave the print cartridge in the open.
Use the storage container provided to keep the black or color
print cartridge while it is not in the printer.
Opening the storage container
press to release the
cover
Storing the black print cartridge
Make sure the
arrow on the top of
the black print
cartridge is pointing
towards the
cartridge clip at the
left of the storage
container.
cartridge
clip
Removing the print cartridge
Storing the color print cartridge
Grasp the top of the
print cartridge and lift
the print cartridge from
the storage container.
If the print cartridge
cannot be removed,
press the cartridge clip
back while lifting the
print cartridge.
Make sure the
arrow on the top of
the color print
cartridge is
pointing towards
the cartridge clip at
the back of the
storage container.
Caution
The ink in the print cartridge has been carefully formulated by
Hewlett-Packard to ensure superior print quality and compatibility
with the printer. Damage to the printer or print cartridge resulting
from modifying or refilling the print cartridge is not the
responsibility of Hewlett-Packard.
33333
US Eng
3
8/28/96, 1:19 PM
�
Getting Started
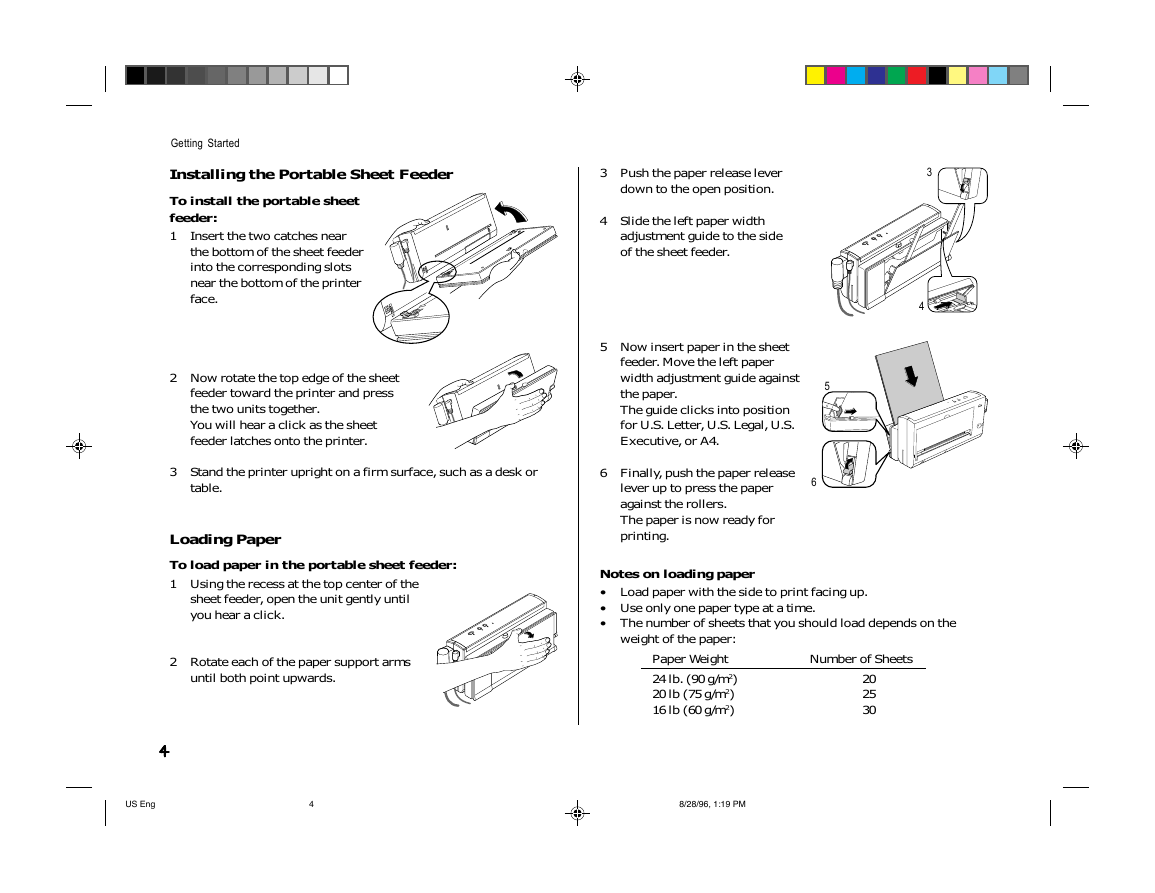
Installing the Portable Sheet Feeder
To install the portable sheet
feeder:
1
Insert the two catches near
the bottom of the sheet feeder
into the corresponding slots
near the bottom of the printer
face.
2 Now rotate the top edge of the sheet
feeder toward the printer and press
the two units together.
You will hear a click as the sheet
feeder latches onto the printer.
3 Push the paper release lever
down to the open position.
4 Slide the left paper width
adjustment guide to the side
of the sheet feeder.
5 Now insert paper in the sheet
feeder. Move the left paper
width adjustment guide against
the paper.
The guide clicks into position
for U.S. Letter, U.S. Legal, U.S.
Executive, or A4.
3 Stand the printer upright on a firm surface, such as a desk or
6 Finally, push the paper release
3
4
5
6
table.
Loading Paper
To load paper in the portable sheet feeder:
1 Using the recess at the top center of the
sheet feeder, open the unit gently until
you hear a click.
2 Rotate each of the paper support arms
until both point upwards.
44444
lever up to press the paper
against the rollers.
The paper is now ready for
printing.
Notes on loading paper
• Load paper with the side to print facing up.
• Use only one paper type at a time.
• The number of sheets that you should load depends on the
weight of the paper:
Paper Weight
24 lb. (90 g/m2)
20 lb (75 g/m2)
16 lb (60 g/m2)
Number of Sheets
20
25
30
US Eng
4
8/28/96, 1:19 PM
�
Feeding Paper Manually
You may find that the paper you have loaded into the portable sheet
feeder is not feeding well into the printer. In such cases you may
wish to remove the portable sheet feeder and try feeding each sheet
by hand. See “Removing the Portable Sheet Feeder” at the end of
this chapter.
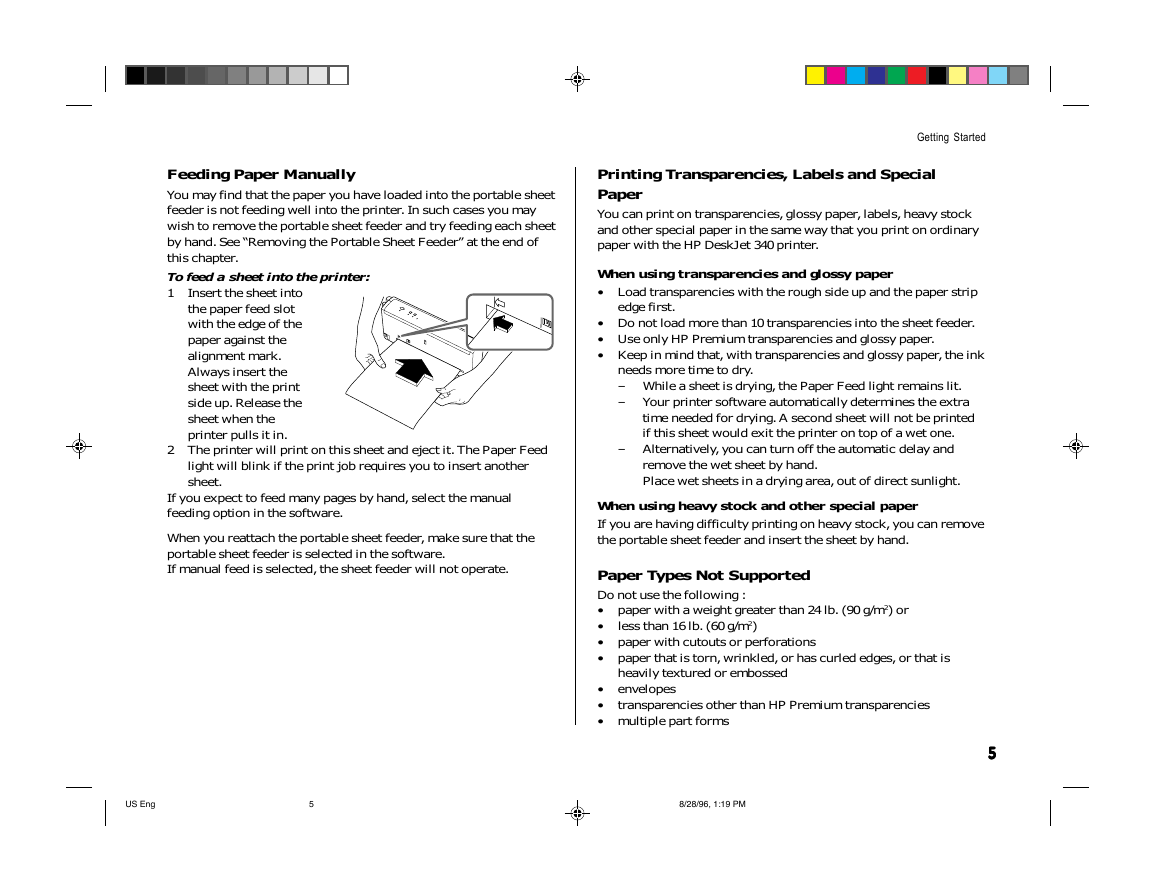
To feed a sheet into the printer:
1
Insert the sheet into
the paper feed slot
with the edge of the
paper against the
alignment mark.
Always insert the
sheet with the print
side up. Release the
sheet when the
printer pulls it in.
2 The printer will print on this sheet and eject it. The Paper Feed
light will blink if the print job requires you to insert another
sheet.
If you expect to feed many pages by hand, select the manual
feeding option in the software.
When you reattach the portable sheet feeder, make sure that the
portable sheet feeder is selected in the software.
If manual feed is selected, the sheet feeder will not operate.
Getting Started
Printing Transparencies, Labels and Special
Paper
You can print on transparencies, glossy paper, labels, heavy stock
and other special paper in the same way that you print on ordinary
paper with the HP DeskJet 340 printer.
When using transparencies and glossy paper
• Load transparencies with the rough side up and the paper strip
edge first.
• Do not load more than 10 transparencies into the sheet feeder.
• Use only HP Premium transparencies and glossy paper.
• Keep in mind that, with transparencies and glossy paper, the ink
needs more time to dry.
– While a sheet is drying, the Paper Feed light remains lit.
–
Your printer software automatically determines the extra
time needed for drying. A second sheet will not be printed
if this sheet would exit the printer on top of a wet one.
Alternatively, you can turn off the automatic delay and
remove the wet sheet by hand.
Place wet sheets in a drying area, out of direct sunlight.
–
When using heavy stock and other special paper
If you are having difficulty printing on heavy stock, you can remove
the portable sheet feeder and insert the sheet by hand.
Paper Types Not Supported
Do not use the following :
• paper with a weight greater than 24 lb. (90 g/m2) or
•
• paper with cutouts or perforations
• paper that is torn, wrinkled, or has curled edges, or that is
less than 16 lb. (60 g/m2)
heavily textured or embossed
envelopes
transparencies other than HP Premium transparencies
•
•
• multiple part forms
55555
US Eng
5
8/28/96, 1:19 PM
�
Getting Started
Installing the Printer Software
The HP DeskJet 340 printer can be used with both Microsoft
Windows and DOS, and Apple Macintosh software applications.
Follow the appropriate instructions in this section to install the
printer software on your computer.
Instructions for Microsoft Windows Users
If you are using the printer with Microsoft Windows, first make
sure that you have the minimum system requirements:
80386 processor and above
Microsoft Windows 3.1x or Windows 95
DOS 3.3 and above
2 MB RAM minimum for monochrome imaging
4 MB RAM minimum for color imaging
Use the following procedure to install your printer software:
• Start Windows and make sure that no Windows applications are
running.
Insert the installation disk into the disk drive of your computer.
•
For Windows 3.x
• Click File in the Program Manager window menu.
• Click Run in the File menu.
• Type A:\SETUP in the command line box. Then click OK.
• Follow the instructions that appear on the screen to complete
the installation of the printer software.
For Windows 95
• From Control Panel, choose Printer, Add Printer
• Follow the instructions and choose Local Printer
• Click Have Disk
• Follow the instructions that appear on the screen to complete
the installation of the printer software.
To print pages with graphics, we recommend that you have at least
10 MB of free hard disk space.
The HP DeskJet 340 printer cannot be used as a network printer.
66666
Instructions for DOS Users
If you are using the printer with Microsoft DOS, use the following
procedure to install your printer configuration utility:
•
• At the DOS prompt (A:\>) type INSTALL and press the Enter
Insert the installation disk into drive A.
key.
• Follow the instructions that appear on the screen to complete
the installation.
• To run the DJPMenu software, type C:\DESKJET \DJPMENU
at the DOS prompt.
For more up to date information on the DJPMenu software, please
refer to the file: C:\deskjet\djpmenu.txt which you have just
installed.
You do not need to install the DJPMenu software if you are printing
from your Microsoft Windows 3.1 applications.
Use the DJPMenu software to define or change the settings on the
HP DeskJet 340 printer if your DOS applications do not allow you
to do so.
The DJPMenu software requires that your printer is connected
directly to the parallel port of your computer.
Establishing Communication
If the printer stops while printing from a DOS application and an
error message appears on your computer screen, check that you
have included the correct Mode command in your computer’s
AUTOEXEC.BAT file.
For MS-DOS 4.0.1 or earlier, use MODE LPT1:,,P
For MS-DOS 5.0 and MS-DOS 6.x, use MODE LPT1:
RETRY=R
Replace “LPT1” in the Mode command with the correct port if
necessary.
US Eng
6
8/28/96, 1:19 PM
�


 2023年江西萍乡中考道德与法治真题及答案.doc
 2012年重庆南川中考生物真题及答案.doc
 2013年江西师范大学地理学综合及文艺理论基础考研真题.doc
 2020年四川甘孜小升初语文真题及答案I卷.doc
 2020年注册岩土工程师专业基础考试真题及答案.doc
 2023-2024学年福建省厦门市九年级上学期数学月考试题及答案.doc
 2021-2022学年辽宁省沈阳市大东区九年级上学期语文期末试题及答案.doc
 2022-2023学年北京东城区初三第一学期物理期末试卷及答案.doc
 2018上半年江西教师资格初中地理学科知识与教学能力真题及答案.doc
 2012年河北国家公务员申论考试真题及答案-省级.doc
 2020-2021学年江苏省扬州市江都区邵樊片九年级上学期数学第一次质量检测试题及答案.doc
 2022下半年黑龙江教师资格证中学综合素质真题及答案.doc