Application Note: Zynq-7000 AP SoC
Using VxWorks BSP with Zynq-7000 AP SoC
Authors: Uwe Gertheinrich, Simon George, Kester Aernoudt
XAPP1158 (v1.0) September 27, 2013
Summary
VxWorks from Wind River:
•
Is a Real Time Operating system (RTOS).
Is a platform-based approach with configurable components that relate to different
architecture support, network, file system, compiler and development tool chains.
Supports the Zynq ®-7000 All Programmable (AP) SoC architecture of multicore processor
systems.
Has support for asymmetric multiprocess ing (AMP) and symmetric multiprocessing
(SMP).
This application note is intended as a getting started guide for new users of VxWorks on the
Zynq-7000 device. The document contains the following primary sections:
Introduction: Explains the important elements of the Zynq-7000 software environment to
provide a better understanding of BSP and application generation. This includes the:
ROM mechanism
Function of the first stage bootloader (FSBL)
Wind River bootloader
Explanation of the Zynq-7000 processor subsystem boot process
Building VxWorks for Zynq-7000 AP SoC, page 5: Explains native flash (SD Card) and
remote Ethernet (FTP) boot source options and the bootloader configurations for both
options.
Building and Debugging the Application, page 17: Explains how to create, build and
remotely run a custom application with VxWorks on a Zynq-7000 device.
This document assumes familiarity with the Xilinx® ISE® Design Suite and Zynq-7000 AP
SoC design methodology. This document includes a reference system for the Xilinx ZC702
board derived from the Zynq-7000 AP SOC - Concepts, Tools and Techniques User Guide
[Ref 1], which provides the details on how to rebuild such a system.
Accessing a Peripheral in the Processing System, page 20: Describes how to access
peripheral systems in the Zynq-7000 Processing System (PS).
Conclusion, page 25: Summarizes what this application note describes.
Additional Resources, page 25: Provides additional resource links.
© Copyright 2013 Xilinx, Inc. Xilinx, the Xilinx logo, Artix, ISE, Kintex, Spartan, Virtex, Vivado, Zynq, and other designated brands included herein are trademarks of Xilinx in the
United States and other countries. All other trademarks are the property of their respective owners.
XAPP1158 (v1.0) September 27, 2013
www.xilinx.com
1
�
Hardware and Software Requirements
Hardware and
Software
Requirements
Software Requirements
Xilinx ® ISE® Design Suite: Embedded or System Edition 14.6 or Vivado® Design Suite,
2013.2.
Wind River Workbench for VxWorks 6.9.3, which includes a Zynq-7000 AP SoC BSP
Serial Communication utility pr ogram (such as Tera Term)
Introduction
Hardware Requirements
Xilinx ZC702 Development Board
Ethernet Cable
USB UART Cable
The Zynq-7000 AP SOC devices takes advantage of the on-chip CPU to facilitate configuration.
Initial device configuration of the processing system (PS) and the programmable logic (PL)
must take place through the PS when not using JTAG.
Two major blocks control the configuration:
The first is the BootROM which is a static block of memory that is executed by the
multiprocessor core after power-on reset and warm reset.
The second major block is the device configuration unit which controls JTAG debug
access and provides an interface to the AES, HMAC, and PCAP blocks for PL
configuration and data decryption.
Both the PS and PL can be configured under PS control either securely or non-securely.
Configuration under external host control is also possible using JTAG.
Unlike other Xilinx 7 series devices, Zynq-7000 AP SOC devices do not support initial PL
controlled configuration. Configuration on the Zynq-7000 AP SOC devices is a multi-step
process. The configuration process involves a minimum of two stages, but generally requires
three stages.
The stages are:
Stage 0: BootROM, page 3: Referred to as the BootROM, this stage controls initial device
startup. The BootROM is non-modifiable code executed by the processor after power-on
reset and warm reset.
Stage 1: First Stage Bootloader, page 4: This is generally a first stage boot loader (FSBL),
but it can be any user-controlled code. See the Zynq-7000 AP SOC Software Developers
Guide (UG821) [Ref 1] for details about FSBL.
Stage 2: VxWorks Bootloader, page 4: This is generally user-configurable software that
can act as a second stage boot loader (SSBL). This stage is completely within user
control. In the case of this document, it is part of the VxWorks bootloader.
Figure 1, page 3 illustrates a non-secure boot process for typical Linux system. Uboot is an
example for higher-level boot loader and can be exchanged by VxWorks bootloader.
XAPP1158 (v1.0) September 27, 2013
www.xilinx.com
2
�
Introduction
X-Ref Target - Figure 1
Stage 0: BootROM
Figure 1: Boot Flow
The Zynq-7000 AP SoC processor subsystem configuration starts after power-on reset. The
ARM® CPU starts executing code from the on-chip BootROM with JTAG disabled. The
BootROM contains code for base drivers for NAND, NOR, Quad-SPI, SD, and PCAP. DDR and
other peripheral initializations are not performed from the BootROM and must be done in the
Stage 1 image, First Stage Bootload (FSBL) or later.
For security, the CPU is always the first device out of reset among all master modules within the
PS. When the BootROM is running the JTAG is disabled to ensure security.
The BootROM code is also responsible for loading the FSBL. Zynq-7000 AP SoC architecture
supports multi-stage user boot image loading; any further user boot image loading after FSBL
is the responsibility of the user. When the BootROM releases control to FSBL, user software
assumes full control of entire system. The only way to execute the BootROM again is by
performing a reset.
The PS boot source is selected using the mode-pin signals (indicated by a weak pull-up or
pull-down applied to specific pins), which are sampled after during power-on reset. The
sampled value is stored in the BOOT_MODE register.
The BootROM supports encrypted and unencrypted images referred to as secure boot and
non-secure boot, respectively. Additionally, the BootROM supports beginning execution of the
stage 1 image from OCM after copying the image or executing direct from linear flash (NOR or
QSPI) when using the execute-in-place (XIP) feature.
In secure boot the CPU, running from secure BootROM code, decrypts and authenticates
the incoming user PS image, stores it in the OCM RAM, and then branches into that RAM.
In non-secure boot the CPU, running from BootROM code, disables all secure boot
features including the AES engine within the PL before branching to the user image in the
OCM RAM or flash, if XIP is used. The Processor System (PS) boot image is limited to
192 KB unless booting with XIP.
Any subsequent boot stages for either the PS or the PL are the responsibility of the user and
are under user control. The BootROM code is not accessible to the user.
Following the stage 1 secure boot, you can proceed with either secure or non-secure
subsequent boot stages.
XAPP1158 (v1.0) September 27, 2013
www.xilinx.com
3
�
Introduction
Following a non-secure first stage boot, only non-secure subsequent stage boots are
possible.
For secure boot decryption and authentication, the PS uses the hard-wired AES-256 and
SHA-256 modules within the PL. For this reason, the PL must be powered up during any secure
boot, even if only the PS is configured. The device encryption key is user-selectable from either
the on-chip eFUSE unit or the on-chip block RAM.
The possible boot sources are: NAND, NOR, SD, Quad-SPI, and JTAG. The first four boot
sources are used in master boot methods in which the CPU loads the external boot image from
nonvolatile memory into the PS.
Stage 1: First Stage Bootloader
The First Stage Bootloader (FSBL) starts after the execution of the BootROM. BootRom loads
the FSBL into the OCM, or the FSBL executes in place (XIP) unencrypted from memory
mapped flash (NOR or Quad-SPI), contingent upon the BootROM header description.
The FSBL is responsible for:
Initialization using the PS configuration data provided by Xilinx Platform Studio (XPS) (see
"Zynq-7000 PS Configuration" in the Zynq-7000 AP SOC Software Developers Guide
(UG821) [Ref 2].
Programming the PL using a bitstream
Loading second stage bootloader or bare-metal application code into DDR memory
Starting execution of the second stage bootloader or bare-metal application
Note: Before handoff to the second stage bootloader or bare-metal application, the FSBL
invalidates the instruction cache and disables the cache and MMU, because Linux (and
perhaps other operating systems) assume it is disabled upon start.
See the FSBL code provided with SDK for details on how the FSBL initializes the CPU and
peripherals used by the FSBL, and how it uses a simple C run time library.
The bitstream for the PL and the second stage bootloader or bare-metal application data, as
well as other code and data used by the second stage bootloader, Linux (or other operating
system), or bare-metal application are grouped into partitions in the flash image.
Stage 2: VxWorks Bootloader
The VxWorks bootloader application loads a VxWorks image onto a target. Like VxWorks, you
can configure the VxWorks bootloader with various facilities; such as a command line interface
for dynamically setting boot parameters, a network loader, and a file system loader.
Uniprocessor (UP), symmetric multiprocessor (SMP), and asymmetric multiprocessor (AMP),
configurations of VxWorks use the same bootloader.
In a development environment, a bootloader is useful for loading a VxWorks image from a host
system, where you can modify and rebuild VxWorks. You can also use a VxWorks bootloader
in production systems when the bootloader and operating system are stored on a disk or other
media.
Self-booting (standalone) VxWorks images do not require a bootloader. These images are
commonly used in production systems (stored in nonvolatile devices).
Usually, the bootloader is programmed in a nonvolatile device (usually flash memory or
EEPROM) at an address such that it is the first code run by the processor when the target is
powered on or rebooted. The procedure to get the boot loader programmed in a nonvolatile
device or written to a disk is dependent on the target, and is described in following section using
an SD card image.
XAPP1158 (v1.0) September 27, 2013
www.xilinx.com
4
�
Building VxWorks for Zynq-7000 AP SoC
Building
VxWorks for
Zynq-7000 AP
SoC
The VxWorks product installation includes default bootloader images for each installed BSP. If
they do not meet your needs, you can create a custom bootloader.
Host Environment Configuration
The following steps are one-time only:
1.
Install VxWorks Tool chain 6.9.3.1.
a.
b.
Install Base Tools Package.
Invoke the Product Maintenance GUI.
-
-
Update the installer.
Configure online Content Update Network settings.
2. Apply updates based upon your license file, as shown in Figure 2.
X-Ref Target - Figure 2
Figure 2: Select Products Dialog Box
XAPP1158 (v1.0) September 27, 2013
www.xilinx.com
5
�
Building VxWorks for Zynq-7000 AP SoC
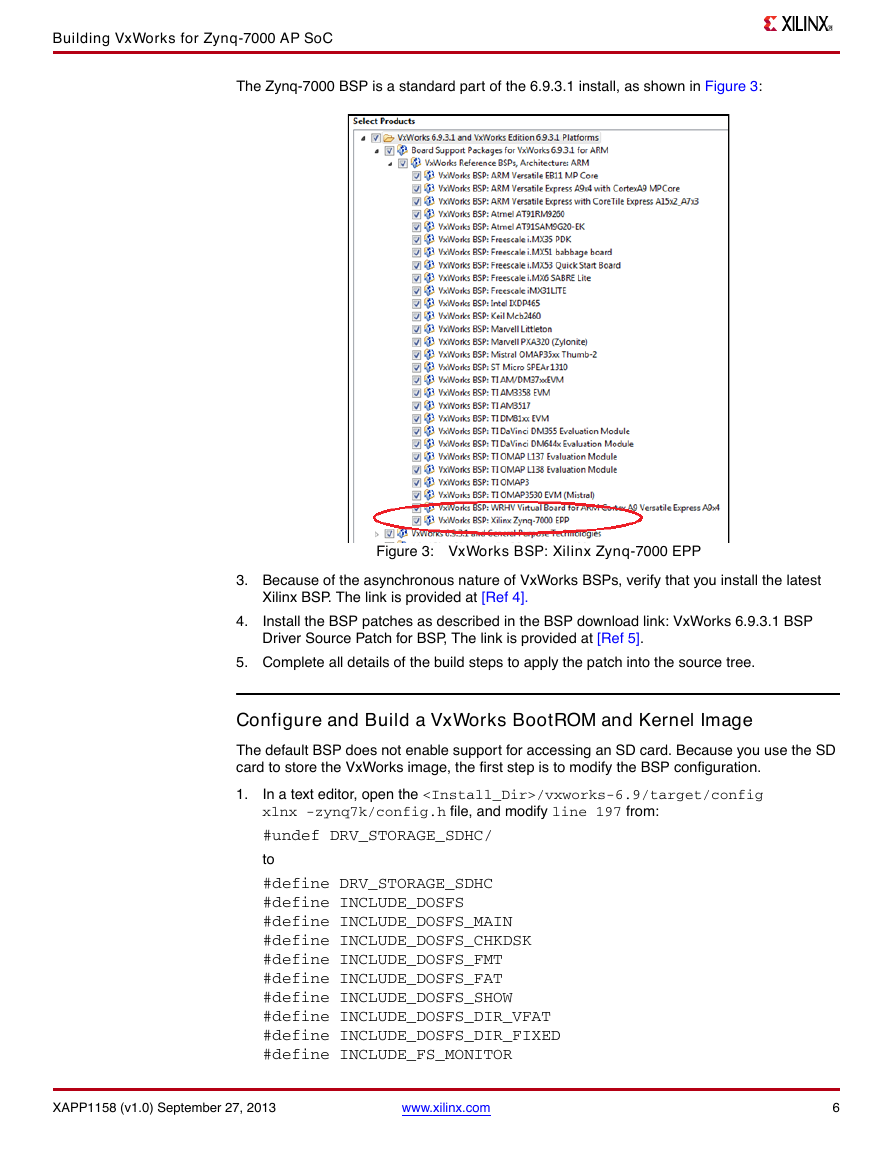
The Zynq-7000 BSP is a standard part of the 6.9.3.1 install, as shown in Figure 3:
X-Ref Target - Figure 3
Figure 3: VxWorks BSP: Xilinx Zynq-7000 EPP
3. Because of the asynchronous nature of VxWorks BSPs, verify that you install the latest
4.
Xilinx BSP. The link is provided at [Ref 4].
Install the BSP patches as described in the BSP download link: VxWorks 6.9.3.1 BSP
Driver Source Patch for BSP, The link is provided at [Ref 5].
5. Complete all details of the build steps to apply the patch into the source tree.
Configure and Build a VxWorks BootROM and Kernel Image
The default BSP does not enable support for accessing an SD card. Because you use the SD
card to store the VxWorks image, the first step is to modify the BSP configuration.
1.
In a text editor, open the /vxworks-6.9/target/config
xlnx -zynq7k/config.h file, and modify line 197 from:
#undef DRV_STORAGE_SDHC/
to
#define DRV_STORAGE_SDHC
#define INCLUDE_DOSFS
#define INCLUDE_DOSFS_MAIN
#define INCLUDE_DOSFS_CHKDSK
#define INCLUDE_DOSFS_FMT
#define INCLUDE_DOSFS_FAT
#define INCLUDE_DOSFS_SHOW
#define INCLUDE_DOSFS_DIR_VFAT
#define INCLUDE_DOSFS_DIR_FIXED
#define INCLUDE_FS_MONITOR
XAPP1158 (v1.0) September 27, 2013
www.xilinx.com
6
�
Building VxWorks for Zynq-7000 AP SoC
#define INCLUDE_FS_EVENT_UTIL
#define INCLUDE_ERF
#define INCLUDE_XBD
#define INCLUDE_XBD_BLKDEV
#define INCLUDE_XBD_TRANS
#define INCLUDE_DEVICE_MANAGER
#define INCLUDE_XBD_BLK_DEV
#define INCLUDE_XBD_PART_LIB
#define INCLUDE_DISK_UTIL
This enables the SDHC controller, as well as drivers for the FAT file system.
To use the VxWorks BSP with the Wind River Workbench to create a VxWorks Kernel
Image, do the following:
2. Start the Wind River Workbench tool and select a workspace.
3.
The Wind River SDK opens.
In the main context menu select File > New > Project.
The New Project Wizard opens.
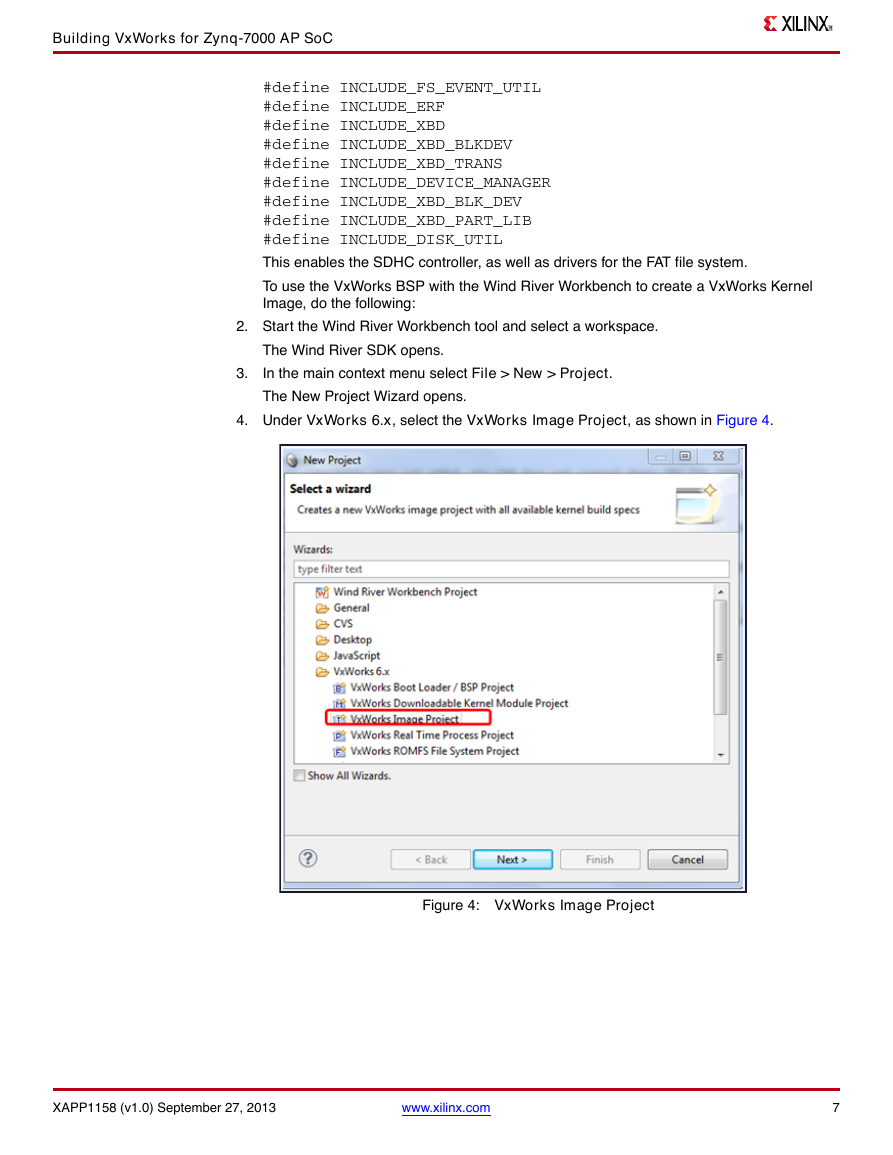
4. Under VxWorks 6.x, select the VxWorks Image Project, as shown in Figure 4.
X-Ref Target - Figure 4
Figure 4: VxWorks Image Project
XAPP1158 (v1.0) September 27, 2013
www.xilinx.com
7
�
Building VxWorks for Zynq-7000 AP SoC
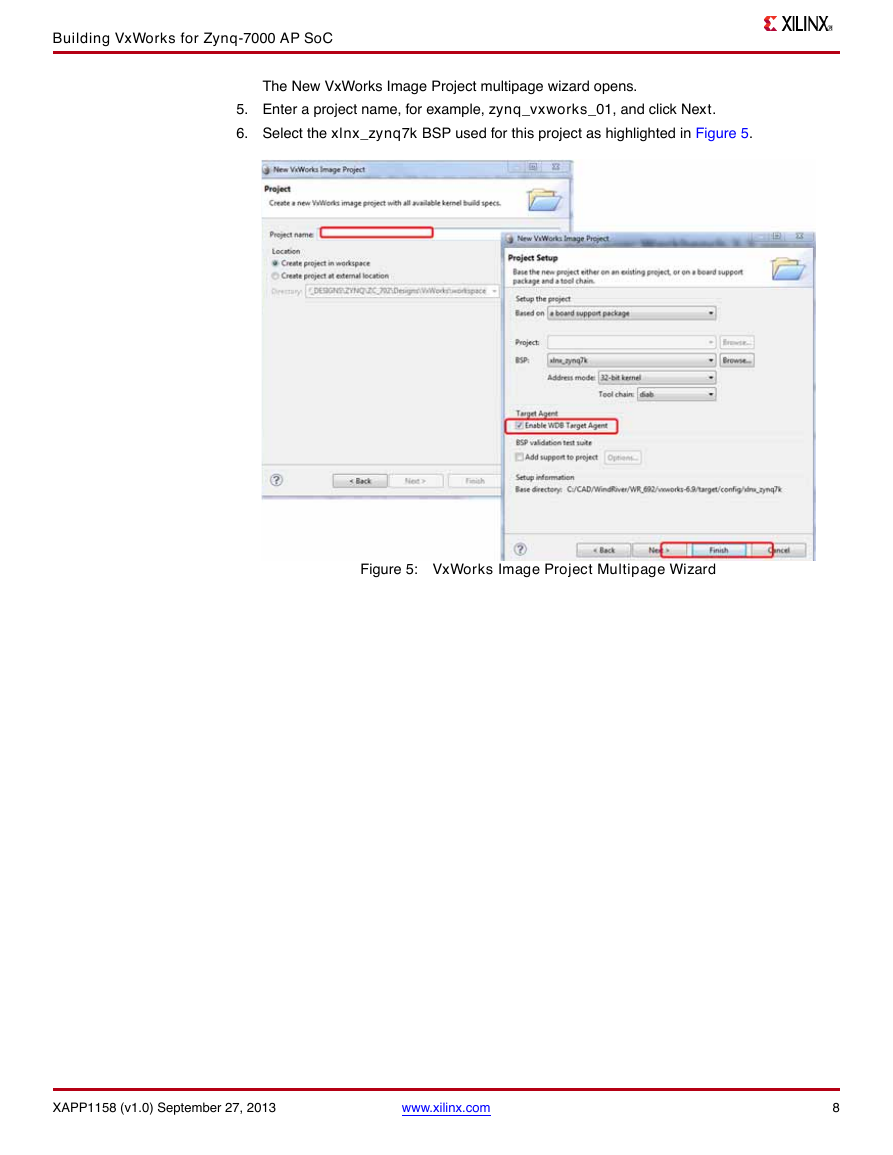
The New VxWorks Image Project multipage wizard opens.
5. Enter a project name, for example, zynq_vxworks_01, and click Next.
6. Select the xlnx_zynq7k BSP used for this project as highlighted in Figure 5.
X-Ref Target - Figure 5
Figure 5: VxWorks Image Project Multipage Wizard
XAPP1158 (v1.0) September 27, 2013
www.xilinx.com
8
�



 2023年江西萍乡中考道德与法治真题及答案.doc
 2012年重庆南川中考生物真题及答案.doc
 2013年江西师范大学地理学综合及文艺理论基础考研真题.doc
 2020年四川甘孜小升初语文真题及答案I卷.doc
 2020年注册岩土工程师专业基础考试真题及答案.doc
 2023-2024学年福建省厦门市九年级上学期数学月考试题及答案.doc
 2021-2022学年辽宁省沈阳市大东区九年级上学期语文期末试题及答案.doc
 2022-2023学年北京东城区初三第一学期物理期末试卷及答案.doc
 2018上半年江西教师资格初中地理学科知识与教学能力真题及答案.doc
 2012年河北国家公务员申论考试真题及答案-省级.doc
 2020-2021学年江苏省扬州市江都区邵樊片九年级上学期数学第一次质量检测试题及答案.doc
 2022下半年黑龙江教师资格证中学综合素质真题及答案.doc