Introduction
Thank you for purchasing the mini-v S41.
Weighing 1.25 kg (with 3 cell battery) and small enough to fit in a school bag, handbag
or briefcase, the mini-v is the world’s most practical mini notebook computer designed
to offer everything that a notebook can.
The mini-v has the benefit of having an easy to use Qwerty keyboard, with real keys and
full notebook functionality. The mini-v combines your conventional notebook, desktop,
PDA, MP3 and MP4 Player, whilst being not much bigger than a paperback book.
Your mini-v mini-notebook offers great performance in a stylish silver and black light-
weight design. With its stunning 7-inch WSVGA touch screen display and slim -line
DVD/RW Optical Drive this mini-notebook offers you the best on-screen performance,
enabling you to operate full Microsoft Office™ applications, watch films or view pictures
of your last holiday. All this with the freedom to choose from keyboard, mouse, touch
pad, joystick, touch screen and stylus.
The mini-v comes pre-loaded with Microsoft Vista™ and can act as a Phone, Notebook,
MP3 Player and PMP (Portable Movie Player) as it has been fully tested with iTunes™,
DiVX, Skype™ and comes with CF (Compact Flash) compatibility to support a 3G data/
voice card.
Using Intel® McCaslin technology and configurations that will include Intel® Stealey
processors, the mini-v is a compact notebook computer that’s capable of acting as your
office PC. With an integrated VGA port, 10/100 LAN and USB 2.0 interfaces, you can con-
nect all your desktop peripherals and multimedia devices to the mini-v. With integrated
Wireless LAN and built-in Bluetooth® you can also take advantage of wireless networks
and hot spots whilst out and about.
The mini-v is a stylish and elegant ultra-portable notebook that can handle all your work
and entertainment needs.
Macrovision’s Copy Protection Technology
This product incorporates copy protection technology that is protected by U.S. and
foreign patents, including patent numbers 5,315,448 and 6,836,549, and other intellectual
property rights. The use of Macrovision’s copy protection technology in the product must
be authorized by Macrovision. Reverse engineering or disassembly is prohibited.
�
�
1. Before you start
1
How to get help
B
e
f
o
r
e
y
o
u
s
t
a
r
t
When you have any problems using your Vye Notebook, in addition to referring to this
manual or on-line-help screens on your notebook, you can:
• Call our service centres to help you solve your problem.
• Access the service web site to receive related information.
All information on service web sites can be found in the warranty section of this guide.
Best care for your Vye Notebook
Knowing how to take care of your Vye Notebook notebook can avoid the notebook
from coming to harm or being damaged. As an electrical appliance, this product has the
ability to cause serious harm or death.
Taking care of the notebook
• Handle with extreme care.
• Do not expose the notebook to temperatures above 50° C or below 0° C.
• Keep the notebook away from direct sunlight or heat sources.
• Do not expose the notebook to rain or moisture.
• Do not spill water or any other liquid on the notebook.
• Do not place the notebook near magnetic fields.
• Avoid heavy shocks or vibrations to the notebook.
• Do not expose the notebook to dusty or dirty environments.
• Do not place objects on top of the notebook.
• Do not place the notebook on uneven surfaces.
• Make sure that the convertible hinge is in the correct position before closing the
display screen.
• Do not slam the display screen when closing it.
• Do not operate the touch-panel using anything besides the stylus pen of the
notebook. (mini-v touch screen version)
• Do not cover the enclosure openings. It will block the air convection of the cooling
system.
• Only use the adapter specifically provided with your notebook.
• Make sure the notebook is turned off and the adapter is unplugged before changing
any system modules (battery pack, DRAM module, hard disk, etc.).
�
�
1
B
e
f
o
r
e
y
o
u
s
t
a
r
t
Taking care of the adapter and power cord
• Carefully read the specifications and safety precautions written on the adapter.
• Make sure the power source meets the requirements detailed on the power adapter
and is safe to use before connecting the adapter to the source.
• Do not connect the adapter to any other devices.
• Do not place heavy objects on top of the adapter or power cord; do not step on them.
• Do not pull on the power cord; disconnect the notebook at the plug when
unplugging it.
• Disconnect the adapter from the power source when the notebook is not being used.
Taking care of your battery pack
• Read the safety precautions indicated on the battery.
• Keep the battery away from direct sunlight or heat.
• When Vye Notebook is turned off, the best temperature for preserving the battery is
between 0° and 30° C.
• Do not expose the battery to rain or moisture.
• Do not spill water or any other liquid on the battery.
• Avoid heavy shocks to the battery.
• Do not put any heavy objects on top of the battery.
• Keep the battery away from children.
• Periodically recharge the battery.
Return of old units
As far as possible, our devices are produced from materials which can be appropriately
recycled.
After use, the device can be taken back for re-utilisation or recycling of the materials,
insofar as it is returned in a state corresponding to proper use. Non-recyclable device
components should be disposed of appropriately.
To return a device, please use the recycling and disposal facilities available in your
country.
Further information about country-specific recycling and disposal facilities can be
found on the internet at:www.vyepc.com/environment
If you have any other questions about disposal, please contact your sales agent or our
Help Desk.
�
�
2
G
e
t
t
i
n
g
S
t
a
r
t
e
d
2. Getting Started
Packing list:
What should be in your mini-v gift box?
1
2
3
4
5
6
Vye mini-v S41 Notebook
Power Adapter
Power Cord
User Guide
Carry Pocket
O/S Licence Pack
Unpack your Vye mini-v S41 carefully, should you be missing any items you should
contact the retail outlet where you bought the product, or call our Help desk on:
Vye Computers Support Centre
¤ Telephone service, available from 9 am to 5 pm, Monday - Friday, excluding
Christmas, New Year and Bank Holidays.
0845-603-8128
A Glance at your mini-v:
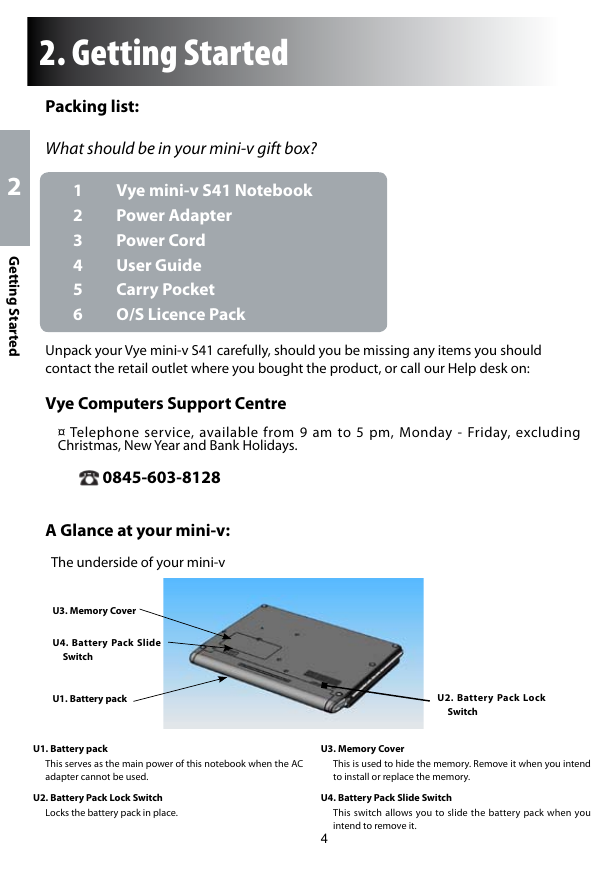
The underside of your mini-v
U3. Memory Cover
U4. Battery Pack Slide
Switch
U1. Battery pack
U2. Battery Pack Lock
Switch
U1. Battery pack
U3. Memory Cover
This serves as the main power of this notebook when the AC
adapter cannot be used.
This is used to hide the memory. Remove it when you intend
to install or replace the memory.
U2. Battery Pack Lock Switch
Locks the battery pack in place.
U4. Battery Pack Slide Switch
This switch allows you to slide the battery pack when you
intend to remove it.
�
�
2
G
e
t
t
i
n
g
S
t
a
r
t
e
d
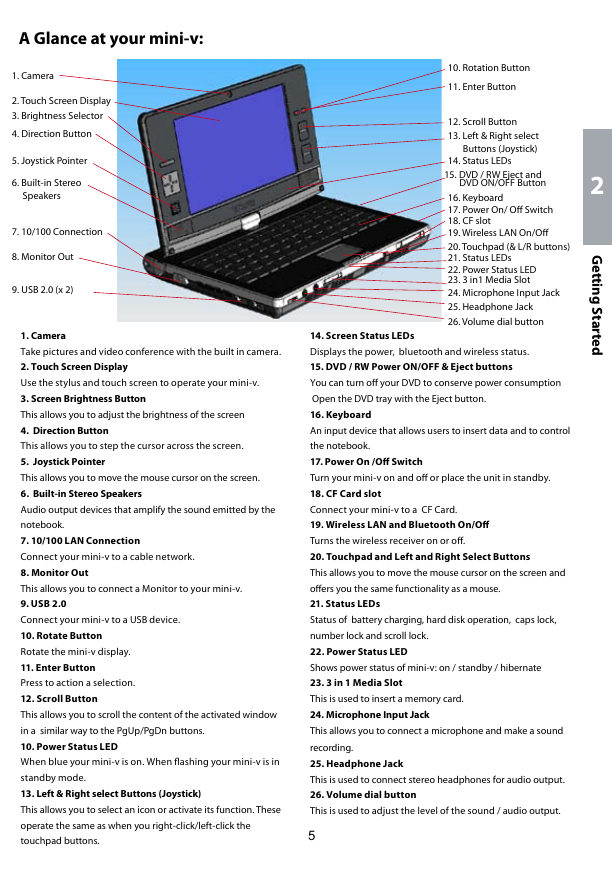
A Glance at your mini-v:
1. Camera
2. Touch Screen Display
3. Brightness Selector
4. Direction Button
5. Joystick Pointer
6. Built-in Stereo
Speakers
7. 10/100 Connection
8. Monitor Out
9. USB 2.0 (x 2)
10. Rotation Button
11. Enter Button
12. Scroll Button
13. Left & Right select
Buttons (Joystick)
14. Status LEDs
15. DVD / RW Eject and
DVD ON/OFF Button
16. Keyboard
17. Power On/ Off Switch
18. CF slot
19. Wireless LAN On/Off
20. Touchpad (& L/R buttons)
21. Status LEDs
22. Power Status LED
23. 3 in1 Media Slot
24. Microphone Input Jack
25. Headphone Jack
26. Volume dial button
1. Camera
Take pictures and video conference with the built in camera.
2. Touch Screen Display
Use the stylus and touch screen to operate your mini-v.
3. Screen Brightness Button
This allows you to adjust the brightness of the screen
4. Direction Button
This allows you to step the cursor across the screen.
5. Joystick Pointer
This allows you to move the mouse cursor on the screen.
6. Built-in Stereo Speakers
Audio output devices that amplify the sound emitted by the
notebook.
7. 10/100 LAN Connection
Connect your mini-v to a cable network.
8. Monitor Out
This allows you to connect a Monitor to your mini-v.
9. USB 2.0
Connect your mini-v to a USB device.
10. Rotate Button
Rotate the mini-v display.
11. Enter Button
Press to action a selection.
12. Scroll Button
This allows you to scroll the content of the activated window
in a similar way to the PgUp/PgDn buttons.
10. Power Status LED
When blue your mini-v is on. When flashing your mini-v is in
standby mode.
13. Left & Right select Buttons (Joystick)
This allows you to select an icon or activate its function. These
operate the same as when you right-click/left-click the
touchpad buttons.
14. Screen Status LEDs
Displays the power, bluetooth and wireless status.
15. DVD / RW Power ON/OFF & Eject buttons
You can turn off your DVD to conserve power consumption
Open the DVD tray with the Eject button.
16. Keyboard
An input device that allows users to insert data and to control
the notebook.
17. Power On /Off Switch
Turn your mini-v on and off or place the unit in standby.
18. CF Card slot
Connect your mini-v to a CF Card.
19. Wireless LAN and Bluetooth On/Off
Turns the wireless receiver on or off.
20. Touchpad and Left and Right Select Buttons
This allows you to move the mouse cursor on the screen and
offers you the same functionality as a mouse.
21. Status LEDs
Status of battery charging, hard disk operation, caps lock,
number lock and scroll lock.
22. Power Status LED
Shows power status of mini-v: on / standby / hibernate
23. 3 in 1 Media Slot
This is used to insert a memory card.
24. Microphone Input Jack
This allows you to connect a microphone and make a sound
recording.
25. Headphone Jack
This is used to connect stereo headphones for audio output.
26. Volume dial button
This is used to adjust the level of the sound / audio output.
�
�
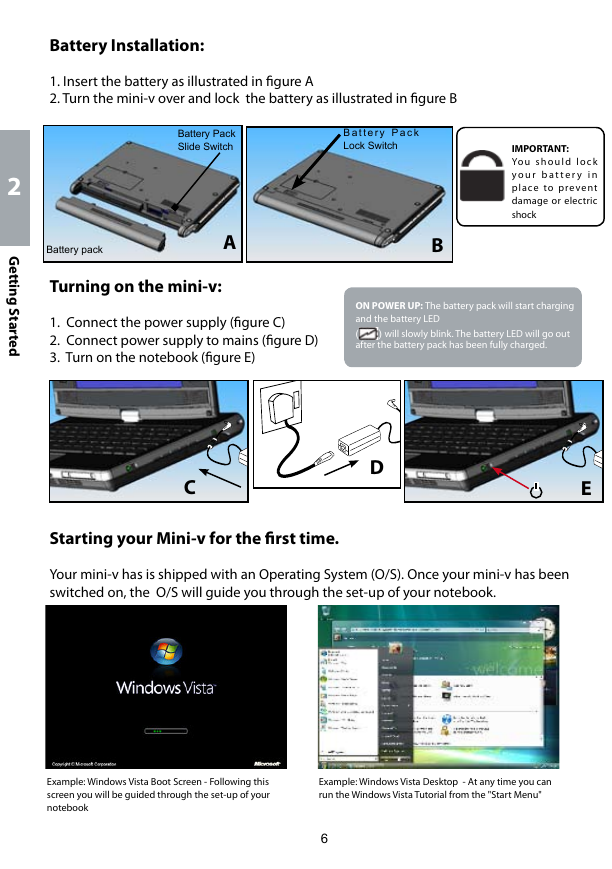
Battery Installation:
1. Insert the battery as illustrated in figure A
2. Turn the mini-v over and lock the battery as illustrated in figure B
Battery Pack
Slide Switch
B a t t e r y P a c k
Lock Switch
Battery pack
A
Turning on the mini-v:
IMPORTANT:
Yo u s h o u l d l o c k
y o u r b a t t e r y i n
place to prevent
damage or electric
shock
B
1. Connect the power supply (figure C)
2. Connect power supply to mains (figure D)
3. Turn on the notebook (figure E)
ON POWER UP: The battery pack will start charging
and the battery LED
(
after the battery pack has been fully charged.
) will slowly blink. The battery LED will go out
2
G
e
t
t
i
n
g
S
t
a
r
t
e
d
C
D
E
Starting your Mini-v for the first time.
Your mini-v has is shipped with an Operating System (O/S). Once your mini-v has been
switched on, the O/S will guide you through the set-up of your notebook.
Example: Windows Vista Boot Screen - Following this
screen you will be guided through the set-up of your
notebook
Example: Windows Vista Desktop - At any time you can
run the Windows Vista Tutorial from the "Start Menu"
�
�
3. Operation of your mini-v
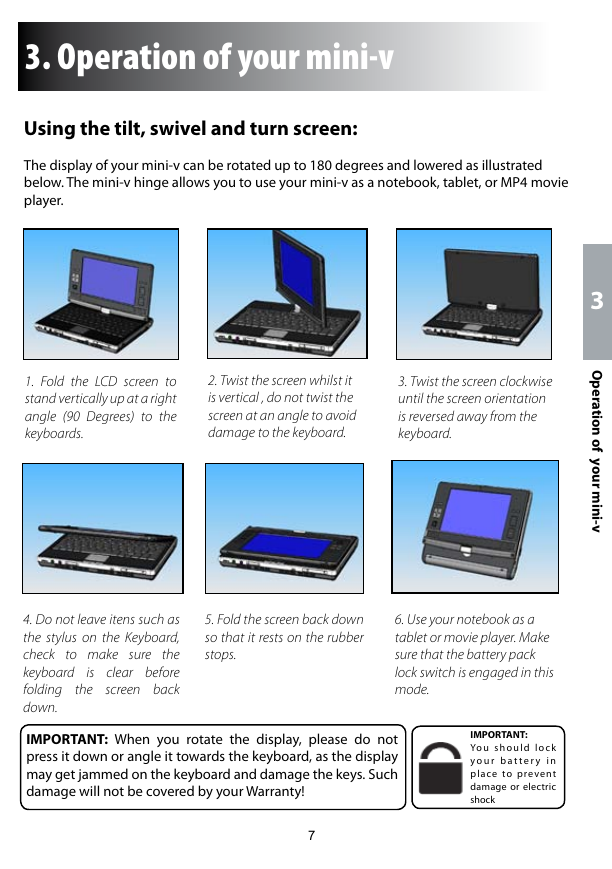
Using the tilt, swivel and turn screen:
The display of your mini-v can be rotated up to 180 degrees and lowered as illustrated
below. The mini-v hinge allows you to use your mini-v as a notebook, tablet, or MP4 movie
player.
1. Fold the LCD screen to
stand vertically up at a right
angle (90 Degrees) to the
keyboards.
2. Twist the screen whilst it
is vertical , do not twist the
screen at an angle to avoid
damage to the keyboard.
3. Twist the screen clockwise
until the screen orientation
is reversed away from the
keyboard.
3
O
p
e
r
a
t
i
o
n
o
f
y
o
u
r
i
m
n
i
-
v
4. Do not leave itens such as
the stylus on the Keyboard,
check to make sure the
is clear before
keyboard
folding
the screen back
down.
5. Fold the screen back down
so that it rests on the rubber
stops.
6. Use your notebook as a
tablet or movie player. Make
sure that the battery pack
lock switch is engaged in this
mode.
IMPORTANT: When you rotate the display, please do not
press it down or angle it towards the keyboard, as the display
may get jammed on the keyboard and damage the keys. Such
damage will not be covered by your Warranty!
IMPORTANT:
Yo u s h o u l d l o c k
y o u r b a t t e r y i n
place to prevent
damage or electric
shock
�
�
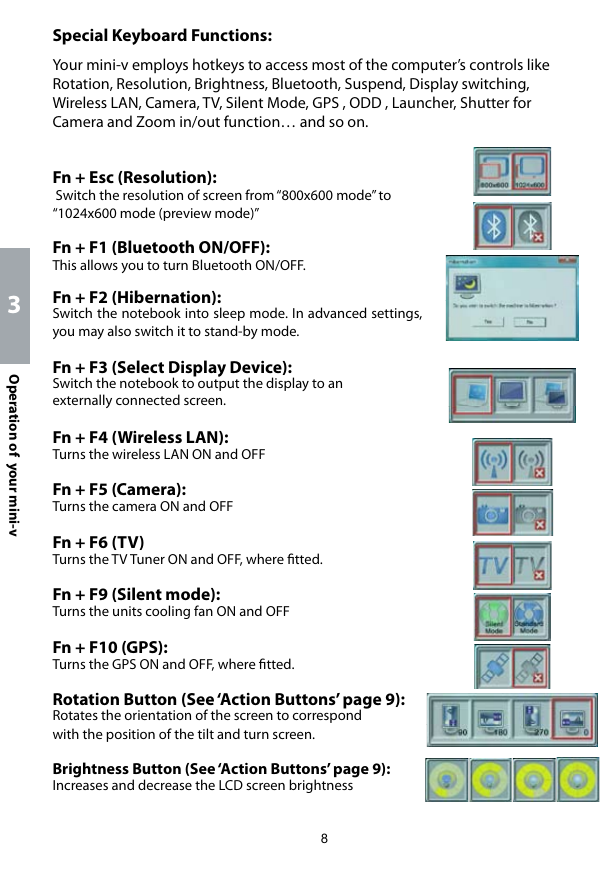
Special Keyboard Functions:
Your mini-v employs hotkeys to access most of the computer’s controls like
Rotation, Resolution, Brightness, Bluetooth, Suspend, Display switching,
Wireless LAN, Camera, TV, Silent Mode, GPS , ODD , Launcher, Shutter for
Camera and Zoom in/out function… and so on.
3
O
p
e
r
a
t
i
o
n
o
f
y
o
u
r
i
m
n
i
-
v
Fn + Esc (Resolution):
Switch the resolution of screen from “800x600 mode” to
“1024x600 mode (preview mode)”
Fn + F1 (Bluetooth ON/OFF):
This allows you to turn Bluetooth ON/OFF.
Fn + F2 (Hibernation):
Switch the notebook into sleep mode. In advanced settings,
you may also switch it to stand-by mode.
Fn + F3 (Select Display Device):
Switch the notebook to output the display to an
externally connected screen.
Fn + F4 (Wireless LAN):
Turns the wireless LAN ON and OFF
Fn + F5 (Camera):
Turns the camera ON and OFF
Fn + F6 (TV)
Turns the TV Tuner ON and OFF, where fitted.
Fn + F9 (Silent mode):
Turns the units cooling fan ON and OFF
Fn + F10 (GPS):
Turns the GPS ON and OFF, where fitted.
Rotation Button (See ‘Action Buttons’ page 9):
Rotates the orientation of the screen to correspond
with the position of the tilt and turn screen.
Brightness Button (See ‘Action Buttons’ page 9):
Increases and decrease the LCD screen brightness
�
�


 2023年江西萍乡中考道德与法治真题及答案.doc
 2012年重庆南川中考生物真题及答案.doc
 2013年江西师范大学地理学综合及文艺理论基础考研真题.doc
 2020年四川甘孜小升初语文真题及答案I卷.doc
 2020年注册岩土工程师专业基础考试真题及答案.doc
 2023-2024学年福建省厦门市九年级上学期数学月考试题及答案.doc
 2021-2022学年辽宁省沈阳市大东区九年级上学期语文期末试题及答案.doc
 2022-2023学年北京东城区初三第一学期物理期末试卷及答案.doc
 2018上半年江西教师资格初中地理学科知识与教学能力真题及答案.doc
 2012年河北国家公务员申论考试真题及答案-省级.doc
 2020-2021学年江苏省扬州市江都区邵樊片九年级上学期数学第一次质量检测试题及答案.doc
 2022下半年黑龙江教师资格证中学综合素质真题及答案.doc