DIGITAL CAMERA
APPAREIL PHOTO NUMÉRIQUE
DIGITAL-KAMERA
C-3000ZOOM
ENGLISH
FRANÇAIS
DEUTSCH
INSTRUCTIONS
MODE D’EMPLOI
BEDIENUNGSANLEITUNG
䡲 Before using your camera, read this manual carefully to ensure correct use.
䡲 We recommend that you take test shots to get accustomed to your camera
before taking important photographs.
䡲 Avant d’utiliser votre appareil photo, veuillez lire attentivement ce mode
d’emploi, de manière à obtenir les meilleurs résultats possibles.
䡲 Avant d’effectuer des prises de vues importantes, nous vous conseillons
par ailleurs de faire quelques essais afin de vous familiariser avec le
maniement de l’appareil photo.
䡲 Bitte lesen Sie vor Gebrauch dieser Kamera sorgfältig diese
Bedienungsanleitung, um optimale Ergebnisse beim Fotografieren zu erzielen.
䡲 Wir empfehlen, vor wichtigen Aufnahmen Probeaufnahmen durchzuführen,
um sich mit der Bedienung und den Funktionen der Kamera vertraut zu
machen.
�
PREPARATION
4 5 6
9
^
0
@
#
$
8
%
Y U I O
1
2
3
Q
W
E
R
T
S
2
& q w e
*
(
)
7
8
!
i
o
p
P
a
s
d
f
l
2
r
t
y
u
;
A
g
hj k
F
D
G
H
J
HQ
z
x
c v
P F2.8 1/800 +2.0
23.12.,00 21:56
10
K
L
:
b n
�
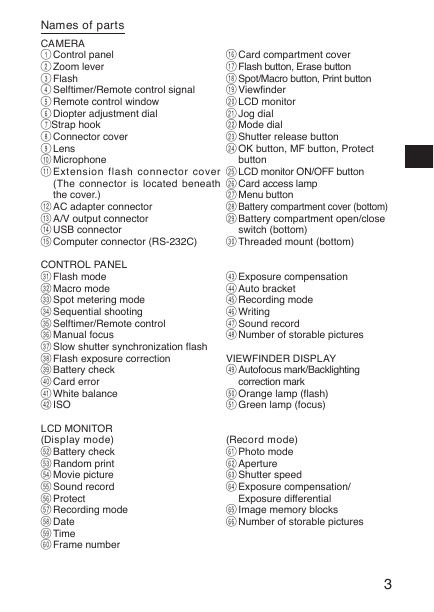
Names of parts
CAMERA
1 Control panel
2 Zoom lever
3 Flash
4 Selftimer/Remote control signal
5 Remote control window
6 Diopter adjustment dial
7Strap hook
8 Connector cover
9 Lens
0 Microphone
! Extension flash connector cover
(The connector is located beneath
the cover.)
@ AC adapter connector
# A/V output connector
$ USB connector
% Computer connector (RS-232C)
CONTROL PANEL
Q Flash mode
W Macro mode
E Spot metering mode
R Sequential shooting
T Selftimer/Remote control
Y Manual focus
U Slow shutter synchronization flash
I Flash exposure correction
O Battery check
P Card error
a White balance
s ISO
LCD MONITOR
(Display mode)
S Battery check
D Random print
F Movie picture
G Sound record
H Protect
J Recording mode
K Date
L Time
: Frame number
^ Card compartment cover
& Flash button, Erase button
* Spot/Macro button, Print button
( Viewfinder
) LCD monitor
q Jog dial
w Mode dial
e Shutter release button
r OK button, MF button, Protect
button
t LCD monitor ON/OFF button
y Card access lamp
u Menu button
i Battery compartment cover (bottom)
o Battery compartment open/close
switch (bottom)
p Threaded mount (bottom)
d Exposure compensation
f Auto bracket
g Recording mode
h Writing
j Sound record
k Number of storable pictures
VIEWFINDER DISPLAY
l Autofocus mark/Backlighting
correction mark
; Orange lamp (flash)
A Green lamp (focus)
(Record mode)
z Photo mode
x Aperture
c Shutter speed
v Exposure compensation/
Exposure differential
b Image memory blocks
n Number of storable pictures
3
�
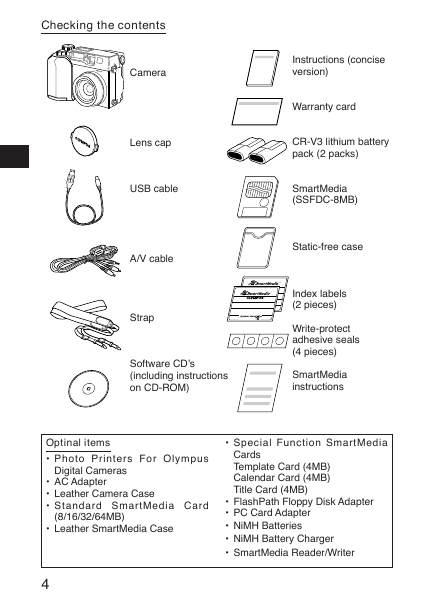
Checking the contents
Camera
Lens cap
USB cable
A/V cable
Strap
Software CD’s
(including instructions
on CD-ROM)
Instructions (concise
version)
Warranty card
CR-V3 lithium battery
pack (2 packs)
SmartMedia
(SSFDC-8MB)
Static-free case
Index labels
(2 pieces)
Write-protect
adhesive seals
(4 pieces)
SmartMedia
instructions
Optinal items
• Photo Printers For Olympus
Digital Cameras
• AC Adapter
• Leather Camera Case
• Standard SmartMedia Card
(8/16/32/64MB)
• Leather SmartMedia Case
4
• Special Function SmartMedia
Cards
Template Card (4MB)
Calendar Card (4MB)
Title Card (4MB)
• FlashPath Floppy Disk Adapter
• PC Card Adapter
• NiMH Batteries
• NiMH Battery Charger
• SmartMedia Reader/Writer
�
Attaching the strap
Attach the strap to the strap hook on the camera.
Loading the batteries
This camera uses 2 CR-V3 lithium battery packs or 4 AA NiMH batteries, NiCd
batteries, alkaline batteries or lithium batteries. Performance will be limited
with alkaline batteries, especially in low temperatures. Lithium battery packs
or NiMH batteries are recommended. Do not use zinc-carbon batteries; they
may overheat and destroy the camera.
When pressing the battery cover shut, be sure to press the center of the
cover since it may be difficult to close properly by pressing the edge.
Close the battery cover, then press it down and slide it in the opposite
direction of the arrow printed on it. Slide the opening and closing switch on
the battery cover in the direction of
.
A
/
S
P
/
M
OFF
POW E
L
A
I
D
E
D
R/MO
2
1
OPEN
3
6
To load the lithium battery packs, insert
them with the CAMEDIA labels facing
outward and the concave terminals
facing each other.
5
SHUT
Using the AC adapter (optional)
Use an AC220V power source.
AC wall outlet
A
/
S
P
/
M
OFF
POW E
L
A
I
D
E
D
R/MO
AC adapter
AC adapter connector
4
5
�
Inserting SmartMedia
Note:
• Use 3V (3.3V) cards only. 5V cards cannot
be used.
• Olympus brand cards are recommended
(already formatted). Non-Olympus brand
cards must be formatted by the camera.
• When using a special function SmartMedia
card (optional), insert it in the same way.
Insert
SmartMedia.
Caution:
• NEVER open the card cover, eject the card, remove the batteries, or pull the
plug while the camera is in operation. It may destroy the data in the card.
• The card is a precision instrument. Handle it carefully and do not subject it
to physical shocks.
• Do not touch the contact area of the card.
Power on/off
Remove the lens cap, then set the Mode dial to P, A/S/M,
are no pictures stored in the card when the Mode dial is set to
PICTURE will appear on the LCD monitor.
or
. If there
, NO
Checking the card
When the power is turned on in the Record mode, the camera checks the
SmartMedia card.
Control panel
Viewfinder
Card error
Green lamp
CARD
SETUP
NO [OFF]
LCD monitor
When there is no SmartMedia card in
the camera / the card is protected:
The Card error indicator on the control
panel and the Green lamp blink.
When the card needs to be formatted:
The Card error indicator on the control
panel lights, and the Card format
confirmation screen appears. Select
to enter the Card format mode.
6
�
Card format
Press the Menu button, then press the top/bottom arrows on the Jog dial to
select CARD SETUP. Press the right arrow to select
, and press the OK
button to display
. Press the OK button again with YES
YES
selected to format the card.
Note:
• Formatting the card erases the existing data, including pictures which have
been write-protected from the camera. Be careful not to erase important
data when formatting a recorded card.
NO
Adjusting the date and time
Press the Menu button, then press the top/bottom arrows on the Jog dial to
select MODE SETUP and press the right arrow. Press the OK button. Press
the top/bottom arrows to select
, press the right arrow and press the OK
button. Select the date order, and adjust the date and time using the Jog dial.
Press the OK button. Press the OK button twice.
• When the Mode dial is set to
, the card must contain images in order to
display the Menu.
LCD brightness
Press the Menu button, then press the top/bottom arrows on the Jog dial to
select MODE SETUP and press the right arrow. Press the OK button. Press
the top/bottom arrows to select
, press the right arrow and press the OK
button. Select the brightness using the Jog dial. Press the OK button twice.
Beep sound
Press the Menu button, then press the top/bottom arrows on the Jog dial to
select MODE SETUP and press the right arrow. Press the OK button. Press
the top/bottom arrows to select
, press the right arrow and top/bottom
arrows to make the selection. Press the left arrow to confirm the setting.
Press the OK button twice.
7
�
RECORDING FUNCTIONS
How to use the mode dial
Aperture priority
Shutter priority
Manual
Program
A/S/M
P
O
F
F
Power off
• P or A/S/M (Still picture recording)
•
• OFF (Power off)
•
(Movie picture recording)
(Display)
Adjusting the diopter
Diopter adjustment dial
Viewfinder
Autofocus mark
Movie picture recording
DIAL
E
D
O
M
WER/
O
P
Display
• Turn the Diopter adjustment dial
to see the Autofocus mark
clearly.
Proper shutter relese
Press the Shutter release button halfway to lock the focus and exposure.
• The Green lamp next to the viewfinder
lights.
• If the Green lamp blinks, the focus or
exposure is not locked. Check the working
distance.
Press the Shutter release button fully to release the shutter and take the picture.
• The camera emits a beep sound when the
shutter is released.
• The Card access lamp blinks while the
picture is being recorded.
8
�


 2023年江西萍乡中考道德与法治真题及答案.doc
 2012年重庆南川中考生物真题及答案.doc
 2013年江西师范大学地理学综合及文艺理论基础考研真题.doc
 2020年四川甘孜小升初语文真题及答案I卷.doc
 2020年注册岩土工程师专业基础考试真题及答案.doc
 2023-2024学年福建省厦门市九年级上学期数学月考试题及答案.doc
 2021-2022学年辽宁省沈阳市大东区九年级上学期语文期末试题及答案.doc
 2022-2023学年北京东城区初三第一学期物理期末试卷及答案.doc
 2018上半年江西教师资格初中地理学科知识与教学能力真题及答案.doc
 2012年河北国家公务员申论考试真题及答案-省级.doc
 2020-2021学年江苏省扬州市江都区邵樊片九年级上学期数学第一次质量检测试题及答案.doc
 2022下半年黑龙江教师资格证中学综合素质真题及答案.doc