logo资料库

RIO数码影音-Rio 800 128M说明书.pdf

第1页 / 共38页
第2页 / 共38页
第3页 / 共38页
第4页 / 共38页
第5页 / 共38页
第6页 / 共38页
第7页 / 共38页
第8页 / 共38页
资料共38页,剩余部分请下载后查看
Rio 800 User Guide
About the User Guide
Navigating and printing the Rio 800 User Guide
Using Acrobat toolbar icons
Legal notices
Introduction
Using your Rio
Using Rio buttons and controls
Using the rechargeable backpack
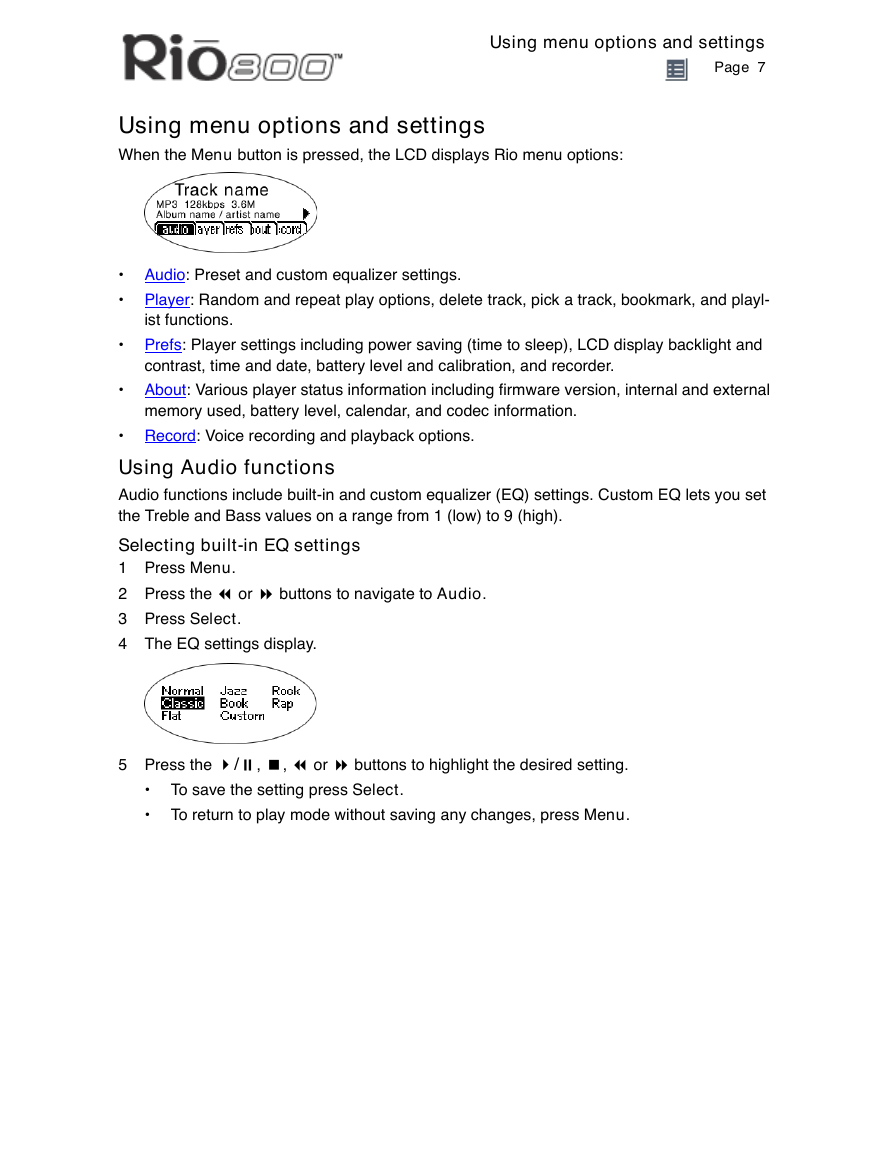
Using menu options and settings
Using Audio functions
Selecting built-in EQ settings
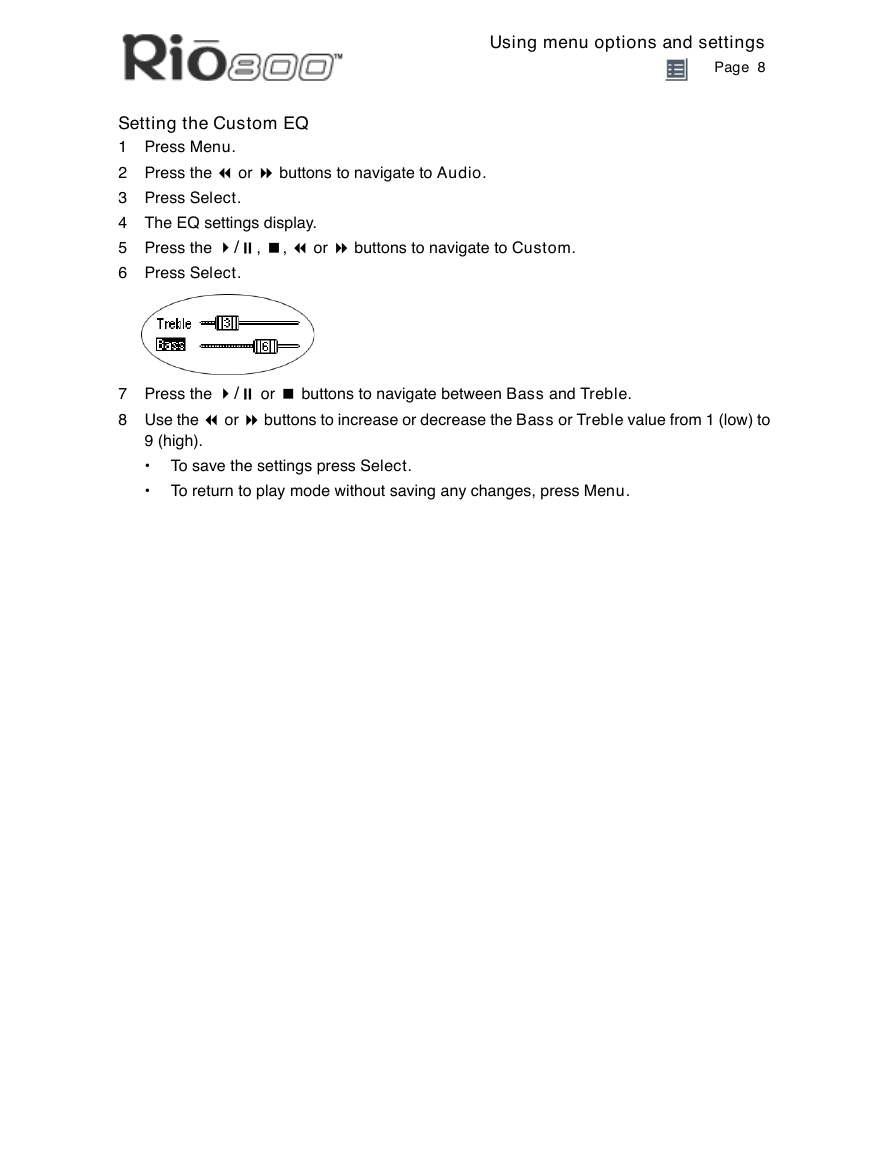
Setting the Custom EQ
Using Player functions
Setting Repeat and Random play options
Deleting tracks from the Rio
Picking a track to play
Adding bookmarks
Playing or deleting bookmarks
Working with Playlists
Choosing a playlist
Building a playlist
Modifying a playlist
Removing a playlist
Setting Preferences
Adjusting the power saving setting
Setting time and date
Adjusting LCD display backlight and contrast
Displaying battery information
Calibrating the battery
Setting recorder sampling rate and volume
Displaying About information
Recording and playing voice
Recording your voice
Playing a recording
Using the Rio software
Using RealJukebox
To learn more about using RealJukebox, from within the software:
Copying tracks to your Rio
Encoding a CD
Using AudibleManager (PC only)
Using SoundJam MP (Mac only)
Master Playlist
Main Window
Converter
Connector
Use the help system to learn more
Digital audio terms
AAC
ADPCM
Bitrate
CDDB
Codec
DRM, security
Encoding, or Ripping (a CD)
Firmware
Gracenote
MP3
Playlist
Ripping
SDMI
Skin
USB
WMA
FAQ and troubleshooting
How do you put music on the Rio?
How much music will my Rio hold?
Can I use the Rio with Windows 95? I have the USB supplement pack.
Where is the serial number located on the Rio?
The Rio is connected to the USB, why doesn’t the computer recognize it?
Is the Random menu function truly random?
What does the Rio Hold feature do?
How do I upgrade the Rio firmware?
Checking your Rio’s firmware version
Downloading the firmware upgrade from the Rio Web site
Upgrading the Rio firmware (PC)
Upgrading the Rio firmware (Mac)
How do I register my SoundJam software online?
Why do I get an error when I click Read a CD to start encoding?
How can I get the best sound quality when encoding from a CD?
One Year Limited Warranty
Our warranty to you
How to obtain service under this warranty
Product failures not covered by this warranty
How to obtain out of warranty service
Limits of liability
Regulatory Information
Federal Communications Commission (FCC)
Industry Canada
CISPR 22
EU Declaration of Conformity
Customer Care
Technical support
Hours of Operation
Email
Telephone
TDD
Fax
Web site
Solution Library
Customer service
Hours of Operation
Email
Telephone
Fax
Rio Product Support
With every Rio product you receive the following support services:
New Product Support
Extended Service Option
Premium Support Service
Index
About the User Guide Page 1 Rio 800 User Guide About the User Guide The Rio 800 User Guide includes the following information: Introduction Using your Rio Using Rio menu options and settings Using the Rio software Understanding digital audio terms Frequently asked questions (FAQ) and troubleshooting Warranty Regulatory Customer care Index To learn more: • Refer to the Getting Started Guide for the basics on how to set up and start using your Rio. Click the RealJukebox, AudibleManager, or SoundJam software Help menus for detailed step-by-step instructions on how to use the software to convert CD tracks into com- pressed digital audio formats, get audio from the Internet or transfer tracks to your Rio. Visit the Rio Web site Navigating and printing the Rio 800 User Guide The User Guide is in Adobe Acrobat (.PDF) file format. Important: We strongly recommend that you use Adobe Acrobat Reader version 4.0—available on the Rio software CD-ROM—to view and print the Rio User Guide. Click links (blue underlined text) to jump to another location in the document or to a location on the World Wide Web. Click the Index icon at the top of any page (by the page number) to go to the index—or you can click the Index bookmark. Click page numbers in the Index to jump to a topic. Using Acrobat toolbar icons Click the Show/Hide Navigation Pane icon in the Acrobat toolbar to show a list of book- marks. Bookmarks are links to the contents of the User Guide. Click any bookmark in the list to jump to the page in the User Guide that contains the topic. Click the Print icon in the Acrobat toolbar to print the User Guide. The size of the User Guide is optimized for printing.
About the User Guide Page 2 Legal notices Copyright © 2000-2001 SONICblue Incorporated. All Rights Reserved. SONICblue Incorporated does not assume any responsibility for errors or omissions in this document or make any commitment to update the information contained herein. Rio is a registered trademark of RioPort, Inc. in the United States and/or other countries and is used under license. The RealPlayer and the RealJukebox are included under license from RealNetworks, Inc. Copyright 1999. RealNetworks, Inc. Patents pending. All rights reserved. Microsoft, Windows Media and the Windows Logo are trademarks or reg- istered trademarks of Microsoft Corporation in the United States and/or other countries. All other product names may be trademarks of the companies with which they are associated. First Edition, March 2001. Part Number 75550139-001.
Introduction Page 3 Introduction The Rio 800 provides the ultimate listening experience while you exercise, commute, or relax. Create and mix your favorite selections on your PC or Mac for playback on your Rio. Your player is similar in function to a portable cassette or CD player. However, it has no mov- ing parts, so it delivers skip-free music under any conditions. Plus, the convenient recharge- able battery and voice recording option make the Rio 800 the premier digital audio player. The Rio interfaces with your computer through the USB port. Use the software included on the CD-ROM to: Organize digital audio tracks on your computer. Organize tracks on your Rio. Record (encode) your audio CDs. Search for tracks on your computer or on the Internet. Create a custom CD-ROM—if you have CD burning hardware and your computer sup- ports it. In addition, there are many cool accessories you can purchase separately to customize your Rio. Visit the Rio Web site for information about accessories or to place an order online. Sources on the Internet for digital audio content include: Riohome.com WindowsMedia.com Audible.com—for spoken audio
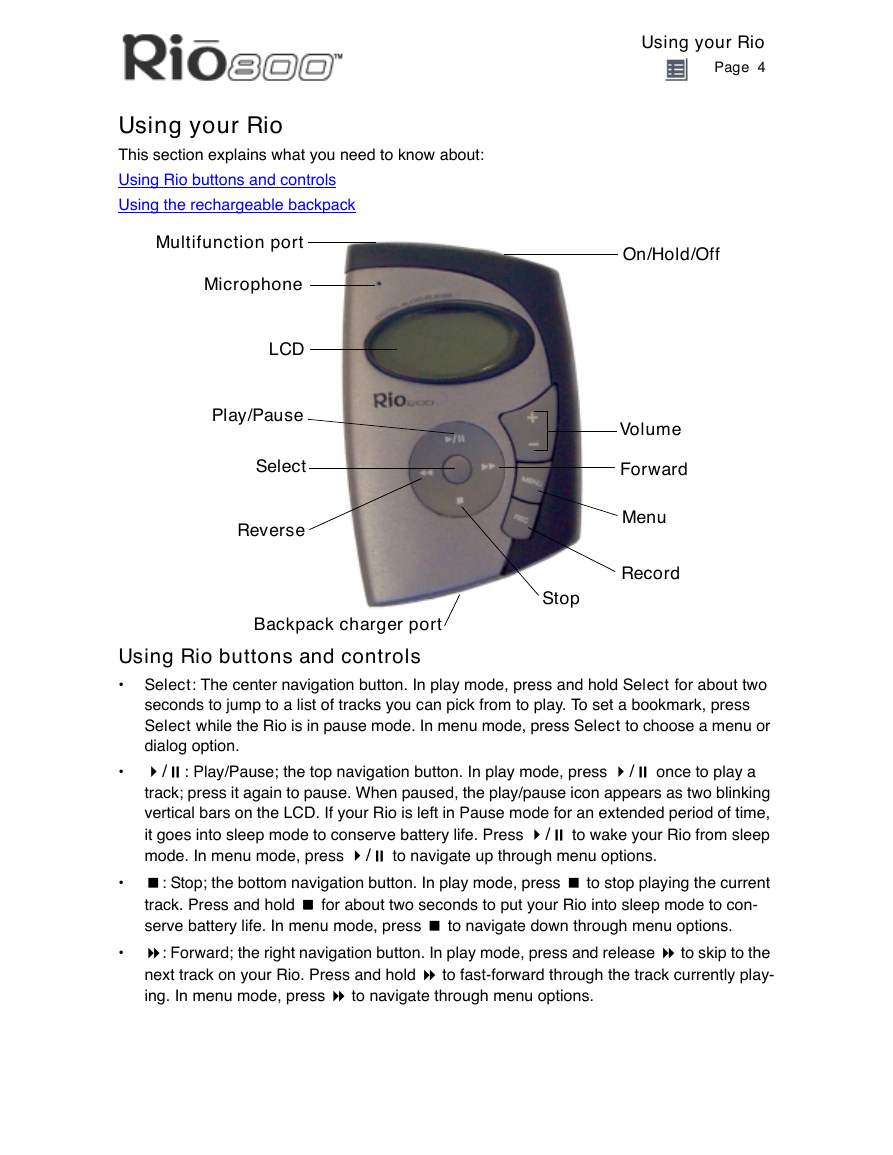
Using your Rio This section explains what you need to know about: Using Rio buttons and controls Using the rechargeable backpack Multifunction port Microphone LCD Play/Pause Select Reverse Using your Rio Page 4 On/Hold/Off Volume Forward Menu Record Stop Backpack charger port Using Rio buttons and controls Select: The center navigation button. In play mode, press and hold Select for about two seconds to jump to a list of tracks you can pick from to play. To set a bookmark, press Select while the Rio is in pause mode. In menu mode, press Select to choose a menu or dialog option. 4/;: Play/Pause; the top navigation button. In play mode, press 4/; once to play a track; press it again to pause. When paused, the play/pause icon appears as two blinking vertical bars on the LCD. If your Rio is left in Pause mode for an extended period of time, it goes into sleep mode to conserve battery life. Press 4/; to wake your Rio from sleep mode. In menu mode, press 4/; to navigate up through menu options. <: Stop; the bottom navigation button. In play mode, press < to stop playing the current track. Press and hold < for about two seconds to put your Rio into sleep mode to con- serve battery life. In menu mode, press < to navigate down through menu options. 8: Forward; the right navigation button. In play mode, press and release 8 to skip to the next track on your Rio. Press and hold 8 to fast-forward through the track currently play- ing. In menu mode, press 8 to navigate through menu options.
Using your Rio Page 5 7: Reverse; the left navigation button. In play mode, press and release 7 to skip to the beginning of the track currently playing on your Rio. Press and hold 7 to fast-rewind through the current track. In menu mode, press 7 to navigate through menu options. Menu: Press the Menu button to display the Rio menu options. Press 4/;, 8, 7, and < to navigate through menu options. Press Select to choose a menu option. Generally, pressing Menu while in menu mode before saving any changes returns the Rio to play mode without saving. Rec: The Record button on the Rio. Press Rec to display the Recorder options menu, where you can choose to record your voice or play a recording. See the section on Recording and Playing Voice for instructions and more information. Liquid Crystal Display (LCD): In play mode, the LCD provides the following informa- tion—clockwise from the right: Play/Pause icon: Displays either a Play icon (triangle) or a Pause icon (two vertical bars), to show the current action of the Rio. Divider line: Graphically organizes the display. Current song position: Displays the play location in the current track in minutes:seconds (mm:ss) form. For Audible content the display includes hours (hh:mm or hh:mm:ss). Volume level: Displays the volume setting in both digital and graphic form. The bar- graph disappears as volume is reduced and re-appears as volume is increased. Volume level ranges from 0-20. Track display: Displays the number of the currently selected track and the total number of tracks on your Rio. If a playlist is active, the track count shows the number of tracks in a playlist. Album name/artist name: Album name displays in this field for a few seconds, followed by artist name. If the name is longer than the width of the display, the name scrolls. Track information: Track information includes the codec type (MP3, WMA, and so on), the bitrate (XXX kbps), and the file size (XX:XX MB). Track name: Displays the title of the currently selected track. Song name scrolls if the name is longer than the width of the display. Hold icon (key): Appears if the Rio is set to Hold mode. Hold locks all settings except the Power switch on the Rio.
Using your Rio Page 6 Using the rechargeable backpack Calibrating the battery ensures accurate battery level display. The first time you charge the battery backpack, it is important to calibrate it and give it a full charge overnight or until the calibration timer expires. You do not need to charge the battery before you calibrate it. Note: You do not have to calibrate the battery each time you charge it—only the first time. See the section on Battery Calibration for instructions and more information. For subsequent chargings you can charge the backpack until the charge lamp goes off for a quick charge—after about 1.5 hours—or leave the AC adapter attached for about 2.5 hours for a full charge. Full charge allows you to play music for about 10 hours. You can leave the backpack plugged into the AC adapter after charging is complete to main- tain the charge. In addition, you can use your Rio to play music while the backpack is charg- ing. Warnings: Do not remove the rechargeable battery from the backpack. Batteries may explode or leak if disposed of in fire, inserted backwards or disassembled.
Using menu options and settings Page 7 Using menu options and settings When the Menu button is pressed, the LCD displays Rio menu options: Audio: Preset and custom equalizer settings. Player: Random and repeat play options, delete track, pick a track, bookmark, and playl- ist functions. Prefs: Player settings including power saving (time to sleep), LCD display backlight and contrast, time and date, battery level and calibration, and recorder. About: Various player status information including firmware version, internal and external memory used, battery level, calendar, and codec information. Record: Voice recording and playback options. Using Audio functions Audio functions include built-in and custom equalizer (EQ) settings. Custom EQ lets you set the Treble and Bass values on a range from 1 (low) to 9 (high). Selecting built-in EQ settings 1 Press Menu. 2 Press the 7 or 8 buttons to navigate to Audio. 3 Press Select. 4 The EQ settings display. 5 Press the 4/;, <, 7 or 8 buttons to highlight the desired setting. To save the setting press Select. To return to play mode without saving any changes, press Menu.
Using menu options and settings Page 8 Setting the Custom EQ 1 Press Menu. 2 Press the 7 or 8 buttons to navigate to Audio. 3 Press Select. 4 The EQ settings display. 5 Press the 4/;, <, 7 or 8 buttons to navigate to Custom. 6 Press Select. 7 Press the 4/; or < buttons to navigate between Bass and Treble. 8 Use the 7 or 8 buttons to increase or decrease the Bass or Treble value from 1 (low) to 9 (high). To save the settings press Select. To return to play mode without saving any changes, press Menu.
分享到:
收藏