Projector
HDPJ52
User’s Manual – Operating Guide
I
H
S
L
G
N
E
Thank you for purchasing this projector.
WARNING
► Before using this product, please read the "User's Manual
- Safety Guide" and related manuals to ensure the proper use of this product.
After reading them, store them in a safe place for future reference.
• The information in this manual is subject to change without notice.
NOTE
• The manufacturer assumes no responsibility for any errors that may appear in
this manual.
• The reproduction, transfer or copy of all or any part of this document is not
permitted without express written consent.
Trademark acknowledgment
• VGA and XGA are registered trademarks of International Business Machines
Corporation.
• Mac is registered trademarks of Apple Computer, Inc.
• VESA and SVGA are trademarks of Video Electronics Standard Association.
• Windows is a registered trademark of Microsoft Corporation.
• HDMI, the HDMI logo and High-Definition Multimedia Interface are trademarks
or registered trademarks of HDMI Licensing LLC.
All other trademarks are the properties of their respective owners.
1
�
Content
Content
Before use ................................................................................ 4
Projector features .........................................................................................4
About this manual .........................................................................................4
About contents of package ...........................................................................5
Part names ...................................................................................................6
Projector ....................................................................................................... 6
Controls buttons ........................................................................................... 7
Ports ............................................................................................................. 7
Remote control ............................................................................................. 8
Preparations ............................................................................ 9
Fastening the lens cover ..............................................................................9
Arrangement ...............................................................................................10
Adjusting the projector’s elevation ..............................................................12
Connecting your devices ............................................................................13
With a VCR/DVD player ............................................................................. 13
For HDMI signal source ............................................................................. 14
For DVI signal source ................................................................................. 14
For a SCART RGB input ............................................................................ 14
With a computer ......................................................................................... 15
Example of computer signal ....................................................................... 16
Connecting a power supply ........................................................................17
Using the cable cover .................................................................................17
Loading batteries into the remote control ...................................................18
Using the remote control ............................................................................19
Using the remote control button lights ........................................................19
Projection ............................................................................... 20
Turning the power on ..................................................................................20
Selecting an input signal ............................................................................21
Automatically adjusting the picture .............................................................21
Adjusting the display position .....................................................................22
Adjusting the zoom .....................................................................................22
Adjusting the focus .....................................................................................22
Turning the power off ..................................................................................23
Basic operation ...................................................................... 24
ASPECT .....................................................................................................24
IRIS ............................................................................................................25
MODE .........................................................................................................26
BLACK ........................................................................................................27
BRIGHTNESS, CONTRAST, COLOR ........................................................27
MY MEMORY .............................................................................................28
EASY MENU ........................................................................... 30
EASY MENU operation ..............................................................................30
2
�
(EASY MENU) ......................................................................... 30
EASY MENU functions ...............................................................................31
ASPECT ..................................................................................................... 31
MODE, BLACK ........................................................................................... 32
BRIGHTNESS, CONTRAST, COLOR, TINT, SHARPNESS, MIRROR ..... 33
RESET, LANGUAGE, Go To Advance Menu ............................................. 34
I
H
S
L
G
N
E
Advanced Menu ..................................................................... 35
Advanced Menu operation .........................................................................35
PICTURE menu ..........................................................................................37
BRIGHTNESS, CONTRAST, GAMMA ....................................................... 37
COLOR TEMP ............................................................................................ 39
COLOR, TINT, SHARPNESS ..................................................................... 40
IRIS, BLACK, MY MEMORY ...................................................................... 41
IMAGE menu ..............................................................................................43
ASPECT, OVER SCAN .............................................................................. 43
V POSITION, H POSITION, H PHASE, H SIZE, AUTO ADJUST .............. 44
INPUT menu ...............................................................................................45
PROGRESSIVE, COLOR SPACE ............................................................. 45
COMPONENT, VIDEO FORMAT, HDMI, FRAME LOCK ........................... 46
S-ASPECT, INFORMATION ....................................................................... 47
SETUP menu .............................................................................................48
KEYSTONE, WHISPER, MIRROR ............................................................ 48
SCREEN menu ..........................................................................................49
LANGUAGE, MENU POSITION, OSD BRIGHT. ........................................ 49
START UP, MyScreen ................................................................................ 50
MyScreen Lock, MESSAGE ....................................................................... 51
DIGITAL SHUTTER .................................................................................... 52
OPTION menu ............................................................................................53
AUTO OFF, LAMP TIME, FILTER TIME ..................................................... 53
SERVICE (FAN SPEED, GHOST, STRIPE) ............................................... 54
SERVICE (FILTER MESSAGE, FACTORY RESET) ................................. 55
Content
Maintenance .......................................................................... 56
Lamp ..........................................................................................................56
Air filter .......................................................................................................58
Inside of the projector .................................................................................60
Lens ............................................................................................................60
Cabinet and remote control ........................................................................60
Troubleshooting ..................................................................... 61
Related message .......................................................................................61
Regarding the indicator lamps ....................................................................62
Phenomena that may be easily mistaken as machine defects ................... 64
Warranty and after-service ................................................... 67
Specifications ........................................................................ 67
Dimension diagram ....................................................................................68
Glossary ................................................................................. 69
3
�
Before use
Before use
Projector features
This projector is used to project computer and NTSC/PAL/SECAM video signals
onto a screen. It requires only a small amount of space for installation and
projects a large image from even a short distance.
The following features will turn any room into a High Definition Theater.
● Super Focus ED (Extra-low dispersion) lenses are used for the highest possible
● 720P wide LCD panels are used for faithful reproduction of high definition
image quality.
images.
● Motorized iris control provides film-like images with a darker black.
● The 1.6x zoom lens and optical lens shift feature allow for flexibility of installation
and viewing position.
About this manual
Various symbols are used throughout this manual. The meanings of these
symbols are described below.
WARNING This symbol indicates information that, if ignored, could possibly
result in personal injury or even death due to incorrect handling.
CAUTION This symbol indicates information that, if ignored, could possibly
result in personal injury or physical damage due to incorrect
handling.
To ensure proper use, please take special notice of information
provided following this symbol.
See the pages noted after this symbol for more information about
the current topic.
NOTE
4
�
About contents of package
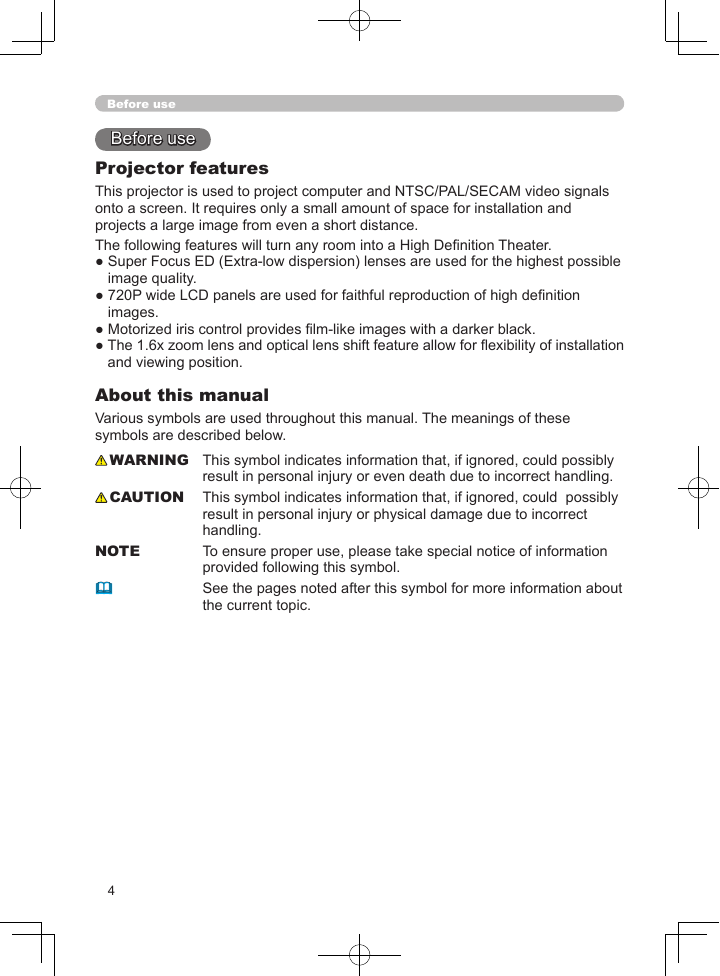
Your projector should come with the items shown below. Check to make sure that
all the items are included. Contact your dealer immediately if anything is missing.
(1) Projector ..................................................................................
I
H
S
L
G
N
E
Before use
(2) Lens cover, rivet and strap ....................................
(3) Power cord ...................................................................................
(4) Component video cable .......................................
POWER
LIGHT
BLACK
MODE
MEMORY
ASPECT
IRIS
ENTER
MENU
RESET
BRIGHT CONTRAST COLOR
HDMI
PC
AUTO
COMPO
S-VIDEO
VIDEO
(5) Remote control and 2 AAA batteries .......................................
(6) User’s manuals ....................................................
(7) Cable cover ..........................................................
WARNING
► Do not place the projector on an unstable surface.
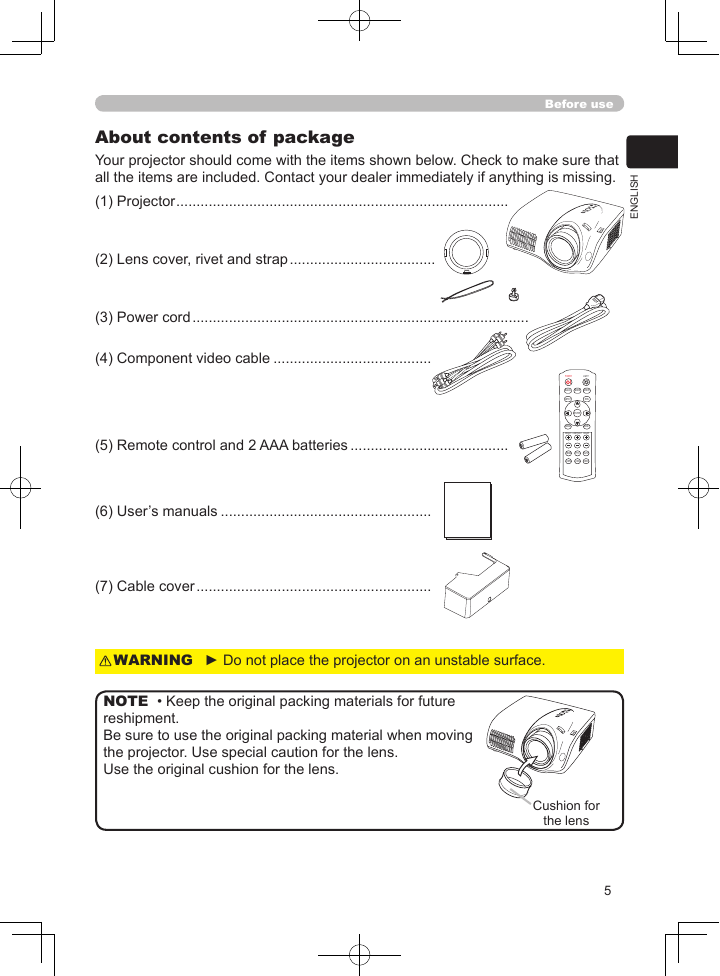
• Keep the original packing materials for future
NOTE
reshipment.
Be sure to use the original packing material when moving
the projector. Use special caution for the lens.
Use the original cushion for the lens.
Cushion for
the lens
5
�
Before use
Part names
Projector
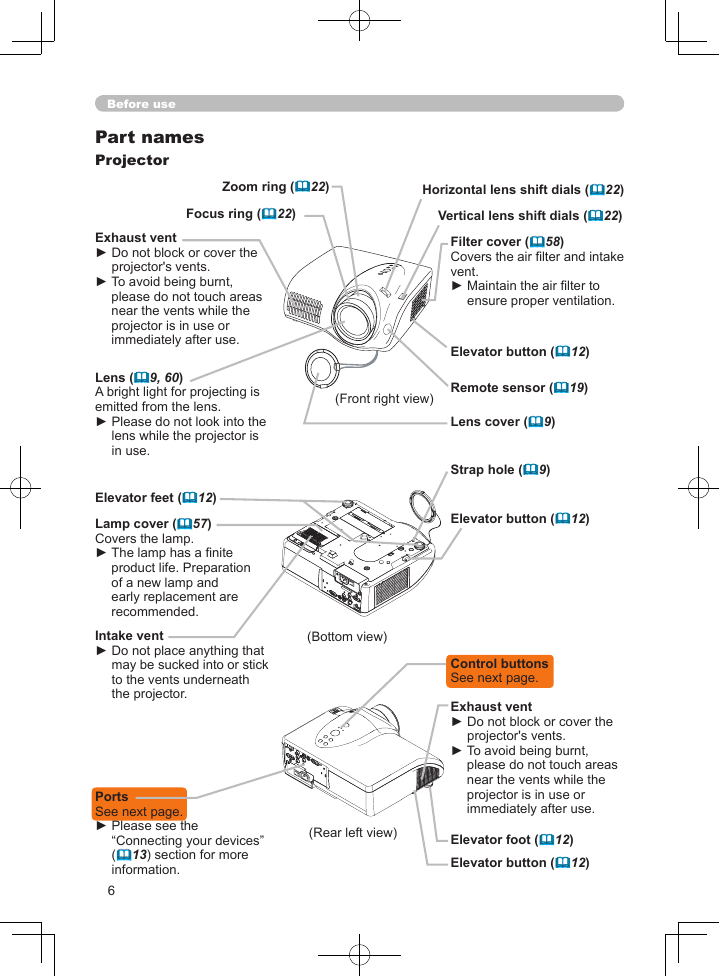
Zoom ring (22)
Focus ring (22)
Exhaust vent
► Do not block or cover the
projector's vents.
► To avoid being burnt,
please do not touch areas
near the vents while the
projector is in use or
immediately after use.
Lens (9, 60)
A bright light for projecting is
emitted from the lens.
► Please do not look into the
lens while the projector is
in use.
Elevator feet (12)
Lamp cover (57)
Covers the lamp.
► The lamp has a finite
product life. Preparation
of a new lamp and
early replacement are
recommended.
Intake vent
► Do not place anything that
may be sucked into or stick
to the vents underneath
the projector.
Ports
See next page.
► Please see the
“Connecting your devices”
(13) section for more
information.
6
Horizontal lens shift dials (22)
Vertical lens shift dials (22)
Filter cover (58)
Covers the air filter and intake
vent.
► Maintain the air filter to
ensure proper ventilation.
(Front right view)
Elevator button (12)
Remote sensor (19)
Lens cover (9)
Strap hole (9)
Elevator button (12)
(Bottom view)
Control buttons
See next page.
Exhaust vent
► Do not block or cover the
projector's vents.
► To avoid being burnt,
please do not touch areas
near the vents while the
projector is in use or
immediately after use.
(Rear left view)
Elevator foot (12)
Elevator button (12)
�
Control buttons
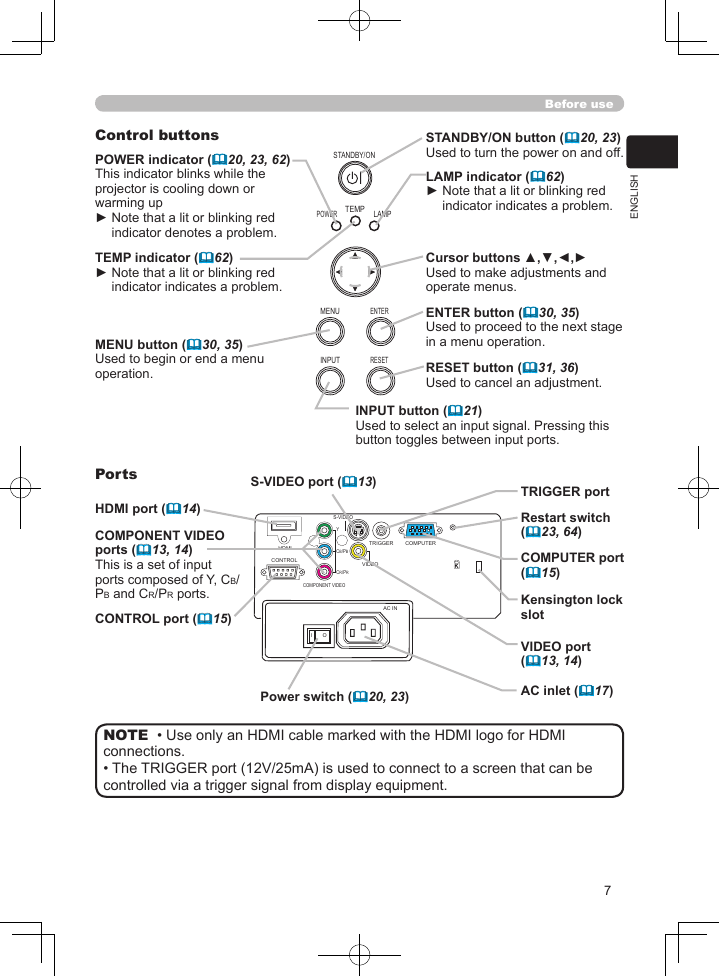
POWER indicator (20, 23, 62)
This indicator blinks while the
projector is cooling down or
warming up
► Note that a lit or blinking red
indicator denotes a problem.
TEMP indicator (62)
► Note that a lit or blinking red
indicator indicates a problem.
MENU button (30, 35)
Used to begin or end a menu
operation.
Before use
STANDBY/ON
POWER
TEMP
LAMP
STANDBY/ON button (20, 23)
Used to turn the power on and off.
LAMP indicator (62)
► Note that a lit or blinking red
indicator indicates a problem.
I
H
S
L
G
N
E
MENU
ENTER
INPUT
RESET
Cursor buttons ▲,▼,◄,►
Used to make adjustments and
operate menus.
ENTER button (30, 35)
Used to proceed to the next stage
in a menu operation.
RESET button (31, 36)
Used to cancel an adjustment.
INPUT button (21)
Used to select an input signal. Pressing this
button toggles between input ports.
Ports
HDMI port (14)
COMPONENT VIDEO
ports (13, 14)
This is a set of input
ports composed of Y, CB/
PB and CR/PR ports.
CONTROL port (15)
S-VIDEO port (13)
HDMI
CONTROL
S-VIDEO
Y
CB/PB
CR/PR
COMPONENT VIDEO
I O
TRIGGER
COMPUTER
VIDEO
AC IN
Power switch (20, 23)
TRIGGER port
Restart switch
(23, 64)
COMPUTER port
(15)
Kensington lock
slot
VIDEO port
(13, 14)
AC inlet (17)
• Use only an HDMI cable marked with the HDMI logo for HDMI
NOTE
connections.
• The TRIGGER port (12V/25mA) is used to connect to a screen that can be
controlled via a trigger signal from display equipment.
7
�
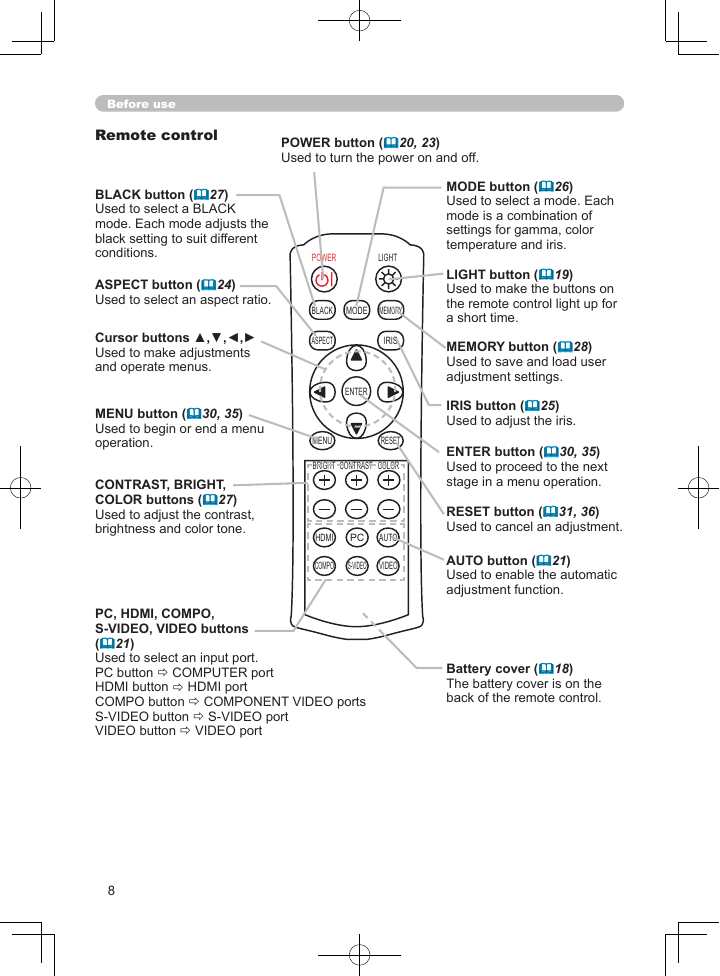
POWER button (20, 23)
Used to turn the power on and off.
MODE button (26)
Used to select a mode. Each
mode is a combination of
settings for gamma, color
temperature and iris.
LIGHT button (19)
Used to make the buttons on
the remote control light up for
a short time.
MEMORY button (28)
Used to save and load user
adjustment settings.
IRIS button (25)
Used to adjust the iris.
ENTER button (30, 35)
Used to proceed to the next
stage in a menu operation.
RESET button (31, 36)
Used to cancel an adjustment.
AUTO button (21)
Used to enable the automatic
adjustment function.
Battery cover (18)
The battery cover is on the
back of the remote control.
Before use
Remote control
BLACK button (27)
Used to select a BLACK
mode. Each mode adjusts the
black setting to suit different
conditions.
ASPECT button (24)
Used to select an aspect ratio.
Cursor buttons ▲,▼,◄,►
Used to make adjustments
and operate menus.
MENU button (30, 35)
Used to begin or end a menu
operation.
CONTRAST, BRIGHT,
COLOR buttons (27)
Used to adjust the contrast,
brightness and color tone.
POWER
LIGHT
BLACK
MODE
MEMORY
ASPECT
IRIS
ENTER
MENU
RESET
BRIGHT CONTRAST COLOR
HDMI
PC
AUTO
COMPO
S-VIDEO
VIDEO
PC, HDMI, COMPO,
S-VIDEO, VIDEO buttons
(21)
Used to select an input port.
PC button COMPUTER port
HDMI button HDMI port
COMPO button COMPONENT VIDEO ports
S-VIDEO button S-VIDEO port
VIDEO button VIDEO port
8
�



 2023年江西萍乡中考道德与法治真题及答案.doc
 2012年重庆南川中考生物真题及答案.doc
 2013年江西师范大学地理学综合及文艺理论基础考研真题.doc
 2020年四川甘孜小升初语文真题及答案I卷.doc
 2020年注册岩土工程师专业基础考试真题及答案.doc
 2023-2024学年福建省厦门市九年级上学期数学月考试题及答案.doc
 2021-2022学年辽宁省沈阳市大东区九年级上学期语文期末试题及答案.doc
 2022-2023学年北京东城区初三第一学期物理期末试卷及答案.doc
 2018上半年江西教师资格初中地理学科知识与教学能力真题及答案.doc
 2012年河北国家公务员申论考试真题及答案-省级.doc
 2020-2021学年江苏省扬州市江都区邵樊片九年级上学期数学第一次质量检测试题及答案.doc
 2022下半年黑龙江教师资格证中学综合素质真题及答案.doc