GZ-MS90U
INSTRUCTIONS
CAMCORDER
MANUAL DE INSTRUCCIONES
VIDEOCÁMARA
MANUEL D’UTILISATION
CAMÉSCOPE
E
N
G
L
S
H
I
E
S
P
A
Ñ
O
L
F
R
A
N
Ç
A
S
I
LYT2046-001A-M
EN
SP
FR
Dear.Customer
Thank you for purchasing this
camcorder. Before use, please read
the safety information and precautions
contained in pages 2 and 3 to ensure
safe use of this product.
Contents
Accessories......................................5
Getting.Started.................................6
- Charging the Battery Pack
- Insert an SD Card
- Date/Time Setting
Recording.Files.................................8
- Checking Remaining Battery
Power
Playing.Back.Files..........................10
Watching.Images.on.TV.................11
Installing.Software.to.the.PC.........12
Connecting.the.Camcorder.to.the..
PC...................................................13
File.Backup.....................................14
File.Upload.to.YouTube™...............15
Further.Information.................17.-.20
For.Future.Reference:.
Enter the Model No. (located on the
bottom of the camcorder) and Serial
No. (located on the battery pack
mount of the camcorder) below.
Model.No.
Serial.No.
�
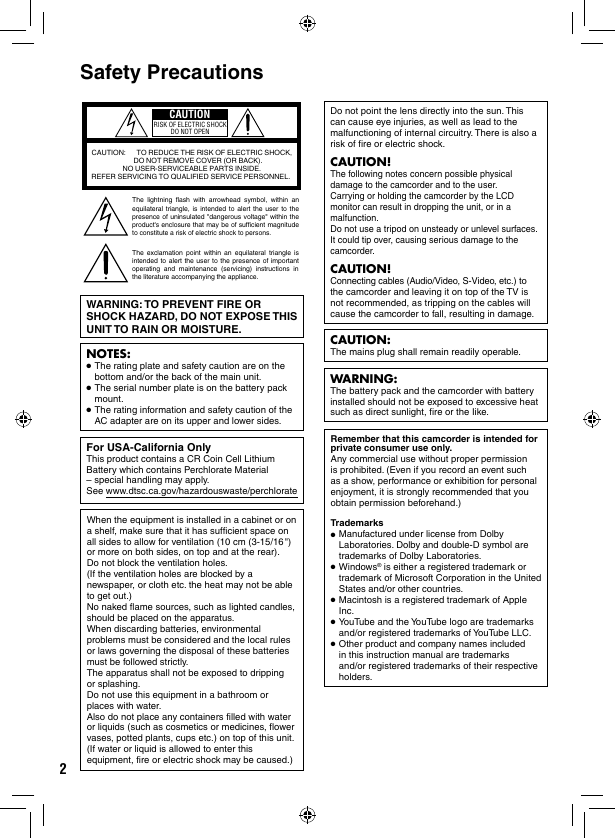
Safety.Precautions
CAUTION
DO NOT OPEN
RISK OF ELECTRIC SHOCK
CAUTION: TO REDUCE THE RISK OF ELECTRIC SHOCK,
DO NOT REMOVE COVER (OR BACK).
NO USER-SERVICEABLE PARTS INSIDE.
REFER SERVICING TO QUALIFIED SERVICE PERSONNEL.
The lightning flash with arrowhead symbol, within an
equilateral triangle, is intended to alert the user to the
presence of uninsulated "dangerous voltage" within the
product's enclosure that may be of sufficient magnitude
to constitute a risk of electric shock to persons.
The exclamation point within an equilateral triangle is
intended to alert the user to the presence of important
operating and maintenance (servicing) instructions in
the literature accompanying the appliance.
WARNING:.TO.PREVENT.FIRE.OR.
SHOCK.HAZARD,.DO.NOT.EXPOSE.THIS.
UNIT.TO.RAIN.OR.MOISTURE.
bottom and/or the back of the main unit.
NOTES:
• The rating plate and safety caution are on the
• The serial number plate is on the battery pack
• The rating information and safety caution of the
AC adapter are on its upper and lower sides.
mount.
For.USA-California.Only
This product contains a CR Coin Cell Lithium
Battery which contains Perchlorate Material
– special handling may apply.
See www.dtsc.ca.gov/hazardouswaste/perchlorate
When the equipment is installed in a cabinet or on
a shelf, make sure that it has sufficient space on
all sides to allow for ventilation (10 cm (3-15/16 ")
or more on both sides, on top and at the rear).
Do not block the ventilation holes.
(If the ventilation holes are blocked by a
newspaper, or cloth etc. the heat may not be able
to get out.)
No naked flame sources, such as lighted candles,
should be placed on the apparatus.
When discarding batteries, environmental
problems must be considered and the local rules
or laws governing the disposal of these batteries
must be followed strictly.
The apparatus shall not be exposed to dripping
or splashing.
Do not use this equipment in a bathroom or
places with water.
Also do not place any containers filled with water
or liquids (such as cosmetics or medicines, flower
vases, potted plants, cups etc.) on top of this unit.
(If water or liquid is allowed to enter this
equipment, fire or electric shock may be caused.)
�
Do not point the lens directly into the sun. This
can cause eye injuries, as well as lead to the
malfunctioning of internal circuitry. There is also a
risk of fire or electric shock.
CAUTION!
The following notes concern possible physical
damage to the camcorder and to the user.
Carrying or holding the camcorder by the LCD
monitor can result in dropping the unit, or in a
malfunction.
Do not use a tripod on unsteady or unlevel surfaces.
It could tip over, causing serious damage to the
camcorder.
CAUTION!
Connecting cables (Audio/Video, S-Video, etc.) to
the camcorder and leaving it on top of the TV is
not recommended, as tripping on the cables will
cause the camcorder to fall, resulting in damage.
CAUTION:
The mains plug shall remain readily operable.
WARNING:
The battery pack and the camcorder with battery
installed should not be exposed to excessive heat
such as direct sunlight, fire or the Iike.
Remember.that.this.camcorder.is.intended.for.
private.consumer.use.only.
Any commercial use without proper permission
is prohibited. (Even if you record an event such
as a show, performance or exhibition for personal
enjoyment, it is strongly recommended that you
obtain permission beforehand.)
Trademarks
• Manufactured under license from Dolby
Laboratories. Dolby and double-D symbol are
trademarks of Dolby Laboratories.
• Windows® is either a registered trademark or
trademark of Microsoft Corporation in the United
States and/or other countries.
Inc.
• Macintosh is a registered trademark of Apple
• YouTube and the YouTube logo are trademarks
and/or registered trademarks of YouTube LLC.
• Other product and company names included
in this instruction manual are trademarks
and/or registered trademarks of their respective
holders.
�
IMPORTANT.SAFETY.INSTRUCTIONS
1. Read these instructions.
2. Keep these instructions.
3. Heed all warnings.
4. Follow all instructions.
5. Do not use this apparatus near water.
6. Clean only with dry cloth.
7. Do not block any ventilation openings. Install
in accordance with the manufacturer’s
instructions.
8. Do not install near any heat sources such
as radiators, heat registers, stoves, or other
apparatus (including amplifiers) that produce
heat.
9. Only use attachments/accessories specified by
the manufacturer.
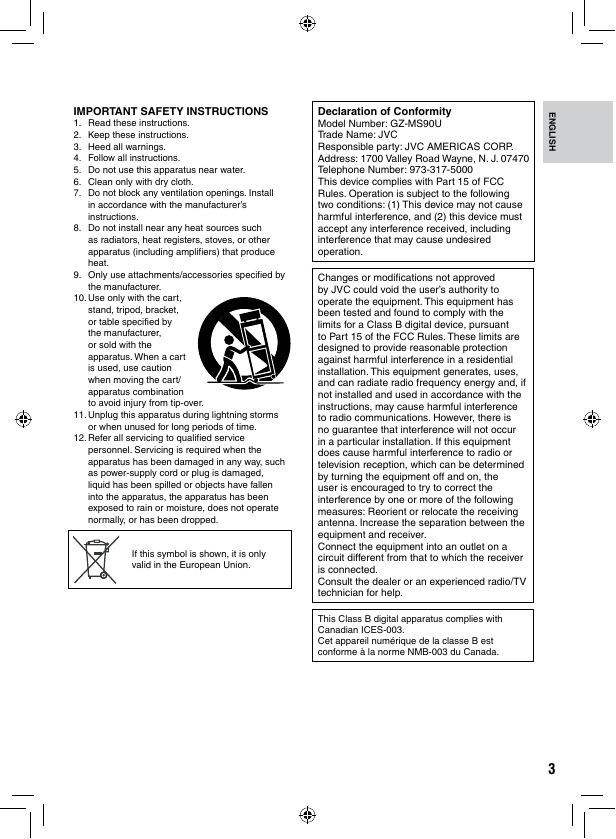
10. Use only with the cart,
stand, tripod, bracket,
or table specified by
the manufacturer,
or sold with the
apparatus. When a cart
is used, use caution
when moving the cart/
apparatus combination
to avoid injury from tip-over.
11. Unplug this apparatus during lightning storms
or when unused for long periods of time.
12. Refer all servicing to qualified service
personnel. Servicing is required when the
apparatus has been damaged in any way, such
as power-supply cord or plug is damaged,
liquid has been spilled or objects have fallen
into the apparatus, the apparatus has been
exposed to rain or moisture, does not operate
normally, or has been dropped.
If this symbol is shown, it is only
valid in the European Union.
Declaration.of.Conformity
Model Number: GZ-MS90U
Trade Name: JVC
Responsible party: JVC AMERICAS CORP.
Address: 1700 Valley Road Wayne, N. J. 07470
Telephone Number: 973-317-5000
This device complies with Part 15 of FCC
Rules. Operation is subject to the following
two conditions: (1) This device may not cause
harmful interference, and (2) this device must
accept any interference received, including
interference that may cause undesired
operation.
Changes or modifications not approved
by JVC could void the user’s authority to
operate the equipment. This equipment has
been tested and found to comply with the
limits for a Class B digital device, pursuant
to Part 15 of the FCC Rules. These limits are
designed to provide reasonable protection
against harmful interference in a residential
installation. This equipment generates, uses,
and can radiate radio frequency energy and, if
not installed and used in accordance with the
instructions, may cause harmful interference
to radio communications. However, there is
no guarantee that interference will not occur
in a particular installation. If this equipment
does cause harmful interference to radio or
television reception, which can be determined
by turning the equipment off and on, the
user is encouraged to try to correct the
interference by one or more of the following
measures: Reorient or relocate the receiving
antenna. Increase the separation between the
equipment and receiver.
Connect the equipment into an outlet on a
circuit different from that to which the receiver
is connected.
Consult the dealer or an experienced radio/TV
technician for help.
This Class B digital apparatus complies with
Canadian ICES-003.
Cet appareil numérique de la classe B est
conforme à la norme NMB-003 du Canada.
E
N
G
L
S
H
I
�
�
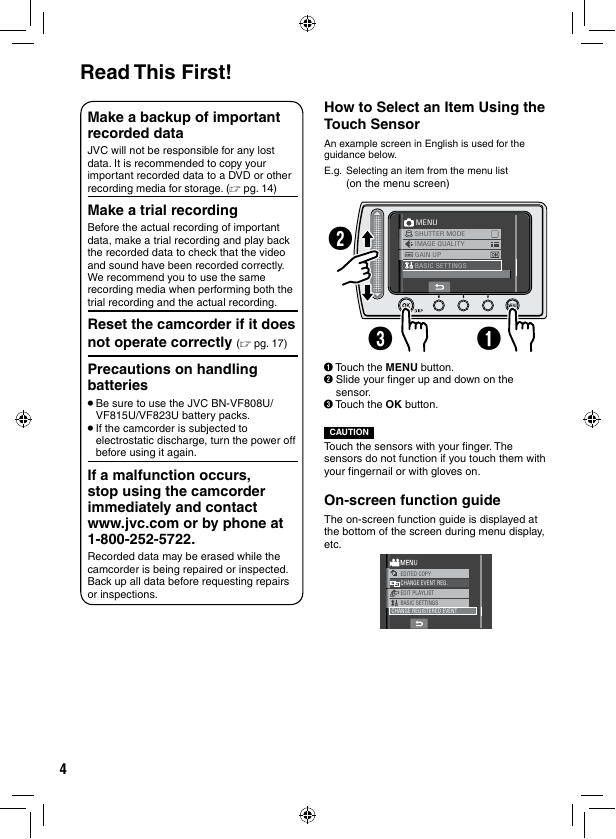
How.to.Select.an.Item.Using.the.
Touch.Sensor
An example screen in English is used for the
guidance below.
E.g. Selecting an item from the menu list
(on the menu screen)
R
MENU
SHUTTER MODE
IMAGE QUALITY
GAIN UP
BASIC SETTINGS
S
Q
Q Touch the MENU button.
R Slide your finger up and down on the
sensor.
S Touch the OK button.
CAUTION
Touch the sensors with your finger. The
sensors do not function if you touch them with
your fingernail or with gloves on.
On-screen.function.guide
The on-screen function guide is displayed at
the bottom of the screen during menu display,
etc.
EDITED COPY
CHANGE EVENT REG.
EDIT PLAYLIST
BASIC SETTINGS
CHANGE REGISTERED EVENT
Read.This.First!
Make.a.backup.of.important.
recorded.data
JVC will not be responsible for any lost
data. It is recommended to copy your
important recorded data to a DVD or other
recording media for storage. (Z pg. 14)
Make.a.trial.recording
Before the actual recording of important
data, make a trial recording and play back
the recorded data to check that the video
and sound have been recorded correctly.
We recommend you to use the same
recording media when performing both the
trial recording and the actual recording.
Reset.the.camcorder.if.it.does.
not.operate.correctly.(Z pg. 17)
Precautions.on.handling.
batteries
• Be sure to use the JVC BN-VF808U/
VF815U/VF823U battery packs.
• If the camcorder is subjected to
electrostatic discharge, turn the power off
before using it again.
If.a.malfunction.occurs,.
stop.using.the.camcorder.
immediately.and.contact.
www.jvc.com.or.by.phone.at.
1-800-252-5722.
Recorded data may be erased while the
camcorder is being repaired or inspected.
Back up all data before requesting repairs
or inspections.
�
�
Accessories
or
AC.Adapter
AP-V18U/V14U/V20U
Battery.Pack
BN-VF808U
Audio/Video.Cable
USB.Cable
(Z pg. 13)
CD-ROM
(Z pg. 12)
Core.Filter
(for USB Cable)
* The core filter reduces
interference.
NOTE
Make sure to use the provided cables for connections. Do not use any other cables.
Attaching.the.Core.Filter.to.the.USB.Cable
Attach the core filter to the USB cable. The core filter reduces interference. Connect the end of
the cable with the core filter to the camcorder.
Release.the.stopper.
3.cm
To.be.connected.to.
the.camcorder.
Wind.once.
Read these INSTRUCTIONS to enjoy your CAMCORDER.
For more details on the operations, refer to the GUIDEBOOK in the
supplied CD-ROM.
In order to view the GUIDEBOOK, Adobe® Acrobat® ReaderTM or Adobe®
Reader® must be installed.
Adobe® Reader® can be loaded from Adobe’s web site:
http://www.adobe.com/
NOTE
Select.your.desired.language.with.a.single.click.
The model name is indicated on the bottom of your camcorder.
E
N
G
L
S
H
I
�
�
Getting.Started
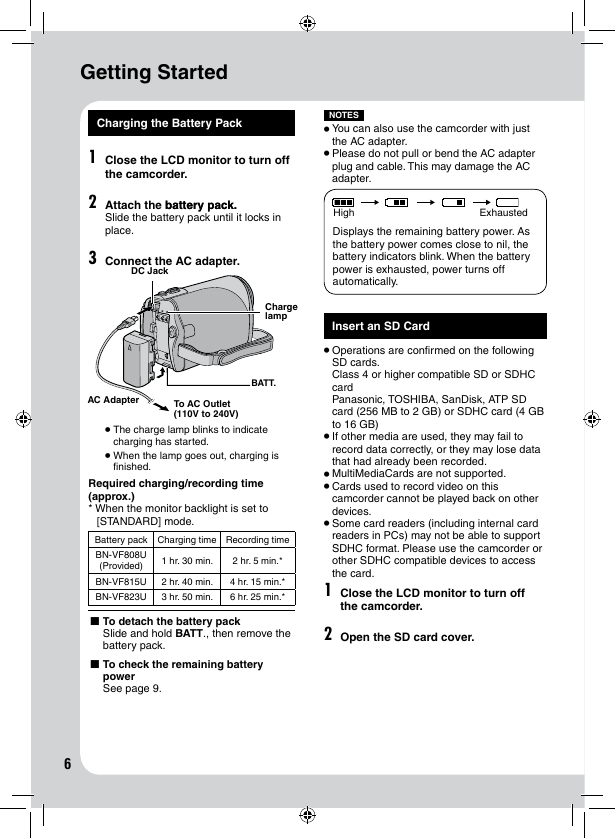
Charging.the.Battery.Pack
1 Close.the.LCD.monitor.to.turn.off.
the.camcorder.
2 Attach.the.battery pack.
battery.pack.
Slide the battery pack until it locks in
place.
3 Connect.the.AC.adapter.
DC.Jack
Charge.
lamp
BATT.
AC.Adapter
To.AC.Outlet
(110V.to.240V)
• The charge lamp blinks to indicate
charging has started.
• When the lamp goes out, charging is
finished.
Required.charging/recording.time.
(approx.)
* When the monitor backlight is set to
[STANDARD] mode.
Battery pack Charging time Recording time
BN-VF808U
(Provided)
BN-VF815U
BN-VF823U
4 hr. 15 min.*
6 hr. 25 min.*
2 hr. 40 min.
3 hr. 50 min.
1 hr. 30 min.
2 hr. 5 min.*
L.To.detach.the.battery.pack
Slide and hold BATT., then remove the
battery pack.
L.To.check.the.remaining.battery.
power
See page 9.
�
NOTES
• You can also use the camcorder with just
the AC adapter.
• Please do not pull or bend the AC adapter
plug and cable. This may damage the AC
adapter.
High
Exhausted
Displays the remaining battery power. As
the battery power comes close to nil, the
battery indicators blink. When the battery
power is exhausted, power turns off
automatically.
Insert.an.SD.Card
• Operations are confirmed on the following
SD cards.
Class 4 or higher compatible SD or SDHC
card
Panasonic, TOSHIBA, SanDisk, ATP SD
card (256 MB to 2 GB) or SDHC card (4 GB
to 16 GB)
• If other media are used, they may fail to
record data correctly, or they may lose data
that had already been recorded.
• MultiMediaCards are not supported.
• Cards used to record video on this
camcorder cannot be played back on other
devices.
• Some card readers (including internal card
readers in PCs) may not be able to support
SDHC format. Please use the camcorder or
other SDHC compatible devices to access
the card.
1 Close.the.LCD.monitor.to.turn.off.
the.camcorder.
2 Open.the.SD.card.cover.
�
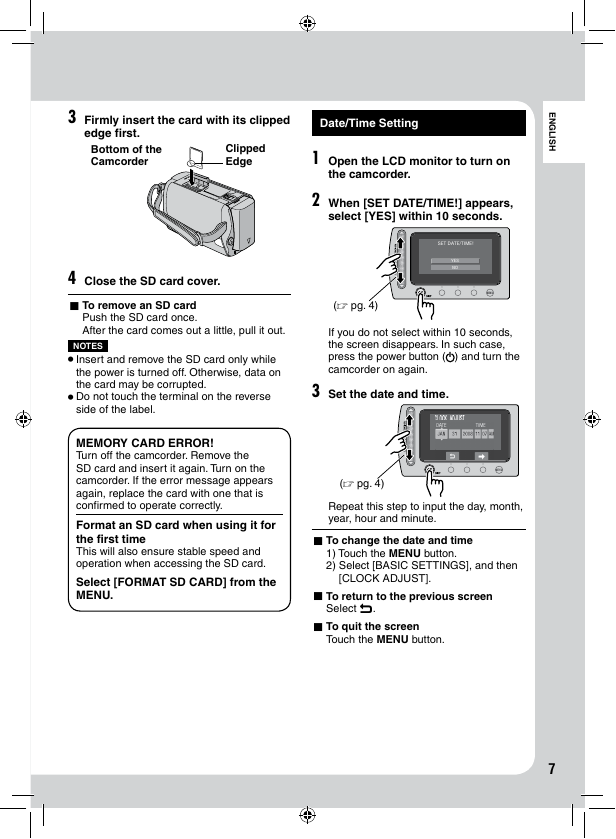
3 Firmly.insert.the.card.with.its.clipped.
edge.first.
Bottom.of.the.
Camcorder
Clipped.
Edge
4 Close.the.SD.card.cover.
L.To.remove.an.SD.card
Push the SD card once.
After the card comes out a little, pull it out.
NOTES
• Insert and remove the SD card only while
the power is turned off. Otherwise, data on
the card may be corrupted.
• Do not touch the terminal on the reverse
side of the label.
MEMORY.CARD.ERROR!
Turn off the camcorder. Remove the
SD card and insert it again. Turn on the
camcorder. If the error message appears
again, replace the card with one that is
confirmed to operate correctly.
Format.an.SD.card.when.using.it.for.
the.first.time
This will also ensure stable speed and
operation when accessing the SD card.
Select.[FORMAT.SD.CARD].from.the.
MENU..
Date/Time.Setting
1 Open.the.LCD.monitor.to.turn.on.
the.camcorder.
2 When.[SET.DATE/TIME!].appears,.
select.[YES].within.10.seconds.
E
N
G
L
S
H
I
SET DATE/TIME!
YES
NO
(Z pg. 4)
If you do not select within 10 seconds,
the screen disappears. In such case,
press the power button (
camcorder on again.
) and turn the
3 Set.the.date.and.time.
(Z pg. 4)
Repeat this step to input the day, month,
year, hour and minute.
L.To.change.the.date.and.time
1) Touch the MENU button.
2) Select [BASIC SETTINGS], and then
[CLOCK ADJUST].
L.To.return.to.the.previous.screen
Select @.
L.To.quit.the.screen
Touch the MENU button.
�
�
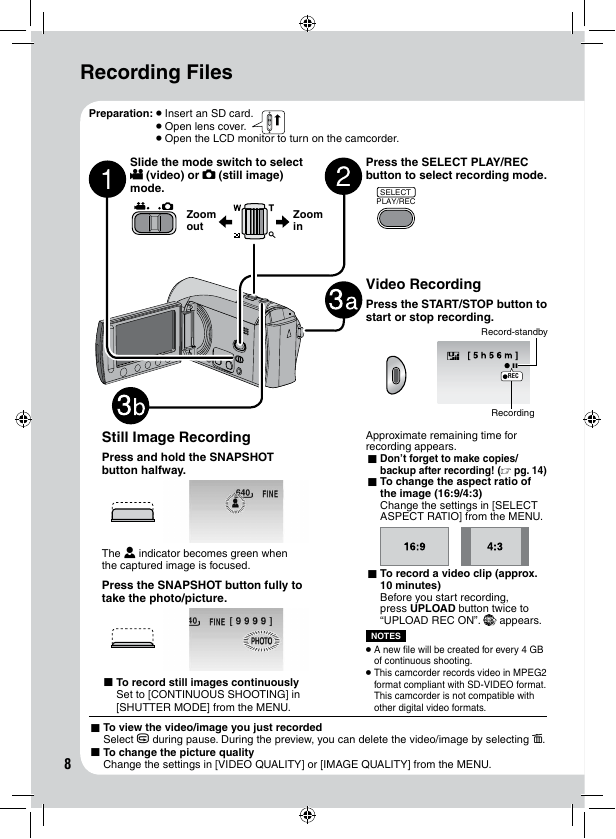
Recording.Files
Preparation: • Insert an SD card.
• Open lens cover.
• Open the LCD monitor to turn on the camcorder.
Slide.the.mode.switch.to.select.
!.(video).or.#.(still.image).
mode.
Zoom.
out
Zoom.
in
Press.the.SELECT.PLAY/REC.
button.to.select.recording.mode.
SELECT
PLAY/REC
Video.Recording
Press.the.START/STOP.button.to.
start.or.stop.recording.
Record-standby
REC
Recording
Still.Image.Recording
Press.and.hold.the.SNAPSHOT.
button.halfway.
The ? indicator becomes green when
the captured image is focused.
Press.the.SNAPSHOT.button.fully.to.
take.the.photo/picture.
Approximate remaining time for
recording appears.
L.Don’t.forget.to.make.copies/
L.To.change.the.aspect.ratio.of.
backup.after.recording!.(Z.pg..14)
the.image.(16:9/4:3)
Change the settings in [SELECT
ASPECT RATIO] from the MENU.
L.To.record.a.video.clip.(approx..
10.minutes)
Before you start recording,
press UPLOAD button twice to
“UPLOAD REC ON”.
appears.
L.To.record.still.images.continuously
Set to [CONTINUOUS SHOOTING] in
[SHUTTER MODE] from the MENU.
NOTES
• A new file will be created for every 4 GB
of continuous shooting.
• This camcorder records video in MPEG2
format compliant with SD-VIDEO format.
This camcorder is not compatible with
other digital video formats.
L.To.view.the.video/image.you.just.recorded
Select A during pause. During the preview, you can delete the video/image by selecting *.
L.To.change.the.picture.quality
�
Change the settings in [VIDEO QUALITY] or [IMAGE QUALITY] from the MENU.
�




 2023年江西萍乡中考道德与法治真题及答案.doc
 2012年重庆南川中考生物真题及答案.doc
 2013年江西师范大学地理学综合及文艺理论基础考研真题.doc
 2020年四川甘孜小升初语文真题及答案I卷.doc
 2020年注册岩土工程师专业基础考试真题及答案.doc
 2023-2024学年福建省厦门市九年级上学期数学月考试题及答案.doc
 2021-2022学年辽宁省沈阳市大东区九年级上学期语文期末试题及答案.doc
 2022-2023学年北京东城区初三第一学期物理期末试卷及答案.doc
 2018上半年江西教师资格初中地理学科知识与教学能力真题及答案.doc
 2012年河北国家公务员申论考试真题及答案-省级.doc
 2020-2021学年江苏省扬州市江都区邵樊片九年级上学期数学第一次质量检测试题及答案.doc
 2022下半年黑龙江教师资格证中学综合素质真题及答案.doc