designing your digital dream
User’s Guide
DMK+
English
Chinese
The contents of user's guide could be changed without prior notice, depending on
updates and changes in specification, etc.
Please read all instructions in the user's guide before using the player.
User's Guide
Date of Publication : Oct. 2003
Date of First edition : Oct. 2003
Publishing Company : Digitalway, Inc.
Address of China Branch :
23F-G Hudu Mansion, NO.838 Zhangyang Road Pudong,
Shanghai (Zip: 200-122)
Tel : 21-5058-6018
Fax : 21-5058-6017
© 2003 Digitalway, Inc.
�
Designing Your Digital Dream
Thanks for your purchasing MPIO DMK+. This Manual pro-
vides you with the method of operation and caution. Be
sure to read this manual before using this product. MPIO
will always try to make better product.
Any form of imitation, copying, reproduction or translation in
part or in whole of both the product and its accompanying
documents or shrinking the product in such a form as to be
read by electronic means without Digitalway's prior consent
is prohibited by the Copyrights Act.
• Microsoft, Windows, Windows Explorer, and Windows
Logo are trademarks or registered trademarks of Microsoft
Corporation.
• Intel & Pentium are registered trademarks of Intel
Corporation.
• Macintosh, Macintosh Logo is trademarks or registered
trademarks of Apple Computer, Inc.
• The system and products appearing in this manual are
covered by trademarks or registered trademarks of each
company or organization concerned; the mark TM or ® is
not always indicated.
Table of Contents
• MPIO DMK+
/ 04
1. What is MP3 Player
2. Technical Specifications
/
05
3. Computer Requirements
/
05
4. Warning / 06
5. Accessories Included with
your DMK+
/ 07
6. Control's Overview / 08
7. Inserting the Battery / 09
8. Listening to the Sample
/ 10
Music
(1) Turn On the MPIO / 10
/ 10
(2) Select the File
(3) Volume Control / 10
(4) Turn Off the MPIO
/ 11
(5) LCD Display
/ 12
(6) Menu Setup
(7) Repeat Segmentation / 15
(8) Voice Record
/ 15
/ 10
• MPIO Manager 2
1. MPIO Manager 2
Installation / 16
2. Connecting MPIO to the
Computer / 18
3. When MPIO is not connected
to the Computer
/ 18
4. How to use MPIO Manager
/ 20
2
1) Control’s Overview / 20
2) Menu Table of MPIO
Manager 2
/ 22
3) Basic Function / 23
4) Application Function for
Power User
/ 25
5) How to use MPIO Audio / 26
• Other Information
1. MP3 File Creation(Ripping)
From Audio CD
/ 28
2. Macintosh iTunes Plug-in
Installation
/ 28
3. Troubleshooting
/ 29
2
English
English
3
�
• MPIO DMK+
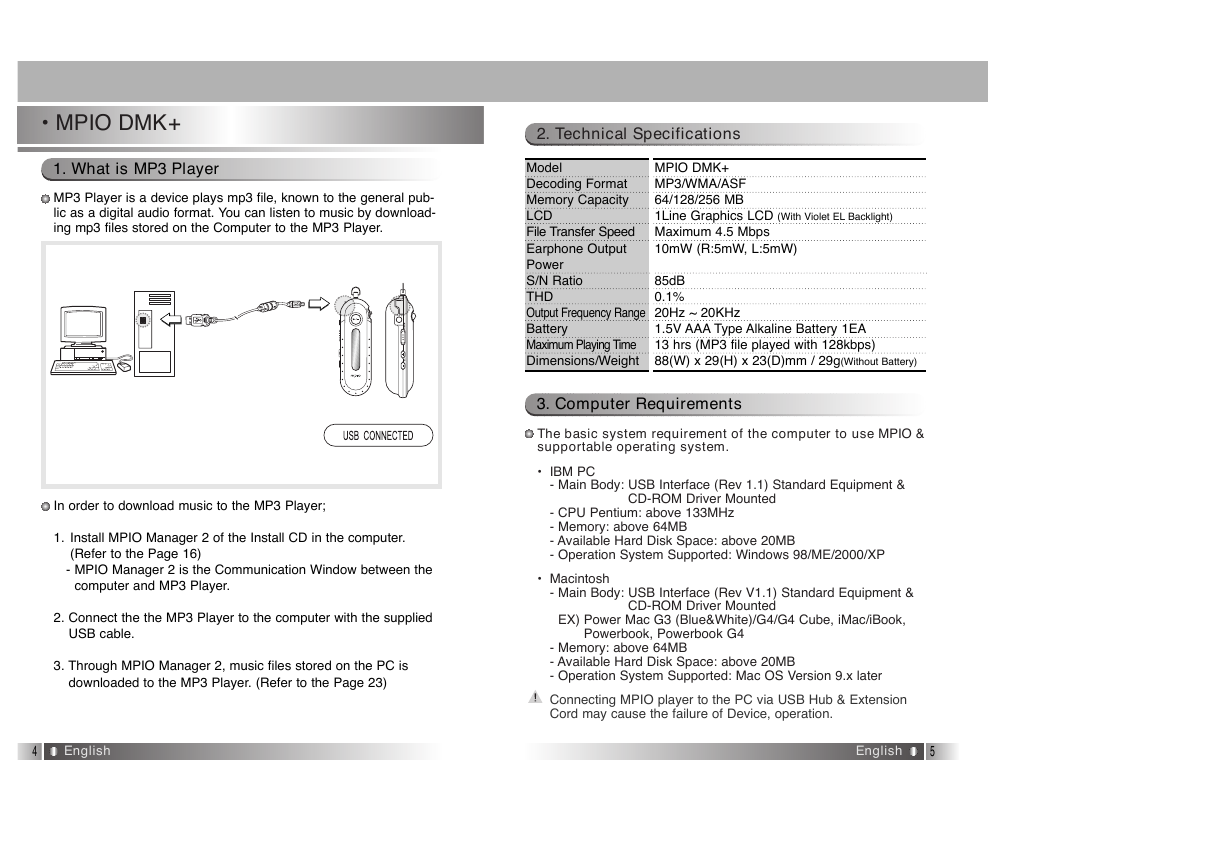
1. What is MP3 Player
MP3 Player is a device plays mp3 file, known to the general pub-
lic as a digital audio format. You can listen to music by download-
ing mp3 files stored on the Computer to the MP3 Player.
U
P
In order to download music to the MP3 Player;
1. Install MPIO Manager 2 of the Install CD in the computer.
(Refer to the Page 16)
- MPIO Manager 2 is the Communication Window between the
computer and MP3 Player.
2. Connect the the MP3 Player to the computer with the supplied
USB cable.
3. Through MPIO Manager 2, music files stored on the PC is
downloaded to the MP3 Player. (Refer to the Page 23)
2. Technical Specifications
Model
Decoding Format
Memory Capacity
LCD
File Transfer Speed
Earphone Output
Power
S/N Ratio
THD
Output Frequency Range
Battery
Maximum Playing Time
Dimensions/Weight
MPIO DMK+
MP3/WMA/ASF
64/128/256 MB
1Line Graphics LCD (With Violet EL Backlight)
Maximum 4.5 Mbps
10mW (R:5mW, L:5mW)
85dB
0.1%
20Hz ~ 20KHz
1.5V AAA Type Alkaline Battery 1EA
13 hrs (MP3 file played with 128kbps)
88(W) x 29(H) x 23(D)mm / 29g(Without Battery)
3. Computer Requirements
The basic system requirement of the computer to use MPIO &
supportable operating system.
• IBM PC
- Main Body: USB Interface (Rev 1.1) Standard Equipment &
CD-ROM Driver Mounted
- CPU Pentium: above 133MHz
- Memory: above 64MB
- Available Hard Disk Space: above 20MB
- Operation System Supported: Windows 98/ME/2000/XP
• Macintosh
- Main Body: USB Interface (Rev V1.1) Standard Equipment &
CD-ROM Driver Mounted
EX) Power Mac G3 (Blue&White)/G4/G4 Cube, iMac/iBook,
Powerbook, Powerbook G4
- Memory: above 64MB
- Available Hard Disk Space: above 20MB
- Operation System Supported: Mac OS Version 9.x later
4
English
English
5
Connecting MPIO player to the PC via USB Hub & Extension
Cord may cause the failure of Device, operation.
�
4. Warning
5. Accessories Included with your DMK+
You should be fully aware of the notice below, before using
the product.
The company does not take the responsibility for the defect
of the product (accessory, connecting device etc.), damage,
data loss, accident & disorder etc., occurred from not fully
understanding the notice below, so please be sure to check
this notice.
1. Do not use the product for the other purpose except for the matters
described in the manual.
2. Pay attention not to hurt your hand while you touch a product box, manu-
al, accessory etc. Keep the manual to use at any time.
3. Pay attention not to have a severe impact on the product, might cause a
trouble or a damage.
4. Pay attention not to use the device or leave it alone in places with high
temperature and humidity or of big thermal difference, and by the strong
magnetic field.
5. Do not spill any liquid (water, beverage etc.) on this device.
6. The device that you discretionary disassembled or remodeled can be exempt-
ed from the free service, so pay special attention to this.
7. The company does not take the responsibility for data loss caused by the
defect of the product, failed operation and other reasons, so pay attention
to this.
8. Check the polarity (+,-) of the battery when you insert a battery into the
9. Try not to injure you nail or not to be scratched by the edges when you
10. Remove the battery when not in use. Leakage of battery might cause a
device.
open the battery cover.
damage on device.
11. Pay attention not to use the earphone continuously for many hours that
might cause a hearing problem.
12. Please plug or unplug the earphone and cable by holding the plugs not
by pulling out the earphone or cable, to prevent internal line breaking.
13. When you plug the USB cable into the computer or device, please check
again the direction of plugging it. In case the USB cable is plugged in the
wrong way, the computer or the device might be damaged.
14. Do not leave the USB cable plugged into the computer.
15. Do not give an impact to the connected part while the USB cable is con-
nected to the device.
the computer
16. Remember not to leave USB cable to be connected to the device and
17. Maintain and keep clean the USB connection of the device.
18. When the device is covered with foreign particles, please wipe off it with
soft cloth or clean towel and be careful not to use chemicals.
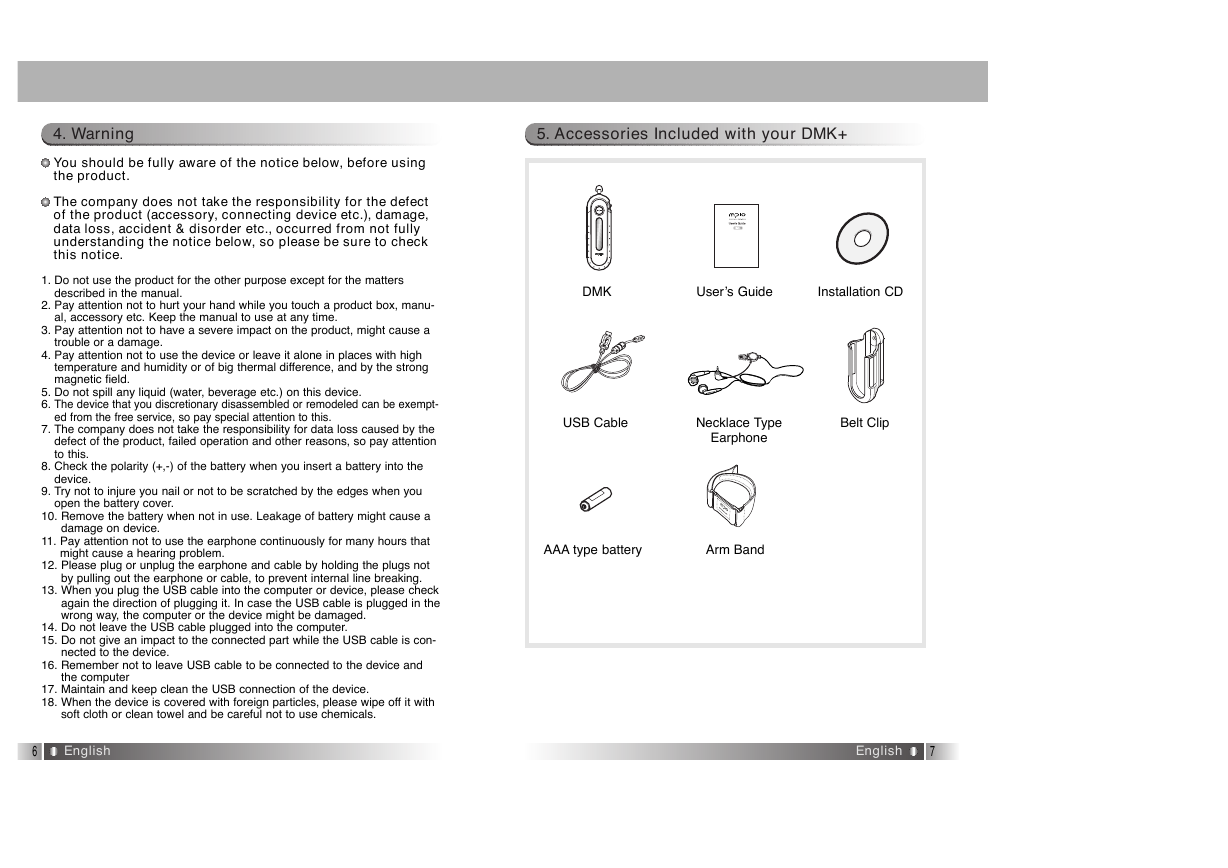
+
DMK
User’s Guide
Installation CD
USB Cable
Necklace Type
Earphone
Belt Clip
AAA type battery
Arm Band
6
English
English
7
�
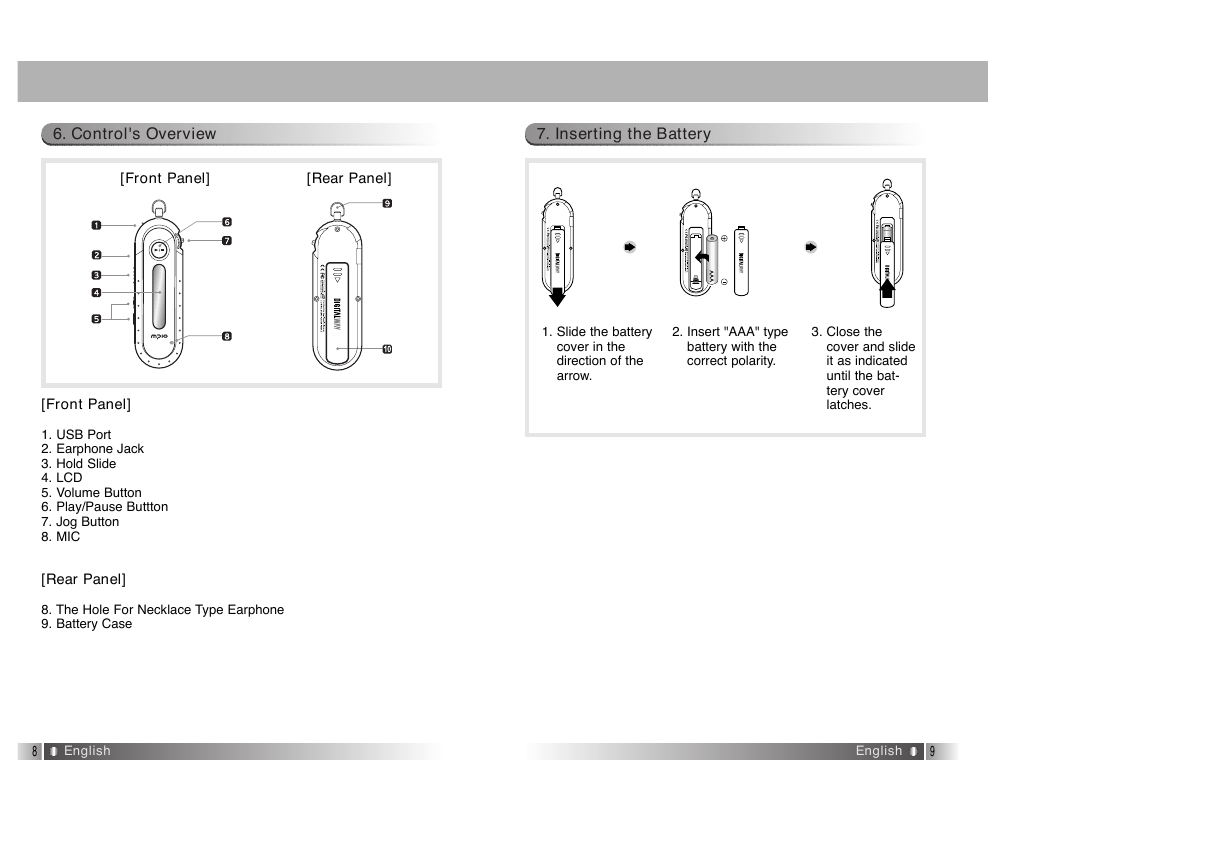
6. Control's Overview
7. Inserting the Battery
[Front Panel]
[Rear Panel]
1. Slide the battery
cover in the
direction of the
arrow.
2. Insert "AAA" type
battery with the
correct polarity.
3. Close the
cover and slide
it as indicated
until the bat-
tery cover
latches.
[Front Panel]
1. USB Port
2. Earphone Jack
3. Hold Slide
4. LCD
5. Volume Button
6. Play/Pause Buttton
7. Jog Button
8. MIC
[Rear Panel]
8. The Hole For Necklace Type Earphone
9. Battery Case
8
English
English
9
�
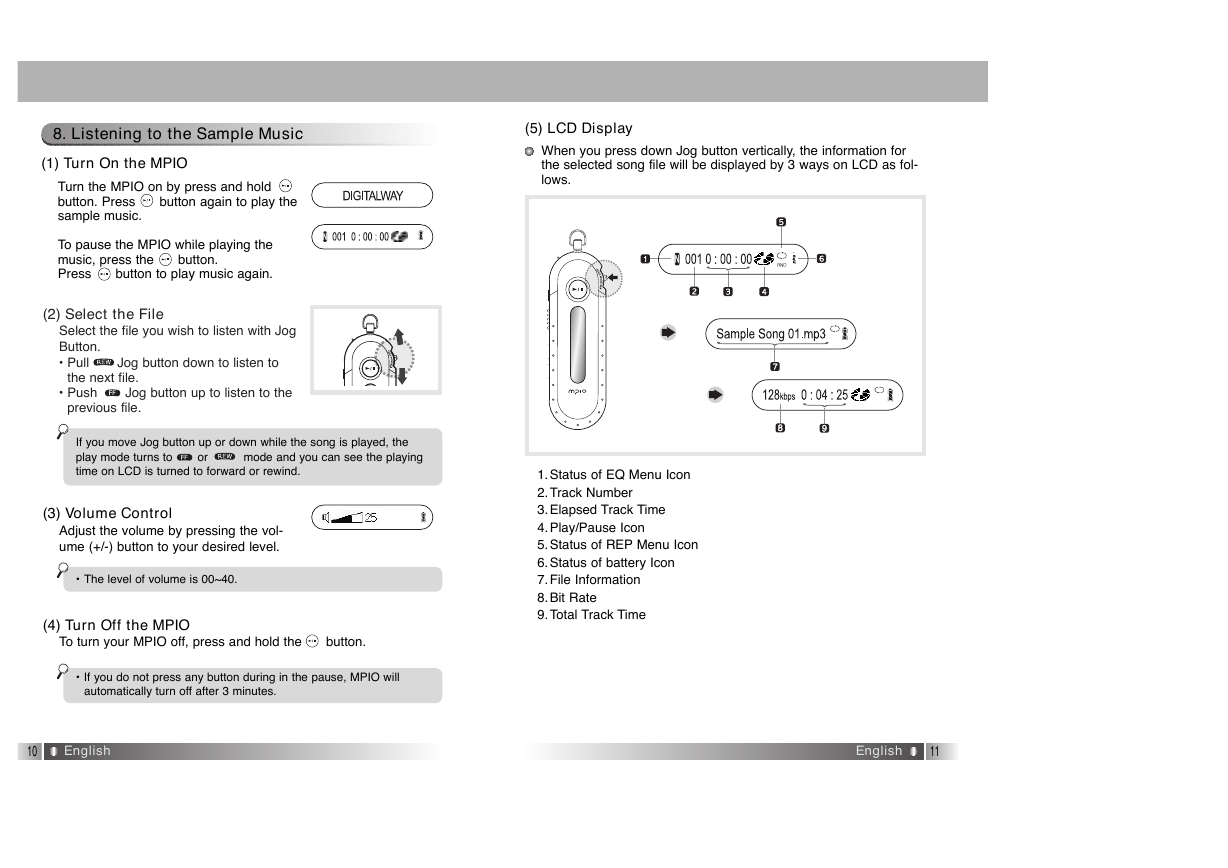
(5) LCD Display
When you press down Jog button vertically, the information for
the selected song file will be displayed by 3 ways on LCD as fol-
lows.
8. Listening to the Sample Music
(1) Turn On the MPIO
Turn the MPIO on by press and hold
button. Press button again to play the
sample music.
To pause the MPIO while playing the
music, press the button.
Press button to play music again.
(2) Select the File
Select the file you wish to listen with Jog
Button.
• Pull Jog button down to listen to
• Push Jog button up to listen to the
the next file.
previous file.
If you move Jog button up or down while the song is played, the
play mode turns to or mode and you can see the playing
time on LCD is turned to forward or rewind.
(3) Volume Control
Adjust the volume by pressing the vol-
ume (+/-) button to your desired level.
• The level of volume is 00~40.
(4) Turn Off the MPIO
To turn your MPIO off, press and hold the button.
• If you do not press any button during in the pause, MPIO will
automatically turn off after 3 minutes.
1.Status of EQ Menu Icon
2.Track Number
3.Elapsed Track Time
4.Play/Pause Icon
5.Status of REP Menu Icon
6.Status of battery Icon
7.File Information
8.Bit Rate
9.Total Track Time
10
English
English
11
�
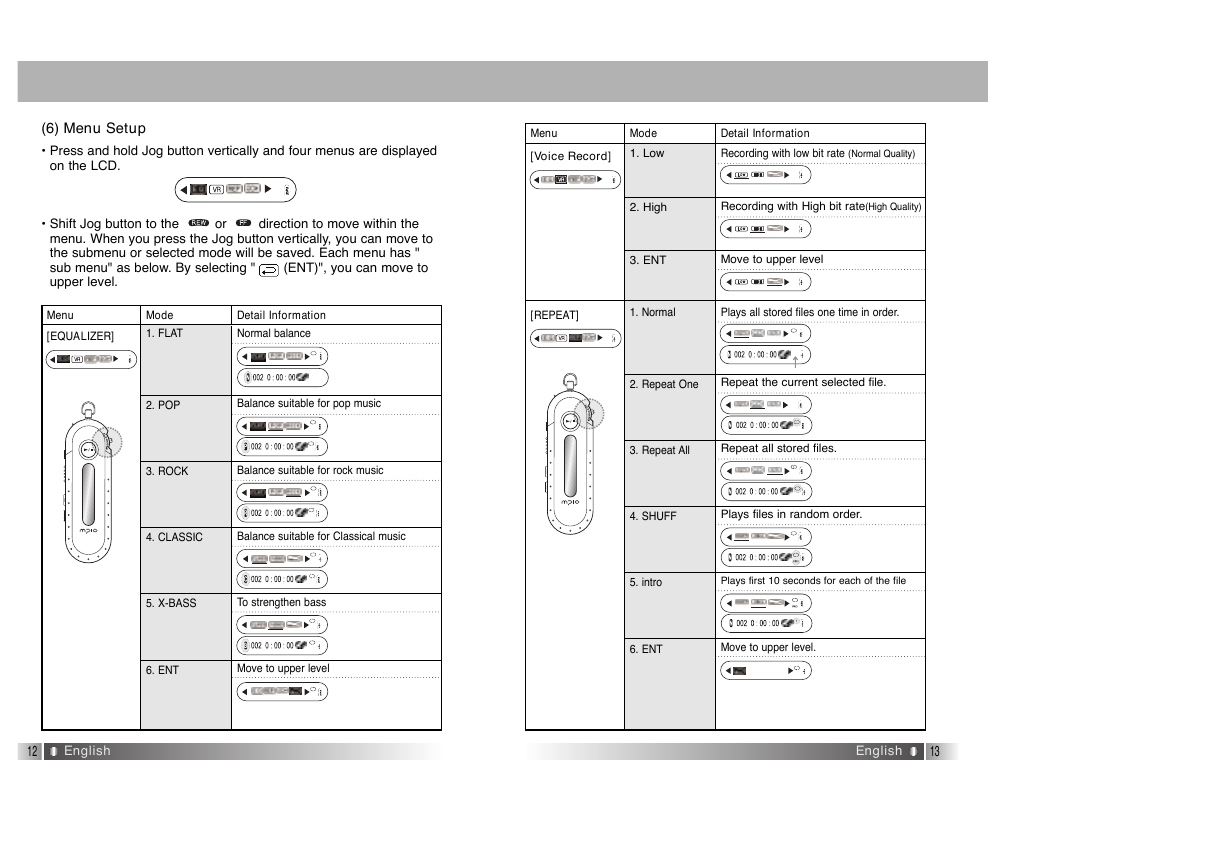
(6) Menu Setup
• Press and hold Jog button vertically and four menus are displayed
on the LCD.
Menu
[Voice Record]
Mode
1. Low
Detail Information
Recording with low bit rate (Normal Quality)
• Shift Jog button to the or direction to move within the
menu. When you press the Jog button vertically, you can move to
the submenu or selected mode will be saved. Each menu has "
sub menu" as below. By selecting " (ENT)", you can move to
upper level.
Menu
[EQUALIZER]
Mode
1. FLAT
Detail Information
Normal balance
2. High
Recording with High bit rate(High Quality)
3. ENT
Move to upper level
[REPEAT]
1. Normal
Plays all stored files one time in order.
2. POP
Balance suitable for pop music
3. ROCK
Balance suitable for rock music
4. CLASSIC
Balance suitable for Classical music
5. X-BASS
To strengthen bass
6. ENT
Move to upper level
2. Repeat One
Repeat the current selected file.
3. Repeat All
Repeat all stored files.
4. SHUFF
Plays files in random order.
5. intro
Plays first 10 seconds for each of the file
6. ENT
Move to upper level.
12
English
English
13
�
Menu
Detail Information
[B/L (Backlight)]
: Make the time of Backlight shortly
: Make the time of Backlight long
• You can adjust the time
00 Backlight Off
01-10 : 1~10 seconds
20: 20 seconds
30: 30 seconds
[Ent (Enter)]
Move to upper level
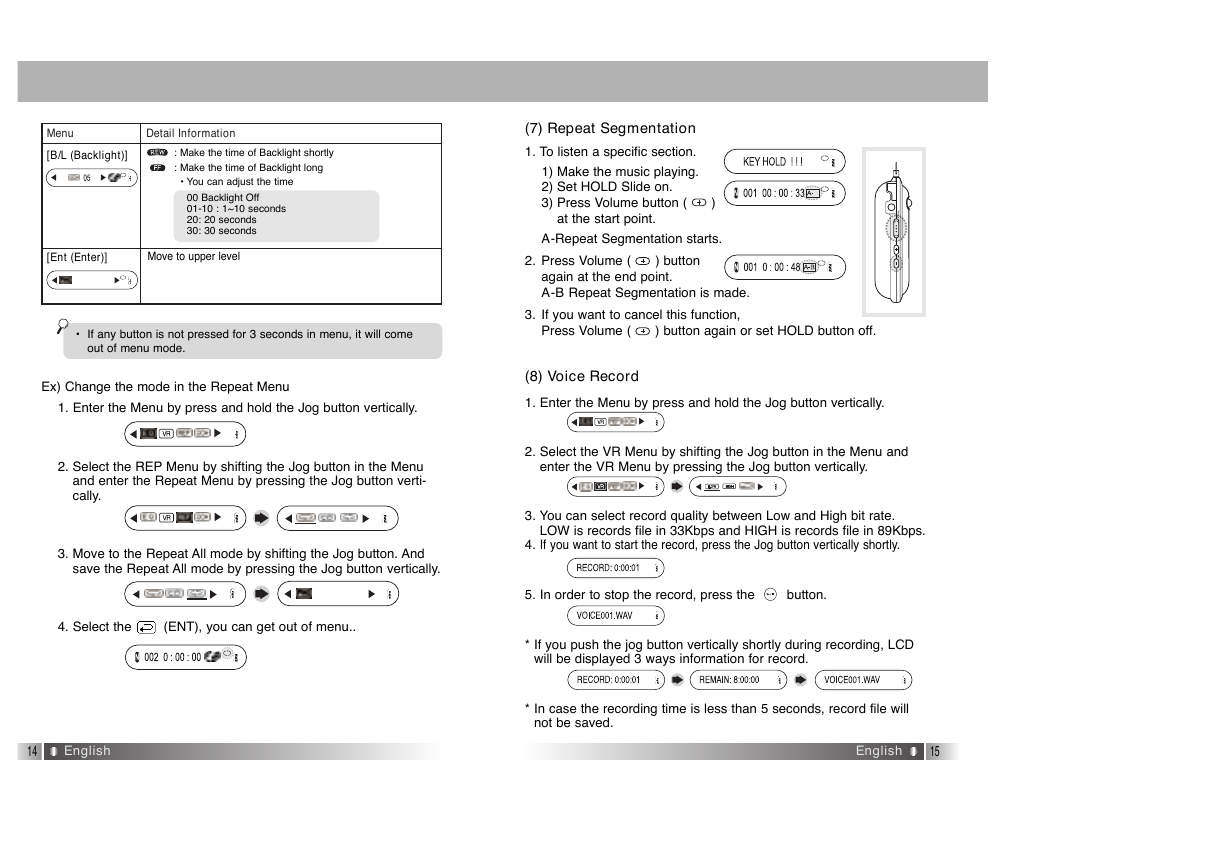
(7) Repeat Segmentation
1. To listen a specific section.
1) Make the music playing.
2) Set HOLD Slide on.
3) Press Volume button ( )
at the start point.
A-Repeat Segmentation starts.
2. Press Volume ( ) button
again at the end point.
A-B Repeat Segmentation is made.
3. If you want to cancel this function,
• If any button is not pressed for 3 seconds in menu, it will come
out of menu mode.
Ex) Change the mode in the Repeat Menu
1. Enter the Menu by press and hold the Jog button vertically.
Press Volume ( ) button again or set HOLD button off.
(8) Voice Record
1. Enter the Menu by press and hold the Jog button vertically.
2. Select the REP Menu by shifting the Jog button in the Menu
and enter the Repeat Menu by pressing the Jog button verti-
cally.
3. Move to the Repeat All mode by shifting the Jog button. And
save the Repeat All mode by pressing the Jog button vertically.
4. Select the (ENT), you can get out of menu..
14
English
2. Select the VR Menu by shifting the Jog button in the Menu and
enter the VR Menu by pressing the Jog button vertically.
3. You can select record quality between Low and High bit rate.
LOW is records file in 33Kbps and HIGH is records file in 89Kbps.
4. If you want to start the record, press the Jog button vertically shortly.
5. In order to stop the record, press the button.
* If you push the jog button vertically shortly during recording, LCD
will be displayed 3 ways information for record.
* In case the recording time is less than 5 seconds, record file will
not be saved.
English
15
�



 2023年江西萍乡中考道德与法治真题及答案.doc
 2012年重庆南川中考生物真题及答案.doc
 2013年江西师范大学地理学综合及文艺理论基础考研真题.doc
 2020年四川甘孜小升初语文真题及答案I卷.doc
 2020年注册岩土工程师专业基础考试真题及答案.doc
 2023-2024学年福建省厦门市九年级上学期数学月考试题及答案.doc
 2021-2022学年辽宁省沈阳市大东区九年级上学期语文期末试题及答案.doc
 2022-2023学年北京东城区初三第一学期物理期末试卷及答案.doc
 2018上半年江西教师资格初中地理学科知识与教学能力真题及答案.doc
 2012年河北国家公务员申论考试真题及答案-省级.doc
 2020-2021学年江苏省扬州市江都区邵樊片九年级上学期数学第一次质量检测试题及答案.doc
 2022下半年黑龙江教师资格证中学综合素质真题及答案.doc