logo资料库

SONY索尼 GPS导航设备-NV-U70T说明书.pdf

第1页 / 共216页
第2页 / 共216页
第3页 / 共216页
第4页 / 共216页
第5页 / 共216页
第6页 / 共216页
第7页 / 共216页
第8页 / 共216页
资料共216页,剩余部分请下载后查看
GB
Important notice
Getting Started
Checking the contents
Installing the unit
Installing the TMC aerial (NV-U70T/U50T only)
Location of controls
Turning the unit on
Starting up the navigation
Receiving GPS signals
Basic Operations
Menu operations
Keyboard operations
Route Searching
Setting the destination and starting guidance
Setting the destination in other ways
Guidance displays
System Settings
Using the Supplied Software
Connecting to your computer
Software features
Additional Information
Precautions
Note on LCD panel
Maintenance
Notes on unit disposal
Specifications
Troubleshooting
Resetting the unit
DE
Wichtiger Hinweis
Vorbereitungen
Überprüfen des Lieferumfangs
Installieren des Geräts
Installieren der TMC-Antenne (nur NV-U70T/U50T)
Lage und Funktion der Teile und Bedienelemente
Einschalten des Geräts
Starten der Navigation
Empfangen von GPS-Signalen
Grundfunktionen
Arbeiten mit dem Menü
Arbeiten mit der Tastatur
Routensuche
Festlegen des Ziels und Starten der Routenführung
Festlegen des Ziels auf andere Weise
Anzeigen für die Routenführung
Systemeinstellungen
Arbeiten mit der mitgelieferten Software
Anschließen an einen Computer
Funktionen der Software
Weitere Informationen
Sicherheitsmaßnahmen
Hinweis zum LCD-Bildschirm
Wartung
Hinweise zur Entsorgung des Geräts
Technische Daten
Störungsbehebung
Zurücksetzen des Geräts
FR
Avis important
Préparation
Vérification du contenu
Installation de l’appareil
Installation de l’antenne TMC (NV-U70T/U50T uniquement)
Emplacement des commandes
Mise en service de l’appareil
Démarrage de la navigation
Réception des signaux GPS
Opérations de base
Utilisation des menus
Utilisation du clavier
Recherche d’un itinéraire
Définition de la destination et démarrage du radioguidage
Définition de la destination par d’autres moyens
Ecrans de radioguidage
Réglages du système
Utilisation du logiciel fourni
Raccordement à votre ordinateur
Caractéristiques du logiciel
Informations complémentaires
Précautions
Remarque sur le panneau LCD
Entretien
Remarques sur la mise au rebut de l’appareil
Spécifications
Dépannage
Réinitialisation de l’appareil
IT
Avvertenza importante
Operazioni preliminari
Verifica del contenuto
Installazione dell’unità
Installazione dell’antenna TMC (solo NV-U70T/U50T)
Posizione dei comandi
Accensione dell’unità
Avvio della navigazione
Ricezione dei segnali GPS
Operazioni di base
Operazioni di menu
Operazioni mediante la tastiera
Ricerca del percorso
Impostazione della destinazione e avvio della guida
Altri metodi per impostare la destinazione
Schermate di guida
Impostazioni del sistema
Uso del software in dotazione
Collegamento al computer
Funzionalità software
Informazioni aggiuntive
Precauzioni
Nota sullo schermo LCD
Manutenzione
Note sullo smaltimento dell’unità
Caratteristiche tecniche
Guida alla soluzione dei problemi
Azzeramento dell’apparecchio
NL
Belangrijke kennisgeving
Aan de slag
De inhoud van de verpakking controleren
Het apparaat installeren
De TMC-antenne installeren (alleen NV-U70T/U50T)
Bedieningselementen
Het apparaat inschakelen
Het navigeren starten
GPS-signalen ontvangen
Algemene handelingen
Menubewerkingen
Bewerkingen met het toetsenbord
Routes zoeken
De bestemming instellen en de begeleiding starten
De bestemming op andere manieren instellen
Begeleidingsschermen
Systeeminstellingen
De bijgeleverde software gebruiken
Aansluiten op de computer
Softwarefuncties
Aanvullende informatie
Voorzorgsmaatregelen
Opmerking over het LCD- scherm
Onderhoud
Opmerkingen over het weggooien van het apparaat
Technische gegevens
Problemen oplossen
Het apparaat opnieuw instellen
ES
Aviso importante
Procedimientos iniciales
Comprobación del contenido
Instalación de la unidad
Instalación de la antena TMC (sólo NV-U70T/U50T)
Ubicación de los controles
Encendido de la unidad
Inicio de la navegación
Recepción de señales GPS
Operaciones básicas
Funcionamiento del menú
Operaciones con el teclado
Búsqueda de rutas
Indicación del destino e inicio de las instrucciones
Otras formas de indicar el destino
Pantallas de instrucciones
Configuración del sistema
Utilización del software suministrado
Conexión al ordenador
Funciones del software
Información adicional
Precauciones
Nota sobre la pantalla de cristal líquido
Mantenimiento
Notas sobre cómo deshacerse de la unidad
Especificaciones
Solución de problemas
Restauración de la unidad
SE
Viktigt!
Komma igång
Kontrollera innehållet
Installation av enheten
Installation av TMC-antennen (endast NV-U70T/U50T)
Kontrollernas placering
Slå på strömmen
Starta navigeringen
Ta emot GPS-signaler
Grundläggande hantering
Menyhantering
Åtgärder från tangentbordet
Ruttsökning
Ställa in resmål och startanvisningar
Andra sätt att ange resmålet
Anvisningsskärmar
Systeminställningar
Använda den medföljande programvaran
Ansluta till en dator
Funktioner i programvaran
Ytterligare information
Försiktighetsåtgärder
Angående LCD-skärmen
Underhåll
Om kassering av enheten
Tekniska data
Felsökning
Återställa enheten
PT
Aviso importante
Como começar
Verificar o conteúdo
Instalar o aparelho
Instalar a antena TMC (apenas para o NV-U70T/U50T)
Localização dos controlos
Ligar o aparelho
Iniciar a navegação
Receber os sinais GPS
Operações básicas
Utilização dos menus
Utilização do teclado
Procurar uma rota
Definir o destino e iniciar o guia de navegação
Outras maneiras de definir o destino
Ecrãs de orientação
Definições do sistema
Utilizar o software fornecido
Ligar ao computador
Funções do software
Informações adicionais
Precauções
Nota sobre o LCD
Manutenção
Notas sobre como deitar fora o aparelho
Características técnicas
Detecção de problemas
Reiniciar o aparelho
PL
Ważna uwaga
Czynności wstępne
Sprawdzanie zawartości
Instalacja urządzenia
Instalowanie anteny komunikatów TMC (dotyczy tylko urządzeń NV-U70T/U50T)
Położenie elementów sterujących
Włączanie urządzenia
Rozpoczęcie nawigacji
Odbieranie sygnałów GPS
Czynności podstawowe
Obsługa menu
Obsługa klawiatury
Wyszukiwanie trasy
Ustawianie celu i uruchamianie wskazówek
Inne sposoby ustawiania celu
Ekrany wskazówek
Ustawienia systemu
Korzystanie z dostarczonego oprogramowania
Podłączanie do komputera
Funkcje oprogramowania
Informacje dodatkowe
Środki ostrożności
Uwaga dotycząca panelu LCD
Konserwacja
Uwagi dotyczące pozbywania się urządzenia
Dane techniczne
Rozwiązywanie problemów
Zerowanie urządzenia
GR
Σηµαντικές σηµειώσεις
Πρώτα ήµατα
Έλεγς των περιεµένων
Εγκατάσταση της µνάδας
Εγκατάσταση της κεραίας TMC (µν για τα NV-U70T/U50T)
Θέσεις των ειριστηρίων
Ενεργ-π-ίηση της µνάδας
Έναρ/η της πλήγησης
Λήψη σηµάτων GPS
Βασικές λειτυργίες
Λειτυργίες µενύ
Λειτ-υργίες πληκτρλγίυ
Ανα"ήτηση διαδρµών
Ρύθµιση τ-υ πρ--ρισµ-ύ και έναρ/η της καθδήγησης
Άλλ-ι τρπ-ι -ρισµ-ύ τ-υ πρρισµύ
Fθνες καθδήγησης
Ρυθµίσεις συστήµατς
%ρήση τ-υ παρεµεν-υ λγισµικύ
Σύνδεση µε τν υπλγιστή
Λειτυργίες τυ λγισµικύ
Πρσθετες πληρφρίες
Πρφυλά/εις
Ση[είωση σετικά [ε την θνη LCD
Συντήρηση
Σηµειώσεις σετικά µε την απρριψη της µνάδας
Πρδιαγραφές
Αντιµετώπιση πρληµάτων
Επαναφρά της µνάδας
P e r s o n a l i N a v g a t i o n S y s t e m 2-676-680-12 (1) Quick Start Guide GB Anleitung zur schnellen Inbetriebnahme DE Guide de démarrage rapide FR Personal Navigation System Guida rapida all’uso IT Beknopte handleiding NL Guía de inicio rápido ES Snabbstartguide SE Guia de iniciação rápida PT Skrócona instrukcja obsługi PL Oδηγς σύντoης εκκίνησης GR NV-U70T NV-U50T NV-U50 © 2005 Sony Corporation
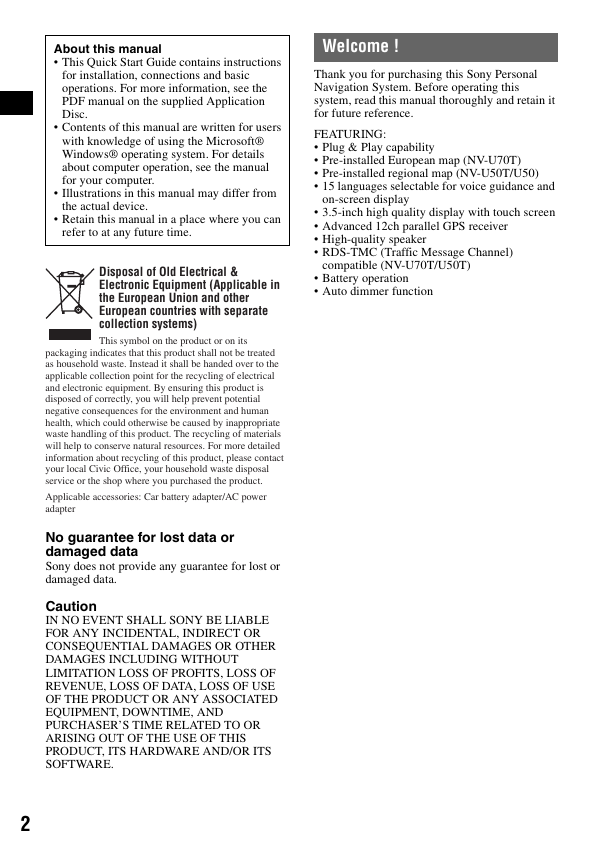
Welcome ! Thank you for purchasing this Sony Personal Navigation System. Before operating this system, read this manual thoroughly and retain it for future reference. FEATURING: Plug & Play capability Pre-installed European map (NV-U70T) Pre-installed regional map (NV-U50T/U50) 15 languages selectable for voice guidance and on-screen display 3.5-inch high quality display with touch screen Advanced 12ch parallel GPS receiver High-quality speaker RDS-TMC (Traffic Message Channel) compatible (NV-U70T/U50T) Battery operation Auto dimmer function About this manual This Quick Start Guide contains instructions for installation, connections and basic operations. For more information, see the PDF manual on the supplied Application Disc. Contents of this manual are written for users with knowledge of using the Microsoft® Windows® operating system. For details about computer operation, see the manual for your computer. Illustrations in this manual may differ from the actual device. Retain this manual in a place where you can refer to at any future time. Disposal of Old Electrical & Electronic Equipment (Applicable in the European Union and other European countries with separate collection systems) This symbol on the product or on its packaging indicates that this product shall not be treated as household waste. Instead it shall be handed over to the applicable collection point for the recycling of electrical and electronic equipment. By ensuring this product is disposed of correctly, you will help prevent potential negative consequences for the environment and human health, which could otherwise be caused by inappropriate waste handling of this product. The recycling of materials will help to conserve natural resources. For more detailed information about recycling of this product, please contact your local Civic Office, your household waste disposal service or the shop where you purchased the product. Applicable accessories: Car battery adapter/AC power adapter No guarantee for lost data or damaged data Sony does not provide any guarantee for lost or damaged data. Caution IN NO EVENT SHALL SONY BE LIABLE FOR ANY INCIDENTAL, INDIRECT OR CONSEQUENTIAL DAMAGES OR OTHER DAMAGES INCLUDING WITHOUT LIMITATION LOSS OF PROFITS, LOSS OF REVENUE, LOSS OF DATA, LOSS OF USE OF THE PRODUCT OR ANY ASSOCIATED EQUIPMENT, DOWNTIME, AND PURCHASER’S TIME RELATED TO OR ARISING OUT OF THE USE OF THIS PRODUCT, ITS HARDWARE AND/OR ITS SOFTWARE. 2
Table of Contents Important notice. . . . . . . . . . . . . . . . . . . . . . . . . 4 System Settings Getting Started 6 Checking the contents . . . . . . . . . . . . . . . . . . . . 6 Installing the unit. . . . . . . . . . . . . . . . . . . . . . . . 7 Installing the TMC aerial (NV-U70T/U50T only). . . . . . . . . . . . . . . . . 9 Location of controls. . . . . . . . . . . . . . . . . . . . . 10 Turning the unit on . . . . . . . . . . . . . . . . . . . . . 11 Starting up the navigation . . . . . . . . . . . . . . . . 11 Receiving GPS signals . . . . . . . . . . . . . . . . . . 11 Basic Operations 12 Menu operations . . . . . . . . . . . . . . . . . . . . . . . 12 Keyboard operations . . . . . . . . . . . . . . . . . . . . 12 Route Searching 13 Setting the destination and starting guidance . . . . . . . . . . . . . . . . . . . . . 13 Setting the destination in other ways. . . . . . . . 14 Guidance displays . . . . . . . . . . . . . . . . . . . . . . 15 Using the Supplied Software 16 17 Connecting to your computer. . . . . . . . . . . 17 Software features . . . . . . . . . . . . . . . . . . . . 18 Additional Information 18 Precautions . . . . . . . . . . . . . . . . . . . . . . . . . . . 18 Note on LCD panel . . . . . . . . . . . . . . . . . . . . . 18 Maintenance . . . . . . . . . . . . . . . . . . . . . . . . . . 18 Notes on unit disposal. . . . . . . . . . . . . . . . . . . 18 Specifications . . . . . . . . . . . . . . . . . . . . . . . . . 19 Troubleshooting . . . . . . . . . . . . . . . . . . . . . . . 20 Resetting the unit . . . . . . . . . . . . . . . . . . . . 20 3
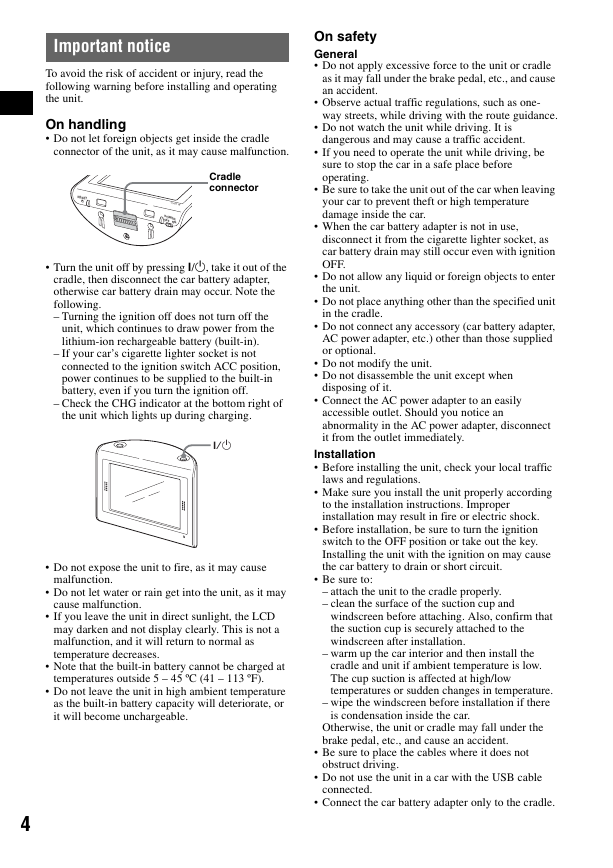
Important notice To avoid the risk of accident or injury, read the following warning before installing and operating the unit. On handling • Do not let foreign objects get inside the cradle connector of the unit, as it may cause malfunction. Cradle connector RESET CHG P OW E R O F F O N Turn the unit off by pressing ?/1, take it out of the cradle, then disconnect the car battery adapter, otherwise car battery drain may occur. Note the following. – Turning the ignition off does not turn off the unit, which continues to draw power from the lithium-ion rechargeable battery (built-in). – If your car’s cigarette lighter socket is not connected to the ignition switch ACC position, power continues to be supplied to the built-in battery, even if you turn the ignition off. – Check the CHG indicator at the bottom right of the unit which lights up during charging. ?/1 Do not expose the unit to fire, as it may cause Do not let water or rain get into the unit, as it may malfunction. cause malfunction. If you leave the unit in direct sunlight, the LCD may darken and not display clearly. This is not a malfunction, and it will return to normal as temperature decreases. Note that the built-in battery cannot be charged at temperatures outside 5 – 45 ºC (41 – 113 ºF). Do not leave the unit in high ambient temperature as the built-in battery capacity will deteriorate, or it will become unchargeable. 4 On safety General Do not apply excessive force to the unit or cradle as it may fall under the brake pedal, etc., and cause an accident. Observe actual traffic regulations, such as one- way streets, while driving with the route guidance. Do not watch the unit while driving. It is dangerous and may cause a traffic accident. If you need to operate the unit while driving, be sure to stop the car in a safe place before operating. Be sure to take the unit out of the car when leaving your car to prevent theft or high temperature damage inside the car. When the car battery adapter is not in use, disconnect it from the cigarette lighter socket, as car battery drain may still occur even with ignition OFF. Do not allow any liquid or foreign objects to enter Do not use the unit in a car with the USB cable obstruct driving. connected. Connect the car battery adapter only to the cradle. the unit. in the cradle. Do not place anything other than the specified unit Do not connect any accessory (car battery adapter, AC power adapter, etc.) other than those supplied or optional. Do not modify the unit. Do not disassemble the unit except when disposing of it. Connect the AC power adapter to an easily accessible outlet. Should you notice an abnormality in the AC power adapter, disconnect it from the outlet immediately. Installation Before installing the unit, check your local traffic laws and regulations. Make sure you install the unit properly according to the installation instructions. Improper installation may result in fire or electric shock. Before installation, be sure to turn the ignition switch to the OFF position or take out the key. Installing the unit with the ignition on may cause the car battery to drain or short circuit. Be sure to: – attach the unit to the cradle properly. – clean the surface of the suction cup and windscreen before attaching. Also, confirm that the suction cup is securely attached to the windscreen after installation. – warm up the car interior and then install the cradle and unit if ambient temperature is low. The cup suction is affected at high/low temperatures or sudden changes in temperature. – wipe the windscreen before installation if there is condensation inside the car. Otherwise, the unit or cradle may fall under the brake pedal, etc., and cause an accident. Be sure to place the cables where it does not
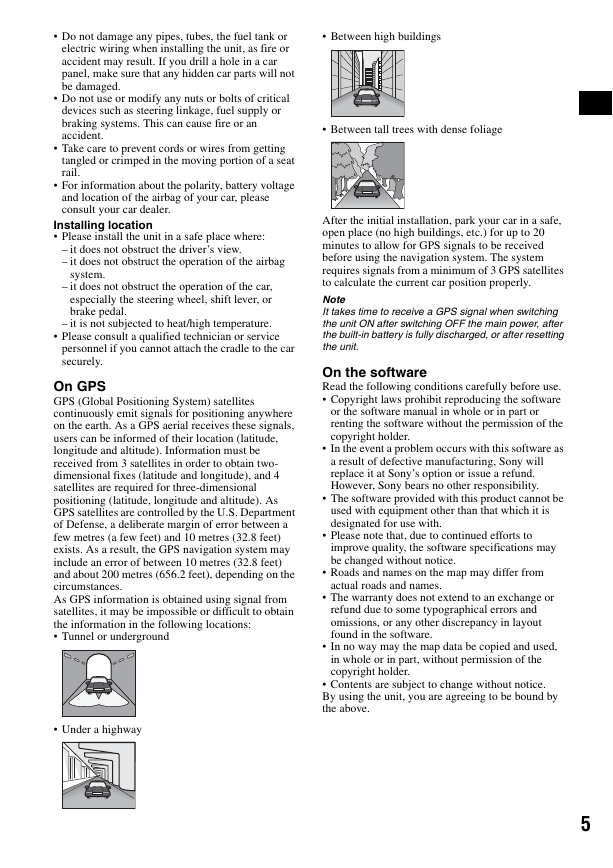
Do not damage any pipes, tubes, the fuel tank or electric wiring when installing the unit, as fire or accident may result. If you drill a hole in a car panel, make sure that any hidden car parts will not be damaged. Do not use or modify any nuts or bolts of critical devices such as steering linkage, fuel supply or braking systems. This can cause fire or an accident. Take care to prevent cords or wires from getting tangled or crimped in the moving portion of a seat rail. For information about the polarity, battery voltage and location of the airbag of your car, please consult your car dealer. Installing location Please install the unit in a safe place where: – it does not obstruct the driver’s view. – it does not obstruct the operation of the airbag system. – it does not obstruct the operation of the car, especially the steering wheel, shift lever, or brake pedal. – it is not subjected to heat/high temperature. Please consult a qualified technician or service personnel if you cannot attach the cradle to the car securely. On GPS GPS (Global Positioning System) satellites continuously emit signals for positioning anywhere on the earth. As a GPS aerial receives these signals, users can be informed of their location (latitude, longitude and altitude). Information must be received from 3 satellites in order to obtain two- dimensional fixes (latitude and longitude), and 4 satellites are required for three-dimensional positioning (latitude, longitude and altitude). As GPS satellites are controlled by the U.S. Department of Defense, a deliberate margin of error between a few metres (a few feet) and 10 metres (32.8 feet) exists. As a result, the GPS navigation system may include an error of between 10 metres (32.8 feet) and about 200 metres (656.2 feet), depending on the circumstances. As GPS information is obtained using signal from satellites, it may be impossible or difficult to obtain the information in the following locations: Tunnel or underground Under a highway Between high buildings Between tall trees with dense foliage After the initial installation, park your car in a safe, open place (no high buildings, etc.) for up to 20 minutes to allow for GPS signals to be received before using the navigation system. The system requires signals from a minimum of 3 GPS satellites to calculate the current car position properly. Note It takes time to receive a GPS signal when switching the unit ON after switching OFF the main power, after the built-in battery is fully discharged, or after resetting the unit. On the software Read the following conditions carefully before use. Copyright laws prohibit reproducing the software or the software manual in whole or in part or renting the software without the permission of the copyright holder. In the event a problem occurs with this software as a result of defective manufacturing, Sony will replace it at Sony’s option or issue a refund. However, Sony bears no other responsibility. The software provided with this product cannot be used with equipment other than that which it is designated for use with. Please note that, due to continued efforts to improve quality, the software specifications may be changed without notice. Roads and names on the map may differ from actual roads and names. The warranty does not extend to an exchange or refund due to some typographical errors and omissions, or any other discrepancy in layout found in the software. In no way may the map data be copied and used, in whole or in part, without permission of the copyright holder. Contents are subject to change without notice. By using the unit, you are agreeing to be bound by the above. 5
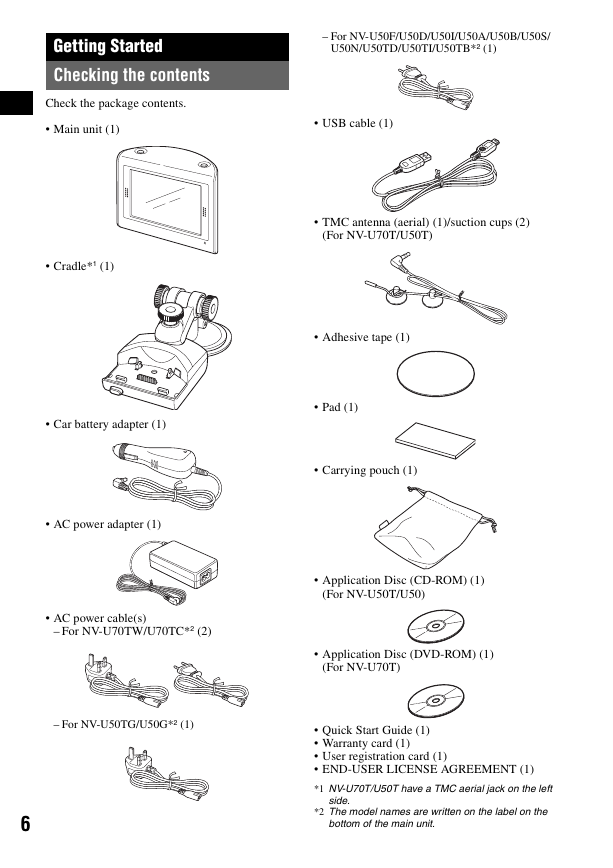
Getting Started Checking the contents Check the package contents. Main unit (1) – For NV-U50F/U50D/U50I/U50A/U50B/U50S/ U50N/U50TD/U50TI/U50TB*2 (1) USB cable (1) Cradle*1 (1) Car battery adapter (1) AC power adapter (1) AC power cable(s) – For NV-U70TW/U70TC*2 (2) – For NV-U50TG/U50G*2 (1) 6 TMC antenna (aerial) (1)/suction cups (2) (For NV-U70T/U50T) Adhesive tape (1) Pad (1) Carrying pouch (1) Application Disc (CD-ROM) (1) (For NV-U50T/U50) Application Disc (DVD-ROM) (1) (For NV-U70T) Quick Start Guide (1) Warranty card (1) User registration card (1) END-USER LICENSE AGREEMENT (1) *1 NV-U70T/U50T have a TMC aerial jack on the left side. *2 The model names are written on the label on the bottom of the main unit.
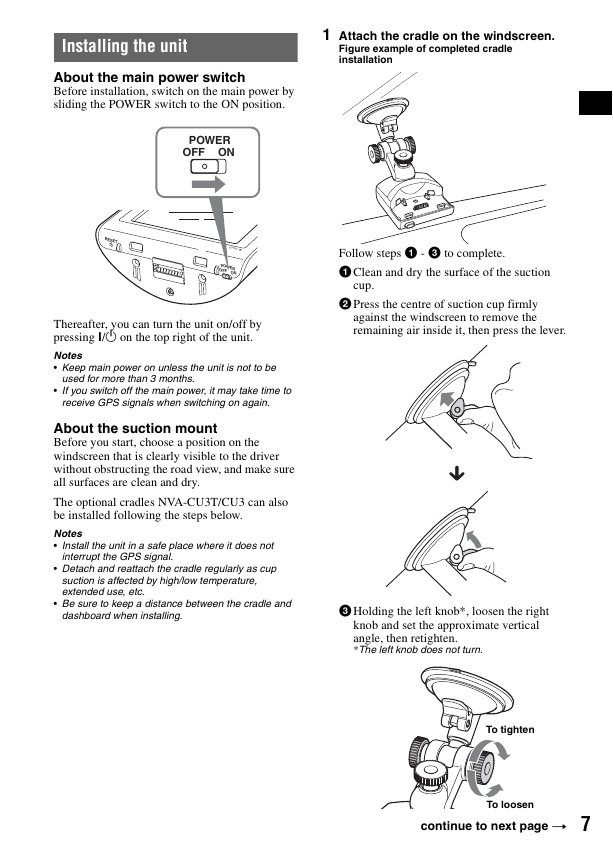
Installing the unit About the main power switch Before installation, switch on the main power by sliding the POWER switch to the ON position. POWER ON OFF RESET CHG P OW E R O F F O N Thereafter, you can turn the unit on/off by pressing ?/1 on the top right of the unit. Notes • Keep main power on unless the unit is not to be used for more than 3 months. If you switch off the main power, it may take time to receive GPS signals when switching on again. About the suction mount Before you start, choose a position on the windscreen that is clearly visible to the driver without obstructing the road view, and make sure all surfaces are clean and dry. The optional cradles NVA-CU3T/CU3 can also be installed following the steps below. Notes Install the unit in a safe place where it does not interrupt the GPS signal. Detach and reattach the cradle regularly as cup suction is affected by high/low temperature, extended use, etc. Be sure to keep a distance between the cradle and dashboard when installing. 1 Attach the cradle on the windscreen. Figure example of completed cradle installation Follow steps 1 - 3 to complete. 1 Clean and dry the surface of the suction cup. 2 Press the centre of suction cup firmly against the windscreen to remove the remaining air inside it, then press the lever. x 3 Holding the left knob*, loosen the right knob and set the approximate vertical angle, then retighten. *The left knob does not turn. To tighten To loosen continue to next page t 7
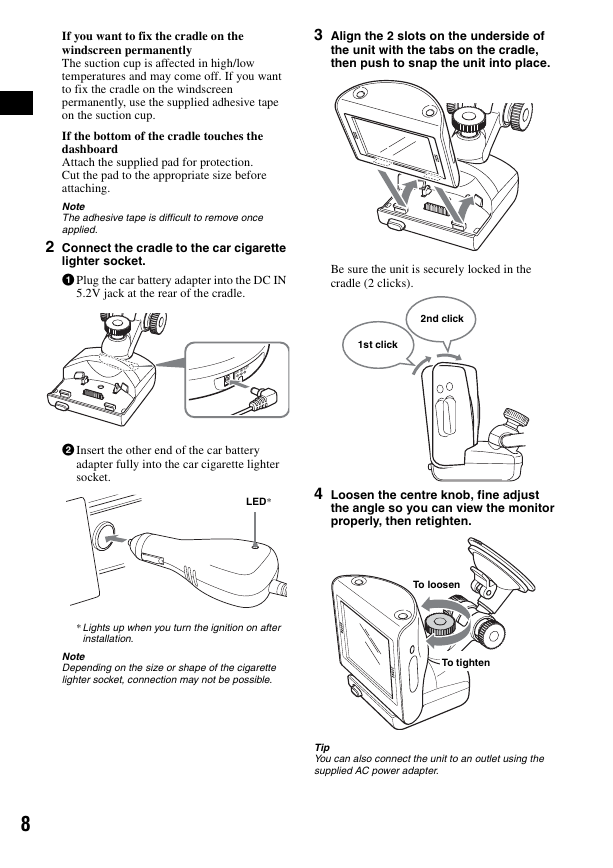
3 Align the 2 slots on the underside of the unit with the tabs on the cradle, then push to snap the unit into place. If you want to fix the cradle on the windscreen permanently The suction cup is affected in high/low temperatures and may come off. If you want to fix the cradle on the windscreen permanently, use the supplied adhesive tape on the suction cup. If the bottom of the cradle touches the dashboard Attach the supplied pad for protection. Cut the pad to the appropriate size before attaching. Note The adhesive tape is difficult to remove once applied. 2 Connect the cradle to the car cigarette lighter socket. 1 Plug the car battery adapter into the DC IN 5.2V jack at the rear of the cradle. Be sure the unit is securely locked in the cradle (2 clicks). 2nd click 1st click DC IN 5.2V 2 Insert the other end of the car battery adapter fully into the car cigarette lighter socket. LED* 4 Loosen the centre knob, fine adjust the angle so you can view the monitor properly, then retighten. *Lights up when you turn the ignition on after installation. Note Depending on the size or shape of the cigarette lighter socket, connection may not be possible. To loosen To tighten Tip You can also connect the unit to an outlet using the supplied AC power adapter. 8
分享到:
收藏