i
English..................................... 1
................................... 15
................................ 29
................................ 43
Türkçe ................................... 57
....................................... 72
�
ii
�
ZEN Neeon 2 QSB.fm Page 1 Friday, June 30, 2006 9:38 AM
English
Congratulations!
Thank you for purchasing Creative’s multiformat player, Creative ZEN™
Neeon 2. Read on to learn how to get started with your new player!
To get the most out of your player, also read the comprehensive User’s
Guide on your Installation and Applications CD.
12
1
2
3
4
2
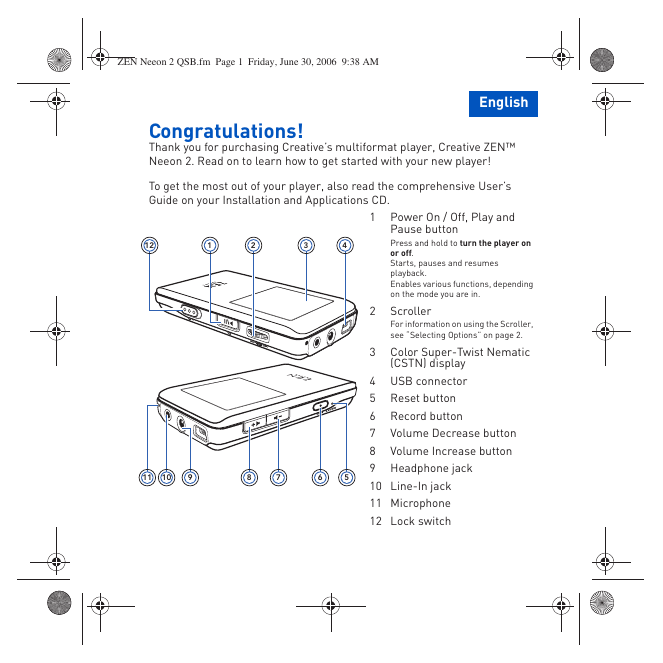
1 Power On / Off, Play and
Pause button
Press and hold to turn the player on
or off.
Starts, pauses and resumes
playback.
Enables various functions, depending
on the mode you are in.
Scroller
For information on using the Scroller,
see “Selecting Options” on page 2.
3 Color Super-Twist Nematic
(CSTN) display
4 USB connector
5 Reset button
6 Record button
7
8
9 Headphone jack
10 Line-In jack
11 Microphone
12 Lock switch
Volume Decrease button
Volume Increase button
11
10
9
8
7
6
5
�
ZEN Neeon 2 QSB.fm Page 2 Friday, June 30, 2006 9:38 AM
2 Selecting Options
Selecting Options
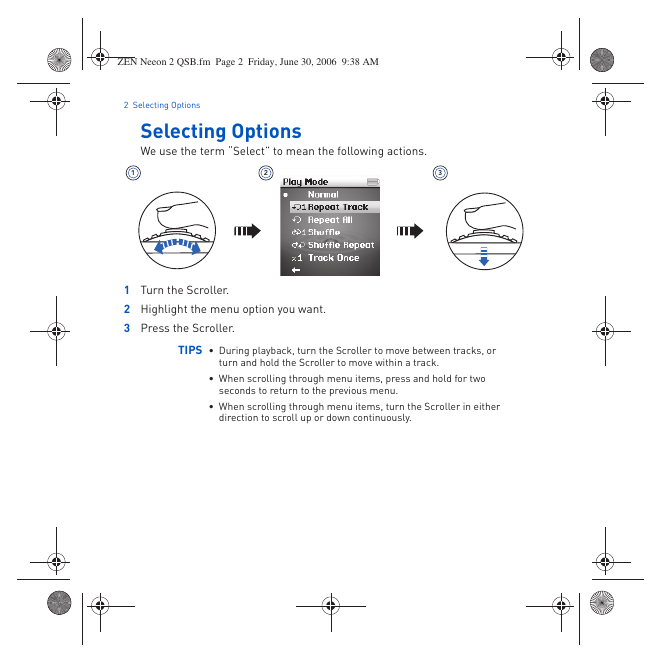
We use the term “Select” to mean the following actions.
1
2
3
1 Turn the Scroller.
2 Highlight the menu option you want.
3 Press the Scroller.
TIPS • During playback, turn the Scroller to move between tracks, or
turn and hold the Scroller to move within a track.
• When scrolling through menu items, press and hold for two
seconds to return to the previous menu.
• When scrolling through menu items, turn the Scroller in either
direction to scroll up or down continuously.
�
ZEN Neeon 2 QSB.fm Page 3 Friday, June 30, 2006 9:38 AM
3 Getting Started
Getting Started
Step 1: Set Up the Software
WARNING DO NOT connect your player to your computer before setting up
the software.
NOTES You need an Internet connection to register your product.
1 Turn on your computer.
You must log in as an administrator in Microsoft® Windows® before you can
set up the software. For more information, refer to your operating system’s
online Help.
2 Insert the Installation and Applications CD into your CD-ROM/DVD-ROM
drive. Your CD should start automatically. If it does not, follow the steps
below:
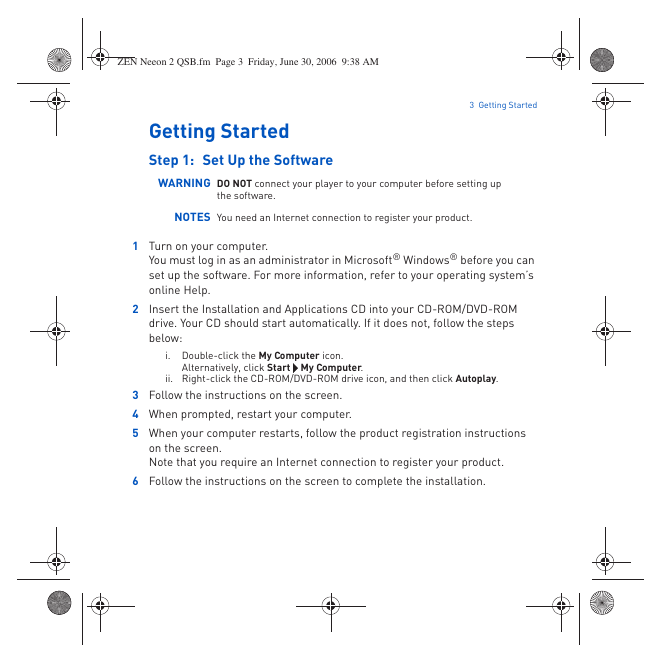
i. Double-click the My Computer icon.
Alternatively, click Start
My Computer.
ii. Right-click the CD-ROM/DVD-ROM drive icon, and then click Autoplay.
3 Follow the instructions on the screen.
4 When prompted, restart your computer.
5 When your computer restarts, follow the product registration instructions
on the screen.
Note that you require an Internet connection to register your product.
6 Follow the instructions on the screen to complete the installation.
�
ZEN Neeon 2 QSB.fm Page 4 Friday, June 30, 2006 9:38 AM
4 Charge the Battery
Step 2: Charge the Battery
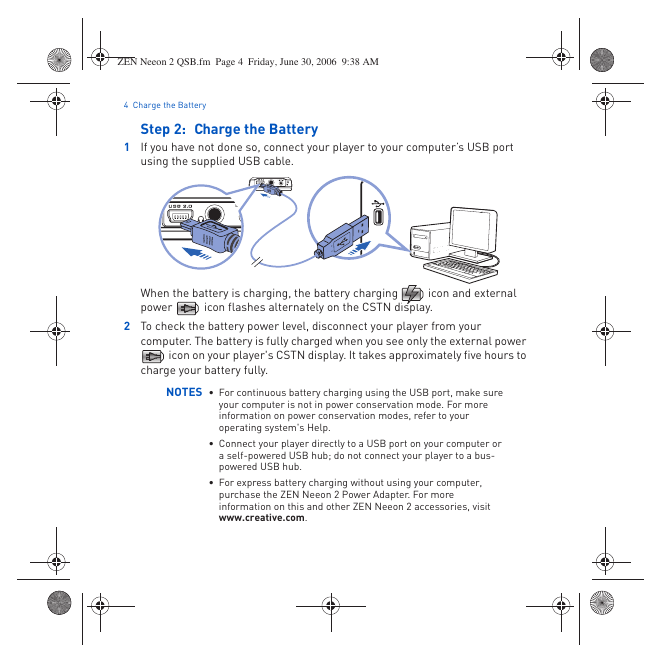
1 If you have not done so, connect your player to your computer’s USB port
using the supplied USB cable.
LIN
When the battery is charging, the battery charging
power
icon flashes alternately on the CSTN display.
icon and external
2 To check the battery power level, disconnect your player from your
computer. The battery is fully charged when you see only the external power
icon on your player's CSTN display. It takes approximately five hours to
charge your battery fully.
NOTES • For continuous battery charging using the USB port, make sure
your computer is not in power conservation mode. For more
information on power conservation modes, refer to your
operating system's Help.
• Connect your player directly to a USB port on your computer or
a self-powered USB hub; do not connect your player to a bus-
powered USB hub.
• For express battery charging without using your computer,
purchase the ZEN Neeon 2 Power Adapter. For more
information on this and other ZEN Neeon 2 accessories, visit
www.creative.com.
�
ZEN Neeon 2 QSB.fm Page 5 Friday, June 30, 2006 9:38 AM
5 Select Your Menu Language
Step 3: Select Your Menu Language
1 If your player is not turned on, press and hold the Play/Pause
until your player turns on.
button
2 When you turn on your player for the first time, the menu will be in English.
To change the language:
i. Press the Scroller.
ii. Select Menu.
iii. Select System.
iv. Select Language.
v. Select a language.
3 After you have finished using your player, press and hold the Play/Pause
button until the screen turns off.
Step 4: Transfer Content
Transfer music, picture, video and other files from your CD collection or
computer to your player.
To start Creative Media Explorer
1 Make sure your player is connected to your computer as shown on page 4.
2 Double-click the ZEN Neeon 2 Media Explorer
icon on the desktop.
To transfer or ‘rip’ music from your CD collection
1 In Creative Media Explorer, click the Rip Audio CDs
2 Follow the instructions on the screen. If you are connected to the Internet,
button.
album information is automatically retrieved.
�
ZEN Neeon 2 QSB.fm Page 6 Friday, June 30, 2006 9:38 AM
6 Transfer Content
To transfer music, videos, pictures, playlists or data from your
computer
1 In Creative Media Explorer, click the Browse Data
2 Locate your media files, and using the drag-and-drop method, copy them to
button.
the following folders in your player:
• MUSIC folder for audio files
• VIDEO folder for video files
• PICTURES folder for pictures
• PLAYLIST for playlists
NOTES • WMA files with Digital Rights Management technology cannot
be copied to your player using Windows Explorer. You can only
do so with applications that support this technology, such as
Creative Media Explorer or Windows Media® Player 10 (WMP
10) and above.
WMP 10 is included with your player. For more information on
WMP10, refer to the User’s Guide on your Installation &
Applications CD or visit Creative's 24-hour self-help Knowledge
Base (see page 12 for details).
• Your player only supports pictures in the JPEG (JPG) format.
• All video formats require conversion before they can be played
on your ZEN Neeon 2. Use Creative Media Explorer only to
convert your videos. Note that if you choose to skip a video file
during file transfer, it will not be transferred to your player.
• Your player only supports playlists created in Creative Media
Explorer.
• Data files can be copied to any location in your player.
�



 2023年江西萍乡中考道德与法治真题及答案.doc
 2012年重庆南川中考生物真题及答案.doc
 2013年江西师范大学地理学综合及文艺理论基础考研真题.doc
 2020年四川甘孜小升初语文真题及答案I卷.doc
 2020年注册岩土工程师专业基础考试真题及答案.doc
 2023-2024学年福建省厦门市九年级上学期数学月考试题及答案.doc
 2021-2022学年辽宁省沈阳市大东区九年级上学期语文期末试题及答案.doc
 2022-2023学年北京东城区初三第一学期物理期末试卷及答案.doc
 2018上半年江西教师资格初中地理学科知识与教学能力真题及答案.doc
 2012年河北国家公务员申论考试真题及答案-省级.doc
 2020-2021学年江苏省扬州市江都区邵樊片九年级上学期数学第一次质量检测试题及答案.doc
 2022下半年黑龙江教师资格证中学综合素质真题及答案.doc