IInnssttaalllll UUttiilliitt
Instal Utilityyy
UUsseerr GGuu
i
User Guiideddee
NavCom Technology, Inc.
20780 Madrona Avenue
Torrance, CA 90503
USA
Tel: +1 310.381.2000
Fax: +1 310. 381.2001
sales@navcomtech.com
www.navcomtech.com
�
INSTALL UTILITY User Guide
Table of Contents
Table of Contents.................................................................................................................ii
Table of Figures ..................................................................................................................iii
Notices .................................................................................................................................iv
Copyright................................................................................................................................................................. iv
Trademarks .............................................................................................................................................................. iv
User Notice .............................................................................................................................................................. iv
Use of this Document ............................................................................................................................................... iv
Introduction.....................................................................................................5
Install Utility Overview................................................................................................................. 5
Receiver Setup Parameters........................................................................................................... 5
Chapter 2 Establishing Communications & Software Upload......................................6
Getting Connected...................................................................................................................... 6
Module Software Upload Procedure ............................................................................................ 7
Options & LBM License Upload Procedure................................................................................... 8
Chapter 1
ii
�
INSTALL UTILITY User Guide
Table of Figures
Figure 1: Install Utility Main Window Initial View ................................................................................................................ 6
Figure 2: PC COM Port Configuration................................................................................................................................. 6
Figure 3: Install Utility Main Window Port Configuration View ............................................................................................ 6
Figure 4: Software Confirmation ......................................................................................................................................... 7
Figure 5: Successfully Load Software Modules..................................................................................................................... 7
Figure 6: Options Confirmation .......................................................................................................................................... 8
iii
�
Notices
Install Utility User Guide
96-310012-3001
Revision B
INSTALL UTILITY User Guide
November 2003
Copyright
2003 by NavCom Technology, Inc.
All rights reserved. No part of this work or the computer programs described herein may be
reproduced or stored or transmitted by any means, without the written permission of the copyright
holders. Translation in any language is prohibited without the permission of the copyright holders.
Trademarks
The ‘find your way’, ‘NavCom Globe’ and NAVCOM TECHNOLOGY logos are trademarks of
NavCom Technology, Inc. StarFire is a registered trademark of Deere & Company. All other
product and brand names are trademarks or registered trademarks of their respective holders.
User Notice
NAVCOM TECHNOLOGY, INC. SHALL NOT BE RESPONSIBLE FOR ANY INACCURACIES, ERRORS, OR
OMISSIONS IN INFORMATION CONTAINED HEREIN, INCLUDING, BUT NOT LIMITED TO,
INFORMATION OBTAINED FROM THIRD PARTY SOURCES, SUCH AS PUBLICATIONS OF OTHER
COMPANIES, THE PRESS, OR COMPETITIVE DATA ORGANIZATIONS.
THIS PUBLICATION IS MADE AVAILABLE ON AN “AS IS” BASIS AND NAVCOM TECHNOLOGY, INC.
SPECIFICALLY DISCLAIMS ALL ASSOCIATED WARRANTIES, WHETHER EXPRESS OR IMPLIED. IN NO
EVENT WILL NAVCOM TECHNOLOGY, INC. BE LIABLE FOR DIRECT, INDIRECT, SPECIAL,
INCIDENTAL, OR CONSEQUENTIAL DAMAGES IN CONNECTION WITH THE USE OF OR RELIANCE
ON THE MATERIAL CONTAINED IN THIS PUBLICATION, EVEN IF ADVISED OF THE POSSIBILITY OF
SUCH DAMAGES. NAVCOM TECHNOLOGY, INC. RESERVES THE RIGHT TO MAKE IMPROVEMENTS
OR CHANGES TO THIS PUBLICATION AND THE PRODUCTS AND SERVICES HEREIN DESCRIBED AT
ANY TIME, WITHOUT NOTICE OR OBLIGATION.
Use of this Document
This User Guide is intended to be used by someone familiar with the concepts of GPS and satellite
surveying equipment.
Note indicates additional information to make better use of the product
Indicates a caution, care, and/or safety situation.
Revisions to this User Guide can be obtained in a digital format from support.navcomtech.com
iv
�
INSTALL UTILITY User Guide
Chapter 1
Install Utility Overview
Introduction
Install Utility is designed to make the uploading of software into NavCom Technology, Inc. GPS
products user friendly. By answering a few questions, the software for all of the internal hardware
modules will be updated. The user also has the flexibility to upload the software for any single
module if desired.
New software will normally be distributed via email along with the Install.EXE executable, and an
Install.INI file. The EXE and the INI file must reside in the same folder and it is suggested that the
software and/or options/license files be placed in the same folder.
It is important to isolate previous versions of the EXE, and INI files. Although the EXE file most likely
will not change, the INI file is specifically written for the version of software supplied with the Install
program. It is recommended that a unique folder be created that will hold each different version of
software received. This also will allow the reinstallation of a previous version for troubleshooting
purposes if required.
After clicking on the Install Utility icon, the utility automatically reads the available serial ports (i.e
RS-232 ports) from the Windows registry. You will then be allowed to configure the Install Utility to
conform to the PC COM Port of your choosing. After the connection between the receiver and the
PC has been established, the Install Utility will automatically read the receiver configuration and
display it in the main Install Utility window.
You will then be allowed to browse to the folder where the new software is stored and update your
receiver software, your receiver options, and/or your StarFire license.
Receiver Setup Parameters
Install Utility does not require any unique receiver settings. Any configuration that has been set in
the receiver prior to the upload will be restored after the upload is complete.
1 - 5
�
Chapter 2
Getting Connected
Establishing Communications & Software Upload
INSTALL UTILITY User Guide
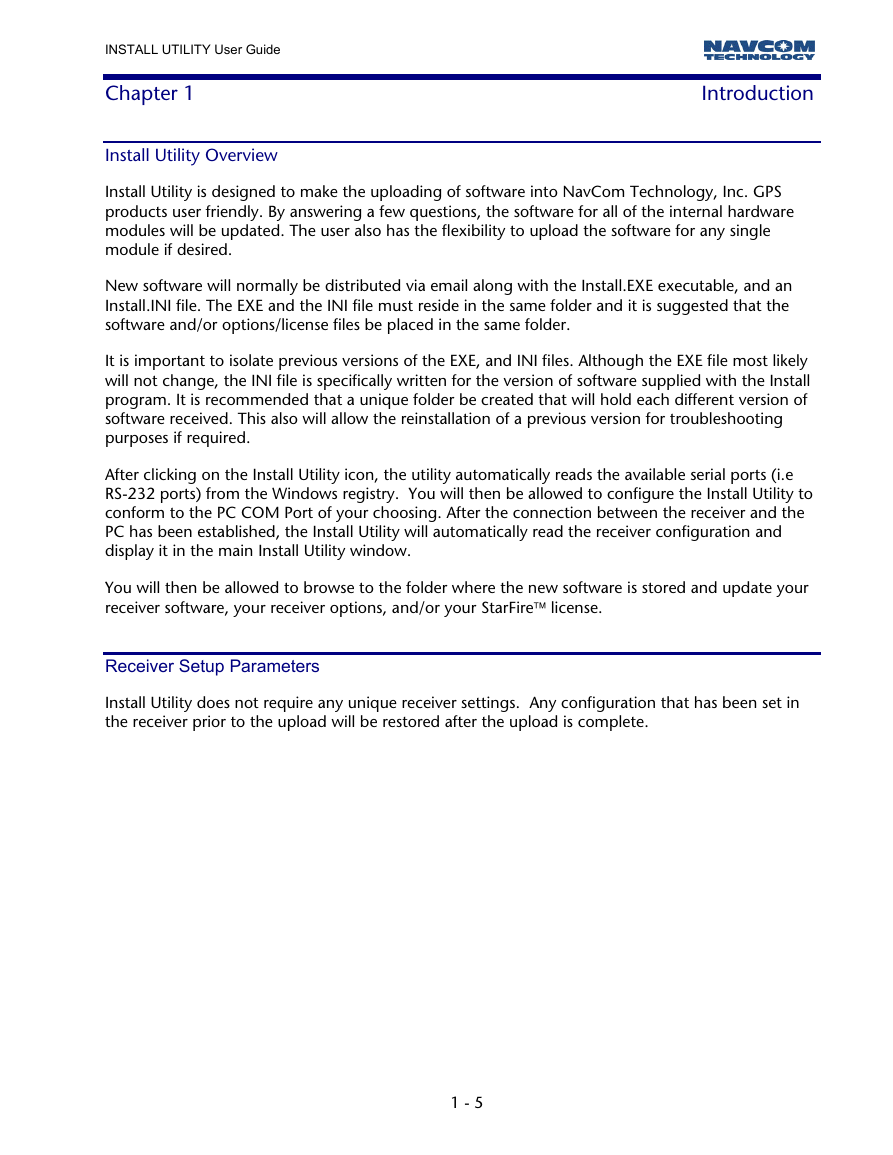
In order to execute Install Utility double click on the icon. Once Install Utility is active
communications with the GPS system must be established by pressing the Configure COM Port
button on the main Install Utility window, see Figure 1.
Figure 1: Install Utility Main Window Initial View
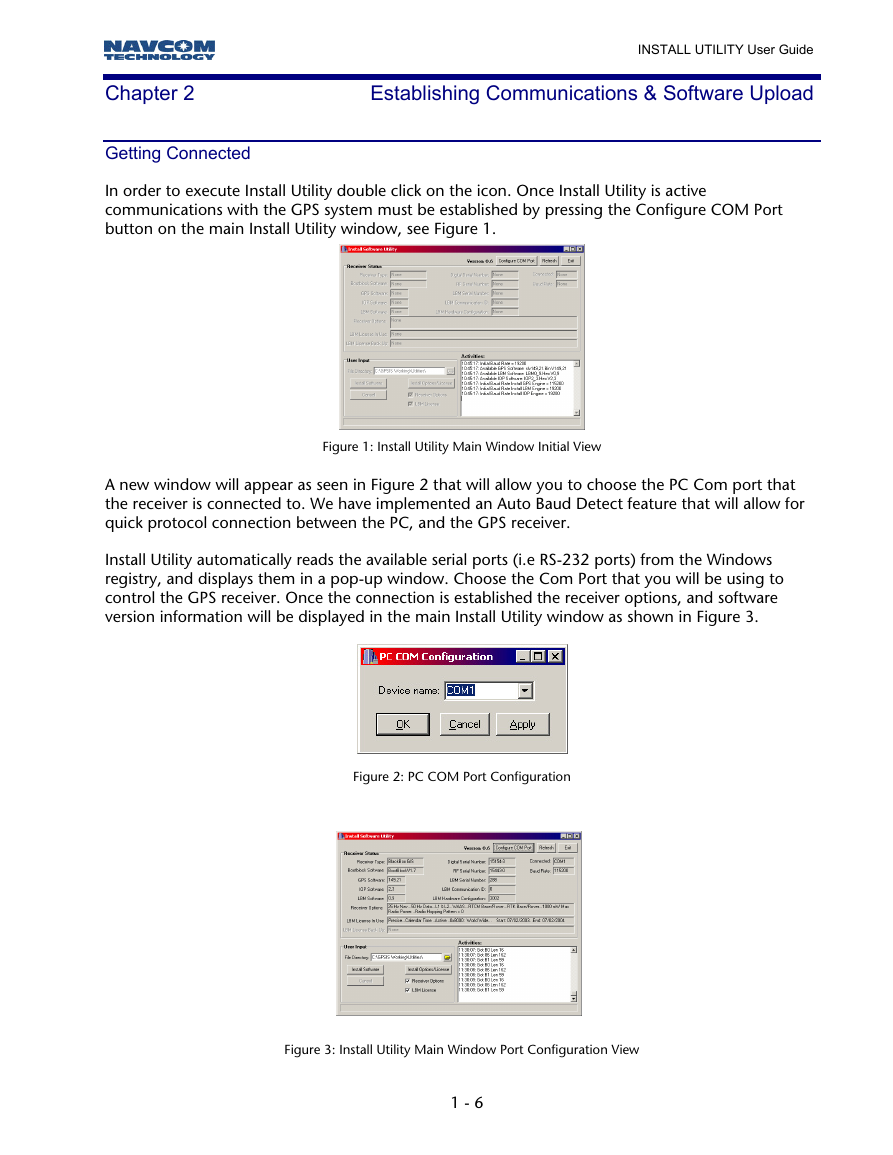
A new window will appear as seen in Figure 2 that will allow you to choose the PC Com port that
the receiver is connected to. We have implemented an Auto Baud Detect feature that will allow for
quick protocol connection between the PC, and the GPS receiver.
Install Utility automatically reads the available serial ports (i.e RS-232 ports) from the Windows
registry, and displays them in a pop-up window. Choose the Com Port that you will be using to
control the GPS receiver. Once the connection is established the receiver options, and software
version information will be displayed in the main Install Utility window as shown in Figure 3.
Figure 2: PC COM Port Configuration
Figure 3: Install Utility Main Window Port Configuration View
1 - 6
�
INSTALL UTILITY User Guide
Module Software Upload Procedure
At this point in the Receiver Status area of Figure 3, you can review all of the options available to
your particular receiver. The Activities area shows which messages are being output from the
receiver, and will show upload status information during the process. If you also have an Options file
that will upgrade your receiver options, or a StarFire LBM license file for upload check the
appropriate box as seen in Figure 3. Click on the Browse icon to path your way to the new software
files.
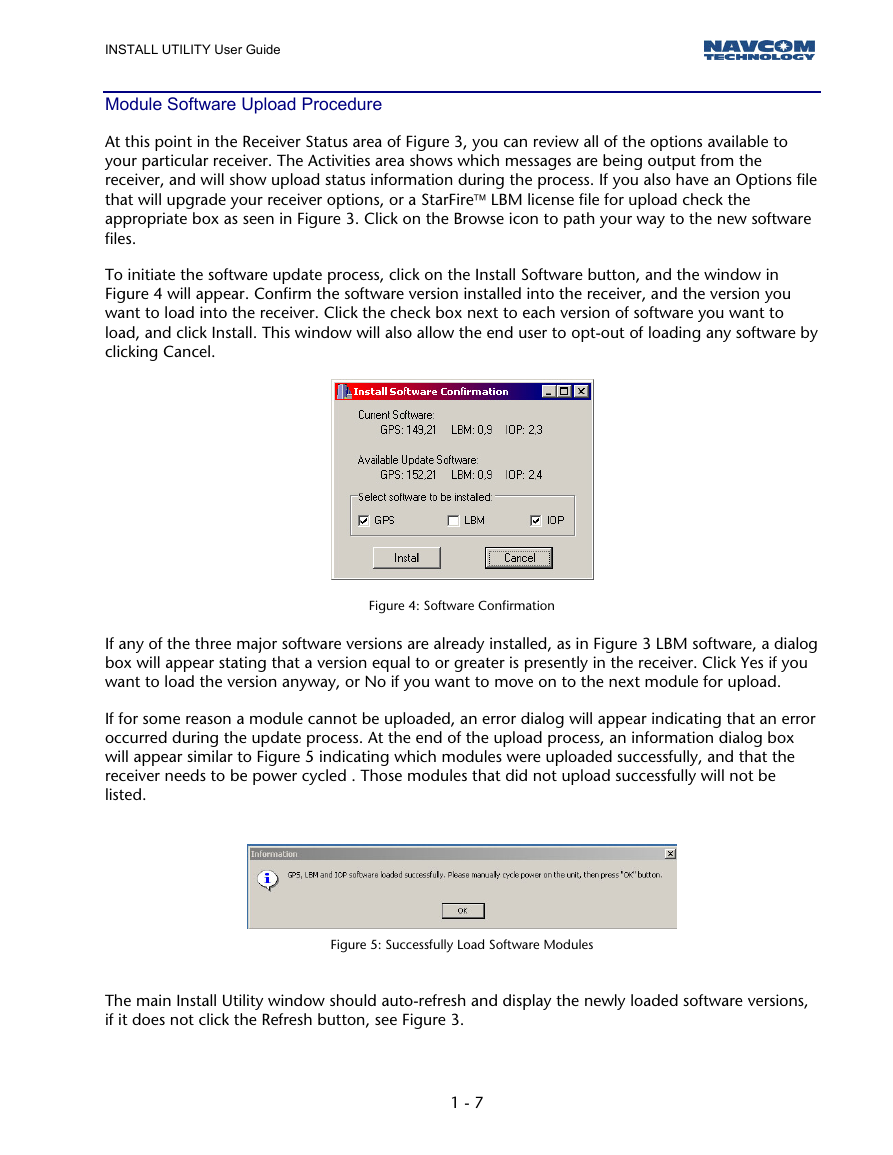
To initiate the software update process, click on the Install Software button, and the window in
Figure 4 will appear. Confirm the software version installed into the receiver, and the version you
want to load into the receiver. Click the check box next to each version of software you want to
load, and click Install. This window will also allow the end user to opt-out of loading any software by
clicking Cancel.
Figure 4: Software Confirmation
If any of the three major software versions are already installed, as in Figure 3 LBM software, a dialog
box will appear stating that a version equal to or greater is presently in the receiver. Click Yes if you
want to load the version anyway, or No if you want to move on to the next module for upload.
If for some reason a module cannot be uploaded, an error dialog will appear indicating that an error
occurred during the update process. At the end of the upload process, an information dialog box
will appear similar to Figure 5 indicating which modules were uploaded successfully, and that the
receiver needs to be power cycled . Those modules that did not upload successfully will not be
listed.
Figure 5: Successfully Load Software Modules
The main Install Utility window should auto-refresh and display the newly loaded software versions,
if it does not click the Refresh button, see Figure 3.
1 - 7
�
Options & LBM License Upload Procedure
INSTALL UTILITY User Guide
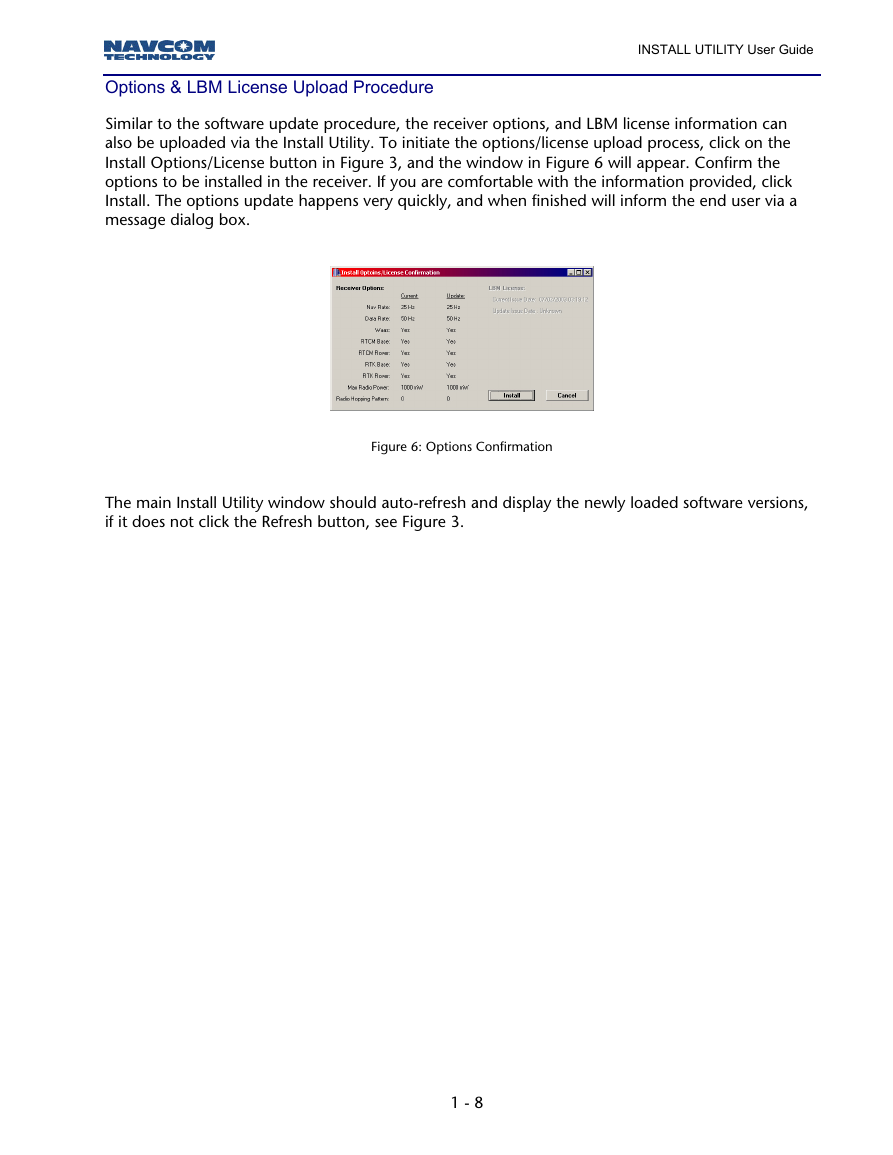
Similar to the software update procedure, the receiver options, and LBM license information can
also be uploaded via the Install Utility. To initiate the options/license upload process, click on the
Install Options/License button in Figure 3, and the window in Figure 6 will appear. Confirm the
options to be installed in the receiver. If you are comfortable with the information provided, click
Install. The options update happens very quickly, and when finished will inform the end user via a
message dialog box.
Figure 6: Options Confirmation
The main Install Utility window should auto-refresh and display the newly loaded software versions,
if it does not click the Refresh button, see Figure 3.
1 - 8
�




 2023年江西萍乡中考道德与法治真题及答案.doc
 2012年重庆南川中考生物真题及答案.doc
 2013年江西师范大学地理学综合及文艺理论基础考研真题.doc
 2020年四川甘孜小升初语文真题及答案I卷.doc
 2020年注册岩土工程师专业基础考试真题及答案.doc
 2023-2024学年福建省厦门市九年级上学期数学月考试题及答案.doc
 2021-2022学年辽宁省沈阳市大东区九年级上学期语文期末试题及答案.doc
 2022-2023学年北京东城区初三第一学期物理期末试卷及答案.doc
 2018上半年江西教师资格初中地理学科知识与教学能力真题及答案.doc
 2012年河北国家公务员申论考试真题及答案-省级.doc
 2020-2021学年江苏省扬州市江都区邵樊片九年级上学期数学第一次质量检测试题及答案.doc
 2022下半年黑龙江教师资格证中学综合素质真题及答案.doc