Application Note: Zynq-7000 AP SoC
Using VxWorks 7 BSP with the
Zynq-7000 AP SoC
Authors: Uwe Gertheinrich, Simon George, Kester Aernoudt, John Linn, and
Upender Cherukupally
XAPP1258 (v1.0) May 8, 2015
Summary
VxWorks® is a multicore-capable Real-Time Operating System (RTOS), commonly used in fully
featured embedded subsystems where a commercial runtime software and tool chain solution
is required. Supporting a variety of CPU architectures, most notably the ARM Cortex™-A9
MPCore as available in the All Programmable Zynq®-7000 SoC platform. This application note
focusses on using the all new (circa 2014) VxWorks 7 offering on this platform, for guidance on
using the maturing VxWorks 6.9 release refer to XAPP1158 [Ref 1].
Introduction
This application note comprises the following major sections:
Source Build Project – Creation, Configuration and Build
Kernel Image Project – Creation, Configuration and Build
Target Bring-Up – Local and Network Boot
Software Application (Generic) – Creation, Development and Debug
Software Application (Peripheral Access) – Creation, Development and Debug (ZC702 Only)
• VxWorks Project Types
•
•
•
•
•
• Appendix A: Development Environment Installation
• Appendix B: Customizing uBoot for the Avnet Mini-ITX Development Kit
Hardware and Software Requirements
Hardware Requirements (Optional)
1. Xilinx ZC702 Development Kit (XC7Z020-1CLG484)
2. Avnet Mini-ITX Development Kit (XC7Z045-2FFG900)
Software Requirements
1. Wind River Workbench 4.0
(See Appendix A: Development Environment Installation for installation instructions.)
2. TFTP server application, such as tftpd32
3. Serial communication utility, such as Tera Term
XAPP1258 (v1.0) May 8, 2015
www.xilinx.com
1
�
VxWorks Project Types
VxWorks Project Types
VxWorks Source Build (VSB)
These are the kernel libraries. VxWorks 6.9 and previous versions ship with standard prebuilt
libraries, but it might be useful to change the configuration/sources of a VSB to rebuild them
for a specific need.
You must build custom libraries if you want to vary from the default binaries shipped with your
platform. For example, if you want to change the default settings for endianness, enable SMP
support, or enable real-time process support, you must specify the appropriate options and
build custom libraries. To build custom libraries, you must create, configure, and compile a
VxWorks source build (VSB) project.
VxWorks Image Project (VIP)
This is the image that you build and run on the target. It contains the kernel, BSP, architecture
support, and VxWorks middleware (stacks, standard programs, etc.). It might also contain a
specific type of read-only file system that is linked with the image (romfs).
A VxWorks image project (VIP) is used to create a version of VxWorks using components based
on the precompiled libraries provided in the VxWorks installation. A VIP can use the standard
components that are delivered with binary libraries, or it can be based on a VxWorks source
build (VSB) project.
Downloadable Kernel Module (DKM)
This is similar to kernel modules in Linux (binaries that you can load and unload on-the-fly to
add symbols to the kernel). This can be used to dynamically load applications/drivers that run
in kernel space.
You can use DKM projects to manage and build modules that exist in the kernel space. You can
separately build the modules, run, and debug them on a target running VxWorks, loading,
unloading, and reloading on-the-fly. Once your development work is complete, the modules
can be statically linked into the kernel, or they can use a file system if one is present.
XAPP1258 (v1.0) May 8, 2015
www.xilinx.com
2
�
Source Build Project – Creation, Configuration and Build
Source Build Project – Creation, Configuration and Build
This section explains how to create, configure and build a VxWorks Source Build (VSB) image
from the Zynq-7000 BSP that is natively installed with the Wind River environment. Such must
be created before creating a VxWorks kernel image. These steps explain how to achieve this:
Invoke Wind River Workbench and open a new or existing workspace.
1.
2. Select File > New > Project. The new project wizard opens.
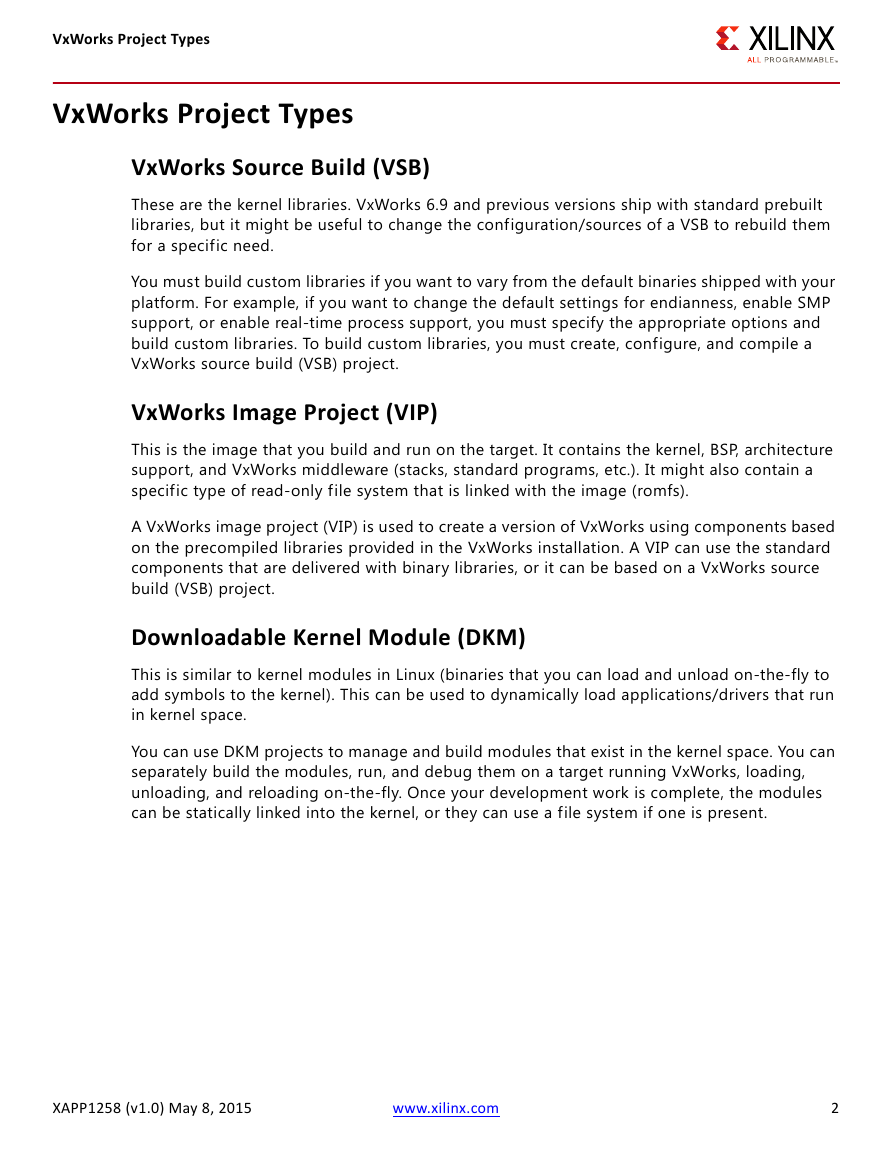
3. Under VxWorks 7, select the VxWorks Source Build Project, as shown in Figure 1.
X-Ref Target - Figure 1
Figure 1:
Selecting the VxWorks Source Build Project
XAPP1258 (v1.0) May 8, 2015
www.xilinx.com
3
�
Source Build Project – Creation, Configuration and Build
3. Click Next. The New VxWorks Source Build Project wizard dialog box opens, as shown in
Figure 2.
X-Ref Target - Figure 2
Figure 2: New VxWorks Source Build Project Wizard Dialog Box
4. Enter a project name, for example, Xilinx_Zynq7k_BSP, and click Next.
x1258_30_050715
RECOMMENDED: It is highly recommended that this be located outside of your workspace to enable
reuse across developments – it is a 'one off build stage' and build times can approach 10-20 minutes.
XAPP1258 (v1.0) May 8, 2015
www.xilinx.com
4
�
Source Build Project – Creation, Configuration and Build
5. Select the appropriate Zynq BSP in the BSP: drop down menu, as shown in Figure 3. This
would be xlnx_zynq7k_?_?_?_? | avnet_mini_itx_7z_?_?_?_? for the
pre-installed BSPs. Click Finish.
Note: BSP versions evolve and might be updated from that which is available at time of publication
of this application note. Select that which is most suitable to your development.
X-Ref Target - Figure 3
Figure 3:
Selecting the BSP and Creating Source Build Project for the Zynq-7000 AP SoC
After a few seconds, the BSP project is created in the Project Explorer window.
x1258_03_050115
6. Right-click Xilinx_Zynq7k_BSP and select the Properties option.
7. The Properties view for Xilinx_Zynq7k_BSP wizard opens. Click Build Properties and change
the Build command to make -jN where N is the number of cores in your host machine. This
speeds up the build time. Give the N value with respect to the host machine configuration
and click Apply.
XAPP1258 (v1.0) May 8, 2015
www.xilinx.com
5
�
Source Build Project – Creation, Configuration and Build
8. A confirmation wizard then opens, select Yes and then click OK. This reduces the BSP build
time.
9. Now build the VSB Project. Right-click the project (Xilinx_Zynq7k_BSP) in the Project
Explorer window and select the Build Project option. A parallel build enable confirmation
box is launched, select Yes.
10. It takes 10 -20 minutes for the BSP build process to complete. After completing the build
process, create the VxWorks kernel image by following the procedures in the following
section.
Note: At time of publication, there are some minor ignorable build errors. Wind River is working on
clearing these issues
XAPP1258 (v1.0) May 8, 2015
www.xilinx.com
6
�
Kernel Image Project – Creation, Configuration and Build
Kernel Image Project – Creation, Configuration and Build
This section explains how to create a VxWorks kernel image from the VxWorks Source Build
Project (VSB) created in the previous stage. It also explains how to configure the VxWorks kernel
for the specific implementation requirements.
1.
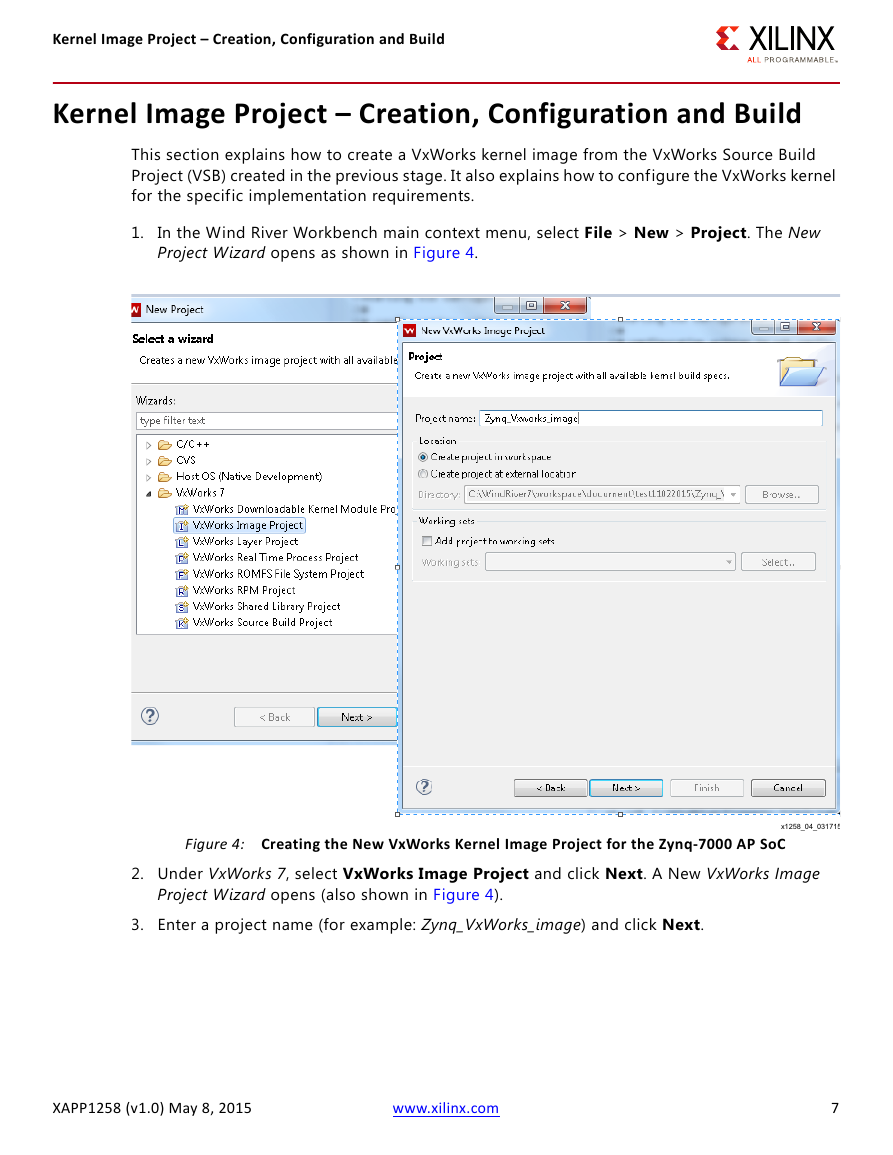
In the Wind River Workbench main context menu, select File > New > Project. The New
Project Wizard opens as shown in Figure 4.
X-Ref Target - Figure 4
Figure 4: Creating the New VxWorks Kernel Image Project for the Zynq-7000 AP SoC
2. Under VxWorks 7, select VxWorks Image Project and click Next. A New VxWorks Image
Project Wizard opens (also shown in Figure 4).
3. Enter a project name (for example: Zynq_VxWorks_image) and click Next.
XAPP1258 (v1.0) May 8, 2015
www.xilinx.com
7
�
Kernel Image Project – Creation, Configuration and Build
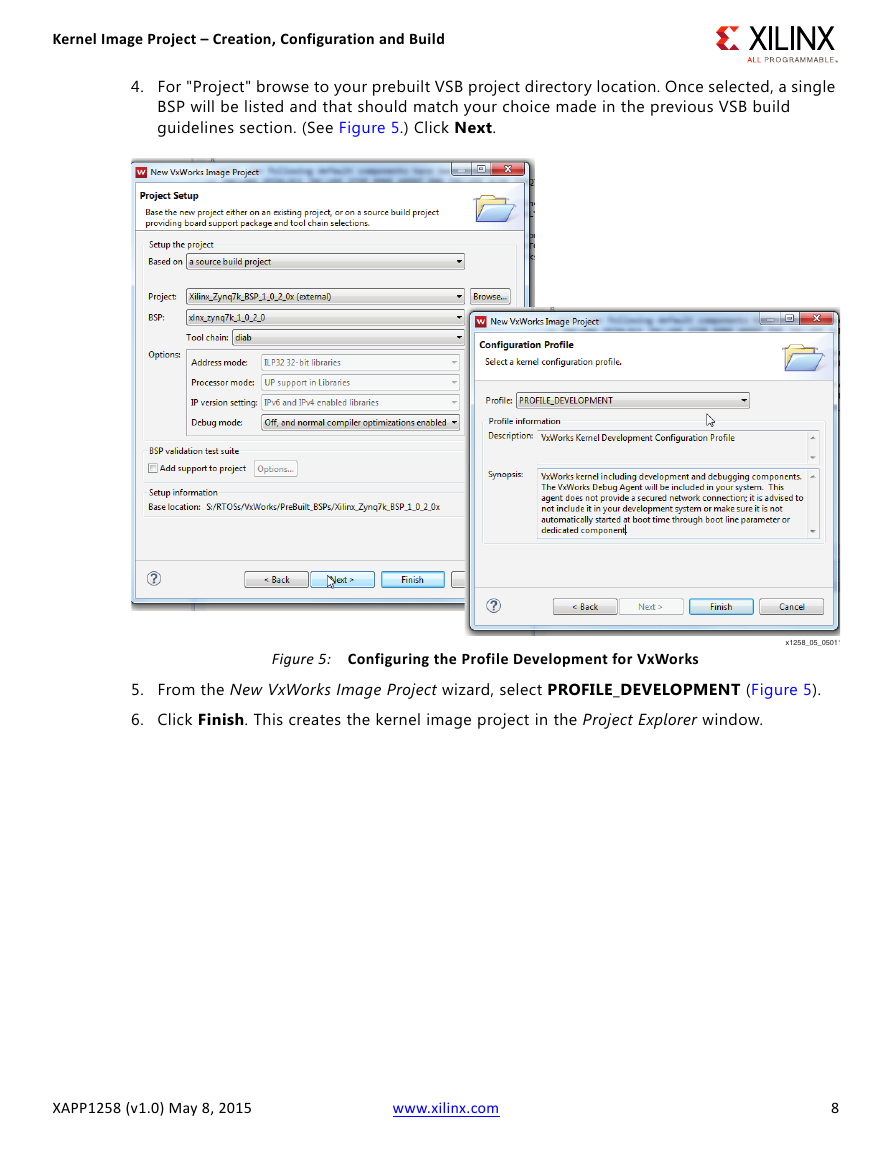
4. For "Project" browse to your prebuilt VSB project directory location. Once selected, a single
BSP will be listed and that should match your choice made in the previous VSB build
guidelines section. (See Figure 5.) Click Next.
X-Ref Target - Figure 5
Figure 5: Configuring the Profile Development for VxWorks
x1258_05_05011
5. From the New VxWorks Image Project wizard, select PROFILE_DEVELOPMENT (Figure 5).
6. Click Finish. This creates the kernel image project in the Project Explorer window.
XAPP1258 (v1.0) May 8, 2015
www.xilinx.com
8
�




 2023年江西萍乡中考道德与法治真题及答案.doc
 2012年重庆南川中考生物真题及答案.doc
 2013年江西师范大学地理学综合及文艺理论基础考研真题.doc
 2020年四川甘孜小升初语文真题及答案I卷.doc
 2020年注册岩土工程师专业基础考试真题及答案.doc
 2023-2024学年福建省厦门市九年级上学期数学月考试题及答案.doc
 2021-2022学年辽宁省沈阳市大东区九年级上学期语文期末试题及答案.doc
 2022-2023学年北京东城区初三第一学期物理期末试卷及答案.doc
 2018上半年江西教师资格初中地理学科知识与教学能力真题及答案.doc
 2012年河北国家公务员申论考试真题及答案-省级.doc
 2020-2021学年江苏省扬州市江都区邵樊片九年级上学期数学第一次质量检测试题及答案.doc
 2022下半年黑龙江教师资格证中学综合素质真题及答案.doc