DC2250
Digital Camera
USER’S MANUAL
STEPS TO GET YOU STARTED
PROBLEMS OR QUESTIONS?
Before returning your new product to the store,
CONTACT ARGUS FIRST
Visit us online at: www.arguscamera.com
E-mail us at:
customerservice@arguscamera.com
or call us at: 1-888-552-7487
1
�
Welcome
Thank you for choosing Argus Camera for your digital adventures. Whether
you’re snapping memorable shots of your
family and friends or exploring the great
outdoors, since 1936 Argus Camera has been
there, sharpening your images with leading
edge technology. To get the utmost satisfaction from your DC2250 digital
camera, please take a moment to read through this manual. Its information
will send you on an educational journey into your camera’s multiple
capabilities. Learn how fun and easy it is to take pictures digitally and then
print them yourself without delay of film processing. Within minutes after
snapping your pictures you may:
• Transfer your pictures to your computer.
• Enjoy multiple editing options.
• Email your photos to friends and family anytime, anywhere!
• Print your very own photos to enjoy for years to come.
Thank you again to choosing Argus!
2
�
TABLE OF CONTENTS
CARING FOR YOUR CAMERA
FEATURES
BATTERY INSTALLATION
POWER (SLEEP MODE)
INSTALLING THE CF CARD
TAKING A PICTURE
SELF TIMER MODE
QUALTIY MODE
MOVIE MODE
TV SYSTEM SELECTION
DELETE MODE
INSTALLING DC2250 DRIVER
UNINSTALLING SOFTWARE
LIVE VIDEO MODE
DOWNLOADING PHOTOS USING PHOTO IMPRESSION 4.0
PHOTO AND SHARING MANAGEMENT USING
PHOTOBASE 3.0
VIDEO PLAYBACK USING VIDEOIMPRESSION 1.6
PLAYING MOVIE CLIPS USING QUICKTIME PLAYER 6
4
5
6
6
6
7
7
7
8
8
8
9
9
9
10
10
10
10
3
�
Caring for Your Camera
Your Argus camera is a precision instrument. Proper care will ensure years of
quality performance.
• Avoid exposing your camera to extreme temperatures. Prolonged exposure
will adversely affect the camera’s internal components.
• Keep camera dry.
• To clean the lens surface, first blow away any dust or sand, then, if
necessary, moisten a lens tissue or soft cloth with lens cleaning fluid and
gently wipe the lens. DO NOT attempt to wipe away sand or dirt particles as
this may scratch the lens’ surface.
• Never touch the lens surface with your fingers.
• Store your camera in a cool, dry, and well-ventilated area free of dust and
chemicals.
• When storing the camera for extended periods, remove the batteries.
4
�
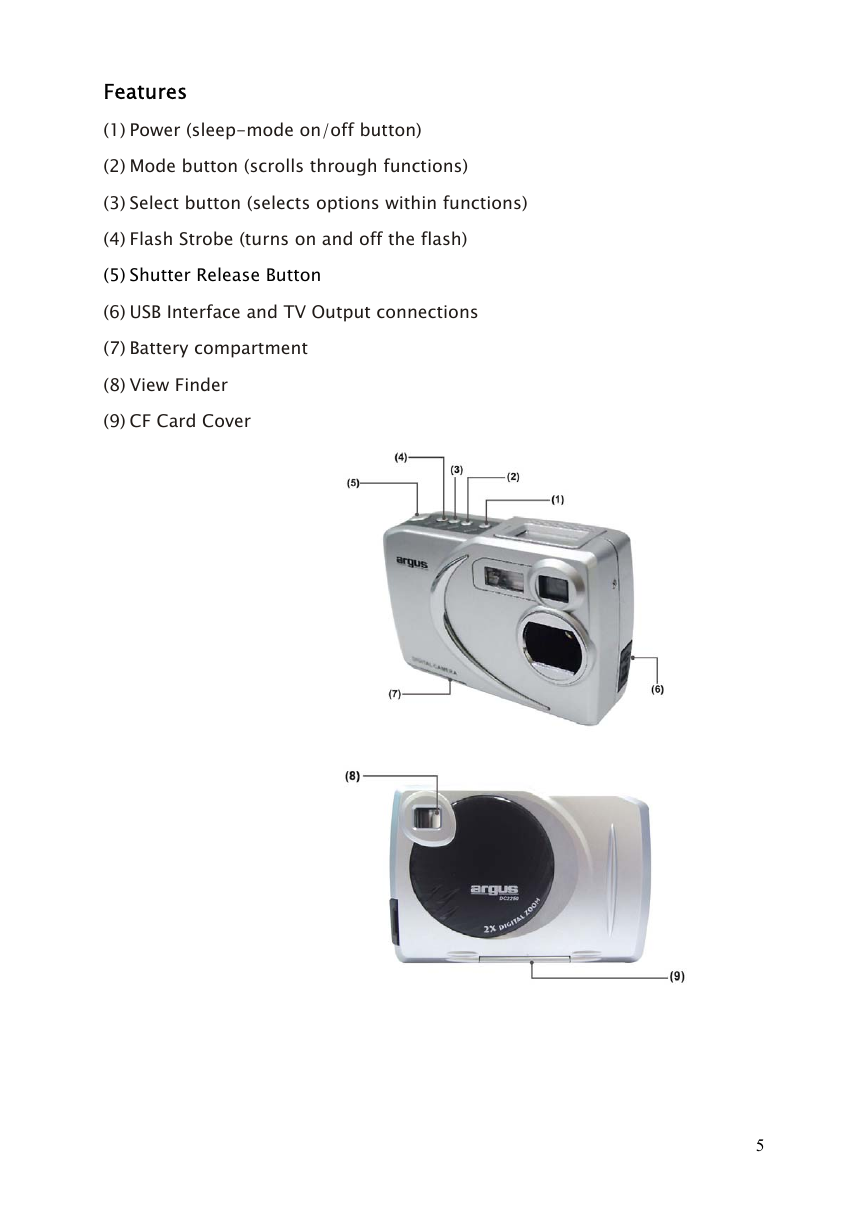
Features
(1) Power (sleep-mode on/off button)
(2) Mode button (scrolls through functions)
(3) Select button (selects options within functions)
(4) Flash Strobe (turns on and off the flash)
(5) Shutter Release Button
(6) USB Interface and TV Output connections
(7) Battery compartment
(8) View Finder
(9) CF Card Cover
5
�
Battery installation
This camera uses 4 AAA alkaline batteries. (Do not mix batteries of different
types.)
1. When replacing batteries, make sure the camera is turned off.
2. Turn the camera upside down and slide the battery door toward the side of
the camera to unlatch then swing it open.
3. Install the batteries according to the polarity diagram on the inside panel of
the battery compartment door.
4. Close the battery door and slide it inward to lock in place.
WARNING: Removing the batteries will erase the camera’s memory—any
pictures left in the camera will be deleted.
Power (sleep-mode on/off button)
Pressing the button marked POWER located on the top of the camera will
either wake up the camera or put it into sleep mode. The camera
automatically defaults to sleep mode approx. 30 seconds after non-use.
(When in sleep mode, the LCD has no display.)
NOTE: To completely devoid the camera of power, and to preserve battery life,
remove the batteries.
Installing the CF card
This camera accepts only CF type I cards.
1. Make sure the camera is turned off.
2. Open the card-slot door located on the bottom of the camera.
3. Gently slide the CF card into the card slot terminal-end first with front of
card facing front of camera. (CF card sold separately.)
4. Close card slot door.
5. To remove the CF card, open the card slot door and push the release
button located beside the card slot.
NOTE:
• For best operation, use only high-quality CF cards such as SanDisc™ or
Kodak™.
• When installed, the Argus DC2250 saves captured images and movies
directly to the CF card and bypasses its internal 6MB SDRAM memory.
• Changing the batteries will not erase the CF card memory.
6
�
Taking a Picture
1) Look through the viewfinder and locate your subject.
2) Press the shutter-release button. (The camera will beep, indicating that it
has recorded a picture.)
Self-Timer Mode:
Using the self-timer, the Argus DC2250 will automatically snap a picture ten
seconds after pressing the shutter-release button.
1) Preferably, mount the DC2250 onto a tripod or and otherwise solid surface.
2) Aim the camera at the selected image.
3) Press the SELECT button until the ( ) icon appears.
4) Press the SHUTTER-RELEASE button.
5) The camera will beep for ten seconds then automatically snap a picture.
Quality Mode:
The Argus DC2250 offers different qualities of image recording, from
FINE (high quality, uses most memory—stores less images) to
ECONOMY (low quality, uses least memory—stores more images).
To change image quality:
1) Press the MODE button once—FEA appears on the LCD. (You have
five seconds to continue in this mode before the LCD defaults
back to main menu.)
2) Press the SELECT button to change from FINE, to NORM, to ECON,
to x2, to the movie icon, and back to FINE.
3) Pause for approximately five seconds on the quality setting of
choice. The LCD will default to main menu with your changed
quality setting.
7
�
Movie Mode:
1) Press the MODE button once—FEA appears on the LCD. (You have
five seconds to continue in this mode before the LCD defaults
back to main menu.)
2) Press the SELECT button to scroll to the movie icon.
3) Pause for approximately five seconds on the movie icon. The LCD
will default to main menu with your changed quality setting.
4) Press and hold the shutter-release button to record your movie.
(During movie recording, the camera will emit a steady beep and
the movie icon will flash on the LCD screen.)
5) To stop recording your movie, release the shutter-release button.
(The movie may automatically stop recording under certain
conditions—low battery, exhausted memory, etc.)
TV System Selection:
1) Use a TV cable to connect the camera to your TV.
2) Press the Power button to turn on the camera.
3) Press the Mode button until the NTSC or PAL icon appears on the LCD
screen.
4) Press the Select button to set NTSC or PAL to match your TV system.
5) The main menu will appear on your TV screen.
NOTE:
For USA and JAPAN, choose NTSC.
For EUROPE, choose PAL.
Delete Mode:
1. Press the Mode button until the trash icon appears on the LCD screen.
2. Press the Select button to delete all pictures.
3. The trash icon blinks as the camera and/or CF card memory clears.
4. The LCD screen will revert to the previous operating mode.
8
�





 2023年江西萍乡中考道德与法治真题及答案.doc
 2012年重庆南川中考生物真题及答案.doc
 2013年江西师范大学地理学综合及文艺理论基础考研真题.doc
 2020年四川甘孜小升初语文真题及答案I卷.doc
 2020年注册岩土工程师专业基础考试真题及答案.doc
 2023-2024学年福建省厦门市九年级上学期数学月考试题及答案.doc
 2021-2022学年辽宁省沈阳市大东区九年级上学期语文期末试题及答案.doc
 2022-2023学年北京东城区初三第一学期物理期末试卷及答案.doc
 2018上半年江西教师资格初中地理学科知识与教学能力真题及答案.doc
 2012年河北国家公务员申论考试真题及答案-省级.doc
 2020-2021学年江苏省扬州市江都区邵樊片九年级上学期数学第一次质量检测试题及答案.doc
 2022下半年黑龙江教师资格证中学综合素质真题及答案.doc