105mm+-2
105mm+-2
English
English
1
5
0
m
m
+
-
2
- i -
- ii -
�
105mm+-2
105mm+-2
English
English
1
5
0
m
m
+
-
2
- iii -
- iv -
�
105mm+-2
105mm+-2
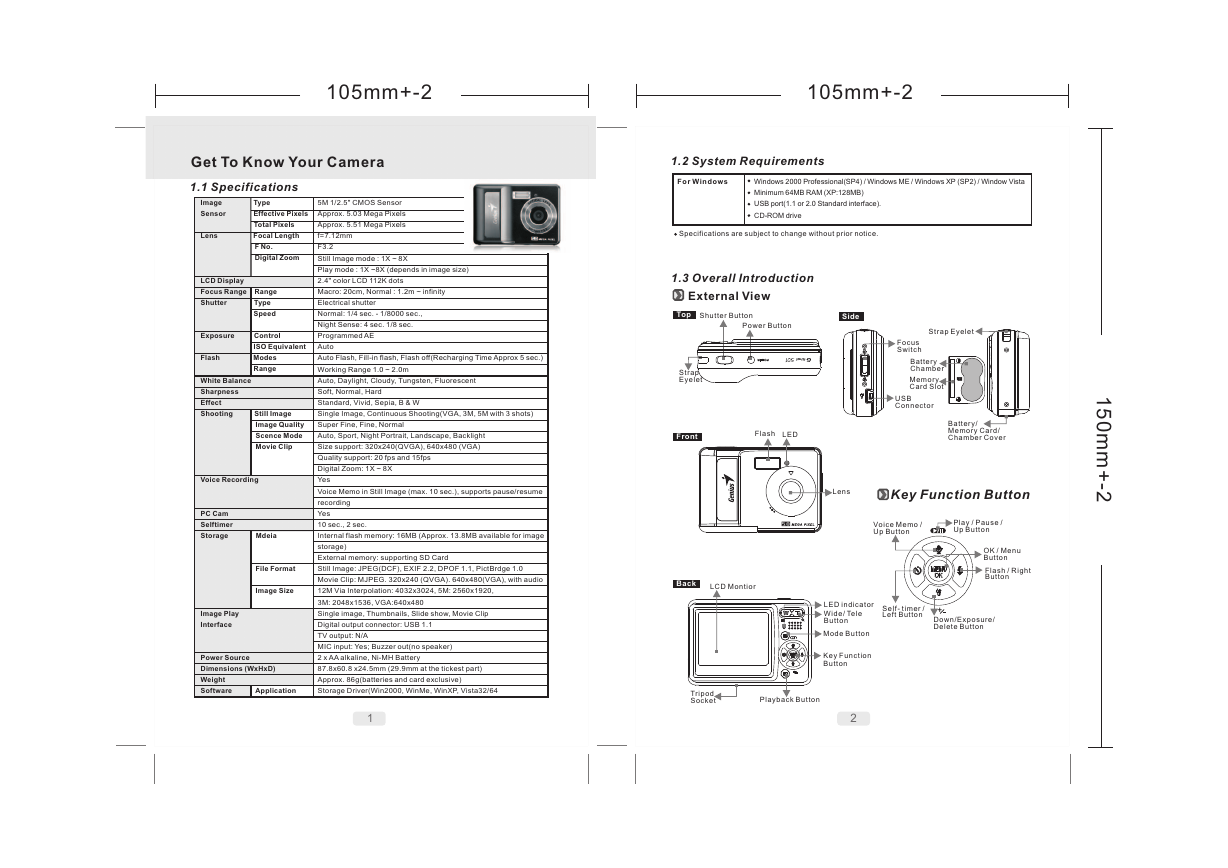
Get To Know Your Camera
1.1 Specifications
Image
Sensor
Type
5M 1/2.5" CMOS Sensor
Effective Pixels
Approx. 5.03 Mega Pixels
Total Pixels
Approx. 5.51 Mega Pixels
Lens
Focal Length
f=7.12mm
F No.
F3.2
Digital Zoom
Still Image mode : 1X ~ 8X
Play mode : 1X ~8X (depends in image size)
LCD Display
2.4" color LCD 112K dots
Focus Range Range
Macro: 20cm, Normal : 1.2m ~ infinity
Shutter
Type
Speed
Electrical shutter
Normal: 1/4 sec. - 1/8000 sec.,
Night Sense: 4 sec. 1/8 sec.
Exposure
Control
Programmed AE
ISO Equivalent
Auto
Flash
Modes
Range
White Balance
Sharpness
Effect
Auto Flash, Fill-in flash, Flash off(Recharging Time Approx 5 sec.)
Working Range 1.0 ~ 2.0m
Auto, Daylight, Cloudy, Tungsten, Fluorescent
Soft, Normal, Hard
Standard, Vivid, Sepia, B & W
Shooting
Still Image
Single Image, Continuous Shooting(VGA, 3M, 5M with 3 shots)
Image Quality
Super Fine, Fine, Normal
Scence Mode
Auto, Sport, Night Portrait, Landscape, Backlight
Movie Clip
Size support: 320x240(QVGA), 640x480 (VGA)
Quality support: 20 fps and 15fps
Digital Zoom: 1X ~ 8X
Voice Recording
Yes
Voice Memo in Still Image (max. 10 sec.), supports pause/resume
PC Cam
Selftimer
Storage
Image Play
Interface
recording
Yes
10 sec., 2 sec.
Mdeia
Internal flash memory: 16MB (Approx. 13.8MB available for image
storage)
External memory: supporting SD Card
File Format
Still Image: JPEG(DCF), EXIF 2.2, DPOF 1.1, PictBrdge 1.0
Movie Clip: MJPEG. 320x240 (QVGA). 640x480(VGA), with audio
Image Size
12M Via Interpolation: 4032x3024, 5M: 2560x1920,
3M: 2048x1536, VGA:640x480
Single image, Thumbnails, Slide show, Movie Clip
Digital output connector: USB 1.1
TV output: N/A
MIC input: Yes; Buzzer out(no speaker)
Power Source
2 x AA alkaline, Ni-MH Battery
Dimensions (WxHxD)
87.8x60.8 x24.5mm (29.9mm at the tickest part)
Weight
Approx. 86g(batteries and card exclusive)
Software
Application
Storage Driver(Win2000, WinMe, WinXP, Vista32/64
1
1.2 System Requirements
For Windows
Windows 2000 Professional(SP4) / Windows ME / Windows XP (SP2) / Window Vista
Minimum 64MB RAM (XP:128MB)
USB port(1.1 or 2.0 Standard interface).
CD-ROM drive
Specifications are subject to change without prior notice.
1.3 Overall Introduction
External View
Top
Shutter Button
Side
Power Button
Strap
Eyelet
Strap Eyelet
Focus
Switch
Battery
Chamber
Memory
Card Slot
USB
Connector
Front
Flash
LED
Battery/
Memory Card/
Chamber Cover
Lens
Key Function Button
Voice Memo /
Up Button
Play / Pause /
Up Button
OK / Menu
Button
Flash / Right
Button
Self- timer /
Left Button
Down/Exposure/
Delete Button
LED indicator
Wide/ Tele
Button
Mode Button
Key Function
Button
2
Back
LCD Montior
Tripod
Socket
Playback Button
1
5
0
m
m
+
-
2
�
105mm+-2
105mm+-2
105mm+-2
105mm+-2
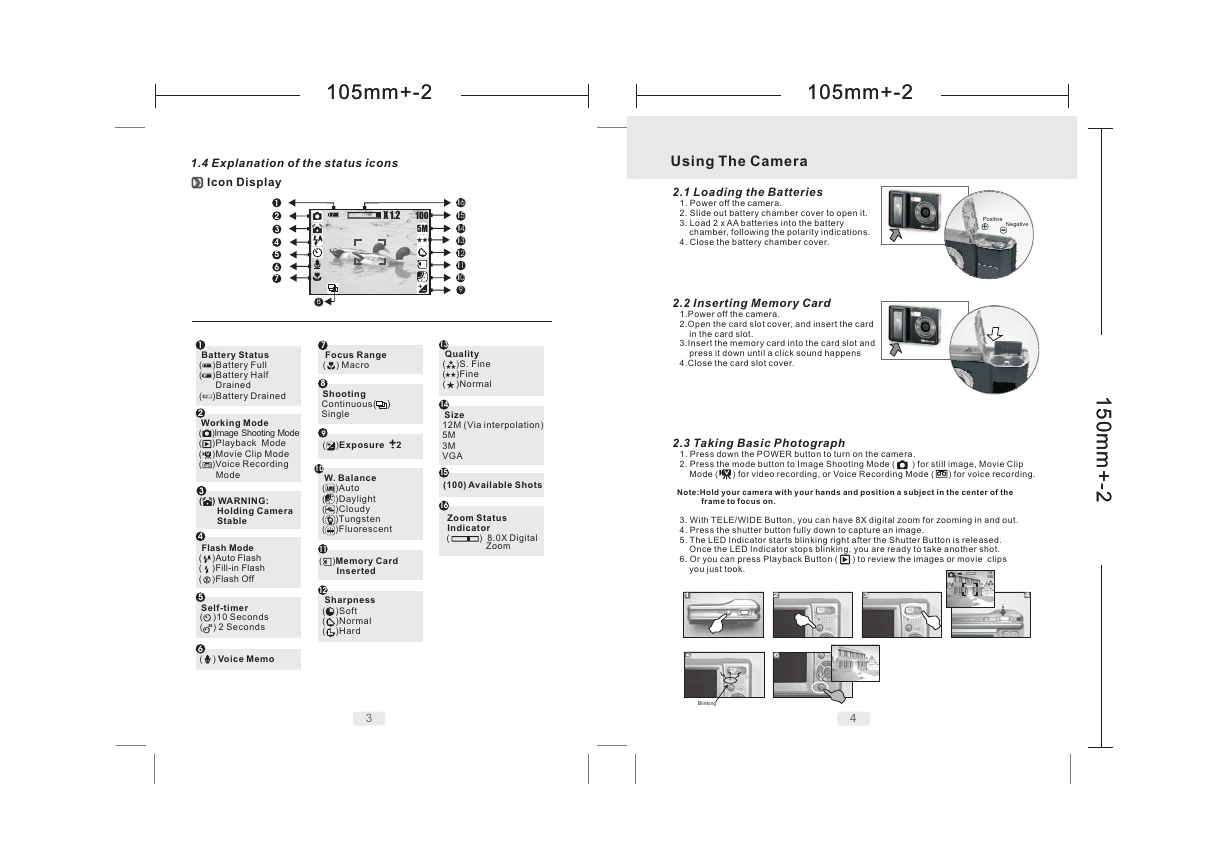
1.4 Explanation of the status icons
Icon Display
1
2
3
4
5
6
7
X 1.2
100
5M
16
15
14
13
12
11
10
9
( )
14
13
Quality
( )S. Fine
( )Fine
( )Normal
Size
12M (Via interpolation)
5M
3M
VGA
15
(100)
Available Shots
16
Zoom Status
Indicator
( ) 8.0X
Zoom
Digital
8
7
Focus Range
( ) Macro
8
Shooting
Continuous
Single
9
( )
Exposure - 2+
10
W. Balance
( )Auto
( )Daylight
( )Cloudy
( )Tungsten
( )Fluorescent
11
( )
12
Memory Card
Inserted
Sharpness
( )Soft
( )Normal
( )Hard
1
Battery Status
( )Battery Full
( )Battery Half
Drained
( )Battery Drained
2
Working Mode
( )Image
( )Playback Mode
( )Movie Clip Mode
( )Voice Recording
Shooting
Mode
Mode
33
( ) WARNING:
Holding Camera
Stable
4
Flash Mode
( )Auto Flash
( )
Fill-in Flash
( )Flash Off
5
Self-timer
( )10 Seconds
( ) 2 Seconds
2S
6
( ) Voice Memo
Using The Camera
2.1 Loading the Batteries
1. Power off the camera.
2. Slide out battery chamber cover to open it.
3. Load 2 x AA batteries into the battery
chamber, following the polarity indications.
4. Close the battery chamber cover.
2.2 Inserting Memory Card
1.Power off the camera.
2.Open the card slot cover, and insert the card
in the card slot.
3.Insert the memory card into the card slot and
press it down until a click sound happens
4.Close the card slot cover.
Positive
+
-Negative
2.3 Taking Basic Photograph
1. Press down the POWER button to turn on the camera.
2. Press the mode button to Image Shooting Mode ( ) for still image, Movie Clip
Mode ( ) for video recording, or Voice Recording Mode ( ) for voice recording.
Note:Hold your camera with your hands and position a subject in the center of the
frame to focus on.
3. With TELE/WIDE Button, you can have 8X digital zoom for zooming in and out.
4. Press the shutter button fully down to capture an image.
5. The LED Indicator starts blinking right after the Shutter Button is released.
Once the LED Indicator stops blinking, you are ready to take another shot.
6. Or you can press Playback Button ( ) to review the images or movie
clips
1
1
5
5
0
0
m
m
m
m
+
+
-
-
2
2
3
4
14
5M
you just took.
1
5
Blinking
2
6
3
4
�
105mm+-2
105mm+-2
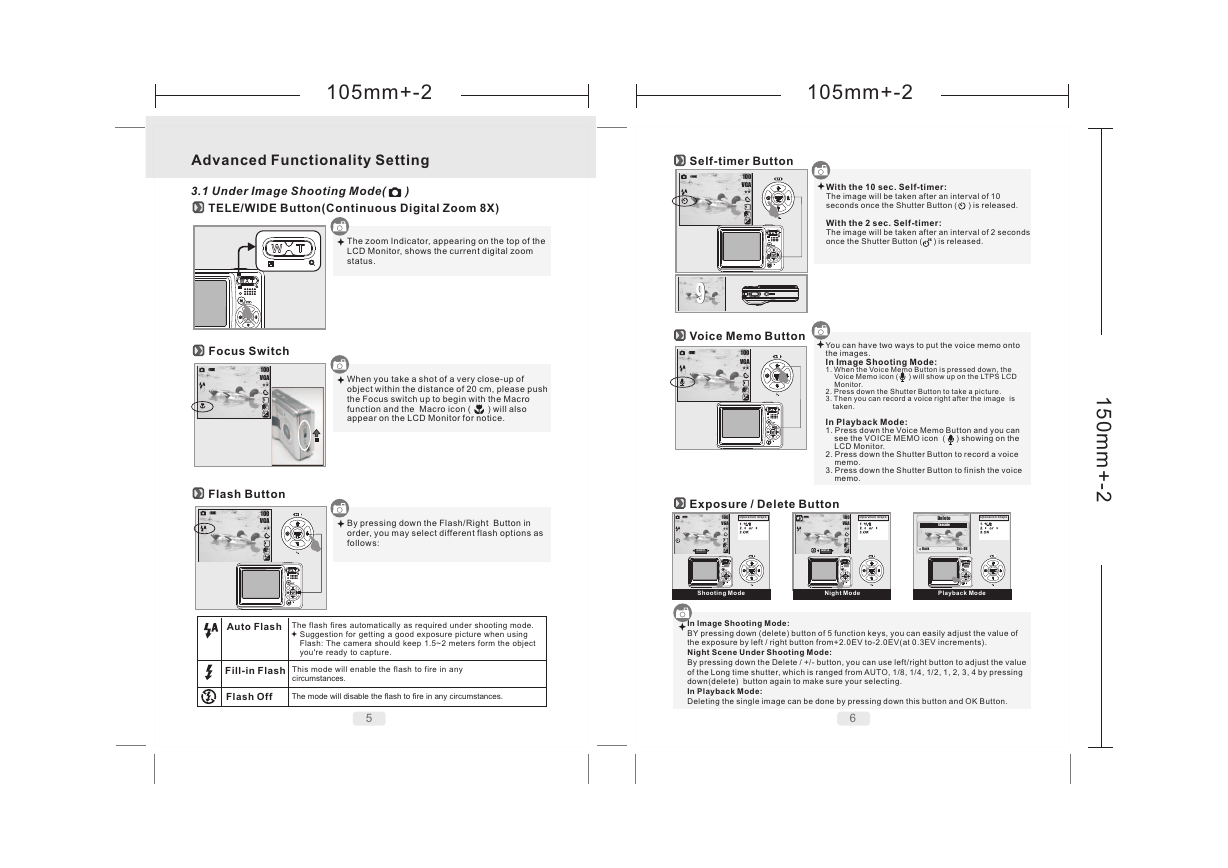
Self-timer Button
100
VGA
99
Voice Memo Button
100
VGA
With the 10 sec. Self-timer:
The image will be taken after an interval of 10
seconds once the Shutter Button ( ) is released.
With the 2 sec. Self-timer:
The image will be taken after an interval of 2 seconds
once the Shutter Button ( ) is released.
2S
You can have two ways to put the voice memo onto
the images.
In Image Shooting Mode:
1. When the Voice Memo Button is pressed down, the
Voice Memo icon ( ) will show up on the LTPS LCD
Monitor.
2. Press down the Shutter Button to take a picture.
3. Then you can record a voice right after the image is
taken.
In Playback Mode:
1. Press down the Voice Memo Button and you can
see the VOICE MEMO icon ( ) showing on the
LCD Monitor.
2. Press down the Shutter Button to record a voice
memo.
3. Press down the Shutter Button to finish the voice
memo.
1
5
0
m
m
+
-
2
Advanced Functionality Setting
3.1 Under Image Shooting Mode( )
TELE/WIDE Button(Continuous Digital Zoom 8X)
The zoom Indicator, appearing on the top of the
LCD Monitor, shows the current digital zoom
status.
When you take a shot of a very close-up of
object within the distance of 20 cm, please push
the Focus switch up to begin with the Macro
function and the Macro icon (
) will also
appear on the LCD Monitor for notice.
Focus Switch
100
VGA
Flash Button
100
VGA
By pressing down the Flash/Right Button in
order, you may select different flash options as
follows:
Exposure / Delete Button
Operation Steps
100
VGA
Operation Steps
100
VGA
Delete
Execute
Operation Steps
0.0EV
LT
AUTO
Back
Set : OK
Auto Flash
The flash fires automatically as required under shooting mode.
Suggestion for getting a good exposure picture when using
Flash: The camera should keep 1.5~2 meters form the object
you're ready to capture.
Fill-in Flash
ode will enable the flash to fire in any
This m
c
ircumstances.
Flash Off
The mode will disable the flash to fire in any circumstances.
Shooting Mode
Night Mode
Playback Mode
In Image Shooting Mode:
BY pressing down (delete) button of 5 function keys, you can easily adjust the value of
the exposure by left / right button from+2.0EV to-2.0EV(at 0.3EV increments).
Night Scene Under Shooting Mode:
By pressing down the Delete / +/- button, you can use left/right button to adjust the value
of the Long time shutter, which is ranged from AUTO, 1/8, 1/4, 1/2, 1, 2, 3, 4 by pressing
down(delete) button again to make sure your selecting.
In Playback Mode:
Deleting the single image can be done by pressing down this button and OK Button.
5
6
�
105mm+-2
105mm+-2
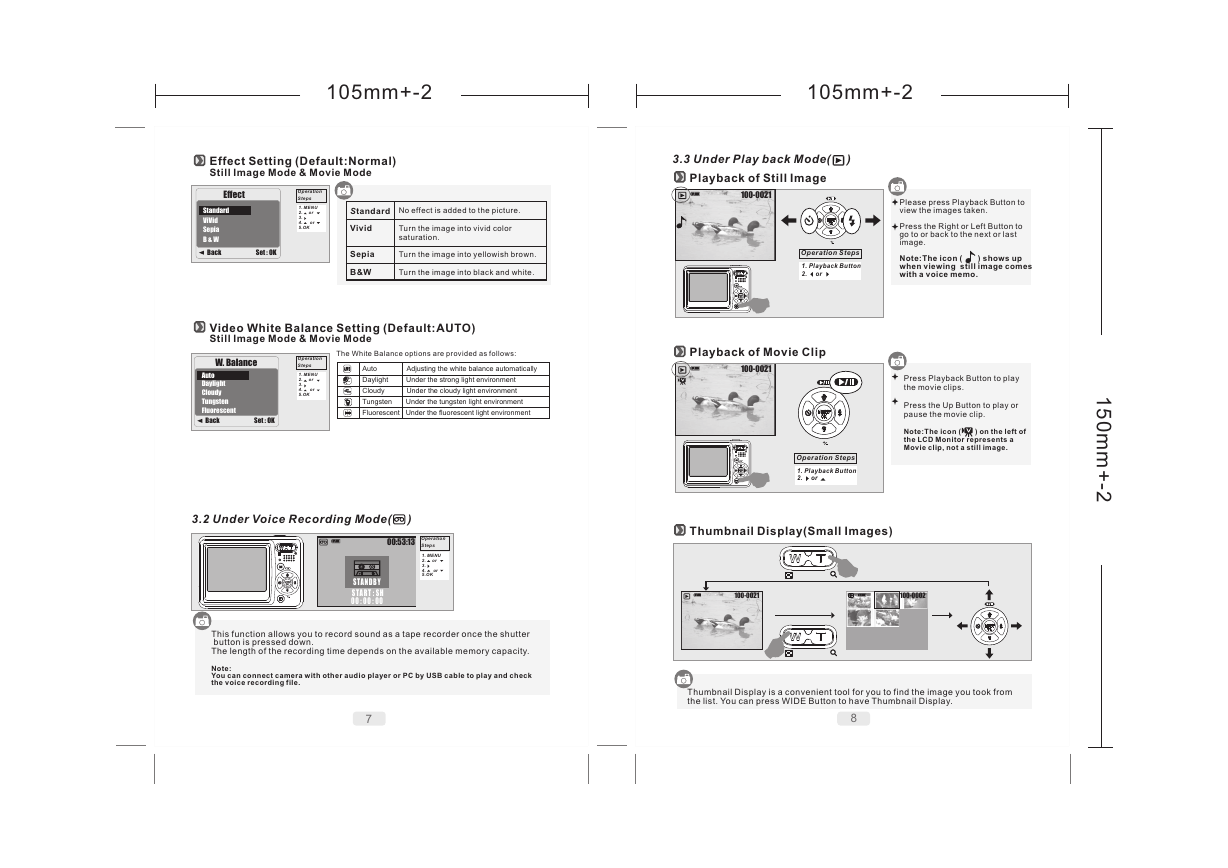
Effect Setting (Default:Normal)
Still Image Mode & Movie Mode
Effect
Operation
Steps
Standard
ViVid
Sepia
B & W
Back Set : OK
1. MENU
2. or
3.
4.
5.
OK
or
Standard
No effect is added to the picture.
Vivid
Sepia
B&W
Turn the image into vivid color
saturation.
Turn the image into yellowish brown.
Turn the image into black and white.
Video White Balance Setting (Default:AUTO)
Still Image Mode & Movie Mode
3.3 Under Play back Mode( )
Playback of Still Image
100-0021
Please press Playback Button to
view the images taken.
Press the Right or Left Button to
go to or back to the next or last
image.
The icon ( ) shows up
Note:
when viewing still image comes
with a voice memo.
Operation Steps
1. Playback Button
2. or
W. Balance
Operation
Steps
Auto
Daylight
Cloudy
Tungsten
Fluorescent
Back Set : OK
1. MENU
2. or
3.
4.
5.
OK
or
The White Balance options are provided as follows:
Auto
Adjusting the white balance automatically
Daylight Under the strong light environment
Cloudy Under the cloudy light environment
Tungsten Under the tungsten light environment
Fluorescent Under the fluorescent light environment
Playback of Movie Clip
100-0021
3.2 Under Voice Recording Mode( )
00:53:13
Operation
Steps
Operation Steps
1. Playback Button
2. or
Thumbnail Display(Small Images)
Press Playback Button to play
the movie clips.
Press the Up Button to play or
pause the movie clip.
Note:The icon ( ) on the left of
the LCD Monitor represents a
Movie clip, not a still image.
1
5
0
m
m
+
-
2
1. MENU
2. or
3.
4.
5.
OK
or
STANDBY
START : SH
00 : 00 : 00
100-0021
100-0002
This function allows you to record sound as a tape recorder once the shutter
button is pressed down.
The length of the recording time depends on the available memory capacity.
Note:
You can connect camera with other audio player or PC by USB cable to play and check
the voice recording file.
7
8
Thumbnail Display is a convenient tool for you to find the image you took from
the list. You can press WIDE Button to have Thumbnail Display.
�
105mm+-2
105mm+-2
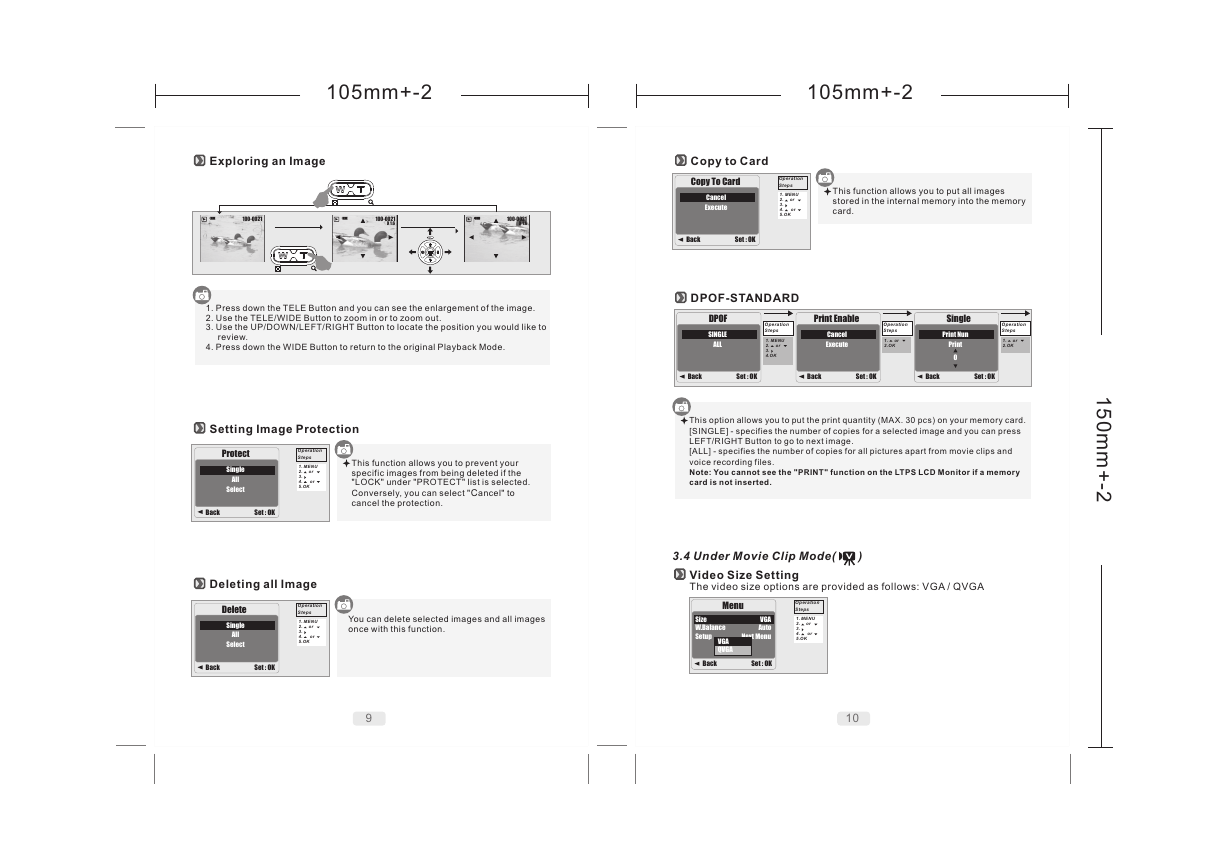
Exploring an Image
Copy to Card
Copy To Card
Operation
Steps
100-0021
100-0021
X 1.6
100-0021
X 1.6
Cancel
Execute
Back Set : OK
1. MENU
2. or
3.
4.
5.
OK
or
This function allows you to put all images
stored in the internal memory into the memory
card.
1. Press down the TELE Button and you can see the enlargement of the image.
2. Use the TELE/WIDE Button to zoom in or to zoom out.
3. Use the UP/DOWN/LEFT/RIGHT Button to locate the position you would like to
review.
4. Press down the WIDE Button to return to the original Playback Mode.
Setting Image Protection
Protect
Single
All
Select
Back Set : OK
Operation
Steps
1. MENU
2. or
3.
4.
5.
OK
or
This function allows you to prevent your
specific images from being deleted if the
"LOCK" under "PROTECT" list is selected.
Conversely, you can select " ancel" to
cancel the protection.
C
Deleting all Image
DPOF-STANDARD
DPOF
SINGLE
ALL
Operation
Steps
1. MENU
2. or
3.
4.OK
Print Enable
Cancel
Execute
Operation
Steps
1. or
2.OK
Single
Print Nun
Print
0
Operation
Steps
1. or
2.OK
Back Set : OK
Back Set : OK
Back Set : OK
This option allows you to put the print quantity (MAX. 30 pcs) on your memory card.
[SINGLE] - specifies the number of copies for a selected image and you can press
LEFT/RIGHT Button to go to next image.
[ALL] - specifies the number of copies for all pictures apart from movie clips and
voice recording files.
Note: You cannot see the "PRINT" function on the LTPS LCD Monitor if a memory
card is not inserted.
1
5
0
m
m
+
-
2
3.4 Under Movie Clip Mode( )
Video Size Setting
The video size options are provided as follows: VGA / QVGA
Menu
Operation
Steps
Delete
Single
All
Select
Back Set : OK
Operation
Steps
1. MENU
2. or
3.
4.
5.
OK
or
You can delete selected images and all images
once with this function.
VGA
Size
W.Balance
Auto
Setup Next Menu
VGA
QVGA
Back Set : OK
1. MENU
2. or
3.
4.
5.
OK
or
9
10
�
105mm+-2
105mm+-2
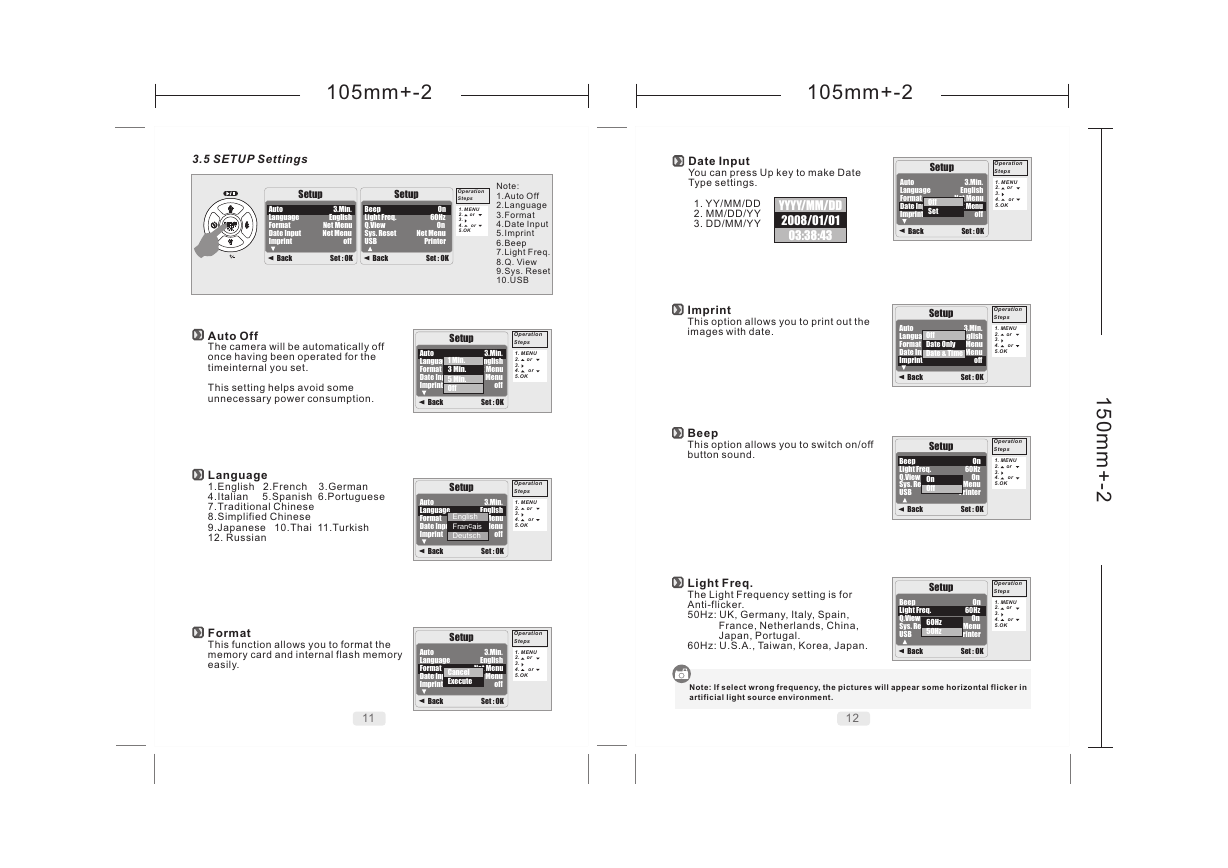
3.5 SETUP Settings
Setup
Setup
Operation
Steps
Auto
3.Min.
Language English
Format Net Menu
Date Input Net Menu
Imprint off
Beep
On
Light Freq. 60Hz
Q.View On
Sys. Reset Net Menu
USB Printer
Back Set : OK
Back Set : OK
1. MENU
2. or
3.
4.
5.
OK
or
Date Input
You can press Up key to make Date
Type settings.
1. YY/MM/DD
2. MM/DD/YY
3. DD/MM/YY
YYYY/MM/DD
2008/01/01
03:38:43
Note:
1.Auto Off
2.Language
3.Format
4.Date Input
5.Imprint
6.Beep
7.Light Freq.
8.Q. View
9.Sys. Reset
10.USB
Setup
Operation
Steps
Auto
3.Min.
Language English
Format Net Menu
Date Input Net Menu
Imprint off
Off
Set
Back Set : OK
1. MENU
2. or
3.
4.
5.
OK
or
Setup
Operation
Steps
Imprint
This option allows you to print out the
images with date.
Auto
3.Min.
Language English
Format Net Menu
Date Input Net Menu
Imprint off
1 Min.
3 Min.
5 Min.
Off
Back Set : OK
1. MENU
2. or
3.
4.
5.
OK
or
Beep
This option allows you to switch on/off
button sound.
Setup
Operation
Steps
Auto Off
The camera will be automatically off
once having been operated for the
timeinternal you set.
This setting helps avoid some
unnecessary power consumption.
Language
1.English 2.French 3.German
4.Italian 5.Spanish 6.Portuguese
7.Traditional Chinese
8.Simplified Chinese
9.Japanese 10.Thai 11.Turkish
12. Russian
Format
This function allows you to format the
memory card and internal flash memory
easily.
Auto
3.Min.
Language English
Format Net Menu
Date Input Net Menu
Imprint off
English
Francais
Deutsch
Back Set : OK
1. MENU
2. or
3.
4.
5.
OK
or
Setup
Operation
Steps
Auto
3.Min.
Language English
Format Net Menu
Date Input Net Menu
Imprint off
Cancel
Execute
Back Set : OK
1. MENU
2. or
3.
4.
5.
OK
or
Setup
Operation
Steps
Auto
3.Min.
Language English
Format Net Menu
Date Input Net Menu
Imprint off
Off
Date Only
Date & Time
Back Set : OK
1. MENU
2. or
3.
4.
5.
OK
or
Setup
Operation
Steps
Beep
On
Light Freq. 60Hz
Q.View On
Sys. Reset Net Menu
USB Printer
On
Off
Back Set : OK
1. MENU
2. or
3.
4.
5.
OK
or
Setup
Operation
Steps
1
5
0
m
m
+
-
2
Beep
On
Light Freq. 60Hz
Q.View On
Sys. Reset Net Menu
USB Printer
6OHz
50Hz
Back Set : OK
1. MENU
2. or
3.
4.
5.
OK
or
Light Freq.
The Light Frequency setting is for
Anti-flicker.
50Hz: UK, Germany, Italy, Spain,
France, Netherlands, China,
Japan, Portugal.
60Hz: U.S.A., Taiwan, Korea, Japan.
11
12
Note: If select wrong frequency, the pictures will appear some horizontal flicker in
artificial light source environment.
�


 2023年江西萍乡中考道德与法治真题及答案.doc
 2012年重庆南川中考生物真题及答案.doc
 2013年江西师范大学地理学综合及文艺理论基础考研真题.doc
 2020年四川甘孜小升初语文真题及答案I卷.doc
 2020年注册岩土工程师专业基础考试真题及答案.doc
 2023-2024学年福建省厦门市九年级上学期数学月考试题及答案.doc
 2021-2022学年辽宁省沈阳市大东区九年级上学期语文期末试题及答案.doc
 2022-2023学年北京东城区初三第一学期物理期末试卷及答案.doc
 2018上半年江西教师资格初中地理学科知识与教学能力真题及答案.doc
 2012年河北国家公务员申论考试真题及答案-省级.doc
 2020-2021学年江苏省扬州市江都区邵樊片九年级上学期数学第一次质量检测试题及答案.doc
 2022下半年黑龙江教师资格证中学综合素质真题及答案.doc