Coot Tutorial
CCP4 Workshop Bangalore
March 23, 2005
Contents
1 Mousing
. . . .
. . . .
. . . .
. .
. . . .
. . . .
2 Introductory Tutorial
. . . .
. . .
2.1 Get the files
. .
. . . .
2.2 Start Coot . . . .
. . .
. . . .
2.3 Display Coordinates
. . . .
2.4 Adjust Virtual Trackball
. . . .
2.5 Display maps .
. . .
2.6 Zoom in and out . . .
. . . .
2.7 Recentre on Different Atoms . . . .
. . . .
2.8 Change the Clipping (Slab)
. . . .
2.9 Recontour the Map .
. . . .
. . . .
2.10 Change the Map Colour . .
2.11 Select a Map . .
. . . .
. . . .
. . .
. . . .
. . . .
. . . .
. . . .
. . . .
. . . .
. . . .
. . . .
. . . .
. . . .
. . . .
. . .
. . .
. . .
. . .
. . .
. . .
. . .
. . .
. . .
. . .
. . .
. . . .
. . . .
. . . .
. . . .
. . . .
. . . .
. . . .
. . . .
. . . .
. . . .
. . . .
. . . .
. . . .
. . . .
. . . .
. . . .
. . . .
. . . .
. . . .
. . . .
. . . .
. . . .
. . . .
. . . .
. . . .
. . . .
. . . .
. . . .
. . . .
. . . .
. . . .
. . . .
. . . .
.
.
.
.
.
.
.
.
.
.
.
2
2
2
2
3
3
4
4
6
7
8
8
8
8
.
9
. 10
10
. 10
. 10
. 11
. 12
12
. 12
. 12
. 13
. 13
. 13
3 Model Building
3.1 Rotamers . . . .
. . . .
3.2 More Real Space Refinement . . . .
. . . .
. . .
. . . .
. . . .
. . .
. . .
. . . .
. . . .
. . . .
. . . .
. . . .
. . . .
4 Blobology
4.1 Find Blobs . . .
4.1.1 Blob 3 .
4.1.2 Blob 2 .
. . . .
. . . .
. . . .
4.2 Make a (Pretty?) Picture . .
. . .
. . .
. . .
5 Extra Fun (if you have time)
.
. . .
. . . .
5.1 Waters
. . . .
5.2 Add Terminal Residue . . .
5.3 Mutate Residue . . .
. . . .
5.4 Display Symmetry Atoms .
5.5 Refine with Refmac .
. . . .
. . . .
. . . .
. . . .
. . . .
. . . .
. . . .
. . . .
. . . .
. . .
. . .
. . .
. . .
. . . .
. . . .
. . . .
. . . .
. . . .
. . . .
. . . .
. . . .
. . . .
. . . .
. . . .
. . . .
. . . .
. . . .
. . . .
. . . .
. . . .
. . . .
. . . .
. . . .
. . . .
. . . .
. . .
. . .
. . .
. . .
. . .
. . . .
. . . .
. . . .
. . . .
. . . .
. . . .
. . . .
. . . .
. . . .
. . . .
. . . .
. . . .
. . . .
. . . .
. . . .
1
�
1 Mousing
First, how do we move around and select things?
Rotate view
Left-mouse Drag
Translates view
Ctrl Left-Mouse Drag
Label Atom
Shift Left-Mouse
Zoom in and out
Right-Mouse Drag
Centre on atom
Middle-mouse
Increase map contour level
Scroll-wheel Forward
Scroll-wheel Backward Decrease map contour level
2 Introductory Tutorial
In this tutorial, we will learn how to do the following:
1. Start Coot
2. Display coordinates
3. Display a map
4. Zoom in and out
5. Recentre on Different Atoms
6. Change the Clipping (Slab)
7. Recontour the Map
8. Change the Map Colour
9. Display rotamers and refine residue
2.1 Get the files
The files are already in the "tutorials" folder
2.2 Start Coot
Before you start coot, you need to setup the proper environment. This is currently
done by “sourcing” a setup file. The location of this setup file is system
dependent,
For the LMB tutorial
To then use coot, simply type (in the X11 window)
% source /Users/vis/.cshrc
%coot
When you first start coot for this tutorial, you may see a message saying
that there is an "auto-save" file and asking if you want to use it.
For the purpose of this tutorial, click on "No" to answer this question.
When you first start coot, it should look something like Figure 1.
2
�
Figure 1: Coot at Startup
Not much to see at present... Actually, from now coot screenshots will be
displayed with a white background, whereas you will see a black one
2.3 Display Coordinates
So let’s read in those coordinates:
Select “File” from the Coot menu-bar1
Select the “Open Coordinates” menu item
[CootdisplaysaCoordinatesFileSelectionwindow]
For the LMB tutorial, the files you need will be in:
/Users/vis/tutorials/coot
Either
– Select tutorial.pdb from the “Files” list
or
– Type demo.pdb in the Selection: entry
Click “OK” in the Coordinates File Selection window
[CootdisplaysthecoordinatesintheGraphicsWindow]
2.4 Adjust Virtual Trackball
By default, Coot has a “virtual trackball” to relate the motion of the molecule to
the motion of the mouse. Many people don’t like this.
So you might like to try the following:
In the Coot main menu-bar:
HID Virtual Trackball Flat
(Use the “Spherical Surface” option to turn it back to how it is by default)
1Note you can also use “Alt-F” instead of clicking on “File”
3
�
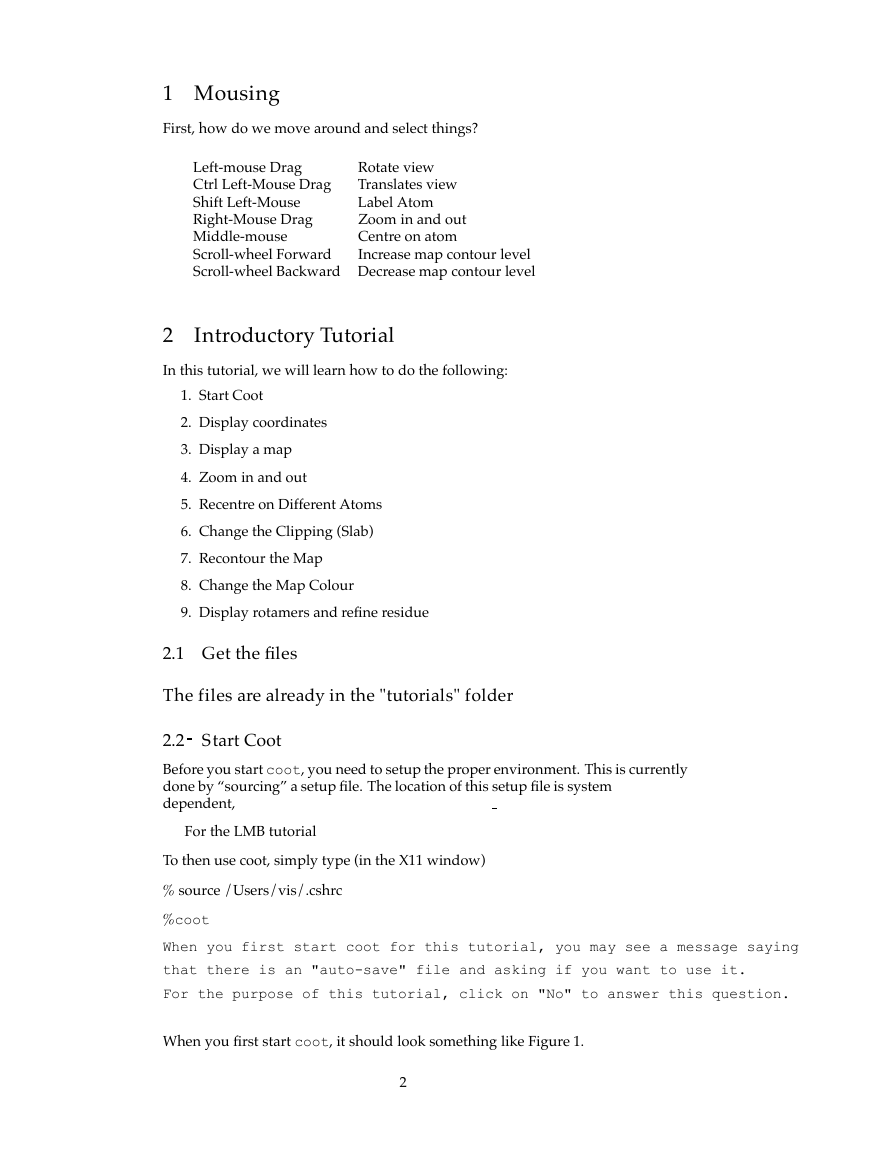
Figure 2: Coot After Loading Coordinates
2.5 Display maps
We are at the stage where we are looking at the results of the refinement. The
refinement programs stores its data (labelled lists of structure factor amplitudes
and phases) in an “MTZ” file. Let’s take a look. . .
Select “File” from the Coot menu-bar
Select “Auto Open MTZ” menu item [CootdisplaysaDatasetFileSelection
window]
Select the filename rnasa-1.8-all refmac1.mtz
If you choose instead “Open MTZ, cif or phs...” you will see:
[CootdisplaysaDatasetFileSelectionwindow]
Select the filename rnasa-1.8-all refmac1.mtz
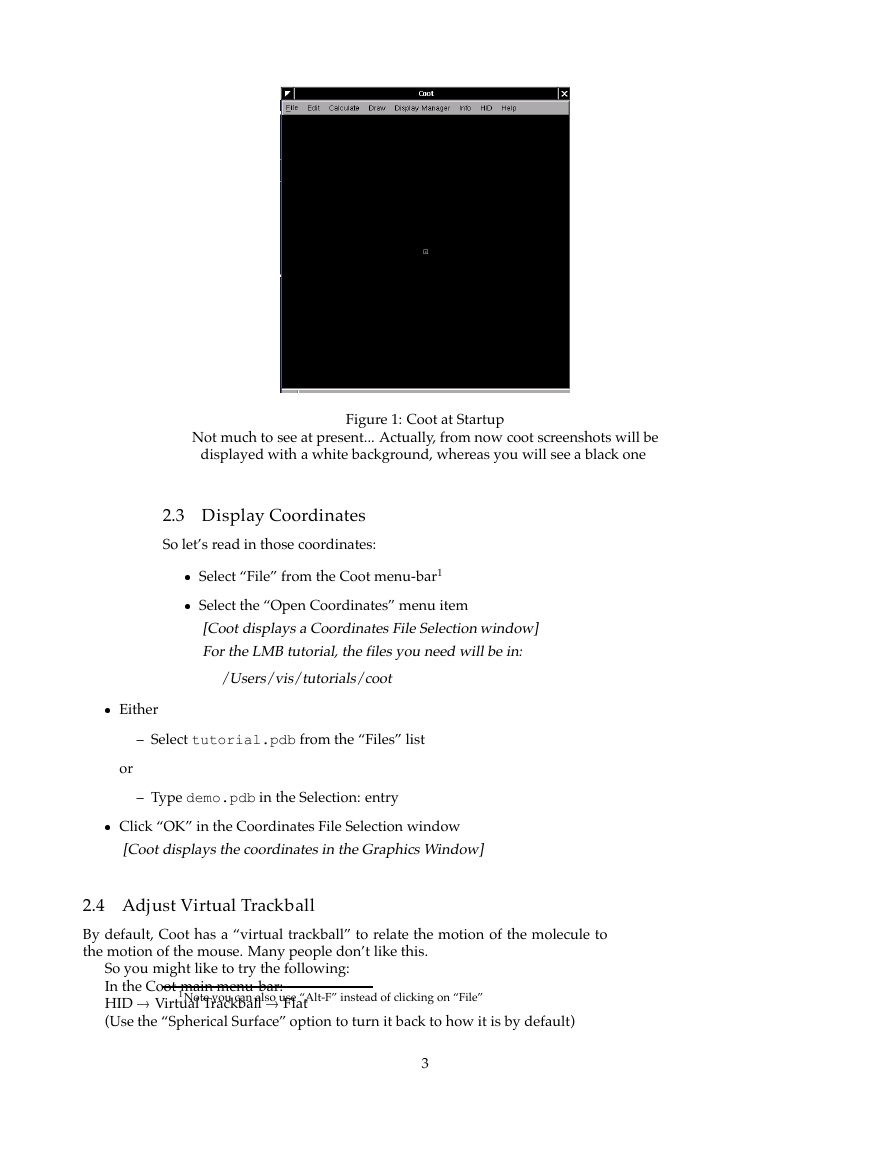
[CootdisplaysaDatasetColumnLabelSelectionwindow]
Notice that you have a selection of different column labels for the “Ampli-
tudes” and “Phases”, however, let’s use the defaults: “FWT” and “PHWT”.
Press “OK” in the Column Label Window
Now open the MTZ file and select column labels “DELFWT” and “PHDELWT”.
So now we have 2 maps (whether auto-opened or not).
2.6 Zoom in and out
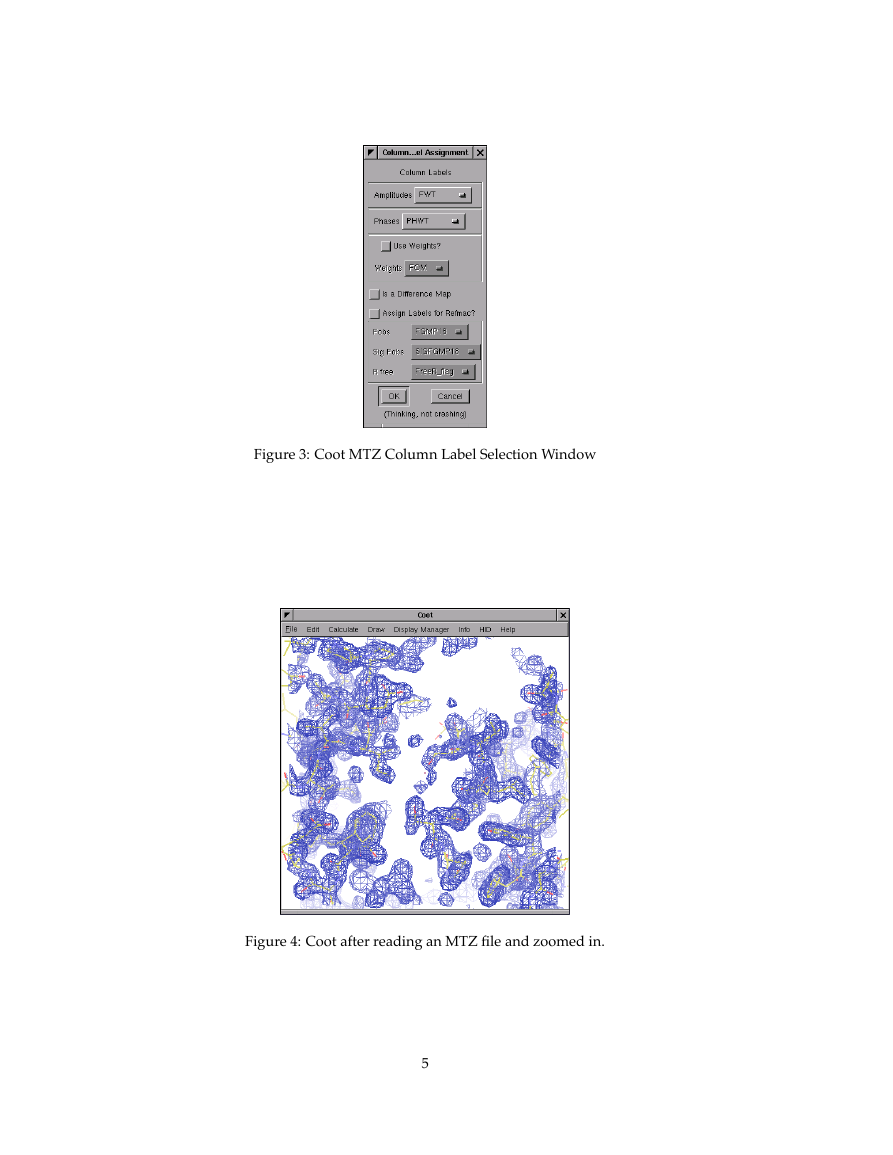
To zoom in, click Right-mouse and drag it left-to-right2. To zoom out again, move
the mouse the opposite way.
2or up-to-down, if you prefer that
4
�
Figure 3: Coot MTZ Column Label Selection Window
Figure 4: Coot after reading an MTZ file and zoomed in.
5
�
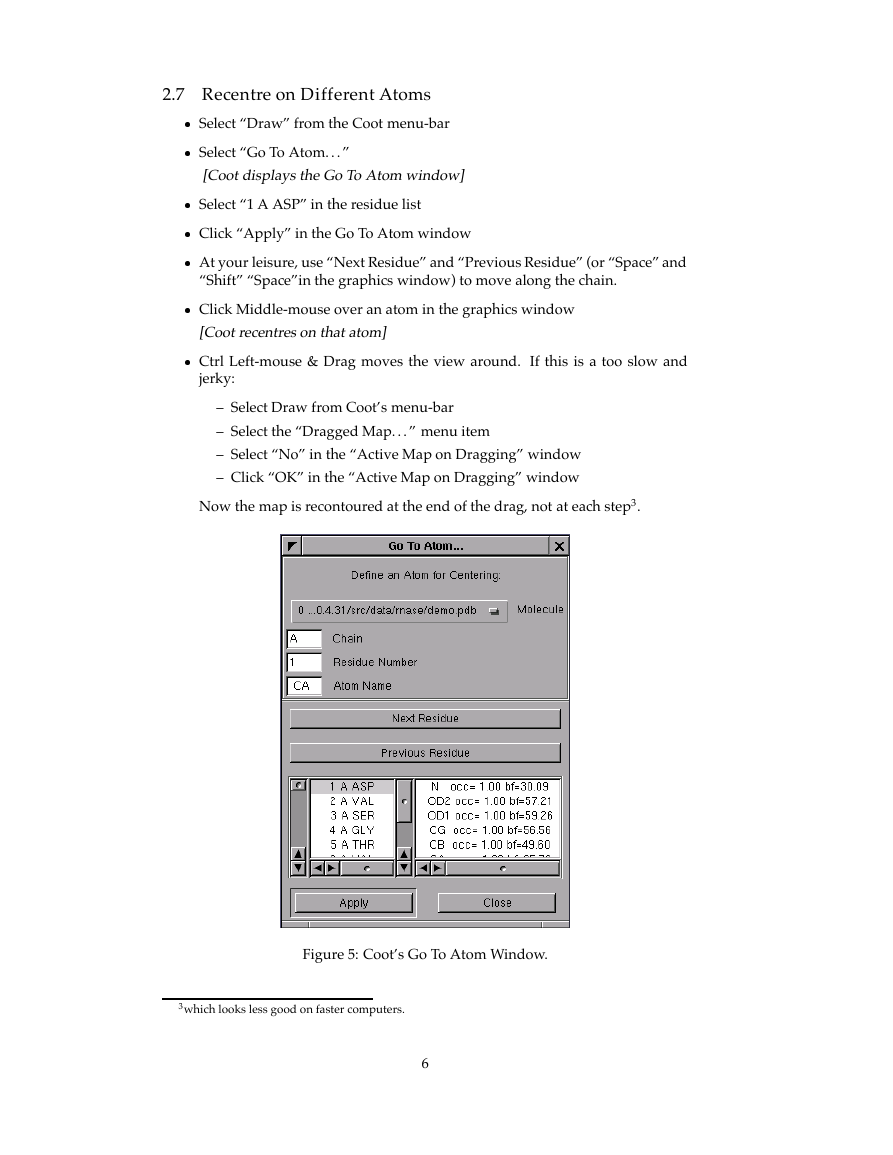
2.7 Recentre on Different Atoms
Select “Draw” from the Coot menu-bar
Select “Go To Atom. . . ”
[CootdisplaystheGoToAtomwindow]
Select “1 A ASP” in the residue list
Click “Apply” in the Go To Atom window
At your leisure, use “Next Residue” and “Previous Residue” (or “Space” and
“Shift” “Space”in the graphics window) to move along the chain.
Click Middle-mouse over an atom in the graphics window
[Cootrecentresonthatatom]
Ctrl Left-mouse & Drag moves the view around. If this is a too slow and
jerky:
– Select Draw from Coot’s menu-bar
– Select the “Dragged Map. . . ” menu item
– Select “No” in the “Active Map on Dragging” window
– Click “OK” in the “Active Map on Dragging” window
Now the map is recontoured at the end of the drag, not at each step3.
Figure 5: Coot’s Go To Atom Window.
3which looks less good on faster computers.
6
�
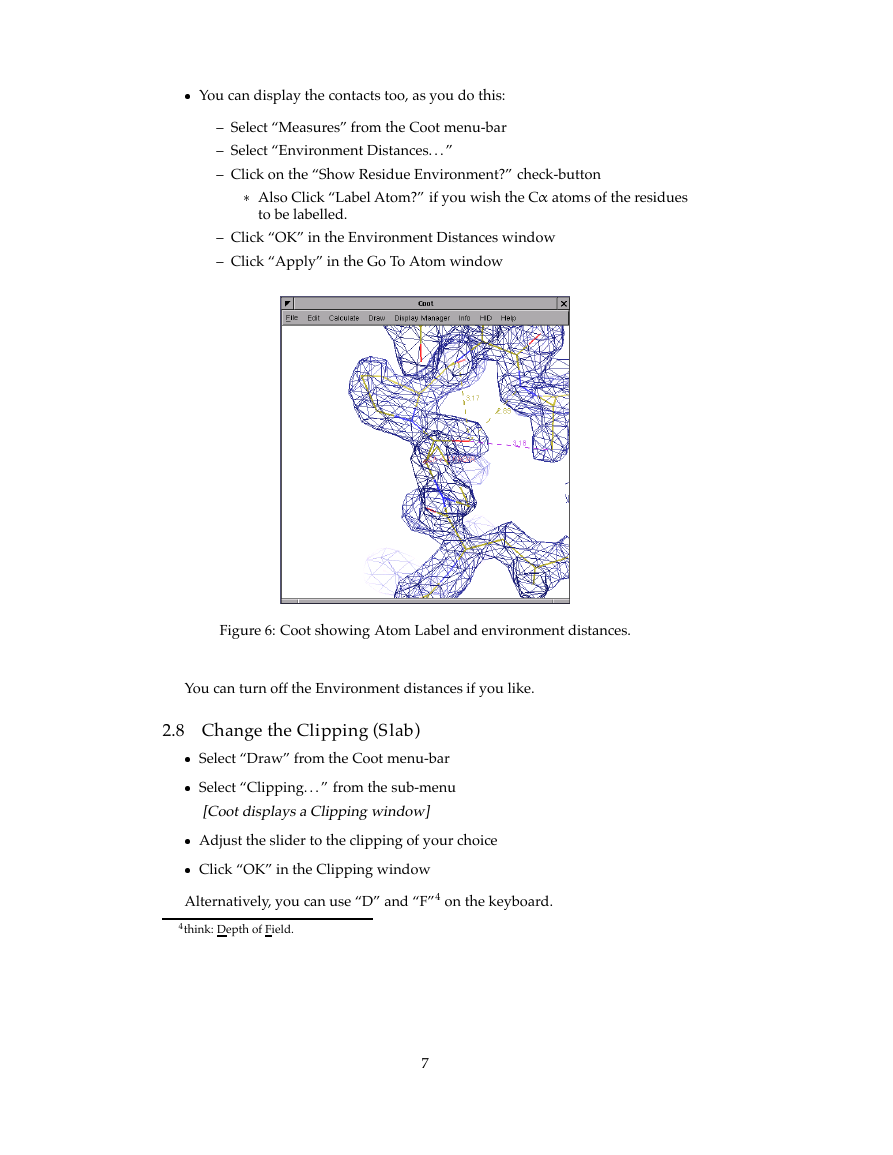
You can display the contacts too, as you do this:
– Select “Measures” from the Coot menu-bar
– Select “Environment Distances. . . ”
– Click on the “Show Residue Environment?” check-button
� Also Click “Label Atom?” if you wish the C atoms of the residues
to be labelled.
– Click “OK” in the Environment Distances window
– Click “Apply” in the Go To Atom window
Figure 6: Coot showing Atom Label and environment distances.
You can turn off the Environment distances if you like.
2.8 Change the Clipping (Slab)
Select “Draw” from the Coot menu-bar
Select “Clipping. . . ” from the sub-menu
[CootdisplaysaClippingwindow]
Adjust the slider to the clipping of your choice
Click “OK” in the Clipping window
Alternatively, you can use “D” and “F”4 on the keyboard.
4think: Depth of Field.
7
�
2.9 Recontour the Map
Scroll your scroll-wheel forwards one click5
[Cootrecontoursthemapusinga0.05electron/˚A highercontourlevel]
Scroll your scroll-wheel forwards and backwards more clicks and see the
contour level changing.
2.10 Change the Map Colour
Select “Edit” from the Coot menu-bar
Select “Map Colour” in the sub-menu
Select “0 xxx FWT PHWT” in the sub-menu
[CootdisplaysaMapColourSelectionwindow]
Choose a new colour by clicking on the colour widgets
[Cootchangesthemapcolourtomatchtheselection]
Click “OK” in the Map Colour Selection window
2.11 Select a Map
Select a map for model building:
Menubar: Calculate Model/Fit/Refine...
[CootdisplaystheModel/Fit/Refinewindow]
Select “Select Map. . . ” from the Model/Fit/Refine window
click OK (you want to select the map with “. . . FWT PHWT”)
3 Model Building
“So what’s wrong with this structure?” you might ask.
There are several ways to analyse structural problems and some of them are
available in Coot.
Validate [Experimental] Geometry Analysis tutorial.pdb
Look at the graph. There are 2 area of outstanding badness in the A chain, around
41A and 89A.
Let’s look at 89A first - click on the block for 89A.
[Cootmovestheviewsothat89ACAisatthecentreofthescreen]
5don’t click it down.
8
�



 2023年江西萍乡中考道德与法治真题及答案.doc
 2012年重庆南川中考生物真题及答案.doc
 2013年江西师范大学地理学综合及文艺理论基础考研真题.doc
 2020年四川甘孜小升初语文真题及答案I卷.doc
 2020年注册岩土工程师专业基础考试真题及答案.doc
 2023-2024学年福建省厦门市九年级上学期数学月考试题及答案.doc
 2021-2022学年辽宁省沈阳市大东区九年级上学期语文期末试题及答案.doc
 2022-2023学年北京东城区初三第一学期物理期末试卷及答案.doc
 2018上半年江西教师资格初中地理学科知识与教学能力真题及答案.doc
 2012年河北国家公务员申论考试真题及答案-省级.doc
 2020-2021学年江苏省扬州市江都区邵樊片九年级上学期数学第一次质量检测试题及答案.doc
 2022下半年黑龙江教师资格证中学综合素质真题及答案.doc