ARCHOS 97 Carbon English
Page 1 of 14
All the information contained in this manual was correct at the time of publication. However, as we are often updating and improving our products, your device’s software may have a
slightly different appearance or modified functionality than presented in this manual.Please register your product at www.archos.com/register.
Table of contents
Product care
First steps
Charging the battery
The startup wizard
Google account
Online registration
Sleep mode
Presentation
ARCHOS Description
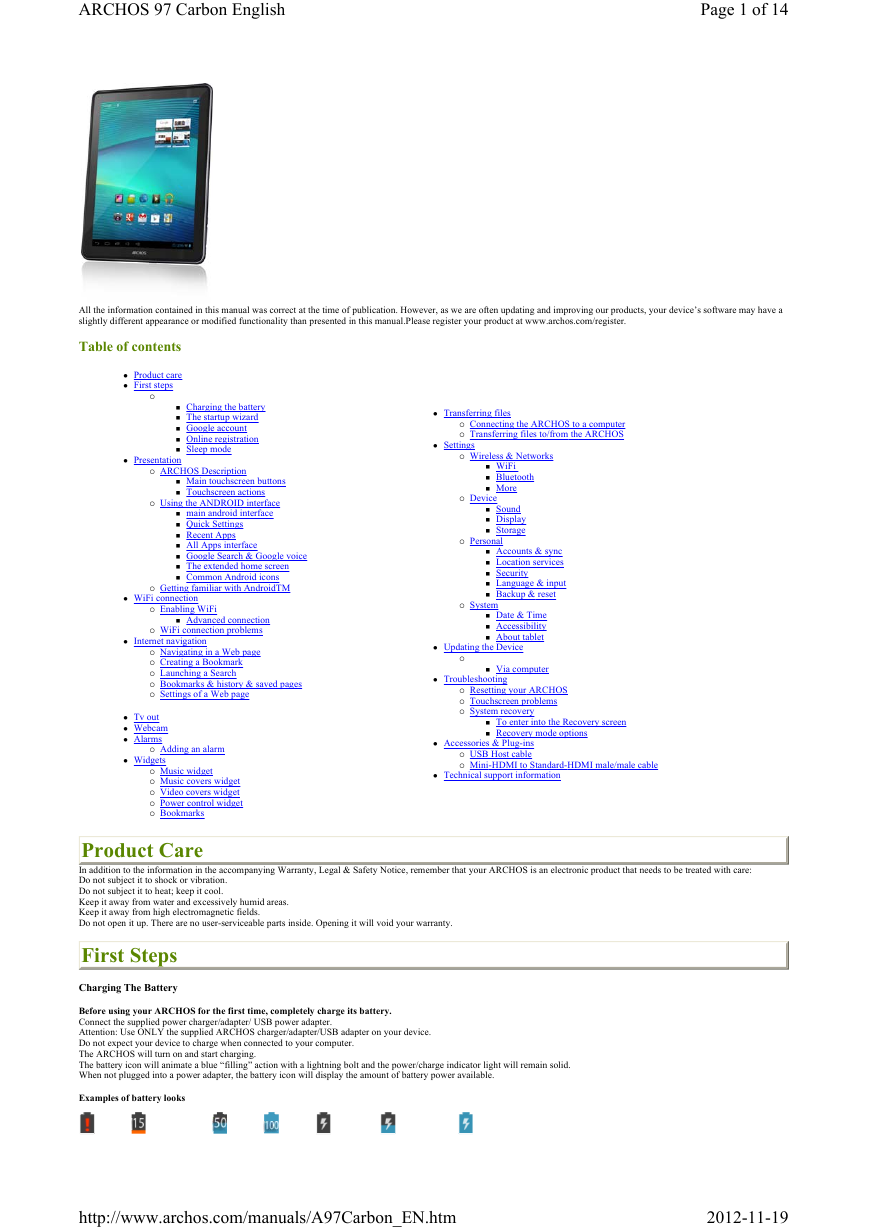
Main touchscreen buttons
Touchscreen actions
Using the ANDROID interface
main android interface
Quick Settings
Recent Apps
All Apps interface
Google Search & Google voice
The extended home screen
Common Android icons
Getting familiar with AndroidTM
WiFi connection
Enabling WiFi
Advanced connection
WiFi connection problems
Internet navigation
Navigating in a Web page
Creating a Bookmark
Launching a Search
Bookmarks & history & saved pages
Settings of a Web page
Tv out
Webcam
Alarms
Widgets
Adding an alarm
Music widget
Music covers widget
Video covers widget
Power control widget
Bookmarks
Transferring files
Connecting the ARCHOS to a computer
Transferring files to/from the ARCHOS
Settings
Wireless & Networks
WiFi
Bluetooth
More
Sound
Display
Storage
Device
Personal
Accounts & sync
Location services
Security
Language & input
Backup & reset
System
Date & Time
Accessibility
About tablet
Updating the Device
Via computer
Troubleshooting
Resetting your ARCHOS
Touchscreen problems
System recovery
To enter into the Recovery screen
Recovery mode options
Accessories & Plug-ins
USB Host cable
Mini-HDMI to Standard-HDMI male/male cable
Technical support information
Product Care
In addition to the information in the accompanying Warranty, Legal & Safety Notice, remember that your ARCHOS is an electronic product that needs to be treated with care:
Do not subject it to shock or vibration.
Do not subject it to heat; keep it cool.
Keep it away from water and excessively humid areas.
Keep it away from high electromagnetic fields.
Do not open it up. There are no user-serviceable parts inside. Opening it will void your warranty.
First Steps
Charging The Battery
Before using your ARCHOS for the first time, completely charge its battery.
Connect the supplied power charger/adapter/ USB power adapter.
Attention: Use ONLY the supplied ARCHOS charger/adapter/USB adapter on your device.
Do not expect your device to charge when connected to your computer.
The ARCHOS will turn on and start charging.
The battery icon will animate a blue “filling” action with a lightning bolt and the power/charge indicator light will remain solid.
When not plugged into a power adapter, the battery icon will display the amount of battery power available.
Examples of battery looks
http://www.archos.com/manuals/A97Carbon_EN.htm
2012-11-19
�
ARCHOS 97 Carbon English
Page 2 of 14
0% Battery 1% - 15% Battery
16% - 99% Battery full Charging
Battery empty
Charging
Battery filling up
Charging over
Battery full
The Startup Wizard
The first time you turn on the ARCHOS, the installation wizard will help you configure the main functions of your ARCHOS.
Touch-screen calibration
Language
Date & time
Location service options: Google's location service uses WiFi networks to provide apps with your approximate location without using GPS.
WiFi connection: we recommend that you set up your device in the WiFi zone of the network that you will regularly be using.
You can change these settings later with the Location & security and Google Search settings.
3rd party apps: these Android applications have been developed by Android's users or others companies, not by ARCHOS and are provided at no charge.
Google Account
To benefit fully from Google services like downloading applications and movies from Google Play, you need to add a Google account.
To add a Google account:
1. Tap Settings.
2.
3.
4.
In the Settings application, tap Accounts & sync.
In the upper right corner, tap Add account.
In the Add an account window, select Google.
If you have already a Google account, tap Existing and follow the on-screen instruction.
If you have not a Google account, tap New and follow the on-screen instructions.
Once you are registered, you can access Google mail, Google play and many other services.
Online Registration
Do not forget to register your device. Go to www.archos.com/register.
Sleep Mode
Auto Sleep
Your tablet will automatically set to Sleep if you haven’t touched the screen for a while.
You can change the Auto Sleep period if required.
1. Select Settings > Display.
2. Select Sleep.
3. Select a duration.
Setting Sleep
Press the (Sleep/Power) button to set Sleep.
Switching on
1. Press the (Sleep/Power) button to switch power on.
The screen will light and show the lock icon on-screen.
2. Touch the lock icon and slide the circle across to the unlock icon.
The tablet will unlock and the display will show the last screen you used.
Presentation
ARCHOS Description
Main Touchscreen Buttons
The Home button - to return to the main screen.
The Recent Apps button
- to navigate among your recently opened apps.
- to close apps by swiping left or right.
The Search and Voice search buttons
- to search your tablet and the web by typing or by speaking.
The Back button - to go back to your previous
screen.
The Apps button - to find all your installed
applications and widgets.
Touchscreen Actions
Drag an item to change its position
- Swipe up/down to scroll through a list
- Swipe left/right to change the view
Double-tap
Pinch
Touch and hold it for a moment, then without lifting your fingertip, move your fingertip on the screen until the item
reaches its destination.
Touch the screen and then quickly move your fingertips across the screen without lifting your fingertip.
Do not pause on the screen with your fingertips at the initial point of contact or you may drag an item.
Quickly tap the screen twice on a webpage or other application screen to zoom.
In some apps (such as Maps), you can zoom in and out by placing two fingers on the
screen at once and pinching them together (to zoom out) or spreading them apart (to
zoom in).
http://www.archos.com/manuals/A97Carbon_EN.htm
2012-11-19
�
ARCHOS 97 Carbon English
Page 3 of 14
Using the ANDROID interface
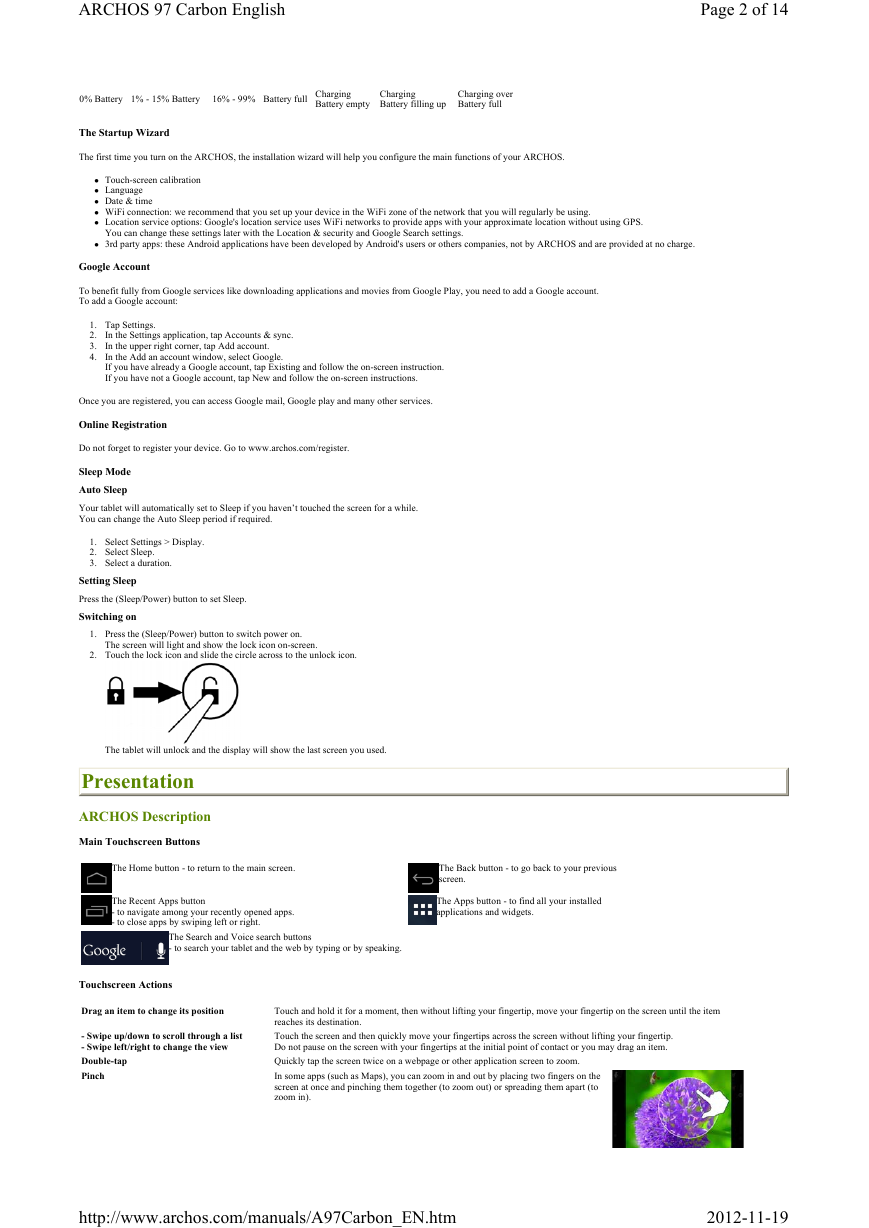
Main Android Interface
1. GoogleTM Search
Touch "Google" for text search or touch the microphone icon for voice
search.
2. Recent apps buttons
Dislpays applications you have opened
3. Home button
4. Back button
To go back to the device home screen
To go back to the previous screen. In an application, you go back to one level
up.
5. All Apps button
Touch this icon to show all the applications and widgets installed on your
ARCHOS.
All your downloaded applications are here.
6. Widget
7. AndroidTM apps shortcuts
Touch to start an application.
8. The status bar
Displays notifications and quick settings
Quick Settings
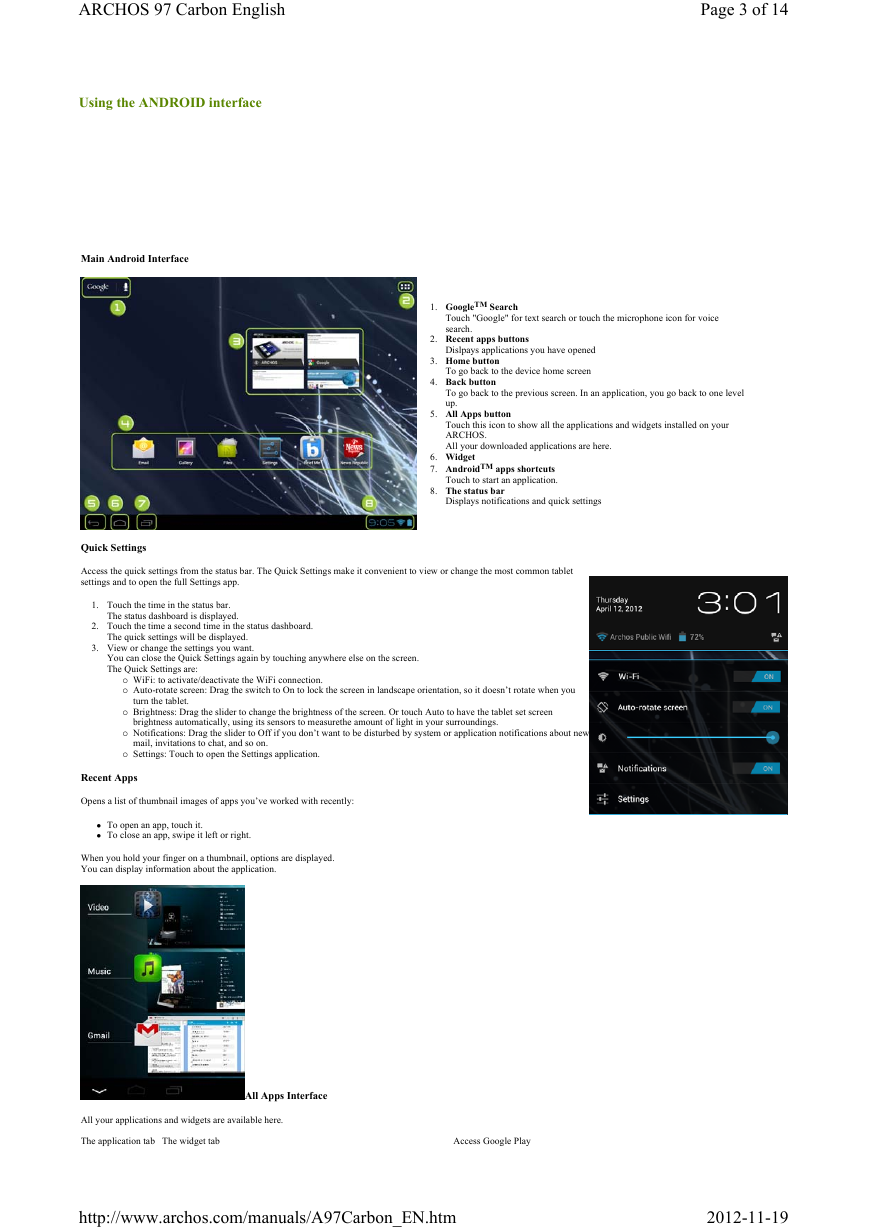
Access the quick settings from the status bar. The Quick Settings make it convenient to view or change the most common tablet
settings and to open the full Settings app.
1. Touch the time in the status bar.
The status dashboard is displayed.
2. Touch the time a second time in the status dashboard.
The quick settings will be displayed.
3. View or change the settings you want.
You can close the Quick Settings again by touching anywhere else on the screen.
The Quick Settings are:
WiFi: to activate/deactivate the WiFi connection.
Auto-rotate screen: Drag the switch to On to lock the screen in landscape orientation, so it doesn’t rotate when you
turn the tablet.
Brightness: Drag the slider to change the brightness of the screen. Or touch Auto to have the tablet set screen
brightness automatically, using its sensors to measurethe amount of light in your surroundings.
Notifications: Drag the slider to Off if you don’t want to be disturbed by system or application notifications about new
mail, invitations to chat, and so on.
Settings: Touch to open the Settings application.
Recent Apps
Opens a list of thumbnail images of apps you’ve worked with recently:
To open an app, touch it.
To close an app, swipe it left or right.
When you hold your finger on a thumbnail, options are displayed.
You can display information about the application.
All Apps Interface
All your applications and widgets are available here.
The application tab The widget tab Access Google Play
http://www.archos.com/manuals/A97Carbon_EN.htm
2012-11-19
�
ARCHOS 97 Carbon English
Page 4 of 14
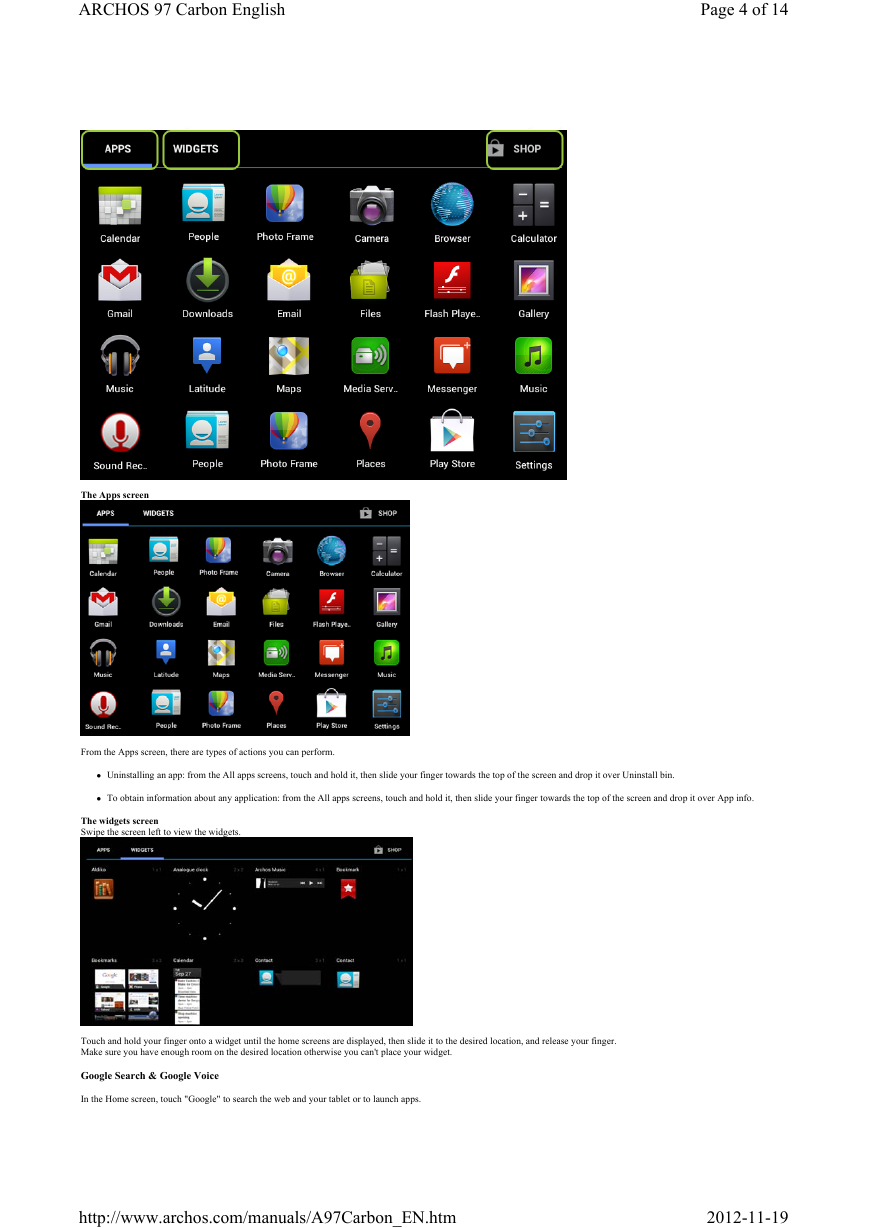
The Apps screen
From the Apps screen, there are types of actions you can perform.
Uninstalling an app: from the All apps screens, touch and hold it, then slide your finger towards the top of the screen and drop it over Uninstall bin.
To obtain information about any application: from the All apps screens, touch and hold it, then slide your finger towards the top of the screen and drop it over App info.
The widgets screen
Swipe the screen left to view the widgets.
Touch and hold your finger onto a widget until the home screens are displayed, then slide it to the desired location, and release your finger.
Make sure you have enough room on the desired location otherwise you can't place your widget.
Google Search & Google Voice
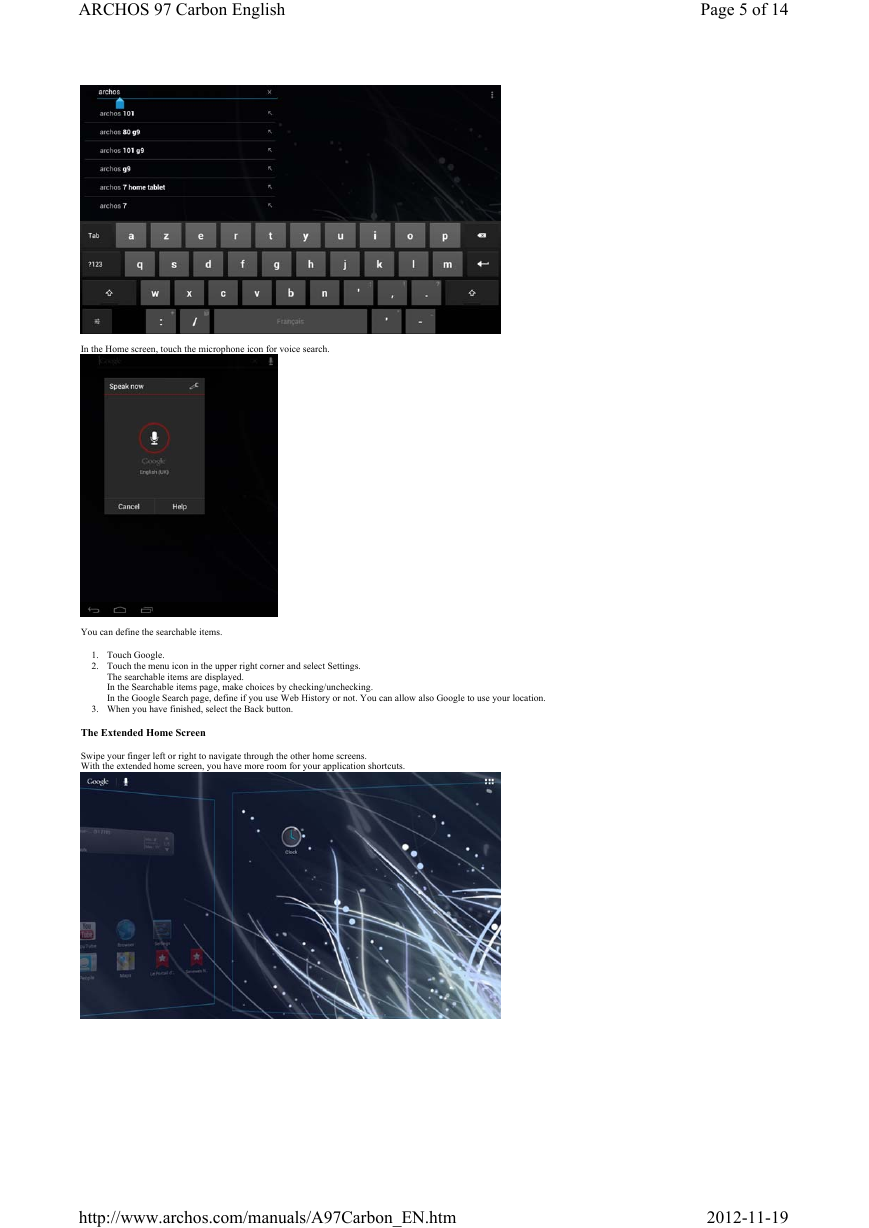
In the Home screen, touch "Google" to search the web and your tablet or to launch apps.
http://www.archos.com/manuals/A97Carbon_EN.htm
2012-11-19
�
ARCHOS 97 Carbon English
Page 5 of 14
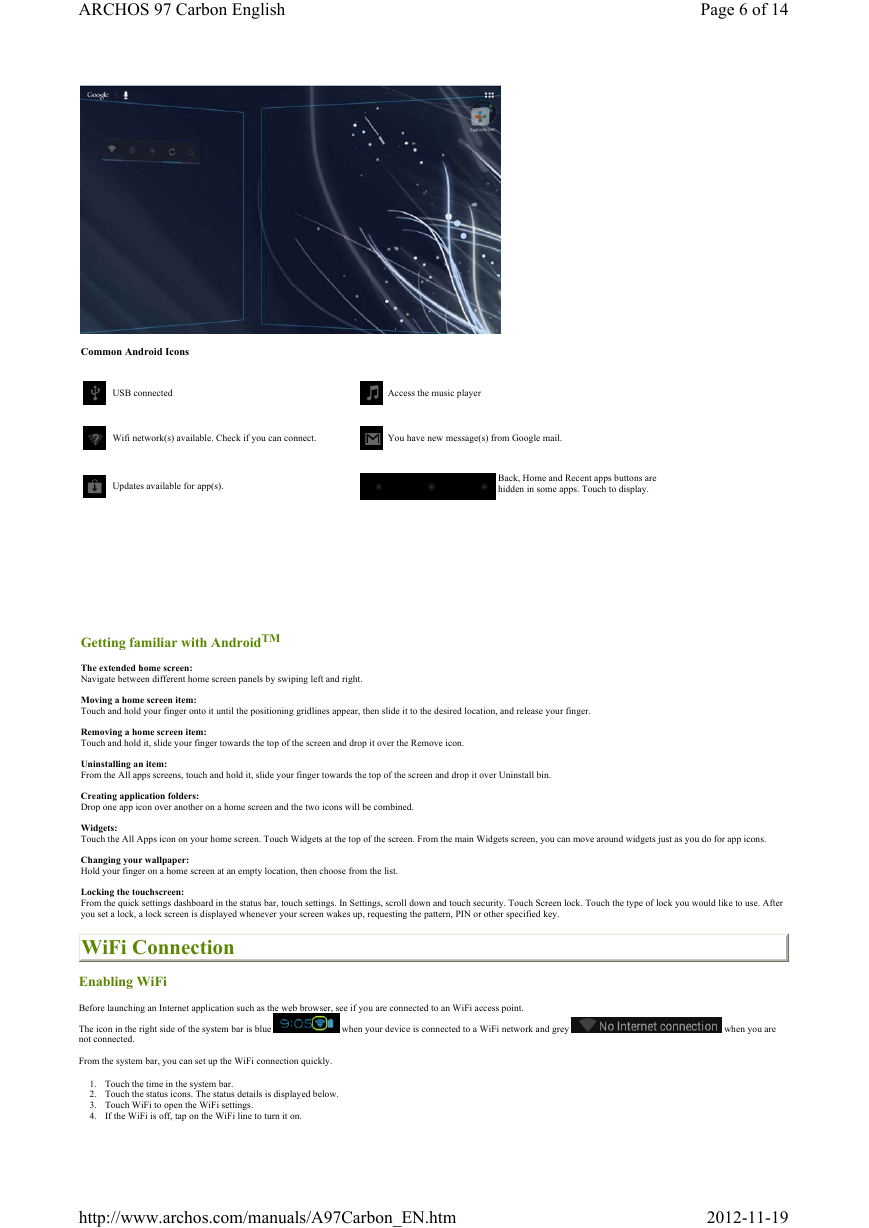
In the Home screen, touch the microphone icon for voice search.
You can define the searchable items.
1. Touch Google.
2. Touch the menu icon in the upper right corner and select Settings.
The searchable items are displayed.
In the Searchable items page, make choices by checking/unchecking.
In the Google Search page, define if you use Web History or not. You can allow also Google to use your location.
3. When you have finished, select the Back button.
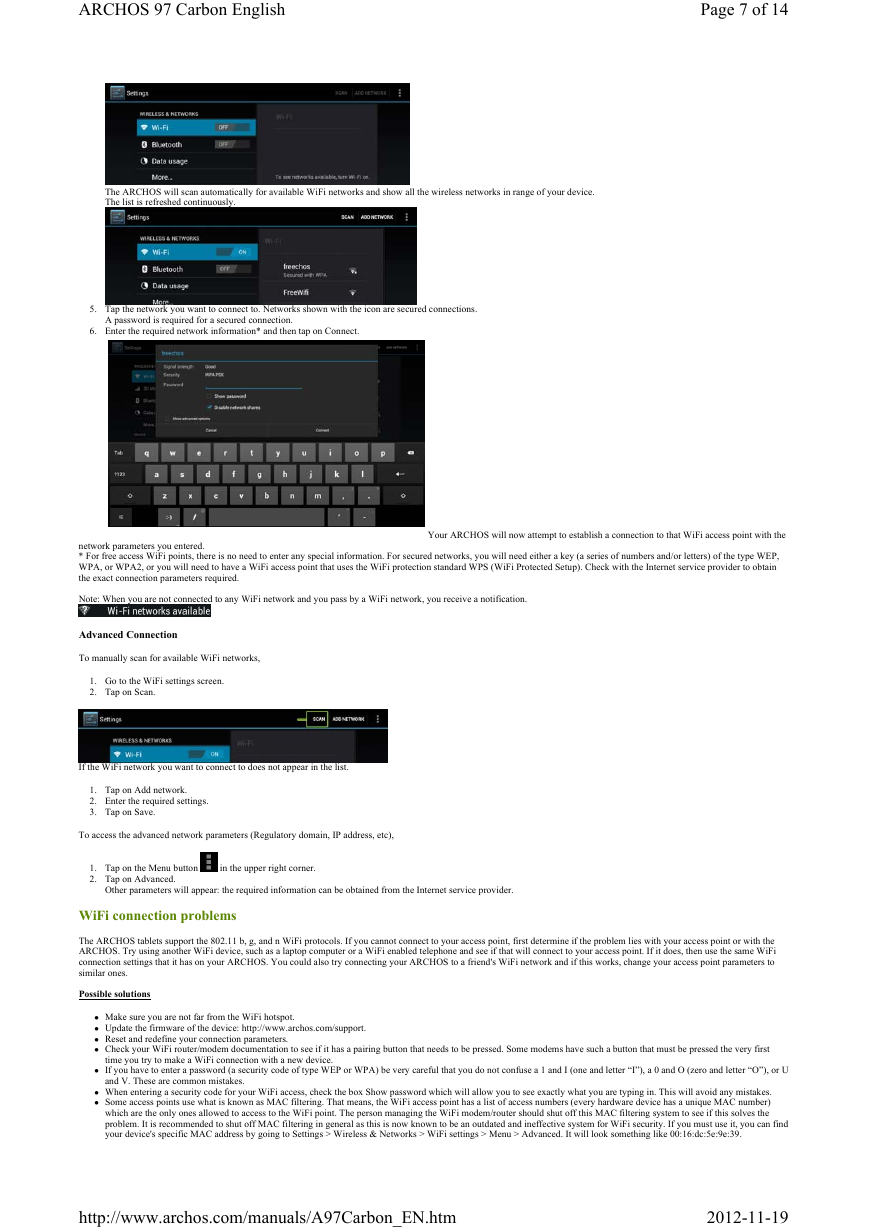
The Extended Home Screen
Swipe your finger left or right to navigate through the other home screens.
With the extended home screen, you have more room for your application shortcuts.
http://www.archos.com/manuals/A97Carbon_EN.htm
2012-11-19
�
ARCHOS 97 Carbon English
Page 6 of 14
Common Android Icons
USB connected
Access the music player
Wifi network(s) available. Check if you can connect.
You have new message(s) from Google mail.
Updates available for app(s).
Back, Home and Recent apps buttons are
hidden in some apps. Touch to display.
Getting familiar with AndroidTM
The extended home screen:
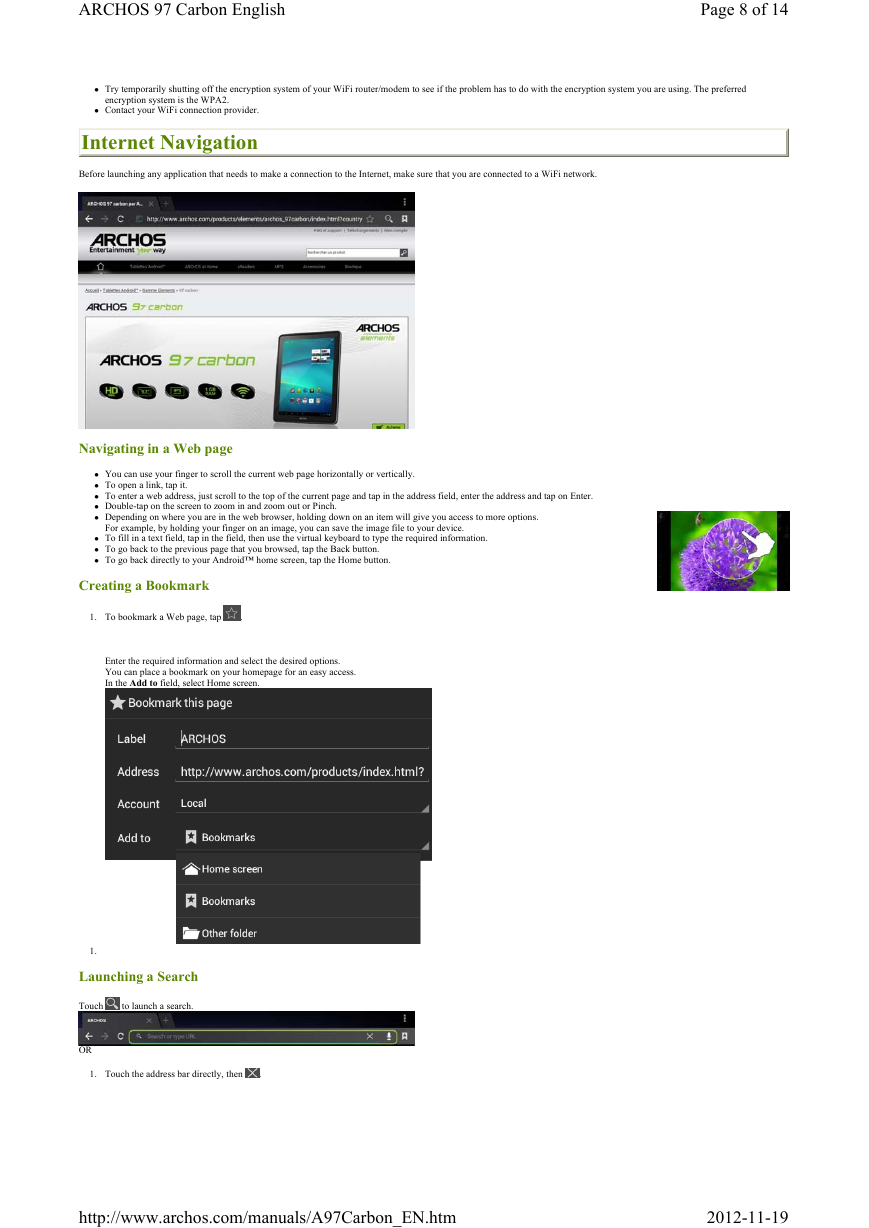
Navigate between different home screen panels by swiping left and right.
Moving a home screen item:
Touch and hold your finger onto it until the positioning gridlines appear, then slide it to the desired location, and release your finger.
Removing a home screen item:
Touch and hold it, slide your finger towards the top of the screen and drop it over the Remove icon.
Uninstalling an item:
From the All apps screens, touch and hold it, slide your finger towards the top of the screen and drop it over Uninstall bin.
Creating application folders:
Drop one app icon over another on a home screen and the two icons will be combined.
Widgets:
Touch the All Apps icon on your home screen. Touch Widgets at the top of the screen. From the main Widgets screen, you can move around widgets just as you do for app icons.
Changing your wallpaper:
Hold your finger on a home screen at an empty location, then choose from the list.
Locking the touchscreen:
From the quick settings dashboard in the status bar, touch settings. In Settings, scroll down and touch security. Touch Screen lock. Touch the type of lock you would like to use. After
you set a lock, a lock screen is displayed whenever your screen wakes up, requesting the pattern, PIN or other specified key.
WiFi Connection
Enabling WiFi
Before launching an Internet application such as the web browser, see if you are connected to an WiFi access point.
The icon in the right side of the system bar is blue
not connected.
From the system bar, you can set up the WiFi connection quickly.
when your device is connected to a WiFi network and grey
when you are
1. Touch the time in the system bar.
2. Touch the status icons. The status details is displayed below.
3. Touch WiFi to open the WiFi settings.
4.
If the WiFi is off, tap on the WiFi line to turn it on.
http://www.archos.com/manuals/A97Carbon_EN.htm
2012-11-19
�
ARCHOS 97 Carbon English
Page 7 of 14
The ARCHOS will scan automatically for available WiFi networks and show all the wireless networks in range of your device.
The list is refreshed continuously.
5. Tap the network you want to connect to. Networks shown with the icon are secured connections.
A password is required for a secured connection.
6. Enter the required network information* and then tap on Connect.
Your ARCHOS will now attempt to establish a connection to that WiFi access point with the
network parameters you entered.
* For free access WiFi points, there is no need to enter any special information. For secured networks, you will need either a key (a series of numbers and/or letters) of the type WEP,
WPA, or WPA2, or you will need to have a WiFi access point that uses the WiFi protection standard WPS (WiFi Protected Setup). Check with the Internet service provider to obtain
the exact connection parameters required.
Note: When you are not connected to any WiFi network and you pass by a WiFi network, you receive a notification.
Advanced Connection
To manually scan for available WiFi networks,
1. Go to the WiFi settings screen.
2. Tap on Scan.
If the WiFi network you want to connect to does not appear in the list.
1. Tap on Add network.
2. Enter the required settings.
3. Tap on Save.
To access the advanced network parameters (Regulatory domain, IP address, etc),
1. Tap on the Menu button
2. Tap on Advanced.
in the upper right corner.
Other parameters will appear: the required information can be obtained from the Internet service provider.
WiFi connection problems
The ARCHOS tablets support the 802.11 b, g, and n WiFi protocols. If you cannot connect to your access point, first determine if the problem lies with your access point or with the
ARCHOS. Try using another WiFi device, such as a laptop computer or a WiFi enabled telephone and see if that will connect to your access point. If it does, then use the same WiFi
connection settings that it has on your ARCHOS. You could also try connecting your ARCHOS to a friend's WiFi network and if this works, change your access point parameters to
similar ones.
Possible solutions
Make sure you are not far from the WiFi hotspot.
Update the firmware of the device: http://www.archos.com/support.
Reset and redefine your connection parameters.
Check your WiFi router/modem documentation to see if it has a pairing button that needs to be pressed. Some modems have such a button that must be pressed the very first
time you try to make a WiFi connection with a new device.
and V. These are common mistakes.
If you have to enter a password (a security code of type WEP or WPA) be very careful that you do not confuse a 1 and I (one and letter “I”), a 0 and O (zero and letter “O”), or U
When entering a security code for your WiFi access, check the box Show password which will allow you to see exactly what you are typing in. This will avoid any mistakes.
Some access points use what is known as MAC filtering. That means, the WiFi access point has a list of access numbers (every hardware device has a unique MAC number)
which are the only ones allowed to access to the WiFi point. The person managing the WiFi modem/router should shut off this MAC filtering system to see if this solves the
problem. It is recommended to shut off MAC filtering in general as this is now known to be an outdated and ineffective system for WiFi security. If you must use it, you can find
your device's specific MAC address by going to Settings > Wireless & Networks > WiFi settings > Menu > Advanced. It will look something like 00:16:dc:5e:9e:39.
http://www.archos.com/manuals/A97Carbon_EN.htm
2012-11-19
�
ARCHOS 97 Carbon English
Page 8 of 14
Try temporarily shutting off the encryption system of your WiFi router/modem to see if the problem has to do with the encryption system you are using. The preferred
encryption system is the WPA2.
Contact your WiFi connection provider.
Internet Navigation
Before launching any application that needs to make a connection to the Internet, make sure that you are connected to a WiFi network.
Navigating in a Web page
You can use your finger to scroll the current web page horizontally or vertically.
To open a link, tap it.
To enter a web address, just scroll to the top of the current page and tap in the address field, enter the address and tap on Enter.
Double-tap on the screen to zoom in and zoom out or Pinch.
Depending on where you are in the web browser, holding down on an item will give you access to more options.
For example, by holding your finger on an image, you can save the image file to your device.
To fill in a text field, tap in the field, then use the virtual keyboard to type the required information.
To go back to the previous page that you browsed, tap the Back button.
To go back directly to your Android™ home screen, tap the Home button.
Creating a Bookmark
1. To bookmark a Web page, tap
.
Enter the required information and select the desired options.
You can place a bookmark on your homepage for an easy access.
In the Add to field, select Home screen.
1.
Launching a Search
Touch
to launch a search.
OR
1. Touch the address bar directly, then
.
http://www.archos.com/manuals/A97Carbon_EN.htm
2012-11-19
�


 2023年江西萍乡中考道德与法治真题及答案.doc
 2012年重庆南川中考生物真题及答案.doc
 2013年江西师范大学地理学综合及文艺理论基础考研真题.doc
 2020年四川甘孜小升初语文真题及答案I卷.doc
 2020年注册岩土工程师专业基础考试真题及答案.doc
 2023-2024学年福建省厦门市九年级上学期数学月考试题及答案.doc
 2021-2022学年辽宁省沈阳市大东区九年级上学期语文期末试题及答案.doc
 2022-2023学年北京东城区初三第一学期物理期末试卷及答案.doc
 2018上半年江西教师资格初中地理学科知识与教学能力真题及答案.doc
 2012年河北国家公务员申论考试真题及答案-省级.doc
 2020-2021学年江苏省扬州市江都区邵樊片九年级上学期数学第一次质量检测试题及答案.doc
 2022下半年黑龙江教师资格证中学综合素质真题及答案.doc