logo资料库

DoCoMo移动电话-D903iTV说明书.pdf

第1页 / 共524页
第2页 / 共524页
第3页 / 共524页
第4页 / 共524页
第5页 / 共524页
第6页 / 共524页
第7页 / 共524页
第8页 / 共524页
资料共524页,剩余部分请下载后查看
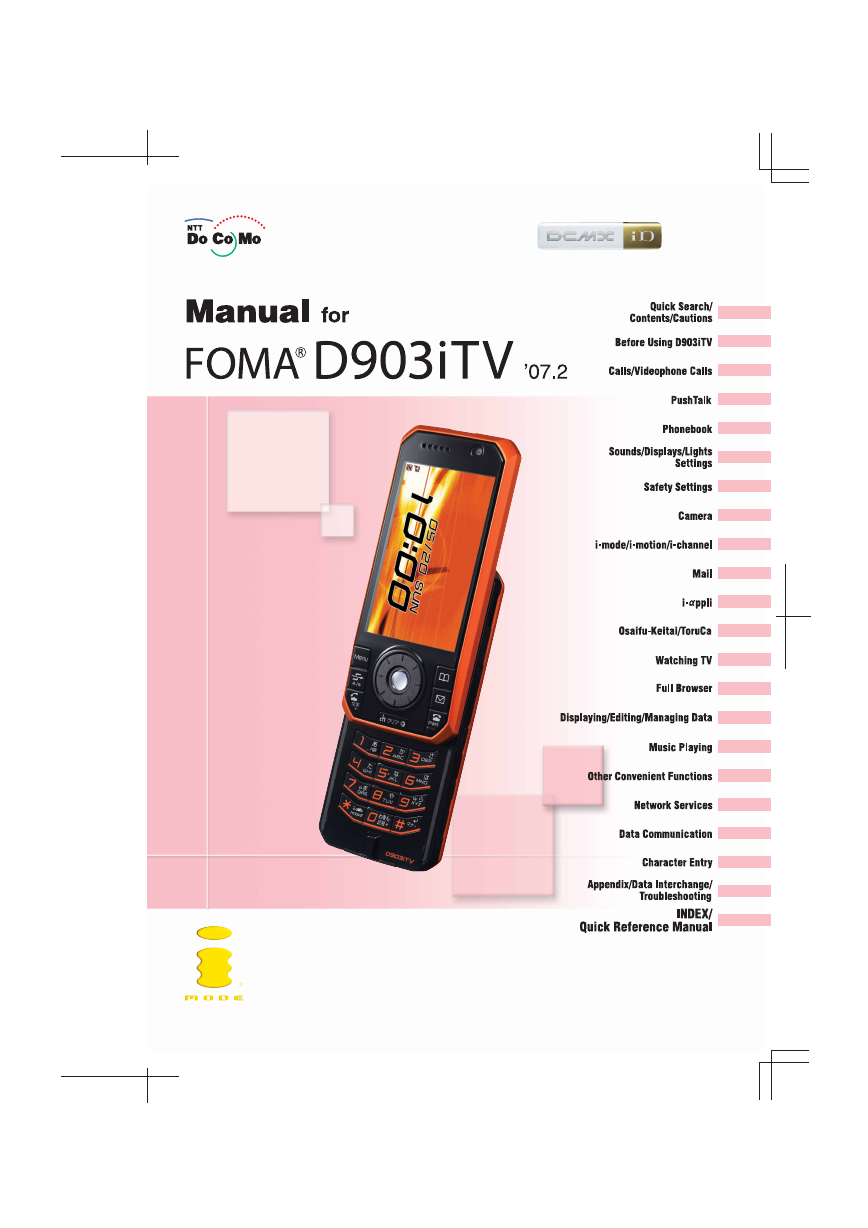
Manual for FOMA D903iTV
Watch Television via Your D903iTV
Before Watching TV
Watching TV
1Seg Viewing Screen
Recording TV
Making Convenient Use of the 1Seg Function
Before using your FOMA terminal
For first time user of the FOMA terminal
Quick Search/Contents/Cautions
How to use and refer to this manual
Quick Search
Contents
Features and functions of FOMA D903iTV
Making full use of D903iTV
SAFETY PRECAUTIONS (Always follow these directions)
Handling instructions
About intellectual property rights
Basic package and optional accessories
Before Using D903iTV
Names and functions of parts
Reading the display
Selecting the menu
Using the UIM (FOMA card)
Attaching/removing the battery pack
Charging the battery of FOMA terminal
Checking the remaining battery level
Turning the power on/off
Switching to English display
Setting the date and time
Notifying your phone number to the other party
Checking your own phone number
Calls/Videophone Calls
Videophone
Making calls/videophone calls
Transmitting tone signals (DTMF)
Switching between a voice call and videophone call
Using Redial/Received Calls
Setting Chaku-moji
Showing/hiding your caller ID for each call
Making calls by setting the conditions
Using international calls
Setting prefix numbers added to phone number
Making a call by specifying a sub-address
Setting the alarm indicating reconnection of interrupted call
Suppressing ambient noises to improve the call quality
Talking without using hands in a car
Receiving calls/videophone calls
Switching a received call between a voice call and videophone call
Enabling use of dial keys to answer a call
Setting to start talking by opening FOMA terminal
Setting to disconnect/continue/hold a call by closing FOMA terminal
Adjusting the volume of the other party’s voice during a call
Adjusting the volume of ring alerts and other sounds emitted from FOMA terminal
Setting for incoming voice/videophone/PushTalk calls
Setting the priority screen for incoming calls during a call or packet communication
Putting incoming calls on hold when you cannot answer right away
Setting the response hold guidance
Setting the on-hold tone
Using Public mode (Driving mode)
Using Public mode (power off)
Allowing the caller to leave message when you cannot answer the call
Using Chara-den
Setting images being sent to the other party
Customizing the screen settings during a videophone call
Changing the videophone settings
Setting of switching between a voice call and videophone call
Setting how incoming videophone calls are handled during i-mode
Using the videophone by connecting to an external device
PushTalk
What’s PushTalk?
Making PushTalk calls
Receiving PushTalk calls
Registering entries into the PushTalk phonebook
Making a PushTalk call by using the PushTalk phonebook
Deleting members from the PushTalk phonebook
Setting for incoming/outgoing PushTalk calls
Phonebook
Phonebooks supported by FOMA terminal
Registering entries into the FOMA terminal phonebook
Registering entries into the UIM phonebook
Setting group names and incoming/outgoing actions
Making calls from the phonebook
Editing phonebook entries
Copying phonebook entries
Deleting phonebook entries
Saving (restoring/updating) the phonebook data to the Data Center
Setting functions for phonebook entries
Protecting the secret phonebook entries
Checking the number of registered phonebook entries
Using simple dialing to make calls
Using Data Security Service
Sounds/Displays/Lights Settings
Changing the FOMA terminal sound
Setting the effects of stereo, 3D sound and surround
Using vibrator to signal incoming calls and alarms
Setting the alert sound for charging
Setting the alarm announcing that the call is about to be cut off
Making FOMA terminal silent
Customizing Silent Mode
Changing the standby display
Changing images to be displayed for incoming/outgoing calls
Changing images for incoming/outgoing mails or for message retrieval
Displaying the other party’s phone number and name when receiving a call
Setting the light for the display and keys
Changing the display color
Setting the menu display format or menu design
Changing the battery level icon
Changing the icon for received signal level
Coordinating according to the color of FOMA terminal
Using Kisekae tool
Setting Machi-chara
Setting the lighting pattern and color for incoming calls/mails, etc.
Flashing the Enter key when receiving new information
Changing the font size
Setting the clock display
Safety Settings
Security codes
Changing the terminal security code
Setting the PIN code
Unblocking the PIN lock
Various lock functions
Preventing unauthorized use of your terminal
Using Omakase Lock
Preventing making/receiving calls
Preventing display of the phonebook or schedule
Prohibiting keypad dial
Preventing unauthorized use of functions such as the phonebook or mail
Preventing key errors
Displaying the data with Secret Attribute set
Rejecting/accepting incoming calls from the specified phone numbers
Setting the operations for incoming calls with no caller ID
Delaying the ringer action for calls from the party not registered in the phonebook
Rejecting calls from phone numbers not registered in the phonebook
Using Data Security Service
Other “Safety settings”
Camera
Before using the camera
Shooting still images
Recording videos
Setting the still image/video size or the saving method
Shooting by various methods
Changing the settings during shooting
Sending still images shot during voice calls
Using Bar Code Reader
i-mode/i-motion/i-channel
What’s i-mode?
Displaying i-mode sites
Reading and operating sites
Using My Menu
Changing your current i-mode password
Displaying Internet websites
Registering websites and i-mode sites for quick browsing
Saving site contents
Downloading images from sites
Downloading melodies from sites
Downloading PDF data from sites
Downloading dictionaries from sites
Downloading Chara-den from sites
Downloading the original certificate from sites
Downloading Kisekae tool from sites
Downloading Machi-chara from sites
Useful functions of i-mode
Making i-mode settings
When Message R/F is received
Displaying saved Message R/F
Operating certificates
i-motion
Downloading i-motion from sites
Setting auto play and the type of i-motion to be downloaded
i-channel
Displaying i-channel
Changing i-channel settings
Restoring i-channel information to the default settings
Mail
FOMA terminal mail function
Composing and sending i-mode Mail
Composing and sending Deco-mail
Attaching files
Using mail templates
Saving i-mode Mail for sending later
Composing mail quickly
Receiving i-mode Mail
Selecting i-mode Mail to receive
Checking for i-mode Mail
Replying to received i-mode Mail
Forwarding received i-mode Mail
Displaying, playing and saving attachments from i-mode Mail
Displaying mail in Inbox/Outbox
Useful functions of mail
Saving mails in the Data Center
Using the mail log
Setting mail functions of FOMA terminal
Composing and sending chat mail
Composing and sending SMS
When SMS is received
Checking for SMS
Making SMS settings
Saving SMS to the UIM
i-αppli
i-αppli
Downloading i-αppli from sites
Starting i-αppli
Using preinstalled i-αppli
Starting i-αppli with One-key Shortcut
Starting i-αppli with Two-key Shortcut
Automatically starting i-αppli
Starting i-αppli from sites or mails
Operating the i-αppli standby display
Managing i-αppli
Using various functions from i-αppli
Osaifu-Keitai/ToruCa
What’s Osaifu-Keitai?
What’s iC transfer service?
Starting Osaifu-Keitai compatible i-αppli
What’s ToruCa?
Obtaining ToruCa
Displaying ToruCa
Setting ToruCa
Preventing use of IC card functions
Watching TV
Watching TV on FOMA
Before watching TV
Setting channels
Watching TV
Using program guide i-αppli
Scheduling TV program viewing
Using data broadcast
Using TV links
Recording TV
Setting TV
Full Browser
Viewing Internet web pages designed for PC
Setting Full Browser
Displaying/Editing/Managing Data
Displaying images
Editing still images
Setting the operating conditions of images
Saving still images in the Data Center
Playing video/i-motion
Editing video/i-motion
Setting the operating conditions of video/i-motion
Moving video/i-motion to the microSD memory card
Chara-den
Displaying Chara-den
Recording Chara-den
Setting the operating conditions of Chara-den
Displaying Machi-chara
Setting the operating conditions of Machi-chara
Playing melodies
Setting the operating conditions of melodies
Viewing 1Seg image
Playing 1Seg video
microSD memory card
Inserting/removing the microSD memory card
Exchanging the data between FOMA terminal and the microSD memory card
Displaying data in the microSD memory card
Managing the microSD memory card
Using the microSD memory card from PC
Using the album
Checking/editing detail information of the data
Deleting data
Sorting data
Checking the memory status of FOMA terminal
About infrared communication
Sending data by infrared communication
Receiving data by infrared communication
Activating infrared communication mode
Using the infrared remote control function
Setting operations for data exchange
About the iC communication function
Using iC communication to send data
Using iC communication to receive data
Recording sound with Sound Recorder
Displaying the PDF data
Using bookmarks and marks
Setting the operating conditions of PDF Viewer
Displaying Word, Excel and PowerPoint files
Music Playing
How to play music
Downloading Chaku-Uta Full from sites
Transferring music data from PC to microSD memory card
Playing music data on Music Player
Managing or using music data
Managing playlists
Other Convenient Functions
Multiaccess
Multitask
Having an edit screen displayed when FOMA terminal is opened
Turning power on/off automatically at the specified time
Alerting with alarms after the specified time period has passed
Ringing the alarm clock at the set time
Setting to turn power on automatically at the time specified for the alarm
Managing schedules
Registering often-used functions
Using Speed Menu
Registering your own name and mail address
Recording the voice and image
Checking the call duration and the call cost
Resetting the call cost automatically
Setting to notify the limit of call cost
Using Calculator
Composing notes
Using electronic dictionaries
Using the Earphone/Microphone with Switch
Reducing the start-up time after power-on
Checking current settings of functions
Resetting functions
Deleting registered data collectively
Network Services
Network services available using FOMA terminal
Using Voice Mail Service
Using Call Waiting Service
Using Call Forwarding Service
Using Nuisance Call Blocking Service
Using Caller ID Request Service
Using Dual Network Service
Switching languages for the guidance
Using Service Dialing Number
Setting actions to receive incoming calls during a call
Setting Remote Control
Using Multi Number
Using OFFICEED
Registering new network services
Data Communication
Data communication
Before usage
Flow of setup for data communication
AT command
CD-ROM
DoCoMo keitai datalink
Character Entry
Entering characters
Entering characters using 5-touch Input Method
Registering fixed phrases
Copying/cutting and pasting characters
Entering characters using codes
Registering frequently used words
Using the downloaded dictionary
Entering characters using Slot Input Method
Setting input method
Appendix/Data Interchange/Troubleshooting
Menu list
Data set by default
List of dial keys and character assignments (5-touch Input Method)
List of input slots and character assignments (Slot Input Method)
List of fixed phrases
List of face marks
List of symbols
List of pictograms
Combination of operations during Multiaccess
Combination of functions during Multitask
Services available for FOMA terminal
Options and related devices
About Video playing software
Troubleshooting
Example of Error messages
Warranty and After-Sales Service
Diagnostic site of i-mode trouble
Updating software
Protecting FOMA terminal from hazardous data
Main specification
Number of saved, registered and protected items in D903iTV
SAR certification information
INDEX/Quick Reference Manual
INDEX
Quick Reference Manual
Mobile phone etiquette
Information Center
FOMA D903iTV Manual for Data Communication (CD-ROM)
Data communication
Before usage
Flow of setup for data communication
Connecting FOMA terminal to PC
Installation of the communication configuration file (driver)
Communicating using the FOMA PC configuration software
Communicating without using the FOMA PC configuration software
AT command
Kuten Code List (CD-ROM)
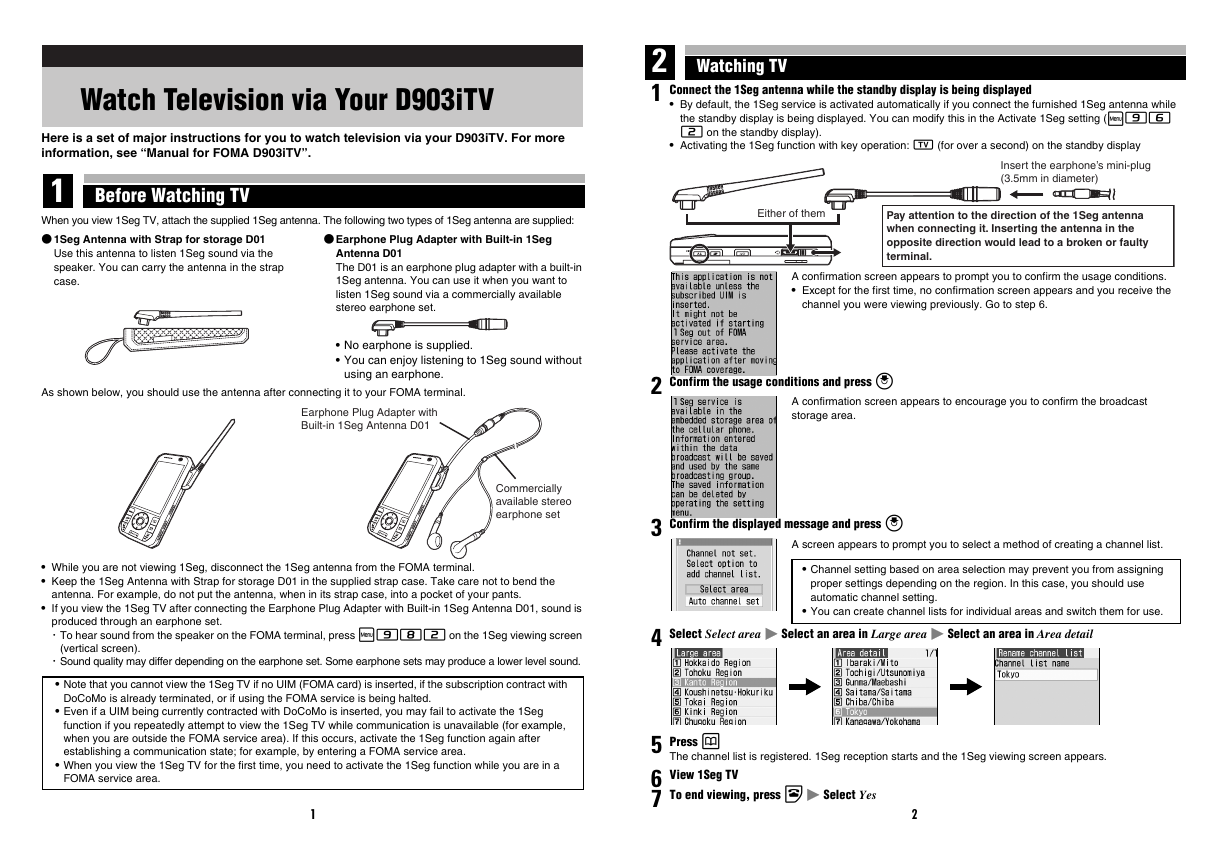
Watch Television via Your D903iTV Here is a set of major instructions for you to watch television via your D903iTV. For more information, see “Manual for FOMA D903iTV”. 1 Before Watching TV When you view 1Seg TV, attach the supplied 1Seg antenna. The following two types of 1Seg antenna are supplied: ● 1Seg Antenna with Strap for storage D01 ● Earphone Plug Adapter with Built-in 1Seg Use this antenna to listen 1Seg sound via the speaker. You can carry the antenna in the strap case. Antenna D01 The D01 is an earphone plug adapter with a built-in 1Seg antenna. You can use it when you want to listen 1Seg sound via a commercially available stereo earphone set. No earphone is supplied. You can enjoy listening to 1Seg sound without using an earphone. As shown below, you should use the antenna after connecting it to your FOMA terminal. Earphone Plug Adapter with Built-in 1Seg Antenna D01 Commercially available stereo earphone set While you are not viewing 1Seg, disconnect the 1Seg antenna from the FOMA terminal. Keep the 1Seg Antenna with Strap for storage D01 in the supplied strap case. Take care not to bend the antenna. For example, do not put the antenna, when in its strap case, into a pocket of your pants. If you view the 1Seg TV after connecting the Earphone Plug Adapter with Built-in 1Seg Antenna D01, sound is produced through an earphone set. ・To hear sound from the speaker on the FOMA terminal, press m982 on the 1Seg viewing screen (vertical screen). ・Sound quality may differ depending on the earphone set. Some earphone sets may produce a lower level sound. Note that you cannot view the 1Seg TV if no UIM (FOMA card) is inserted, if the subscription contract with DoCoMo is already terminated, or if using the FOMA service is being halted. Even if a UIM being currently contracted with DoCoMo is inserted, you may fail to activate the 1Seg function if you repeatedly attempt to view the 1Seg TV while communication is unavailable (for example, when you are outside the FOMA service area). If this occurs, activate the 1Seg function again after establishing a communication state; for example, by entering a FOMA service area. When you view the 1Seg TV for the first time, you need to activate the 1Seg function while you are in a FOMA service area. 1 2 Watching TV 1 Connect the 1Seg antenna while the standby display is being displayed By default, the 1Seg service is activated automatically if you connect the furnished 1Seg antenna while the standby display is being displayed. You can modify this in the Activate 1Seg setting (m96 2 on the standby display). Activating the 1Seg function with key operation: C (for over a second) on the standby display Insert the earphone’s mini-plug (3.5mm in diameter) Either of them Pay attention to the direction of the 1Seg antenna when connecting it. Inserting the antenna in the opposite direction would lead to a broken or faulty terminal. A confirmation screen appears to prompt you to confirm the usage conditions. Except for the first time, no confirmation screen appears and you receive the channel you were viewing previously. Go to step 6. 2 Confirm the usage conditions and press o A confirmation screen appears to encourage you to confirm the broadcast storage area. 3 Confirm the displayed message and press o A screen appears to prompt you to select a method of creating a channel list. Channel setting based on area selection may prevent you from assigning proper settings depending on the region. In this case, you should use automatic channel setting. You can create channel lists for individual areas and switch them for use. 4 Select Select area z Select an area in Large area z Select an area in Area detail The channel list is registered. 1Seg reception starts and the 1Seg viewing screen appears. 5 Press p 6 View 1Seg TV 7 To end viewing, press f z Select Yes 2
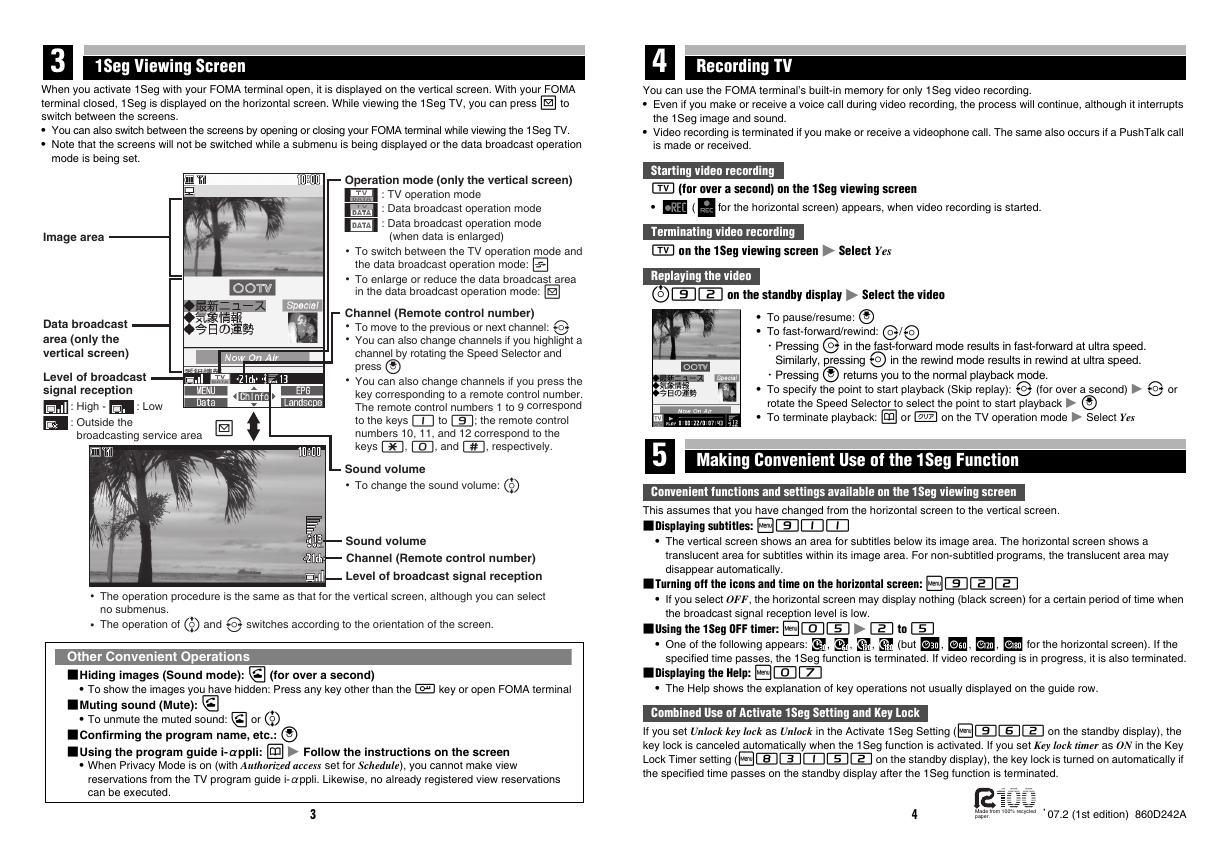
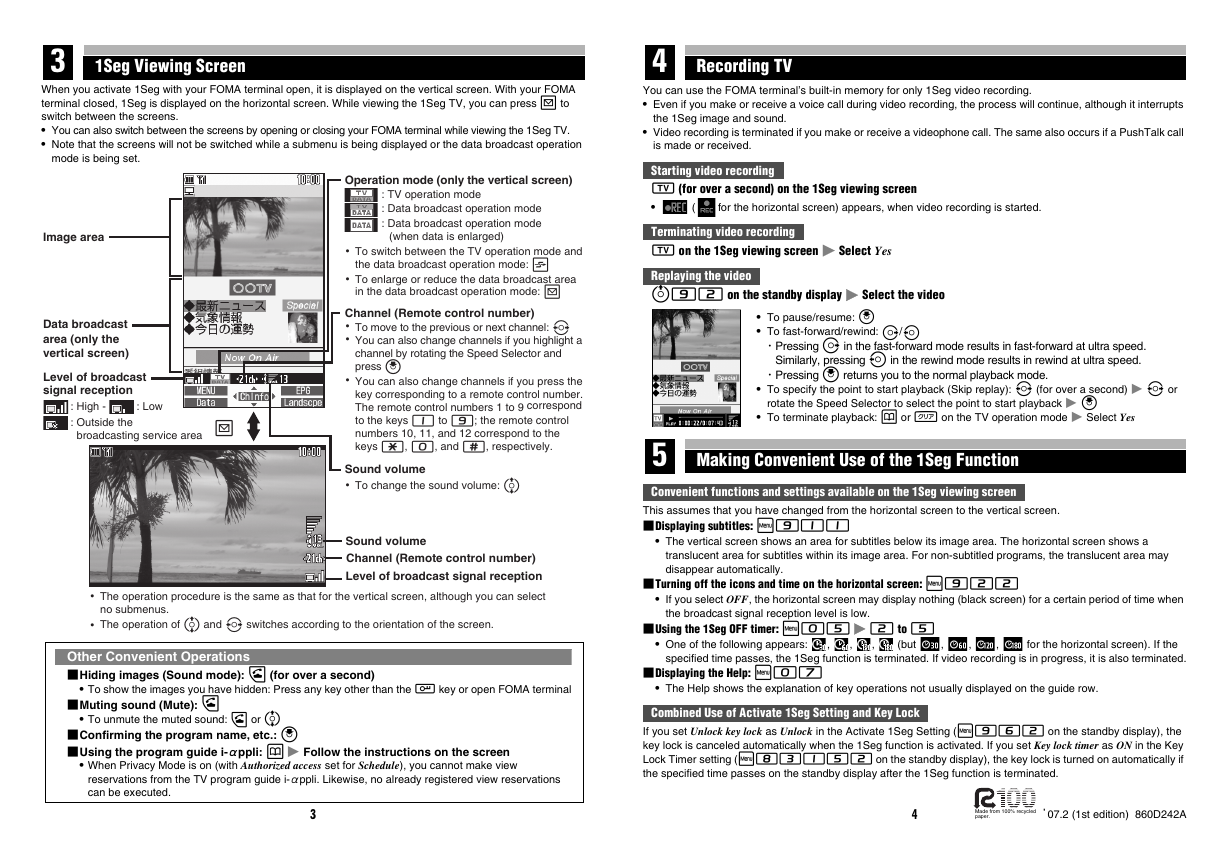
3 1Seg Viewing Screen When you activate 1Seg with your FOMA terminal open, it is displayed on the vertical screen. With your FOMA terminal closed, 1Seg is displayed on the horizontal screen. While viewing the 1Seg TV, you can press a to switch between the screens. You can also switch between the screens by opening or closing your FOMA terminal while viewing the 1Seg TV. Note that the screens will not be switched while a submenu is being displayed or the data broadcast operation mode is being set. Image area Data broadcast area (only the vertical screen) Level of broadcast signal reception : High - : Low : Outside the broadcasting service area a Operation mode (only the vertical screen) : TV operation mode : Data broadcast operation mode : Data broadcast operation mode (when data is enlarged) ・ To switch between the TV operation mode and the data broadcast operation mode: t ・ To enlarge or reduce the data broadcast area in the data broadcast operation mode: a Channel (Remote control number) ・ To move to the previous or next channel: & ・ You can also change channels if you highlight a channel by rotating the Speed Selector and press o ・ You can also change channels if you press the key corresponding to a remote control number. The remote control numbers 1 to 9 correspond to the keys 1 to 9; the remote control numbers 10, 11, and 12 correspond to the keys (, 0, and #, respectively. Sound volume ・ To change the sound volume: % Sound volume Channel (Remote control number) Level of broadcast signal reception ・ The operation procedure is the same as that for the vertical screen, although you can select no submenus. ・ The operation of % and & switches according to the orientation of the screen. Other Convenient Operations ■Hiding images (Sound mode): n (for over a second) To show the images you have hidden: Press any key other than the k key or open FOMA terminal ■Muting sound (Mute): n To unmute the muted sound: n or % ■Confirming the program name, etc.: o ■Using the program guide i-αppli: p z Follow the instructions on the screen When Privacy Mode is on (with Authorized access set for Schedule), you cannot make view reservations from the TV program guide i-αppli. Likewise, no already registered view reservations can be executed. 4 Recording TV You can use the FOMA terminal’s built-in memory for only 1Seg video recording. Even if you make or receive a voice call during video recording, the process will continue, although it interrupts the 1Seg image and sound. Video recording is terminated if you make or receive a videophone call. The same also occurs if a PushTalk call is made or received. Starting video recording C (for over a second) on the 1Seg viewing screen ( for the horizontal screen) appears, when video recording is started. Terminating video recording C on the 1Seg viewing screen z Select Yes Replaying the video u92 on the standby display z Select the video To pause/resume: o To fast-forward/rewind: r/l ・Pressing r in the fast-forward mode results in fast-forward at ultra speed. Similarly, pressing l in the rewind mode results in rewind at ultra speed. ・Pressing o returns you to the normal playback mode. To specify the point to start playback (Skip replay): & (for over a second) z & or rotate the Speed Selector to select the point to start playback z o To terminate playback: p or c on the TV operation mode z Select Yes 5 Making Convenient Use of the 1Seg Function Convenient functions and settings available on the 1Seg viewing screen This assumes that you have changed from the horizontal screen to the vertical screen. ■Displaying subtitles: m911 The vertical screen shows an area for subtitles below its image area. The horizontal screen shows a translucent area for subtitles within its image area. For non-subtitled programs, the translucent area may disappear automatically. ■Turning off the icons and time on the horizontal screen: m922 If you select OFF, the horizontal screen may display nothing (black screen) for a certain period of time when the broadcast signal reception level is low. ■Using the 1Seg OFF timer: m05 z 2 to 5 , , One of the following appears: for the horizontal screen). If the specified time passes, the 1Seg function is terminated. If video recording is in progress, it is also terminated. (but , , , , ■Displaying the Help: m07 The Help shows the explanation of key operations not usually displayed on the guide row. Combined Use of Activate 1Seg Setting and Key Lock If you set Unlock key lock as Unlock in the Activate 1Seg Setting (m962 on the standby display), the key lock is canceled automatically when the 1Seg function is activated. If you set Key lock timer as ON in the Key Lock Timer setting (m83152 on the standby display), the key lock is turned on automatically if the specified time passes on the standby display after the 1Seg function is terminated. 3 4 Made from 100% recycled paper. ’07.2 (1st edition) 860D242A
DoCoMo W-CDMA System Thank you for selecting the FOMA D903iTV. Carefully read this manual and other manuals delivered with devices such as the battery pack, before using your FOMA D903iTV, and consult the corresponding manuals while using the phone so that you are able to use it correctly and effectively. If you are unclear as to any point indicated in any of these manuals, contact the DoCoMo Information Center that is listed on the back of this manual. Your FOMA D903iTV is a valuable asset. Handle it with care and it will be your trusted partner for years to come. Before using your FOMA terminal ● The FOMA terminal is cordless so you may not be able to use it in certain locations where signals cannot penetrate, such as in tunnels, underground, in some buildings or outdoors if the signal is weak or you are outside the service area. You also may not be able to use your FOMA terminal on the upper floors of some highrise building, even though there is nothing around you that interferes with the signal. Please note that your call may be disconnected even when the signal is strong (when the signal strength indication shows three bars) and you are not moving. ● When using the FOMA terminal in public, busy or quiet places, be careful not to disturb others. ● Since the FOMA terminal relies on radio transmission, it is theoretically possible for third parties to intercept a call; however, because the W-CDMA system automatically employs a secrecy function for all calls, a third party will pick up nothing but signal noise. ● Since the FOMA terminal operates by the wireless transmission of voices converted to digital signals, if you are in a location where the signal is weak, the original voice may not be accurately reproduced from the received digital signal, therefore, the voice you hear may differ from the original sound of the speaker’s voice. ● DoCoMo asks that you keep a separate record (e.g. written copy) of all information you store in your FOMA terminal. DoCoMo accepts no responsibility whatsoever for any loss that occurs should the contents of the FOMA terminal’s memory be lost or altered. ● The user hereby agrees that the user shall be solely responsible for the result of the use of SSL. Neither DoCoMo nor the certifier as listed herein makes any representation and warranty as for the security in the use of SSL. In the event that the user shall sustain damage or loss due to the use of SSL, neither DoCoMo nor the certifier shall be responsible for any such damage or loss. Certifier: VeriSign Japan K.K., Cybertrust Japan Co., Ltd., GeoTrust Japan, inc., RSA Security Japan Ltd., Secom Trust Systems Co.,Ltd. ● The FOMA terminal can be used in the FOMA Plus-Area. ● The FOMA terminal can be used only via the FOMA network provided by DoCoMo. For first time user of the FOMA terminal If this is your first FOMA terminal, read this manual in the following order. You can understand the preparations for using the FOMA terminal and its basic operations. 1. Install the battery pack and charge it. ☛P38, P39 2. Turn the power on, make initial settings, and then confirm your phone number. ☛P43, P46 3. Understand the functions of keys on the terminal. ☛P24 4. Understand the meaning of icons displayed on the screen. ☛P27 5. Understand how to use the menus. ☛P30 6. Understand how to make and receive calls. ☛P49, P64 The latest information about this manual can be downloaded from the DoCoMo website. ● User’s Manual Download (http://www.nttdocomo.co.jp/english/support/manual/index.html) Note: The URL and site contents are subject to change without prior notice.
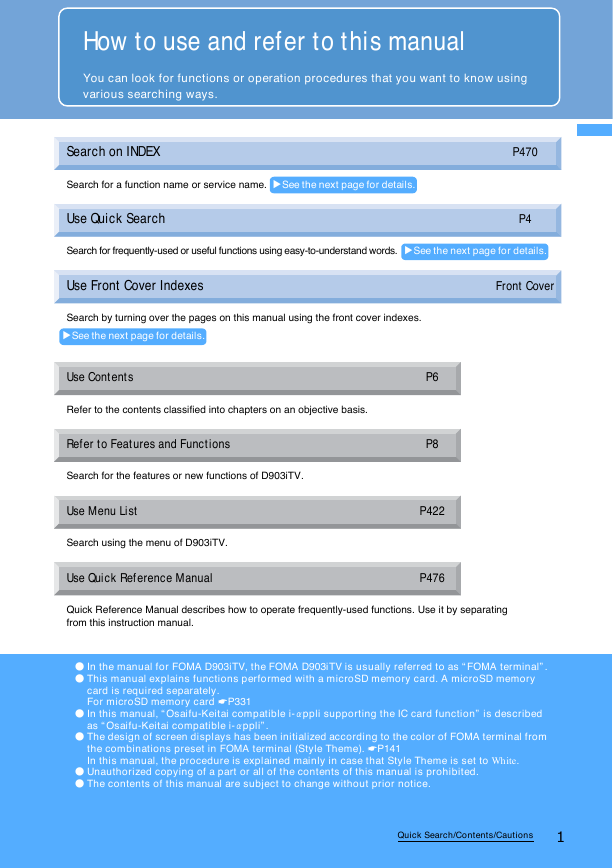
How to use and refer to this manual You can look for functions or operation procedures that you want to know using various searching ways. Search on INDEX Search for a function name or service name. ▲ See the next page for details. Use Quick Search P470 P4 Search for frequently-used or useful functions using easy-to-understand words. ▲ See the next page for details. Use Front Cover Indexes Front Cover Search by turning over the pages on this manual using the front cover indexes. ▲ See the next page for details. Use Contents Refer to the contents classified into chapters on an objective basis. Refer to Features and Functions Search for the features or new functions of D903iTV. Use Menu List Search using the menu of D903iTV. Use Quick Reference Manual P6 P8 P422 P476 Quick Reference Manual describes how to operate frequently-used functions. Use it by separating from this instruction manual. ● In the manual for FOMA D903iTV, the FOMA D903iTV is usually referred to as “FOMA terminal”. ● This manual explains functions performed with a microSD memory card. A microSD memory card is required separately. For microSD memory card ☛P331 ● In this manual, “Osaifu-Keitai compatible i-αppli supporting the IC card function” is described as “Osaifu-Keitai compatible i-αppli”. ● The design of screen displays has been initialized according to the color of FOMA terminal from the combinations preset in FOMA terminal (Style Theme). ☛P141 In this manual, the procedure is explained mainly in case that Style Theme is set to White. ● Unauthorized copying of a part or all of the contents of this manual is prohibited. ● The contents of this manual are subject to change without prior notice. Quick Search/Contents/Cautions 1
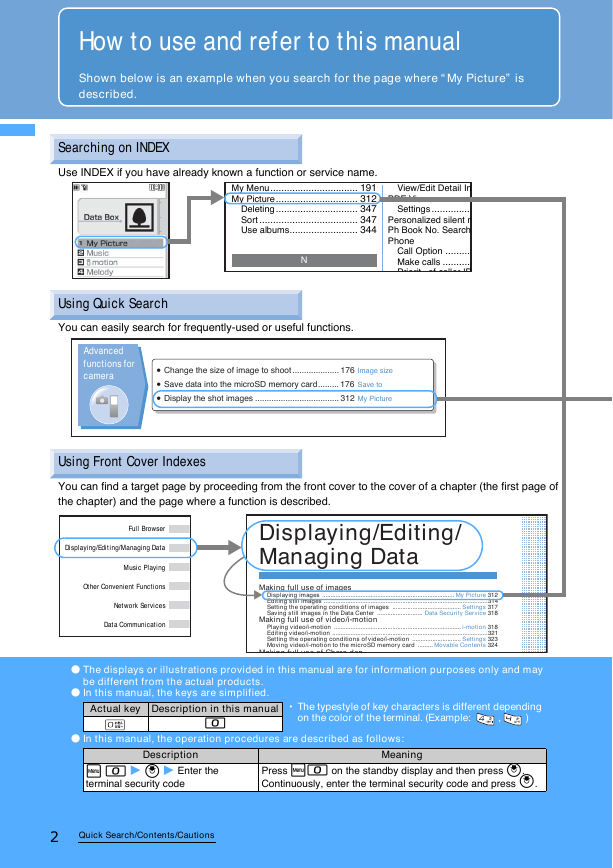
How to use and refer to this manual Shown below is an example when you search for the page where “My Picture” is described. Searching on INDEX Use INDEX if you have already known a function or service name. My Menu................................ 191 My Picture.............................. 312 Deleting.............................. 347 Sort .................................... 347 Use albums......................... 344 ▲ N View/Edit Detail In PDF Viewer............. Settings ............... Personalized silent m Ph Book No. Search Phone Call Option .......... Make calls ........... Priorit of caller ID Using Quick Search You can easily search for frequently-used or useful functions. Advanced functions for camera Change the size of image to shoot .................... 176 Image size Save data into the microSD memory card......... 176 Save to Display the shot images .................................... 312 My Picture Using Front Cover Indexes You can find a target page by proceeding from the front cover to the cover of a chapter (the first page of the chapter) and the page where a function is described. resworB lluF ataD gniganaM/gnitidE/gniyalpsiD gniyalP cisuM snoitcnuF tneinevnoC rehtO secivreS krowteN noitacinummoC ataD ▲ Displaying/Editing/ Managing Data Making full use of images ▲ Displaying images ............................................................................... My Picture 312 Editing still images ..................................................................................................314 Setting the operating conditions of images ......................................... Settings 317 Saving still images in the Data Center ........................... Data Security Service 318 Making full use of video/i-motion Playing video/i-motion ............................................................................ i-motion 318 Editing video/i-motion .............................................................................................321 Setting the operating conditions of video/i-motion ............................. Settings 323 Moving video/i-motion to the microSD memory card ......... Movable Contents 324 Making full use of Chara den ● The displays or illustrations provided in this manual are for information purposes only and may be different from the actual products. ● In this manual, the keys are simplified. Actual key Description in this manual 0 The typestyle of key characters is different depending on the color of the terminal. (Example: , ) ● In this manual, the operation procedures are described as follows: Description Meaning m 0 z o z Enter the terminal security code Press m0 on the standby display and then press o. Continuously, enter the terminal security code and press o. 2 Quick Search/Contents/Cautions
分享到:
收藏