Thank you for purchasing this AGFAPHOTO digital camera. Please read these operating
instructions carefully in order to use the digital camera correctly. Keep the instructions in a safe
place after reading so that you can refer to them later.
Precautions
• Do not aim the camera directly into the sun or other intense light sources which could
damage your eyesight.
• Do not try to open the case of the camera or attempt to modify this camera in any way.
High-voltage internal components create the risk of electric shock when exposed.
Maintenance and repairs should be carried out only by authorized service providers.
• Do not press the flash too close to the eyes of animals or young children. Eye damage may
result. Please remain at least one meter away from infants when using flash.
• Keep the camera away from water and other liquids. Do not use the camera with wet hands.
Never use the camera in the rain or snow. Moisture creates internal danger and may cause
electric shock.
• Keep the camera and its accessories out of the reach of children and animals to prevent
•
accidents or damage to the camera.
If you notice smoke or a strange odor coming from the camera, turn the power off immediately.
Take the camera to the nearest authorized service center for repair. Never attempt to repair
the camera on your own.
• Use only the recommended power accessories. Use of power sources not expressly
recommended for this equipment may lead to overheating, distortion of the equipment, fire,
electrical shock or other hazards.
Disclaimer
We assume no responsibility over and above the provisions of the Product Liability Law for
damages suffered by the user or third parties as a result of inappropriate handling of the product
or its accessories, or by their operational failure and by their use. We reserve the right to make
changes to this product and its accessories without prior notice.
Warning!
Never disconnect to open the camera or remove any parts of it. This will invalidate all guarantee
claims. Danger of explosion if batteries are not changed properly. Only replace the batteries with
the same type or another type approved by the manufacturer. Used batteries must be disposed
of in accordance with the manufacturer’s guidelines and local regulations.
i
�
Contents
GETTING STARTED
1
1
USING THIS MENU
2
CONTENT
PARTS OF THE CAMERA
3
INSERTING THE BATTERIES
5
5
LOW BATTERY INDICATOR
CHARGING THE BATTERY PACK
5
INSERTING THE MEMORY CARD
6
7
ABOUT CAMERA MEMORY
DCF PROTOCOL
7
SETTING THE DISPLAY LANGUAGE / DATE &
7
TIME
7
SETTING THE DISPLAY LANGUAGE
SETTING THE DATE & TIME
8
USING THE LCD MONITOR
9
9
REC MODE
PLAYBACK MODE
10
CHANGING THE LCD STATUS
11
BASIC OPERATION
TURNING THE POWER ON / OFF
POWER SAVING FUNCTION
CHANGING THE MODE
SWITCHING BETWEEN REC MODE AND
PLAYBACK MODE
SELECTING THE REC MODE
SELECTING THE ASM MODE
USING THE MENUS
REC MENU
SETUP MENU
BASIC RECORDING
RECORDING STILL IMAGES
USING THE Q MODE
SETTING IMAGE SIZE AND QUALITY
USING THE ZOOM FUNCTION
USING THE FLASH
12
12
12
13
13
13
15
16
16
17
20
20
21
22
23
24
ii
USING THE MACRO
USING THE SELF-TIMER & BURST
USING THE APERTURE PRIORITY
USING THE SHUTTER PRIORITY
USING THE MANUAL EXPOSURE
USING THE STABILIZER
RECORDING MOVIE CLIPS
SETTING THE MOVIE SIZE
RECORDING AUDIO CLIPS
PLAYBACK AUDIO CLIPS
RECORDING A VOICE MEMO
PLAYBACK A VOICE MEMO
25
26
27
27
28
28
29
29
30
30
31
31
OTHER RECORDING FUNCTIONS 32
SETTING THE METERING
SETTING THE WHITE BALANCE
SETTING THE ISO
SETTING THE EXPOSURE
SETTING THE AEB
SETTING THE HIGHLIGHT
SETTING THE SHARPNESS
SETTING THE PHOTO EFFECT
SETTING DATE STAMP
SETTING FACE TRACKING
SETTING PHOTO FRAME
SETTING AF LAMP
PLAYBACK
32
32
33
33
33
33
34
34
34
35
35
35
36
PLAYBACK IMAGES
36
PLAYBACK MOVIE CLIPS
36
MAGNIFYING & TRIMMING STILL IMAGES 37
VIEWING IN THUMBNAIL
38
PLAYING A SLIDE SHOW
38
DELETING FILES
39
DELETING A SINGLE FILE
39
DELETING MULTIPLE FILES
40
DELETING ALL FILES
40
PROTECTING A SINGLE FILE
41
�
ROTATING STILL IMAGES
41
PROTECTING ALL FILES
PROTECTING MULTIPLE FILES
42
EDITING IMAGES
43
43
CHANGING THE IMAGE SIZE
43
CHANGING THE IMAGE WITH EFFECTS
44
CHOOSING THE IMAGE WITH PHOTO FRAME
44
COPYING THE FILES
45
SETTING THE DPOF
46
CHOOSING A START-UP IMAGE
47
MAKING CONNECTIONS
CONNECTING THE CAMERA TO A TV
CONNECTING THE CAMERA TO A PC
USING THE CARD READER
CONNECTING THE CAMERA TO A
COMPUTER WITH THE USB CABLE
APPENDIX
ABOUT THE FOLDER & FILE NAME
FOLDER STRUCTURE
FILE NAMING
TROUBLESHOOTING
SPECIFICATIONS
FUNCTION AVAILABLE LIST
CUSTOMER CARE
DISPOSAL OF WASTE EQUIPMENT BY
USERS IN PRIVATE HOUSEHOLDS IN THE
EUROPEAN UNION
DECLARATION OF CONFORMITY
FCC COMPLIANCE AND ADVISORY
48
48
49
49
49
50
50
50
50
51
52
53
59
59
60
60
iii
�
�
Getting Started
Using This Menu
Getting Started
This section contains information you should know before using this camera.
Basic Operation
This section explains all recording features of this camera.
Basic Recording
This section explains how to record still images, movies, and audio files.
Other Recording Functions
This section explains common operations about recording images.
Playback
This section explains playback, delete, and edit functions of still images, movies and
audio files.
Making Connections
This section tells you how to connect this camera to a computer or TV.
Appendix
This section describes the troubleshooting and the camera specification.
The meanings of the symbols used in this user's manual are explained below:
This indicates cautions that should be read before using these
functions.
CCaauuttiioonn
TTiippss
This indicates the useful information when using this camera.
This indicates the reference page.
1
�
Content
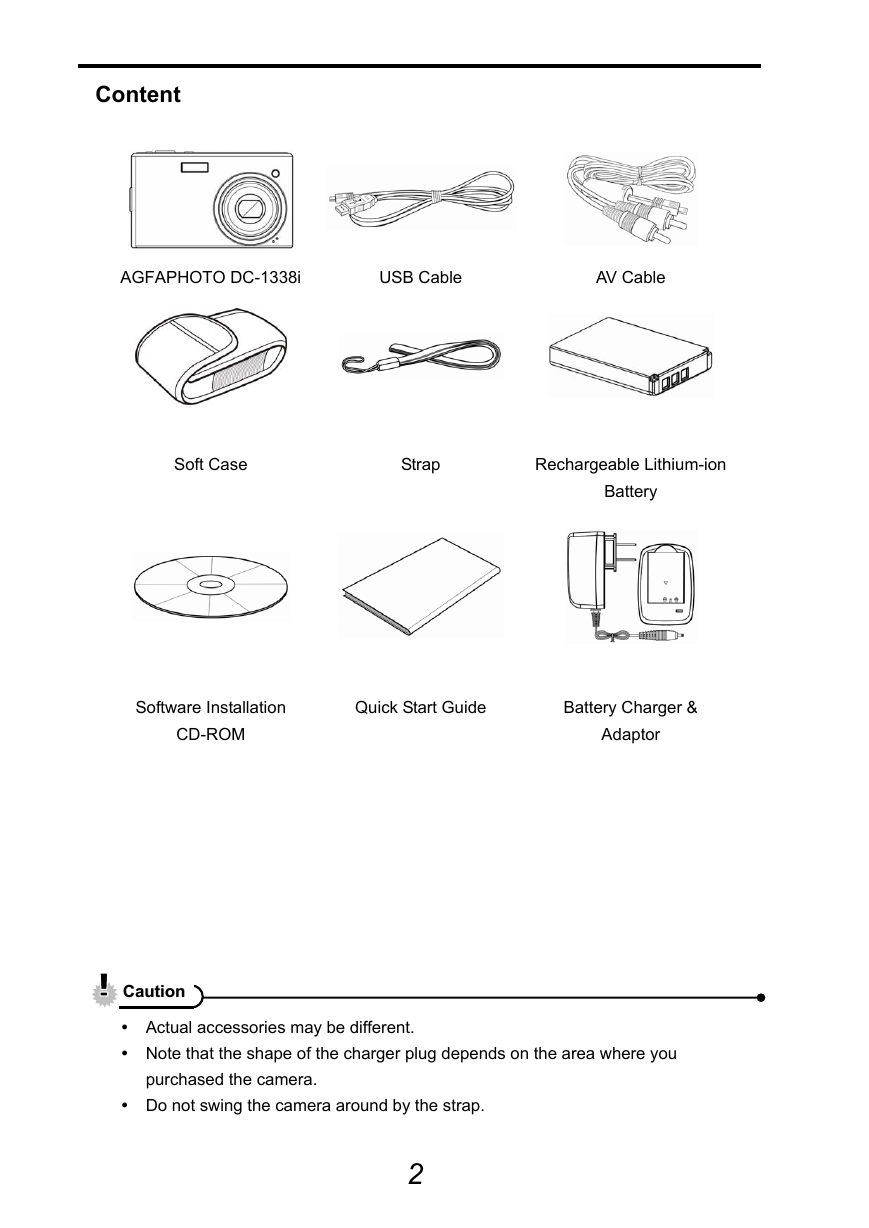
AGFAPHOTO DC-1338i
USB Cable
AV Cable
Strap
Soft Case
Rechargeable Lithium-ion
Battery
Software Installation
Quick Start Guide
Battery Charger &
CD-ROM
Adaptor
CCaauuttiioonn
Actual accessories may be different.
Note that the shape of the charger plug depends on the area where you
purchased the camera.
Do not swing the camera around by the strap.
2
�
Parts of the Camera
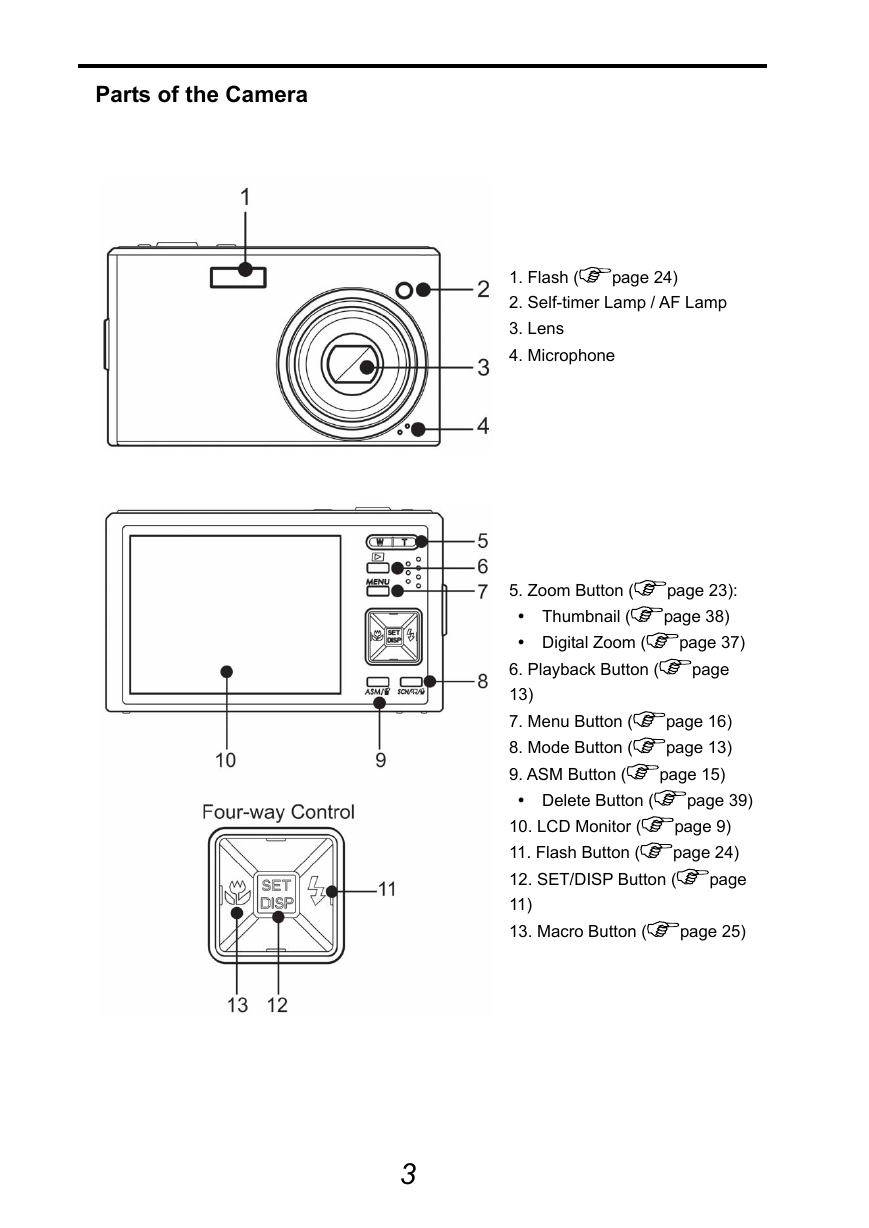
page 24)
1. Flash (
2. Self-timer Lamp / AF Lamp
3. Lens
4. Microphone
page 23):
page 38)
page 37)
page
page 16)
page 13)
page 15)
5. Zoom Button (
Thumbnail (
Digital Zoom (
6. Playback Button (
13)
7. Menu Button (
8. Mode Button (
9. ASM Button (
Delete Button (
10. LCD Monitor (
11. Flash Button (
12. SET/DISP Button (
11)
13. Macro Button (
page 39)
page 9)
page 24)
page
page 25)
3
�
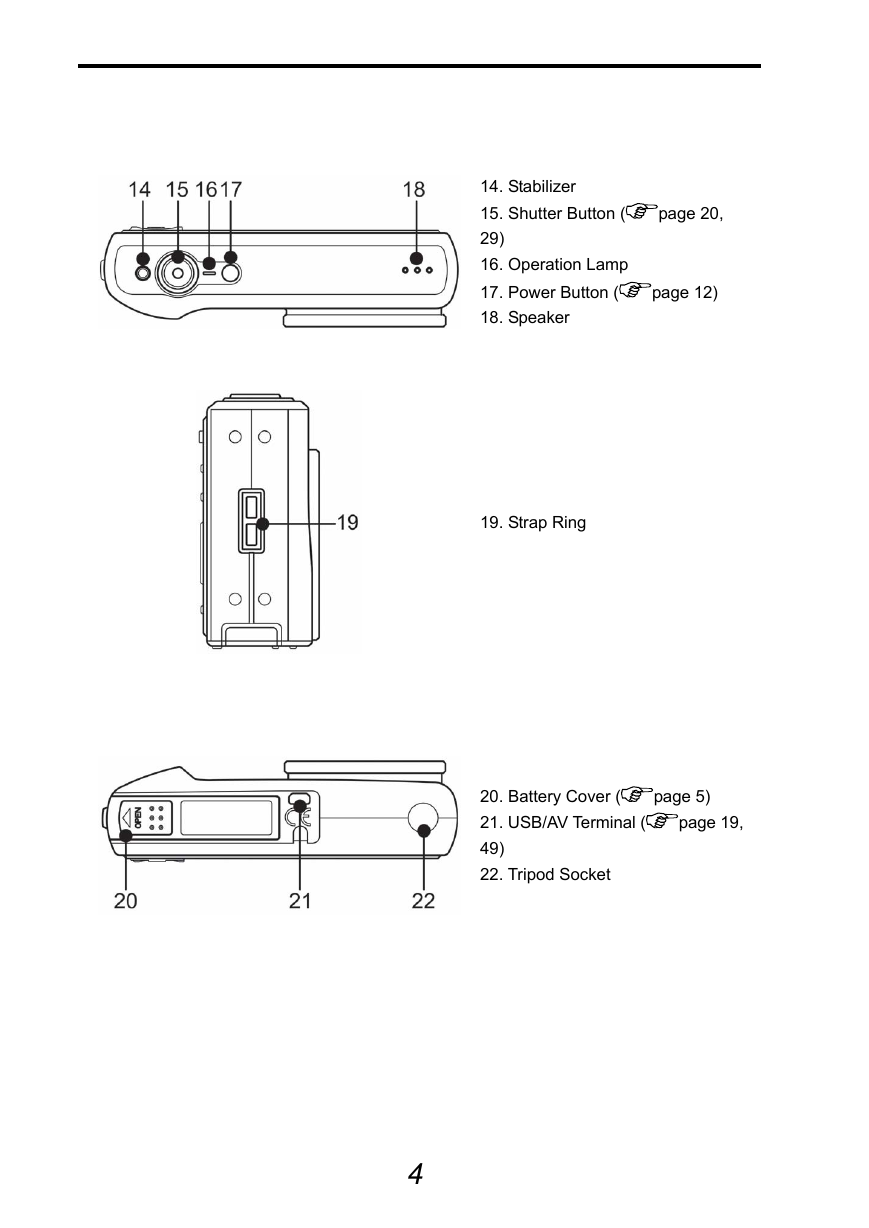
14. Stabilizer
15. Shutter Button (
29)
16. Operation Lamp
17. Power Button (
18. Speaker
page 20,
page 12)
19. Strap Ring
20. Battery Cover (
21. USB/AV Terminal (
49)
22. Tripod Socket
page 5)
page 19,
4
�



 2023年江西萍乡中考道德与法治真题及答案.doc
 2012年重庆南川中考生物真题及答案.doc
 2013年江西师范大学地理学综合及文艺理论基础考研真题.doc
 2020年四川甘孜小升初语文真题及答案I卷.doc
 2020年注册岩土工程师专业基础考试真题及答案.doc
 2023-2024学年福建省厦门市九年级上学期数学月考试题及答案.doc
 2021-2022学年辽宁省沈阳市大东区九年级上学期语文期末试题及答案.doc
 2022-2023学年北京东城区初三第一学期物理期末试卷及答案.doc
 2018上半年江西教师资格初中地理学科知识与教学能力真题及答案.doc
 2012年河北国家公务员申论考试真题及答案-省级.doc
 2020-2021学年江苏省扬州市江都区邵樊片九年级上学期数学第一次质量检测试题及答案.doc
 2022下半年黑龙江教师资格证中学综合素质真题及答案.doc