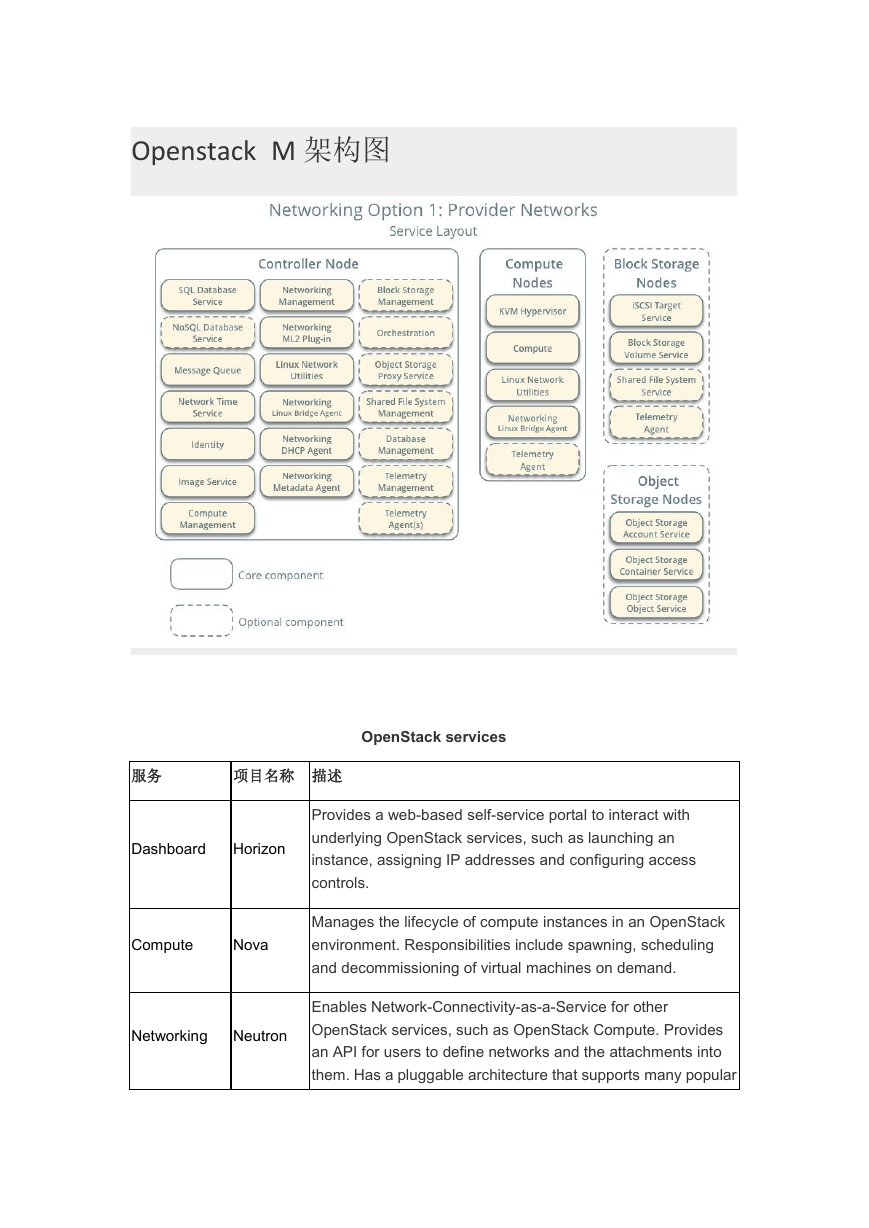
Openstack M 架构图
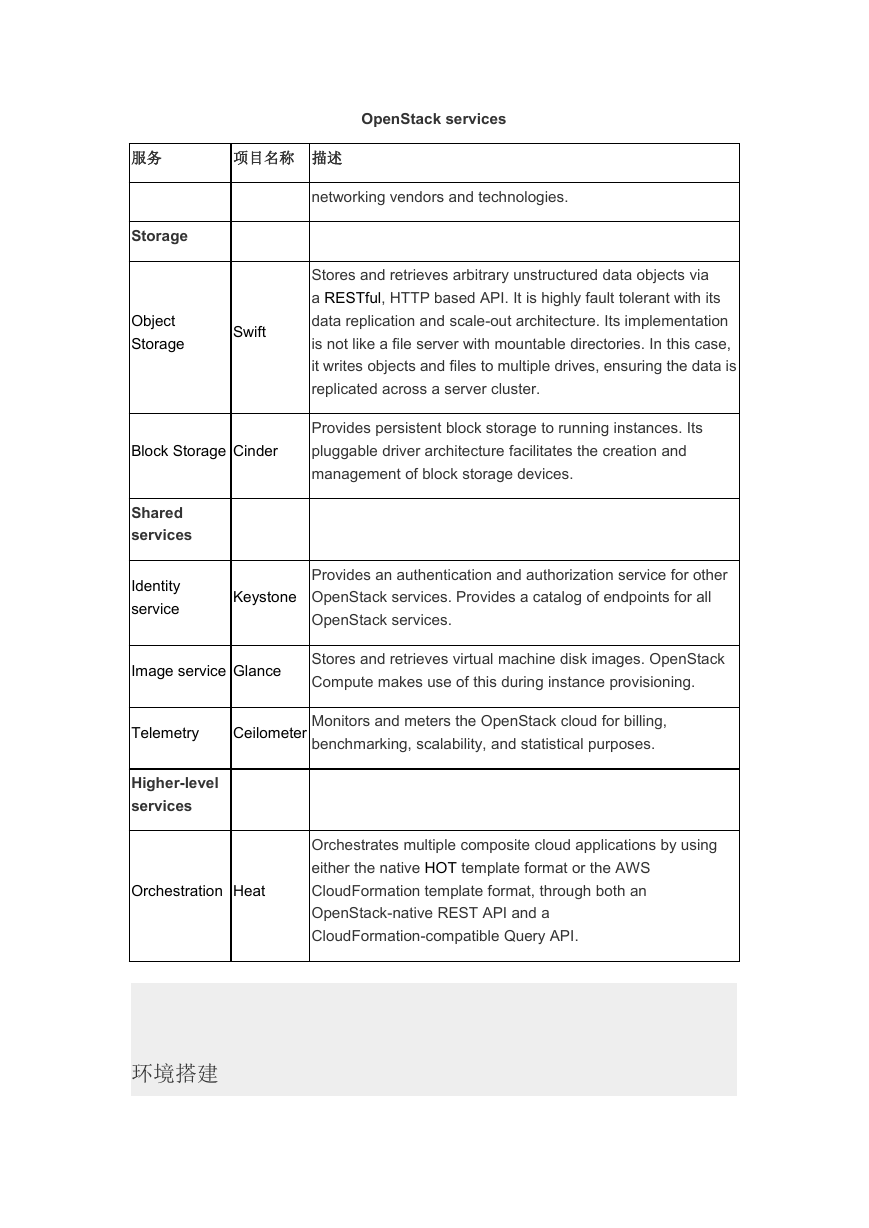
OpenStack services
服务
项目名称 描述
Dashboard
Horizon
Compute
Nova
Networking
Neutron
Provides a web-based self-service portal to interact with
underlying OpenStack services, such as launching an
instance, assigning IP addresses and configuring access
controls.
Manages the lifecycle of compute instances in an OpenStack
environment. Responsibilities include spawning, scheduling
and decommissioning of virtual machines on demand.
Enables Network-Connectivity-as-a-Service for other
OpenStack services, such as OpenStack Compute. Provides
an API for users to define networks and the attachments into
them. Has a pluggable architecture that supports many popular
�
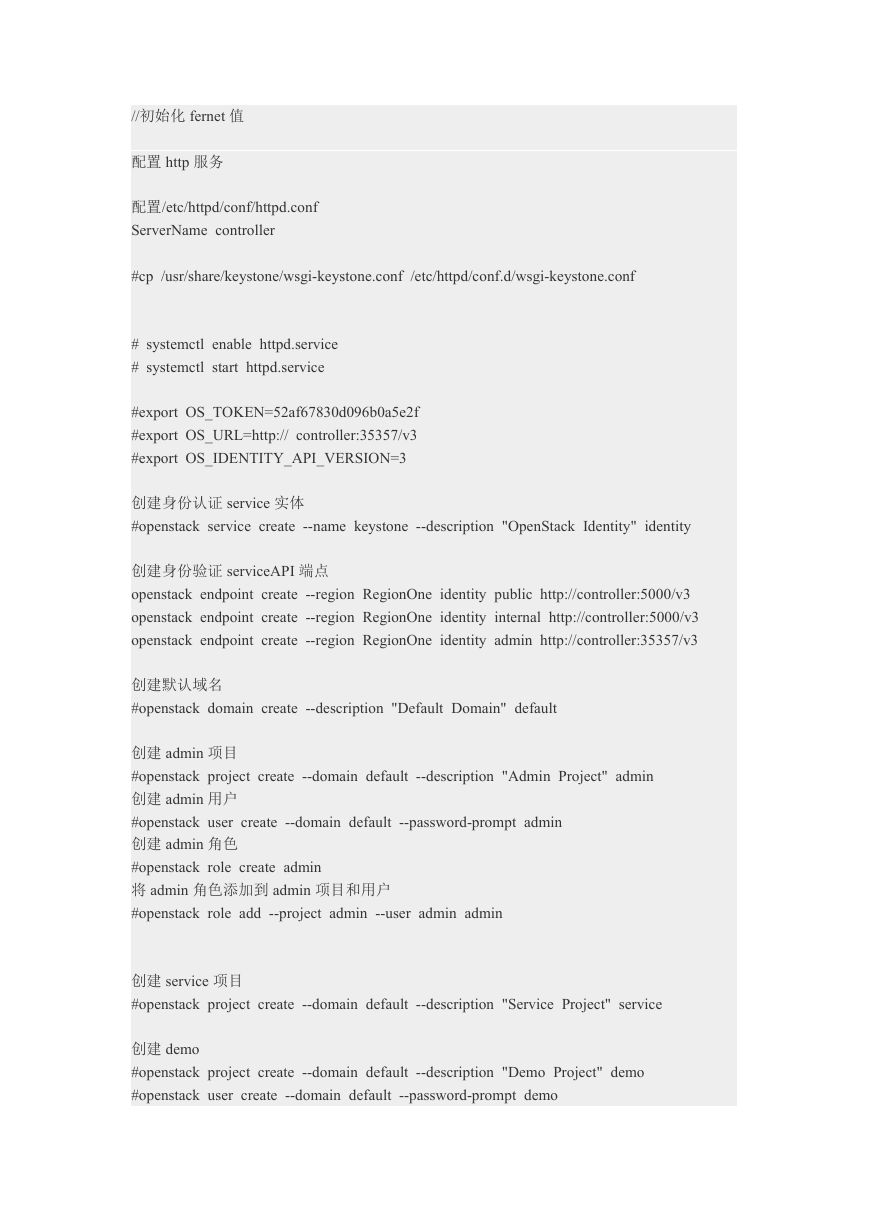
OpenStack services
服务
项目名称 描述
networking vendors and technologies.
Storage
Object
Storage
Swift
Stores and retrieves arbitrary unstructured data objects via
a RESTful, HTTP based API. It is highly fault tolerant with its
data replication and scale-out architecture. Its implementation
is not like a file server with mountable directories. In this case,
it writes objects and files to multiple drives, ensuring the data is
replicated across a server cluster.
Block Storage Cinder
Provides persistent block storage to running instances. Its
pluggable driver architecture facilitates the creation and
management of block storage devices.
Shared
services
Identity
service
Keystone
Provides an authentication and authorization service for other
OpenStack services. Provides a catalog of endpoints for all
OpenStack services.
Image service Glance
Stores and retrieves virtual machine disk images. OpenStack
Compute makes use of this during instance provisioning.
Telemetry
Ceilometer
Monitors and meters the OpenStack cloud for billing,
benchmarking, scalability, and statistical purposes.
Orchestrates multiple composite cloud applications by using
either the native HOT template format or the AWS
CloudFormation template format, through both an
OpenStack-native REST API and a
CloudFormation-compatible Query API.
Higher-level
services
Orchestration Heat
环境搭建
�
controller,compute
配置网络
修改网卡名
进入/etc/sysconfig/network-scripts/文件夹查看配置文件
修改配置文件名成 eth0,eth1
修改配置文件里的 name 和 device
eth1 如上
接下来禁用网卡命名规则。此功能通过/etc/default/grub 文件来控制,要禁用此次功能,在文
件中加入"net.ifnames=0
biosdevname=0"即可
执行 grub2-mkconfig
-o
/boot/grub2/grub.cfg 命令生成更新 grub 配置参数。
#reboot
�
检验:
网卡配置
Controller
Compute
eth0
eth1
eth0
eth1
192.168.117.212(管理网段)
none
192.168.117.211(管理网段)
none
关闭防火墙和 selinux(所有节点)
#systemctl disable NetworkManager
#systemctl stop NetworkManager
#systemctl disable firewalld.service
#systemctl stop firewalld.service
#setenforce 0
vi /etc/selinux/config 中的 selinux = disable
搭建 openstack yum 源
(建议)可以在一台可以连外网的 Linux 上面
安装 yum-install-repository
#yum install -y
yum-plugin-priorities
安装 Centos repository
#yum install -y centos-release-openstack-mitaka
�
安装 Rdo repository
#yum install -y https://rdoproject.org/repos/rdo-release.rpm
升级系统
#yum upgrade -y
安装 openstack 客户端
# yum install -y python-openstackclient
安装 Openstack-selinux
# yum install -y openstack-selinux
接着使用 reposync 将所有所需要的安装包都同步回来
将 openstack 所需的包上传至服务器(可用 xftp 上传)
安装 createrepo 工具(建议所有的 rpm 包都放在 sources 文件夹中)
#createrepo -p -d -o sources/(包的路径) sources/(仓库路径)
#vi /etc/yum.repos.d/openstack.repo(此处应保证只有该 repo,否则 yum 源将连接不上)
[openstack]
name=openstack
baseurl=file:///root/sources/
enabled=1
gpgcheck=0
#yum clean all
#yum list all
NTP 同步
Controller 节点
#yum install chrony 安装 chrony
配置/etc/chrony.conf
server NTP_SERVER iburst(NTP_SERVER 填 NTP 服务器)
(server s1b.time.edu.cn iburst
server s1c.time.edu.cn iburst)
allow 192.168.0.0/24
# systemctl enable chronyd.service
# systemctl restart chronyd.service
Compute 节点
#yum install chrony 安装 chrony
配置/etc/chrony.conf
server controller iburst
�
# systemctl enable chronyd.service
# systemctl restart chronyd.service
验证:
#chronyc sources
Controller 节点:
其他节点:
Database
Controller node
安装 SQL 数据库
安装 mariadb 数据库
#yum install -y mariadb mariadb-server python2-PyMySQL
修改 /etc/my.cnf
#systemctl enable mariadb.service
#systemctl start mariadb.service
#mysql_secure_installation #设置 db
安装 NoSQL 数据库:
安装 mongdb
#yum install –y mongodb-server mongodb
配置/etc/mongod.cnf
bind_ip = controller
smallfiles = true
�
# systemctl enable mongod.service
# systemctl start mongod.service
Messaging server
#yum install -y rabbitmq-server
安装 rabbitmq
#systemctl enable rabbitmq-server.service
#systemctl start rabbitmq-server.service
#rabbitmqctl add_user openstack 123456 创建用户 openstack,密码 123456
#rabbitmqctl set_permissions openstack ".*" ".*" ".*" 赋予 openstack 配置,写,读权限
#rabbitmqctl status | grep rabbit 查看版本
Memcached
# yum install memcached python-memcached 安装 memcached
# systemctl enable memcached.service
# systemctl start memcached.service
Identity service(keystone)
数据库配置
# mysql -u root -p 进入数据库
>CREATE DATABASE keystone; 创建 keystone 数据库
>GRANT ALL PRIVILEGES ON keystone.* TO 'keystone'@'localhost' \
IDENTIFIED BY '123456';
>GRANT ALL PRIVILEGES ON keystone.* TO 'keystone'@'%' \
IDENTIFIED BY '123456';
生成随机码
# openssl rand -hex 10
结果:52af67830d096b0a5e2f
# yum install openstack-keystone httpd mod_wsgi
配置/etc/keystone/keystone.conf
[DEFAULT]
admin_token = 52af67830d096b0a5e2f(前面生成的)
[database]
connection = mysql+pymysql://keystone:123456@controller/keystone
[token]
provider = fernet
# su -s /bin/sh -c "keystone-manage db_sync" keystone //布置到身份验证数据库中
# keystone-manage fernet_setup --keystone-user keystone --keystone-group keystone
�
//初始化 fernet 值
配置 http 服务
配置/etc/httpd/conf/httpd.conf
ServerName controller
#cp /usr/share/keystone/wsgi-keystone.conf /etc/httpd/conf.d/wsgi-keystone.conf
# systemctl enable httpd.service
# systemctl start httpd.service
#export OS_TOKEN=52af67830d096b0a5e2f
#export OS_URL=http:// controller:35357/v3
#export OS_IDENTITY_API_VERSION=3
创建身份认证 service 实体
#openstack service create --name keystone --description "OpenStack Identity" identity
创建身份验证 serviceAPI 端点
openstack endpoint create --region RegionOne identity public http://controller:5000/v3
openstack endpoint create --region RegionOne identity internal http://controller:5000/v3
openstack endpoint create --region RegionOne identity admin http://controller:35357/v3
创建默认域名
#openstack domain create --description "Default Domain" default
创建 admin 项目
#openstack project create --domain default --description "Admin Project" admin
创建 admin 用户
#openstack user create --domain default --password-prompt admin
创建 admin 角色
#openstack role create admin
将 admin 角色添加到 admin 项目和用户
#openstack role add --project admin --user admin admin
创建 service 项目
#openstack project create --domain default --description "Service Project" service
创建 demo
#openstack project create --domain default --description "Demo Project" demo
#openstack user create --domain default --password-prompt demo
�


 2023年江西萍乡中考道德与法治真题及答案.doc
 2012年重庆南川中考生物真题及答案.doc
 2013年江西师范大学地理学综合及文艺理论基础考研真题.doc
 2020年四川甘孜小升初语文真题及答案I卷.doc
 2020年注册岩土工程师专业基础考试真题及答案.doc
 2023-2024学年福建省厦门市九年级上学期数学月考试题及答案.doc
 2021-2022学年辽宁省沈阳市大东区九年级上学期语文期末试题及答案.doc
 2022-2023学年北京东城区初三第一学期物理期末试卷及答案.doc
 2018上半年江西教师资格初中地理学科知识与教学能力真题及答案.doc
 2012年河北国家公务员申论考试真题及答案-省级.doc
 2020-2021学年江苏省扬州市江都区邵樊片九年级上学期数学第一次质量检测试题及答案.doc
 2022下半年黑龙江教师资格证中学综合素质真题及答案.doc