Ubuntu16.04下下tensorflow+SSD实现(人脸,通用物体)目标检测,环境的搭建与
实现(人脸,通用物体)目标检测,环境的搭建与
测试以及搭建环境的踩坑环节的梳理(一)
测试以及搭建环境的踩坑环节的梳理(一)
Ubuntu16.04下下tensorflow+SSD实现(人脸,通用物体)目标检测,环境的搭建与测试以及搭建环境的踩坑环节的梳理(一)
实现(人脸,通用物体)目标检测,环境的搭建与测试以及搭建环境的踩坑环节的梳理(一)
开发环境:Ubuntu16.04、cuda、cudnn
语言:Python3.5(也可以Python3.6)
框架:tensorflow1.12 、SSD
英伟达GPU配置步骤:
1.tensorflow1.12使用的Python版本不能是3.7的,要求在3.7以下
2.cuda和cudnn的环境在英伟达下进行下载,由于每个人的计算机环境是否有GPU显卡和显卡的版本不同,需要进行TensorFlow和cuda、cudnn和匹配
2.1 nvidia-smi 可以先用这个命令看看GPU是否存在
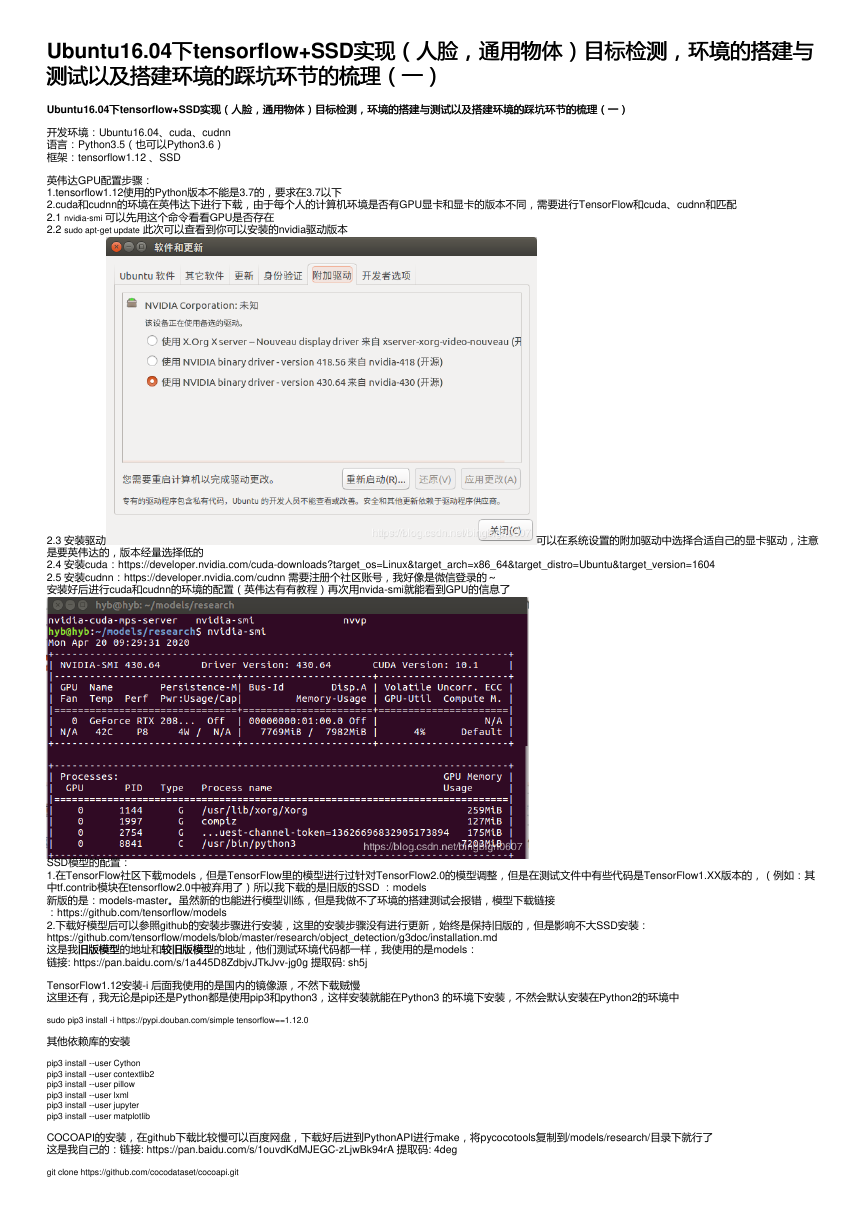
2.2 sudo apt-get update 此次可以查看到你可以安装的nvidia驱动版本
2.3 安装驱动
是要英伟达的,版本经量选择低的
2.4 安装cuda:https://developer.nvidia.com/cuda-downloads?target_os=Linux&target_arch=x86_64&target_distro=Ubuntu&target_version=1604
2.5 安装cudnn:https://developer.nvidia.com/cudnn 需要注册个社区账号,我好像是微信登录的~
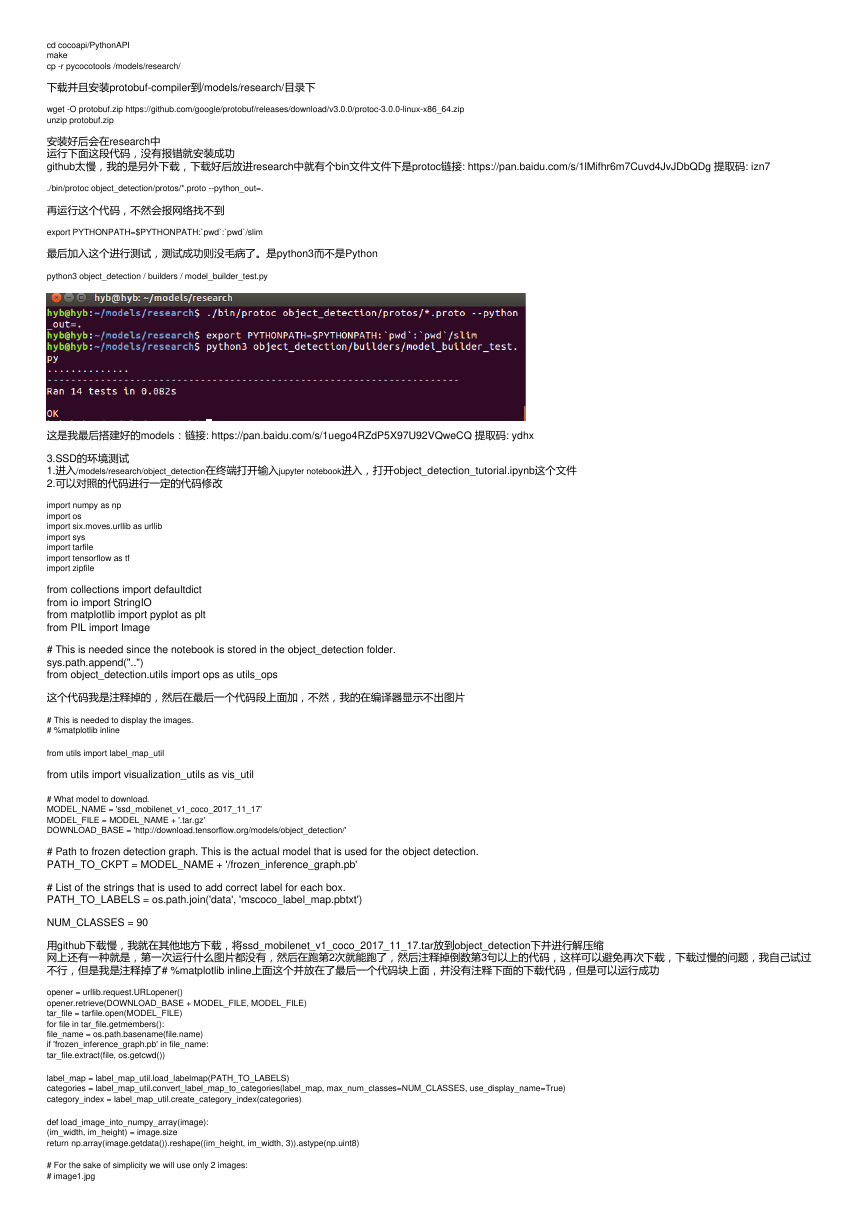
安装好后进行cuda和cudnn的环境的配置(英伟达有有教程)再次用nvida-smi就能看到GPU的信息了
可以在系统设置的附加驱动中选择合适自己的显卡驱动,注意
SSD模型的配置:
1.在TensorFlow社区下载models,但是TensorFlow里的模型进行过针对TensorFlow2.0的模型调整,但是在测试文件中有些代码是TensorFlow1.XX版本的,(例如:其
中tf.contrib模块在tensorflow2.0中被弃用了)所以我下载的是旧版的SSD :models
新版的是:models-master。虽然新的也能进行模型训练,但是我做不了环境的搭建测试会报错,模型下载链接
:https://github.com/tensorflow/models
2.下载好模型后可以参照github的安装步骤进行安装,这里的安装步骤没有进行更新,始终是保持旧版的,但是影响不大SSD安装:
https://github.com/tensorflow/models/blob/master/research/object_detection/g3doc/installation.md
这是我旧版模型
链接: https://pan.baidu.com/s/1a445D8ZdbjvJTkJvv-jg0g 提取码: sh5j
较旧版模型的地址,他们测试环境代码都一样,我使用的是models:
旧版模型的地址和较旧版模型
TensorFlow1.12安装-i 后面我使用的是国内的镜像源,不然下载贼慢
这里还有,我无论是pip还是Python都是使用pip3和python3,这样安装就能在Python3 的环境下安装,不然会默认安装在Python2的环境中
sudo pip3 install -i https://pypi.douban.com/simple tensorflow==1.12.0
其他依赖库的安装
pip3 install --user Cython
pip3 install --user contextlib2
pip3 install --user pillow
pip3 install --user lxml
pip3 install --user jupyter
pip3 install --user matplotlib
COCOAPI的安装,在github下载比较慢可以百度网盘,下载好后进到PythonAPI进行make,将pycocotools复制到/models/research/目录下就行了
这是我自己的:链接: https://pan.baidu.com/s/1ouvdKdMJEGC-zLjwBk94rA 提取码: 4deg
git clone https://github.com/cocodataset/cocoapi.git
�
cd cocoapi/PythonAPI
make
cp -r pycocotools /models/research/
下载并且安装protobuf-compiler到/models/research/目录下
wget -O protobuf.zip https://github.com/google/protobuf/releases/download/v3.0.0/protoc-3.0.0-linux-x86_64.zip
unzip protobuf.zip
安装好后会在research中
运行下面这段代码,没有报错就安装成功
github太慢,我的是另外下载,下载好后放进research中就有个bin文件文件下是protoc链接: https://pan.baidu.com/s/1lMifhr6m7Cuvd4JvJDbQDg 提取码: izn7
./bin/protoc object_detection/protos/*.proto --python_out=.
再运行这个代码,不然会报网络找不到
export PYTHONPATH=$PYTHONPATH:`pwd`:`pwd`/slim
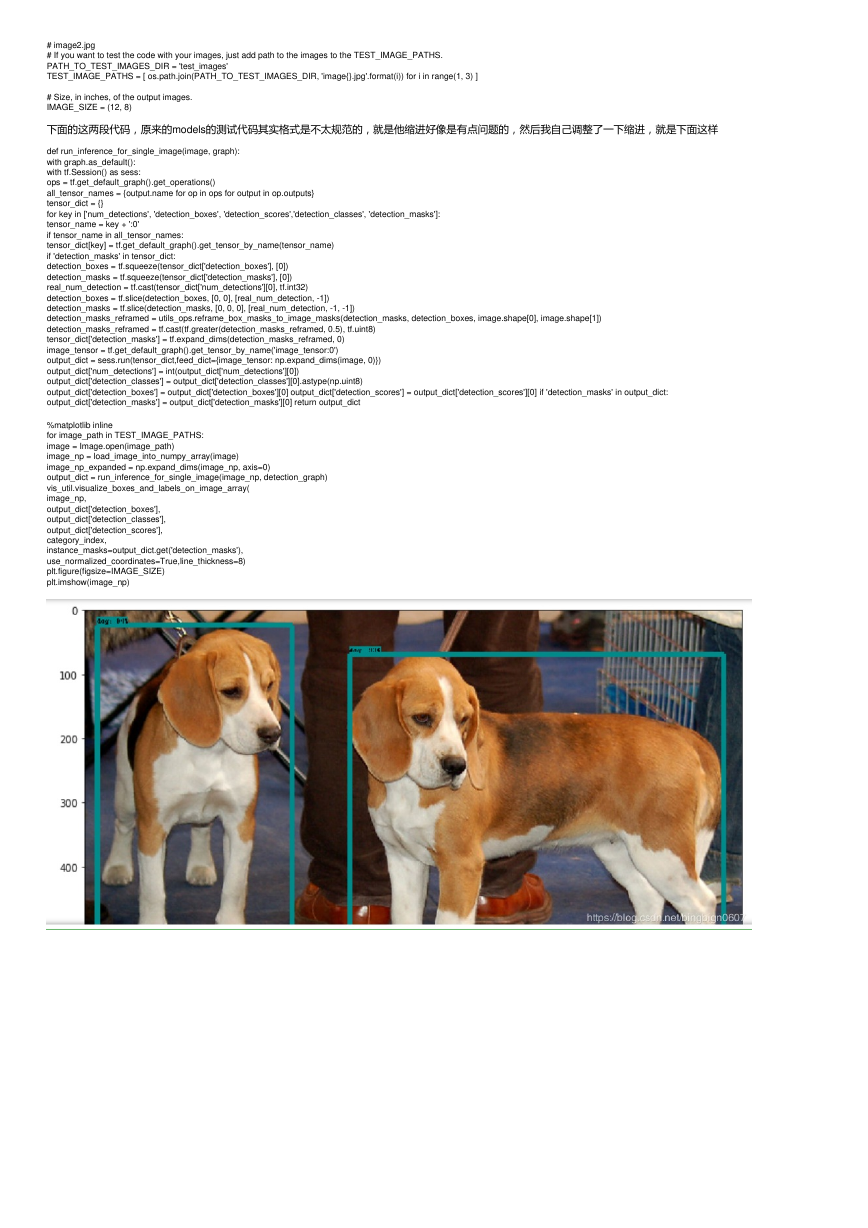
最后加入这个进行测试,测试成功则没毛病了。是python3而不是Python
python3 object_detection / builders / model_builder_test.py
这是我最后搭建好的models:链接: https://pan.baidu.com/s/1uego4RZdP5X97U92VQweCQ 提取码: ydhx
3.SSD的环境测试
1.进入/models/research/object_detection在终端打开输入jupyter notebook进入,打开object_detection_tutorial.ipynb这个文件
2.可以对照的代码进行一定的代码修改
import numpy as np
import os
import six.moves.urllib as urllib
import sys
import tarfile
import tensorflow as tf
import zipfile
from collections import defaultdict
from io import StringIO
from matplotlib import pyplot as plt
from PIL import Image
# This is needed since the notebook is stored in the object_detection folder.
sys.path.append("..")
from object_detection.utils import ops as utils_ops
这个代码我是注释掉的,然后在最后一个代码段上面加,不然,我的在编译器显示不出图片
# This is needed to display the images.
# %matplotlib inline
from utils import label_map_util
from utils import visualization_utils as vis_util
# What model to download.
MODEL_NAME = 'ssd_mobilenet_v1_coco_2017_11_17'
MODEL_FILE = MODEL_NAME + '.tar.gz'
DOWNLOAD_BASE = 'http://download.tensorflow.org/models/object_detection/'
# Path to frozen detection graph. This is the actual model that is used for the object detection.
PATH_TO_CKPT = MODEL_NAME + '/frozen_inference_graph.pb'
# List of the strings that is used to add correct label for each box.
PATH_TO_LABELS = os.path.join('data', 'mscoco_label_map.pbtxt')
NUM_CLASSES = 90
用github下载慢,我就在其他地方下载,将ssd_mobilenet_v1_coco_2017_11_17.tar放到object_detection下并进行解压缩
网上还有一种就是,第一次运行什么图片都没有,然后在跑第2次就能跑了,然后注释掉倒数第3句以上的代码,这样可以避免再次下载,下载过慢的问题,我自己试过
不行,但是我是注释掉了# %matplotlib inline上面这个并放在了最后一个代码块上面,并没有注释下面的下载代码,但是可以运行成功
opener = urllib.request.URLopener()
opener.retrieve(DOWNLOAD_BASE + MODEL_FILE, MODEL_FILE)
tar_file = tarfile.open(MODEL_FILE)
for file in tar_file.getmembers():
file_name = os.path.basename(file.name)
if 'frozen_inference_graph.pb' in file_name:
tar_file.extract(file, os.getcwd())
label_map = label_map_util.load_labelmap(PATH_TO_LABELS)
categories = label_map_util.convert_label_map_to_categories(label_map, max_num_classes=NUM_CLASSES, use_display_name=True)
category_index = label_map_util.create_category_index(categories)
def load_image_into_numpy_array(image):
(im_width, im_height) = image.size
return np.array(image.getdata()).reshape((im_height, im_width, 3)).astype(np.uint8)
# For the sake of simplicity we will use only 2 images:
# image1.jpg
�
# image2.jpg
# If you want to test the code with your images, just add path to the images to the TEST_IMAGE_PATHS.
PATH_TO_TEST_IMAGES_DIR = 'test_images'
TEST_IMAGE_PATHS = [ os.path.join(PATH_TO_TEST_IMAGES_DIR, 'image{}.jpg'.format(i)) for i in range(1, 3) ]
# Size, in inches, of the output images.
IMAGE_SIZE = (12, 8)
下面的这两段代码,原来的models的测试代码其实格式是不太规范的,就是他缩进好像是有点问题的,然后我自己调整了一下缩进,就是下面这样
def run_inference_for_single_image(image, graph):
with graph.as_default():
with tf.Session() as sess:
ops = tf.get_default_graph().get_operations()
all_tensor_names = {output.name for op in ops for output in op.outputs}
tensor_dict = {}
for key in ['num_detections', 'detection_boxes', 'detection_scores','detection_classes', 'detection_masks']:
tensor_name = key + ':0'
if tensor_name in all_tensor_names:
tensor_dict[key] = tf.get_default_graph().get_tensor_by_name(tensor_name)
if 'detection_masks' in tensor_dict:
detection_boxes = tf.squeeze(tensor_dict['detection_boxes'], [0])
detection_masks = tf.squeeze(tensor_dict['detection_masks'], [0])
real_num_detection = tf.cast(tensor_dict['num_detections'][0], tf.int32)
detection_boxes = tf.slice(detection_boxes, [0, 0], [real_num_detection, -1])
detection_masks = tf.slice(detection_masks, [0, 0, 0], [real_num_detection, -1, -1])
detection_masks_reframed = utils_ops.reframe_box_masks_to_image_masks(detection_masks, detection_boxes, image.shape[0], image.shape[1])
detection_masks_reframed = tf.cast(tf.greater(detection_masks_reframed, 0.5), tf.uint8)
tensor_dict['detection_masks'] = tf.expand_dims(detection_masks_reframed, 0)
image_tensor = tf.get_default_graph().get_tensor_by_name('image_tensor:0')
output_dict = sess.run(tensor_dict,feed_dict={image_tensor: np.expand_dims(image, 0)})
output_dict['num_detections'] = int(output_dict['num_detections'][0])
output_dict['detection_classes'] = output_dict['detection_classes'][0].astype(np.uint8)
output_dict['detection_boxes'] = output_dict['detection_boxes'][0] output_dict['detection_scores'] = output_dict['detection_scores'][0] if 'detection_masks' in output_dict:
output_dict['detection_masks'] = output_dict['detection_masks'][0] return output_dict
%matplotlib inline
for image_path in TEST_IMAGE_PATHS:
image = Image.open(image_path)
image_np = load_image_into_numpy_array(image)
image_np_expanded = np.expand_dims(image_np, axis=0)
output_dict = run_inference_for_single_image(image_np, detection_graph)
vis_util.visualize_boxes_and_labels_on_image_array(
image_np,
output_dict['detection_boxes'],
output_dict['detection_classes'],
output_dict['detection_scores'],
category_index,
instance_masks=output_dict.get('detection_masks'),
use_normalized_coordinates=True,line_thickness=8)
plt.figure(figsize=IMAGE_SIZE)
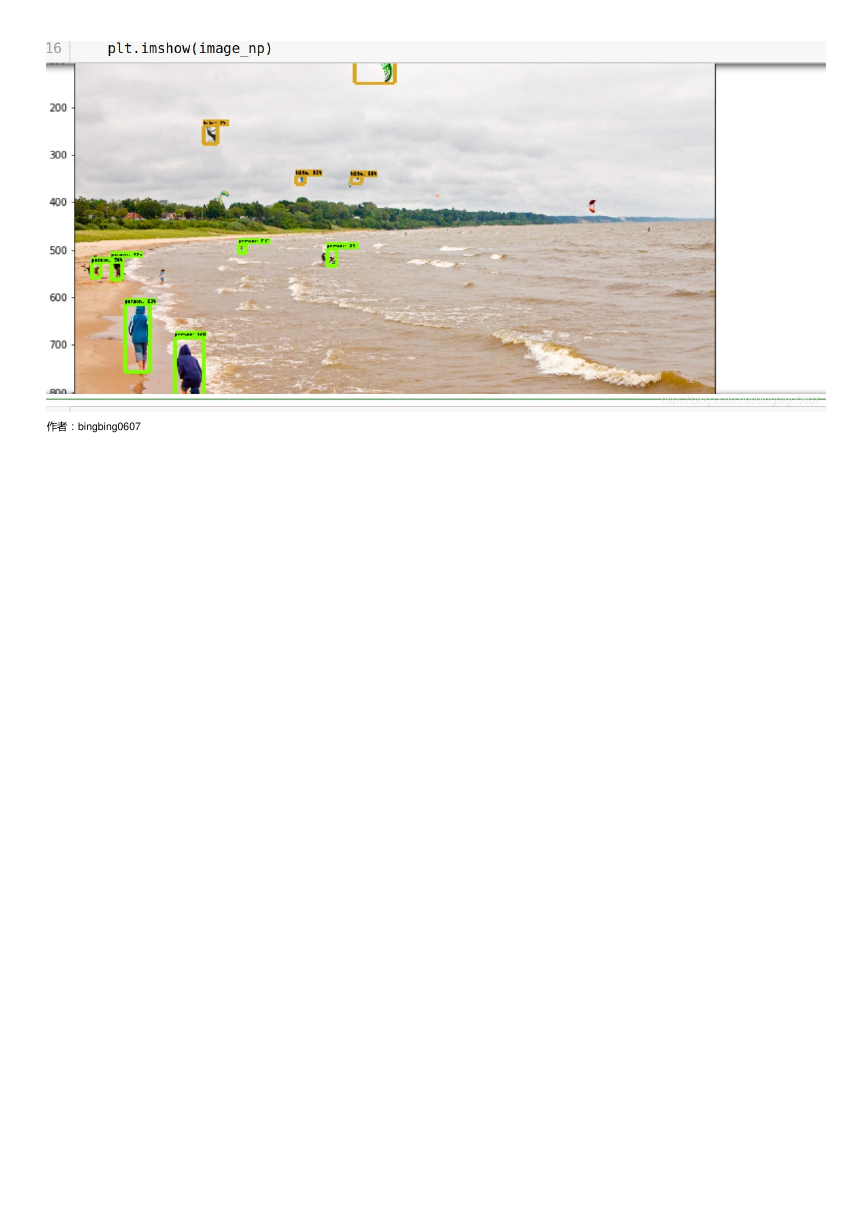
plt.imshow(image_np)
�
作者:bingbing0607
�


 2023年江西萍乡中考道德与法治真题及答案.doc
 2012年重庆南川中考生物真题及答案.doc
 2013年江西师范大学地理学综合及文艺理论基础考研真题.doc
 2020年四川甘孜小升初语文真题及答案I卷.doc
 2020年注册岩土工程师专业基础考试真题及答案.doc
 2023-2024学年福建省厦门市九年级上学期数学月考试题及答案.doc
 2021-2022学年辽宁省沈阳市大东区九年级上学期语文期末试题及答案.doc
 2022-2023学年北京东城区初三第一学期物理期末试卷及答案.doc
 2018上半年江西教师资格初中地理学科知识与教学能力真题及答案.doc
 2012年河北国家公务员申论考试真题及答案-省级.doc
 2020-2021学年江苏省扬州市江都区邵樊片九年级上学期数学第一次质量检测试题及答案.doc
 2022下半年黑龙江教师资格证中学综合素质真题及答案.doc