logo资料库

Brother打印机-PJ-673说明书.pdf

第1页 / 共75页
第2页 / 共75页
第3页 / 共75页
第4页 / 共75页
第5页 / 共75页
第6页 / 共75页
第7页 / 共75页
第8页 / 共75页
资料共75页,剩余部分请下载后查看
PJ-673 Mobile Printer
Introduction
Symbols Used in This Document
About This Document
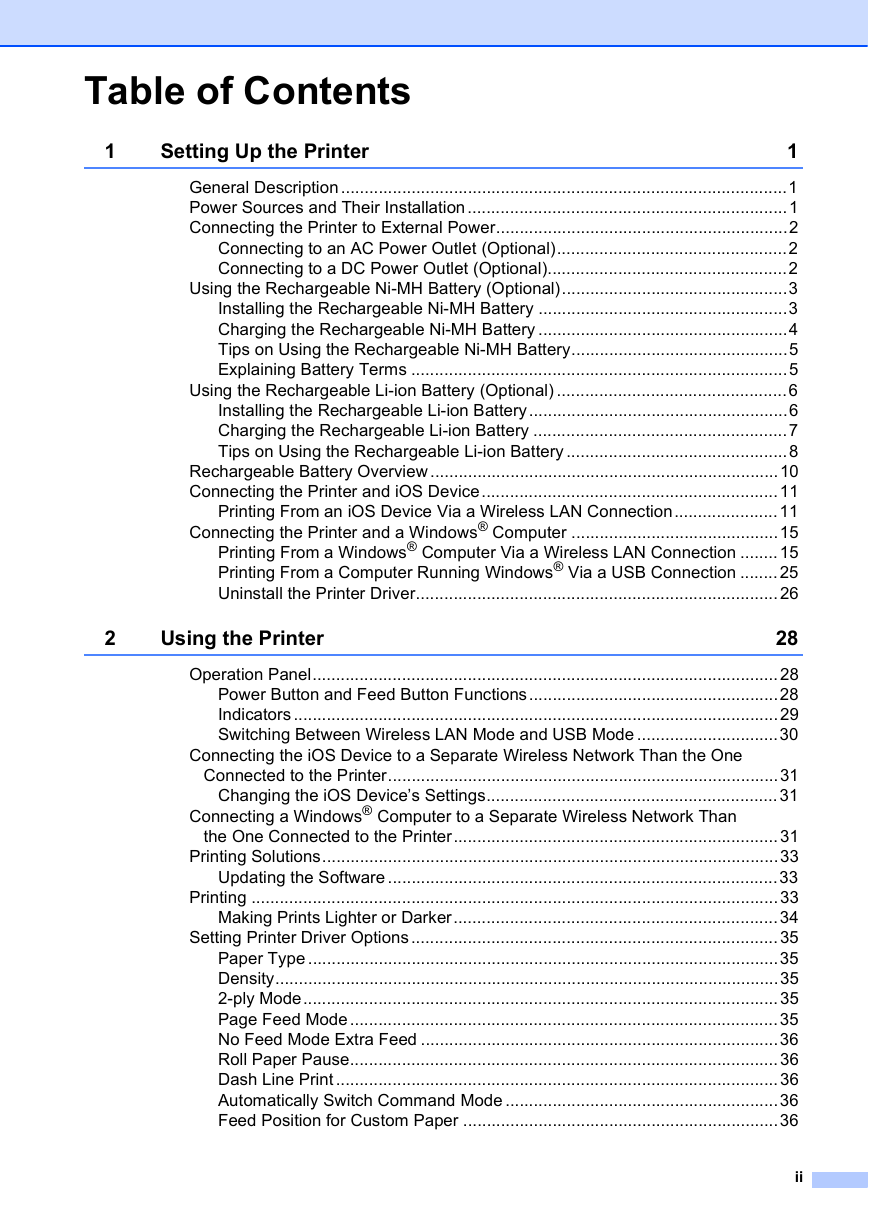
Table of Contents
1 Setting Up the Printer
General Description
Power Sources and Their Installation
Connecting the Printer to External Power
Connecting to an AC Power Outlet (Optional)
Connecting to a DC Power Outlet (Optional)
Using the Rechargeable Ni-MH Battery (Optional)
Installing the Rechargeable Ni-MH Battery
Removing the Rechargeable Ni-MH Battery
Charging the Rechargeable Ni-MH Battery
Stopping Rechargeable Ni-MH Battery Charging
Tips on Using the Rechargeable Ni-MH Battery
If the Printer Will Not be Used For a Long Period of Time
Explaining Battery Terms
Using the Rechargeable Li-ion Battery (Optional)
Installing the Rechargeable Li-ion Battery
Removing the Rechargeable Li-ion Battery
Charging the Rechargeable Li-ion Battery
Charging While Installed in the Printer
Charging While Removed From the Printer
Stopping Rechargeable Li-ion Battery Charging
Tips on Using the Rechargeable Li-ion Battery
Rechargeable Li-ion Battery Characteristics
If the Printer Will Not be Used For a Long Period of Time
Rechargeable Battery Overview
Connecting the Printer and iOS Device
Printing From an iOS Device Via a Wireless LAN Connection
Connecting the Printer (With the Default Settings)
Setting Up the Printer (With the Default Settings Changed)
Connecting the Printer (With the Default Settings Changed)
Connecting the Printer and a Windows® Computer
Printing From a Windows® Computer Via a Wireless LAN Connection
Setting Up the Printer (With the Default Settings)
Setting Up the Computer Running Windows®
Adding a Printer
Setting Up the Printer (With the Default Settings Changed)
Setting Up the Computer Running Windows®
Printing From a Computer Running Windows® Via a USB Connection
Setting Up the Printer
Uninstall the Printer Driver
2 Using the Printer
Operation Panel
Power Button and Feed Button Functions
Indicators
Switching Between Wireless LAN Mode and USB Mode
Connecting the iOS Device to a Separate Wireless Network Than the One Connected to the Printer
Changing the iOS Device’s Settings
Connecting a Windows® Computer to a Separate Wireless Network Than the One Connected to the Printer
Printing Solutions
Updating the Software
Printing
Making Prints Lighter or Darker
Setting Printer Driver Options
Paper Type
Density
2-ply Mode
Page Feed Mode
No Feed Mode Extra Feed
Roll Paper Pause
Dash Line Print
Automatically Switch Command Mode
Feed Position for Custom Paper
Setting Paper Size
Selecting Paper Type
Cut Sheet Paper
Non-Perforated Roll Paper
Variable-Length Pages (Saves Paper)
Infinite Length Pages (Such as for Geological Recordings or Polygraph Charts)
Perforated Roll Paper
Tips on Using Paper
Using Genuine Brother Thermal Paper
Usage and Handling Instructions
Clearing a Paper Jam
Cutting Roll Paper
3 Brother PJ-673 Utility
Overview
Installing Brother PJ-673 Utility
Uninstalling PJ-673 Utility
Using PJ-673 Utility
Before Using PJ-673 Series Utility
Starting PJ-673 Utility
How to Use PJ-673 Utility
Parameters
Changing Parameter Settings
Defining Paper Size
Defining Power and Roll Paper Options
Defining Print Density and Other Options
Defining Internal Font Settings
PJ-673 Utility Menu
4 Maintaining the Printer
Cleaning the Platen Roller
Cleaning the Printer’s Exterior
5 Reference
Indicators
Indicator Warnings
Printing a Printer Report
6 Troubleshooting
Overview
Paper Problems
Printed Image Problems
Pages Don’t Print
Pages Are Partially Printed
7 Technical Information
Product Specifications
A Character Sets
Character Code Tables
brother US ENG
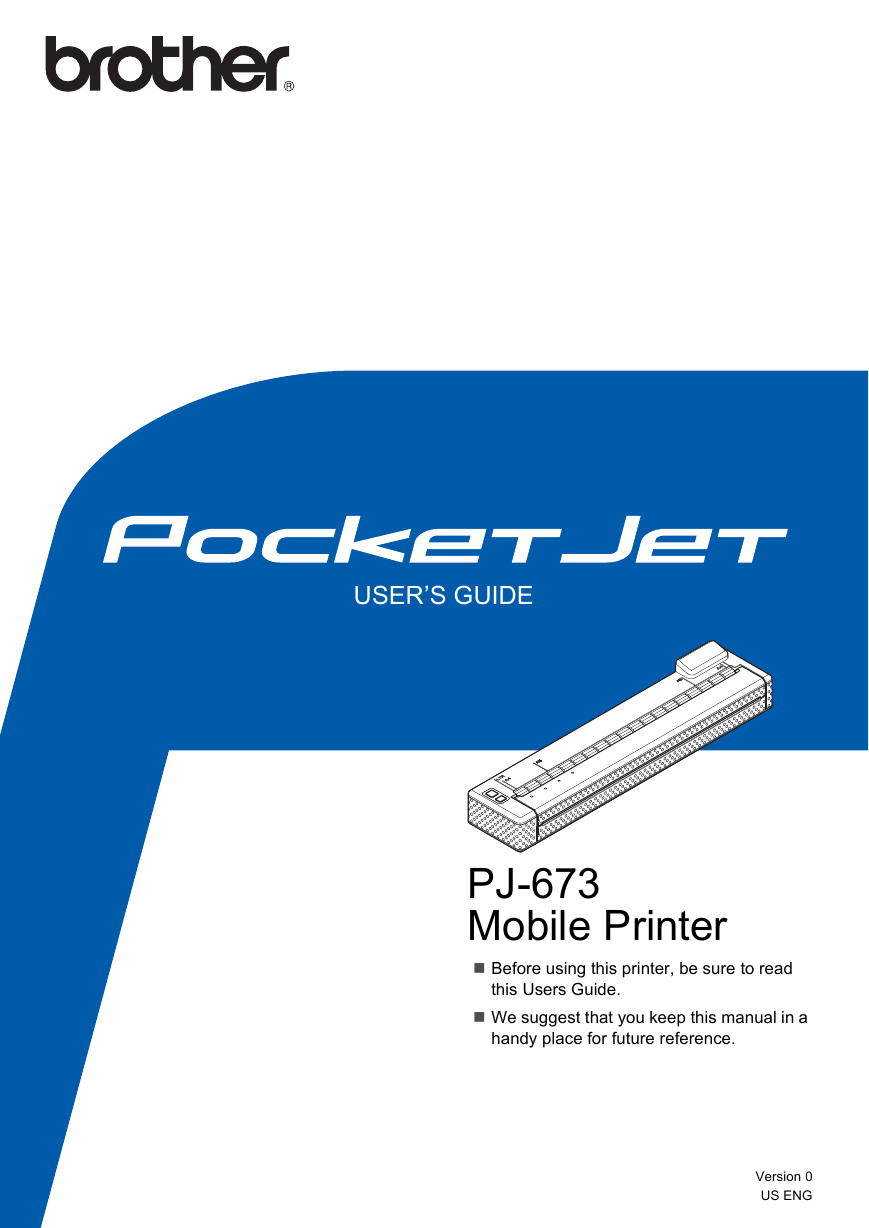
USER’S GUIDE PJ-673 Mobile Printer  Before using this printer, be sure to read this Users Guide.  We suggest that you keep this manual in a handy place for future reference. Version 0 US ENG
Introduction Thank you for purchase of the Brother mobile printer PocketJet PJ-673 (hereafter referred to as “the printer”). This mobile thermal printer can be connected to an iPhone or iPad (hereafter referred to as "an iOS device") or a computer running Windows® to print documents. Be sure to read User’s Guide and Safety and Legal Guide before using the printer. We suggest that you keep this document in a handy place for future reference. When printing from an iOS device, printing software created by a software developer will be needed in addition to the product and services that we provide. (We provide a Software Development Kit (hereafter referred to as “SDK”) that can be used.) Consult with a software developer for printing software for the iOS device. Symbols Used in This Document The following symbols are used throughout this document. This symbol indicates instructions that may result in injuries or damage if they are ignored or incorrectly followed. This symbol indicates information or directions that should be followed. Ignoring them may result in damage, or failed operations. This symbol indicates notes that provide information or directions that can help you better understand and use the product more efficiently. About This Document This document (PDF) is included on the CD-ROM. The latest version is available for download at: http://solutions.brother.com NOTE If using Adobe® Reader® to view this document on a computer, the cursor changes to when the cursor is placed on a link. Click the link to open the corresponding page. For information about using Adobe® Reader®, see the help file included with Adobe® Reader®. i
Table of Contents 1 Setting Up the Printer 1 General Description...............................................................................................1 Power Sources and Their Installation....................................................................1 Connecting the Printer to External Power..............................................................2 Connecting to an AC Power Outlet (Optional).................................................2 Connecting to a DC Power Outlet (Optional)...................................................2 Using the Rechargeable Ni-MH Battery (Optional)................................................3 Installing the Rechargeable Ni-MH Battery .....................................................3 Charging the Rechargeable Ni-MH Battery .....................................................4 Tips on Using the Rechargeable Ni-MH Battery..............................................5 Explaining Battery Terms ................................................................................5 Using the Rechargeable Li-ion Battery (Optional) .................................................6 Installing the Rechargeable Li-ion Battery.......................................................6 Charging the Rechargeable Li-ion Battery ......................................................7 Tips on Using the Rechargeable Li-ion Battery ...............................................8 Rechargeable Battery Overview..........................................................................10 Connecting the Printer and iOS Device...............................................................11 Printing From an iOS Device Via a Wireless LAN Connection......................11 Connecting the Printer and a Windows® Computer ............................................15 Printing From a Windows® Computer Via a Wireless LAN Connection ........15 Printing From a Computer Running Windows® Via a USB Connection ........25 Uninstall the Printer Driver.............................................................................26 2 Using the Printer 28 Operation Panel...................................................................................................28 Power Button and Feed Button Functions.....................................................28 Indicators .......................................................................................................29 Switching Between Wireless LAN Mode and USB Mode ..............................30 Connecting the iOS Device to a Separate Wireless Network Than the One Connected to the Printer...................................................................................31 Changing the iOS Device’s Settings..............................................................31 Connecting a Windows® Computer to a Separate Wireless Network Than the One Connected to the Printer.....................................................................31 Printing Solutions.................................................................................................33 Updating the Software ...................................................................................33 Printing ................................................................................................................33 Making Prints Lighter or Darker.....................................................................34 Setting Printer Driver Options..............................................................................35 Paper Type ....................................................................................................35 Density...........................................................................................................35 2-ply Mode.....................................................................................................35 Page Feed Mode...........................................................................................35 No Feed Mode Extra Feed ............................................................................36 Roll Paper Pause...........................................................................................36 Dash Line Print ..............................................................................................36 Automatically Switch Command Mode ..........................................................36 Feed Position for Custom Paper ...................................................................36 ii
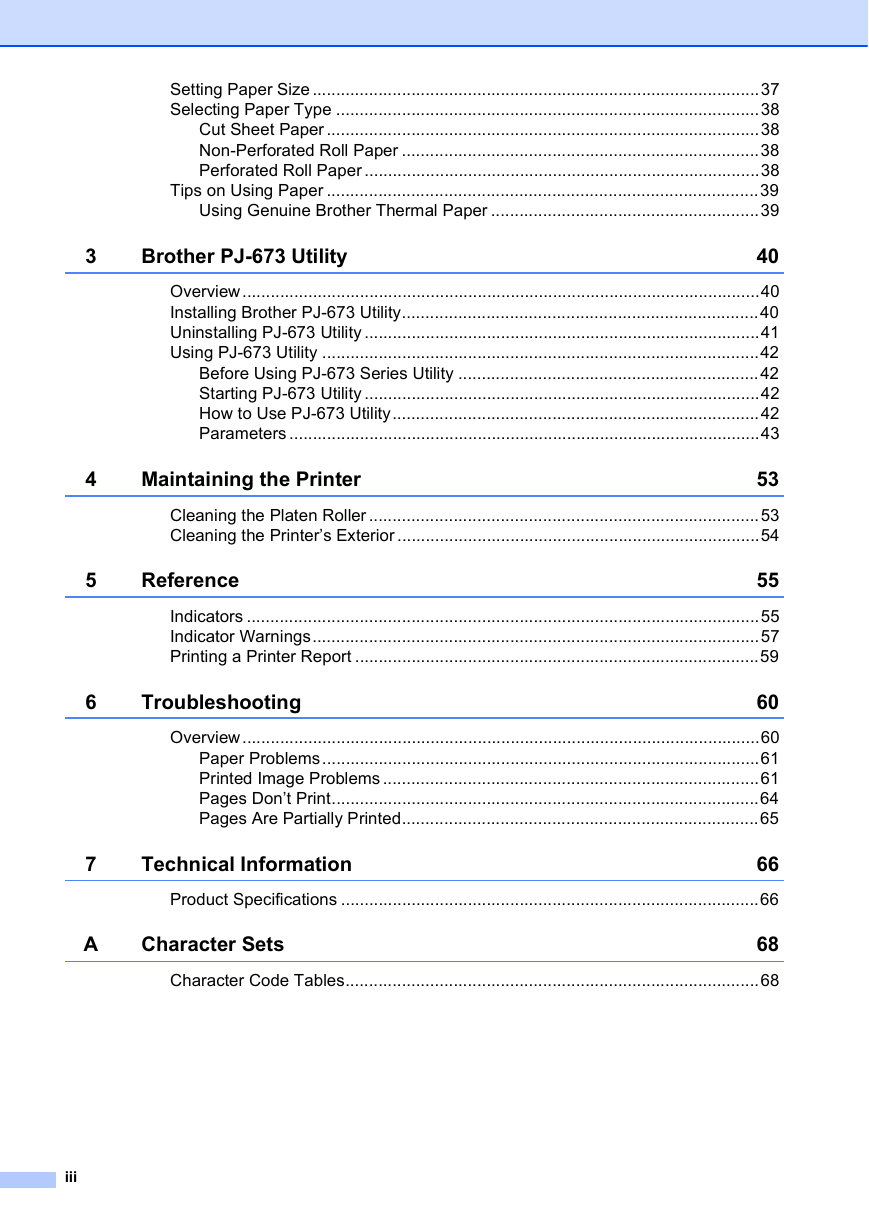
Setting Paper Size ...............................................................................................37 Selecting Paper Type ..........................................................................................38 Cut Sheet Paper ............................................................................................38 Non-Perforated Roll Paper ............................................................................38 Perforated Roll Paper ....................................................................................38 Tips on Using Paper ............................................................................................39 Using Genuine Brother Thermal Paper .........................................................39 Brother PJ-673 Utility 40 Overview..............................................................................................................40 Installing Brother PJ-673 Utility............................................................................40 Uninstalling PJ-673 Utility ....................................................................................41 Using PJ-673 Utility .............................................................................................42 Before Using PJ-673 Series Utility ................................................................42 Starting PJ-673 Utility ....................................................................................42 How to Use PJ-673 Utility..............................................................................42 Parameters ....................................................................................................43 Maintaining the Printer 53 Cleaning the Platen Roller ...................................................................................53 Cleaning the Printer’s Exterior .............................................................................54 Reference 55 Indicators .............................................................................................................55 Indicator Warnings...............................................................................................57 Printing a Printer Report ......................................................................................59 Troubleshooting 60 Overview..............................................................................................................60 Paper Problems.............................................................................................61 Printed Image Problems ................................................................................61 Pages Don’t Print...........................................................................................64 Pages Are Partially Printed............................................................................65 Technical Information 66 Product Specifications .........................................................................................66 Character Sets 68 Character Code Tables........................................................................................68 3 4 5 6 7 A iii
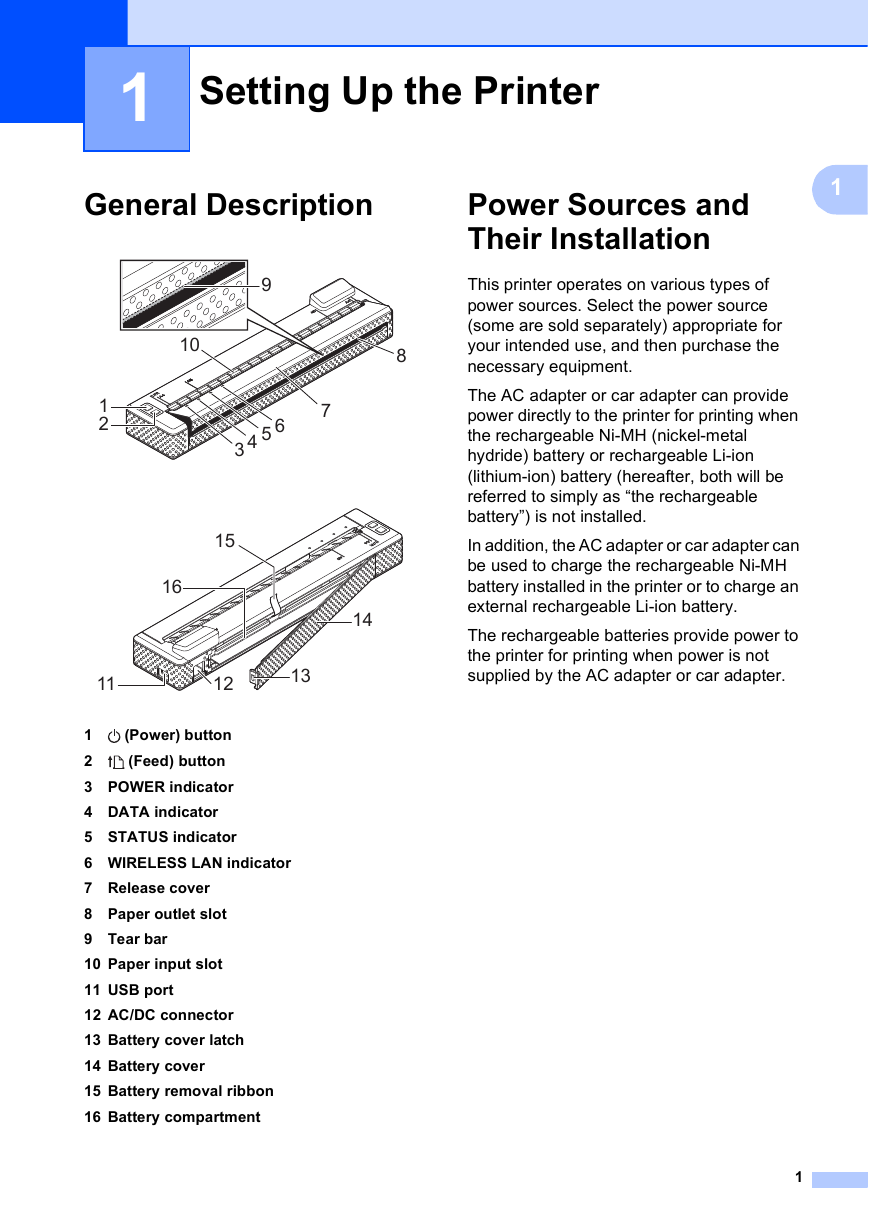
1 Setting Up the Printer 1 General Description 1 1 2 9 10 8 7 3 4 5 6 15 16 14 11 12 13 (Power) button 1 (Feed) button 2 3 POWER indicator 4 DATA indicator 5 STATUS indicator 6 WIRELESS LAN indicator 7 Release cover 8 Paper outlet slot 9 Tear bar 10 Paper input slot 11 USB port 12 AC/DC connector 13 Battery cover latch 14 Battery cover 15 Battery removal ribbon 16 Battery compartment 1 1 Power Sources and Their Installation This printer operates on various types of power sources. Select the power source (some are sold separately) appropriate for your intended use, and then purchase the necessary equipment. The AC adapter or car adapter can provide power directly to the printer for printing when the rechargeable Ni-MH (nickel-metal hydride) battery or rechargeable Li-ion (lithium-ion) battery (hereafter, both will be referred to simply as “the rechargeable battery”) is not installed. In addition, the AC adapter or car adapter can be used to charge the rechargeable Ni-MH battery installed in the printer or to charge an external rechargeable Li-ion battery. The rechargeable batteries provide power to the printer for printing when power is not supplied by the AC adapter or car adapter. 1
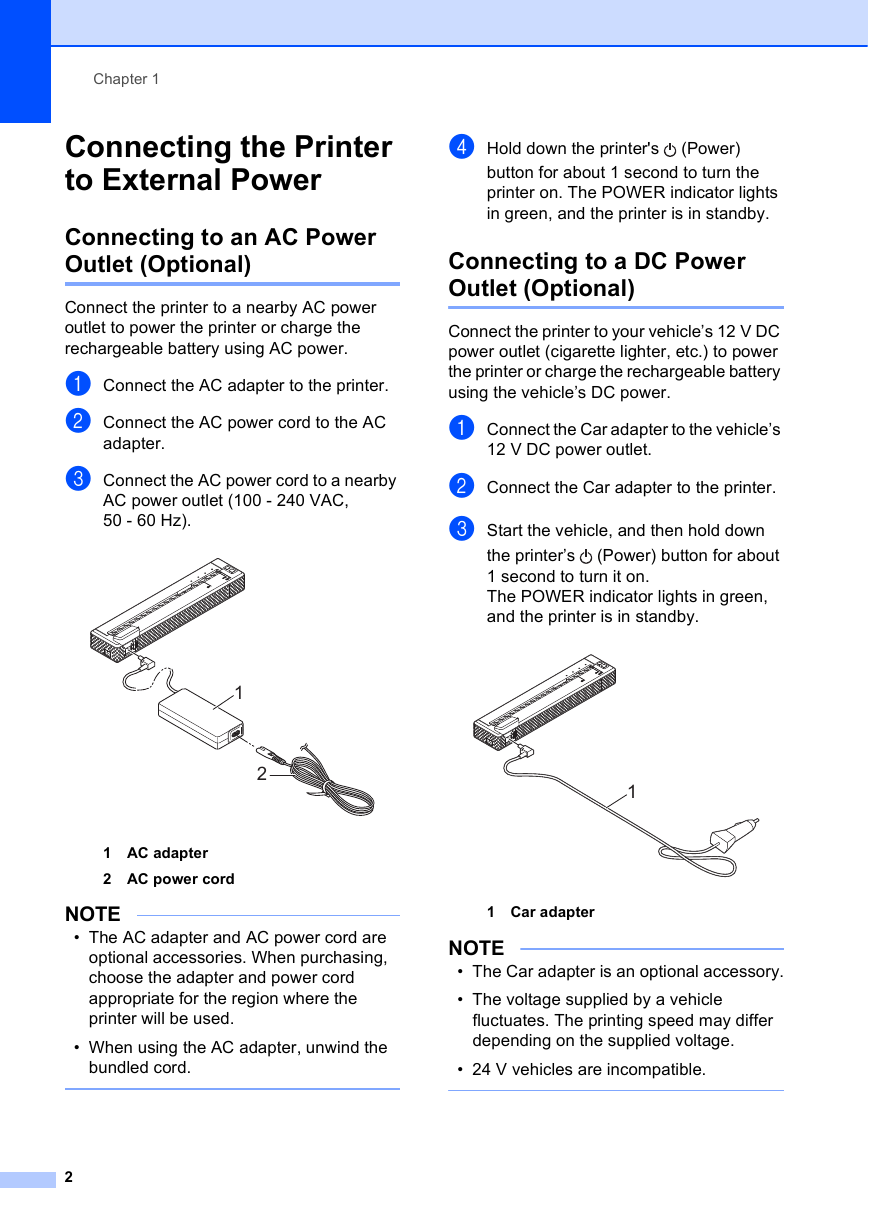
Chapter 1 Connecting the Printer to External Power Connecting to an AC Power Outlet (Optional) 1 1 Connect the printer to a nearby AC power outlet to power the printer or charge the rechargeable battery using AC power. a Connect the AC adapter to the printer. b Connect the AC power cord to the AC adapter. c Connect the AC power cord to a nearby AC power outlet (100 - 240 VAC, 50 - 60 Hz). 1 2 1 AC adapter 2 AC power cord d Hold down the printer's (Power) button for about 1 second to turn the printer on. The POWER indicator lights in green, and the printer is in standby. Connecting to a DC Power Outlet (Optional) 1 Connect the printer to your vehicle’s 12 V DC power outlet (cigarette lighter, etc.) to power the printer or charge the rechargeable battery using the vehicle’s DC power. a Connect the Car adapter to the vehicle’s 12 V DC power outlet. b Connect the Car adapter to the printer. c Start the vehicle, and then hold down (Power) button for about the printer’s 1 second to turn it on. The POWER indicator lights in green, and the printer is in standby. 1 NOTE • The AC adapter and AC power cord are optional accessories. When purchasing, choose the adapter and power cord appropriate for the region where the printer will be used. • When using the AC adapter, unwind the bundled cord. 1 Car adapter NOTE • The Car adapter is an optional accessory. • The voltage supplied by a vehicle fluctuates. The printing speed may differ depending on the supplied voltage. • 24 V vehicles are incompatible. 2
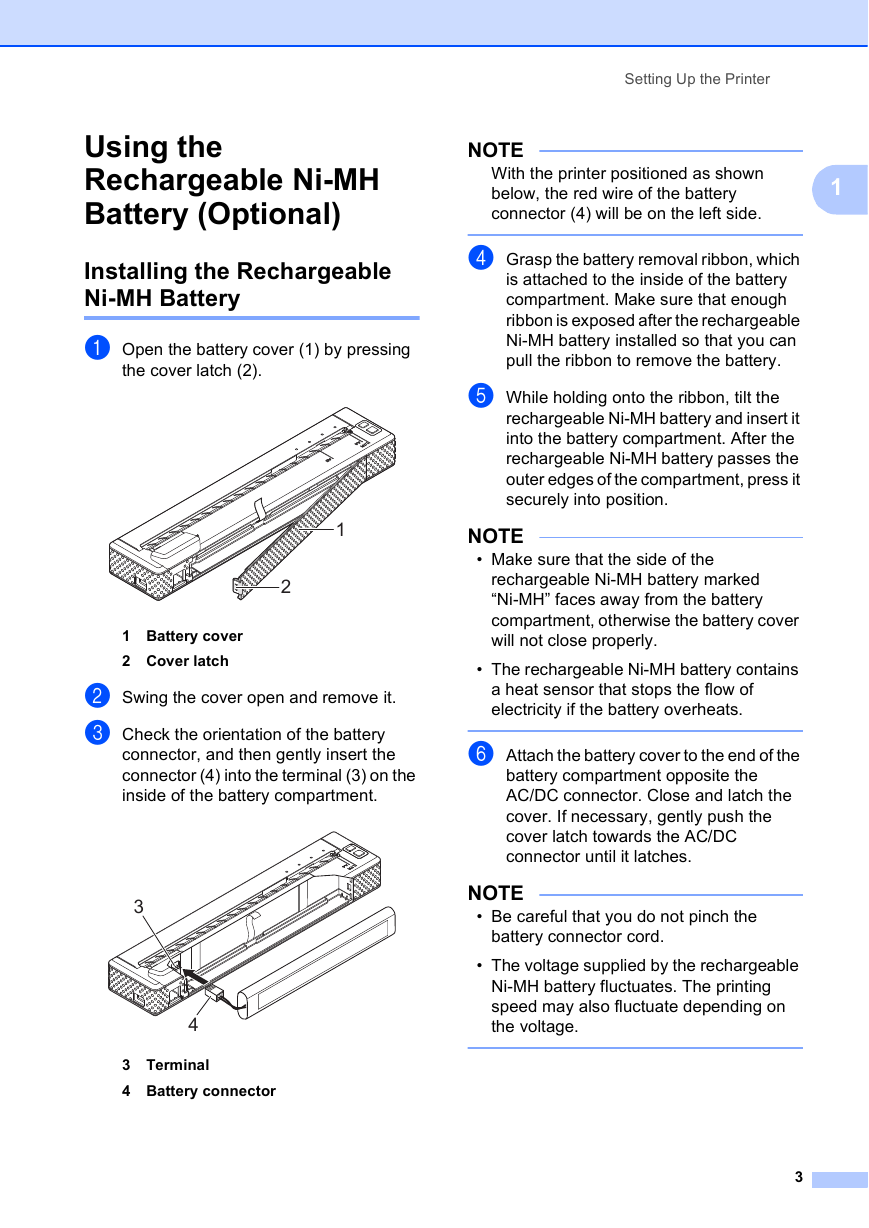
Using the Rechargeable Ni-MH Battery (Optional) Installing the Rechargeable Ni-MH Battery 1 1 a Open the battery cover (1) by pressing the cover latch (2). 1 2 1 Battery cover 2 Cover latch b Swing the cover open and remove it. c Check the orientation of the battery connector, and then gently insert the connector (4) into the terminal (3) on the inside of the battery compartment. 3 4 3 Terminal 4 Battery connector Setting Up the Printer NOTE With the printer positioned as shown below, the red wire of the battery connector (4) will be on the left side. 1 d Grasp the battery removal ribbon, which is attached to the inside of the battery compartment. Make sure that enough ribbon is exposed after the rechargeable Ni-MH battery installed so that you can pull the ribbon to remove the battery. e While holding onto the ribbon, tilt the rechargeable Ni-MH battery and insert it into the battery compartment. After the rechargeable Ni-MH battery passes the outer edges of the compartment, press it securely into position. NOTE • Make sure that the side of the rechargeable Ni-MH battery marked “Ni-MH” faces away from the battery compartment, otherwise the battery cover will not close properly. • The rechargeable Ni-MH battery contains a heat sensor that stops the flow of electricity if the battery overheats. f Attach the battery cover to the end of the battery compartment opposite the AC/DC connector. Close and latch the cover. If necessary, gently push the cover latch towards the AC/DC connector until it latches. NOTE • Be careful that you do not pinch the battery connector cord. • The voltage supplied by the rechargeable Ni-MH battery fluctuates. The printing speed may also fluctuate depending on the voltage. 3
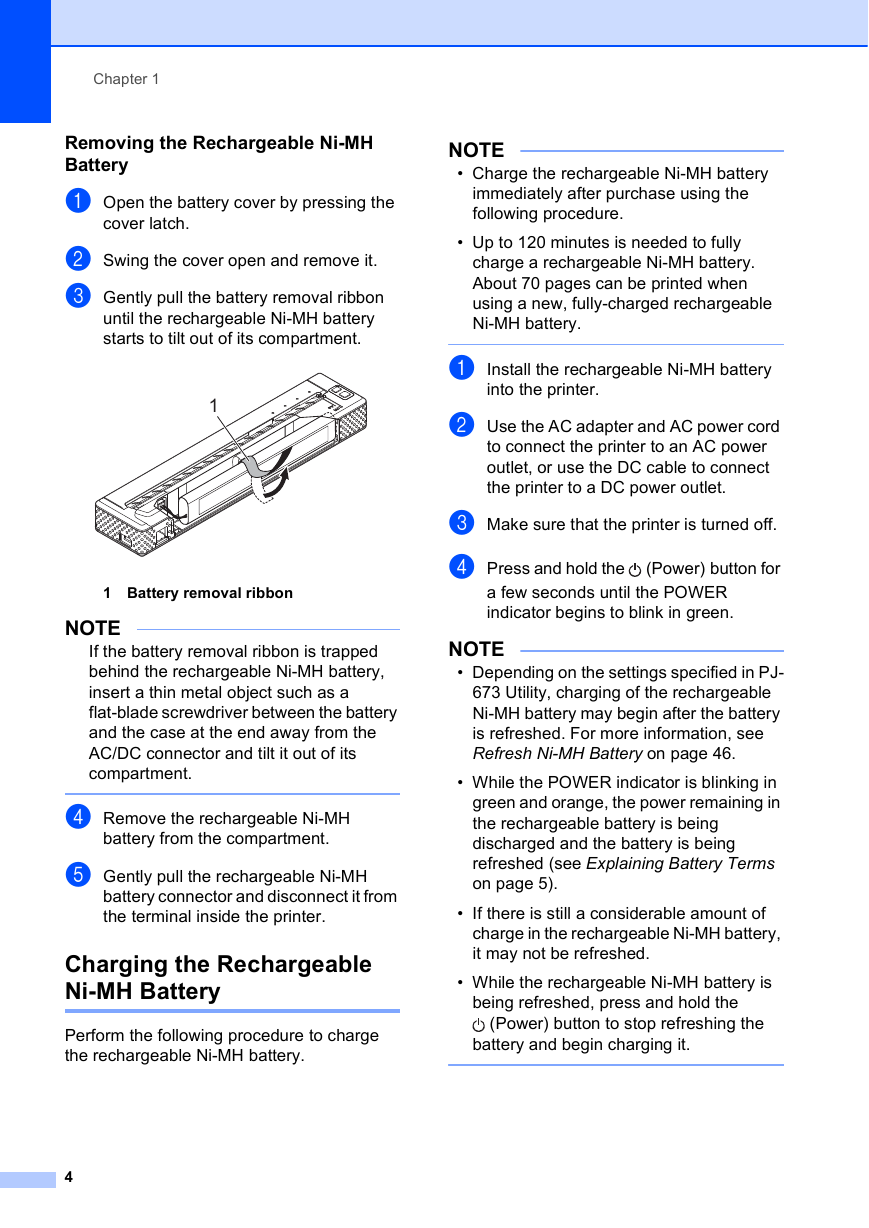
Chapter 1 Removing the Rechargeable Ni-MH Battery 1 a Open the battery cover by pressing the cover latch. b Swing the cover open and remove it. c Gently pull the battery removal ribbon until the rechargeable Ni-MH battery starts to tilt out of its compartment. 1 1 Battery removal ribbon NOTE If the battery removal ribbon is trapped behind the rechargeable Ni-MH battery, insert a thin metal object such as a flat-blade screwdriver between the battery and the case at the end away from the AC/DC connector and tilt it out of its compartment. d Remove the rechargeable Ni-MH battery from the compartment. e Gently pull the rechargeable Ni-MH battery connector and disconnect it from the terminal inside the printer. Charging the Rechargeable Ni-MH Battery 1 Perform the following procedure to charge the rechargeable Ni-MH battery. 4 NOTE • Charge the rechargeable Ni-MH battery immediately after purchase using the following procedure. • Up to 120 minutes is needed to fully charge a rechargeable Ni-MH battery. About 70 pages can be printed when using a new, fully-charged rechargeable Ni-MH battery. a Install the rechargeable Ni-MH battery into the printer. b Use the AC adapter and AC power cord to connect the printer to an AC power outlet, or use the DC cable to connect the printer to a DC power outlet. c Make sure that the printer is turned off. d Press and hold the (Power) button for a few seconds until the POWER indicator begins to blink in green. NOTE • Depending on the settings specified in PJ- 673 Utility, charging of the rechargeable Ni-MH battery may begin after the battery is refreshed. For more information, see Refresh Ni-MH Battery on page 46. • While the POWER indicator is blinking in green and orange, the power remaining in the rechargeable battery is being discharged and the battery is being refreshed (see Explaining Battery Terms on page 5). • If there is still a considerable amount of charge in the rechargeable Ni-MH battery, it may not be refreshed. • While the rechargeable Ni-MH battery is being refreshed, press and hold the (Power) button to stop refreshing the battery and begin charging it.
分享到:
收藏