User Guide
1. Welcome
Congratulations on your purchase of GC222, the compact and
multi functional handset from Micromax. Your GC222 handset
supports both GSM as well as CDMA networks. This beautiful
handset comes with the following features:
Camera: - It has a camera which helps you capture images on
the go.
Wireless FM Radio: - You can tune in to your favorite FM
stations with this feature.
LED Flashlight: - The powerful flashlight comes handy and
useful.
Bluetooth: - You can send and receive files, images etc, using
this feature.
GSM+CDMA Support: - This handset is equipped to support
two SIM cards
WAP: - You can browse the internet using WAP settings.
MMS: - Send and receive multimedia messages using this
feature.
Memory Card Support: - This handset can support memory
card.
GC222 1
�
1.
2.
3.
3.1
3.2
4.
4.1
4.2
4.3
4.4
4.5
4.6
4.7
4.8
4.9
5.
5.1
5.2
5.3
5.4
2
Table of Contents
WELCOME
PHONE LAYOUT
GETTING STARTED
Insert SIM
Insert Memory Card
HOW TO USE YOUR PHONE
Switch On/OFF
Lock/Unlock the phone
Make a Call
Answer/Reject a call
Make an International call
Send Messages
Add contacts to Phonebook
Browse the Net
Use Multimedia Features
NOTABLE FEATURES
LED Flashlight
Bluetooth
Blacklist
Auto Redial
1
4
5
5
6
7
7
7
7
8
8
8
8
8
9
9
9
9
10
10
GC222
�
User Guide
5.5
5.6
5.7
5.8
5.9
5.10
5.11
6.
7.
Auto Quick End
Auto Record
Privacy Protection
Phone Language
Phone Security
Text reader
Useful Tips
SAFETY PRECAUTIONS
TAKING CARE OF YOUR DEVICE
10
10
11
11
11
11
12
12
13
GC222 3
�
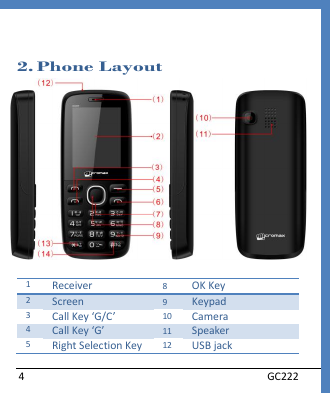
2. Phone Layout
1
2
3
4
5
Receiver
Screen
Call Key ‘G/C’
Call Key ‘G’
Right Selection Key
8
9
10
11
12
OK Key
Keypad
Camera
Speaker
USB jack
4
GC222
�
User Guide
6
7
End/Power Key
Navigation keys
* Key
13
14 # Key
3. Getting Started
3.1 Insert SIM
1.
2.
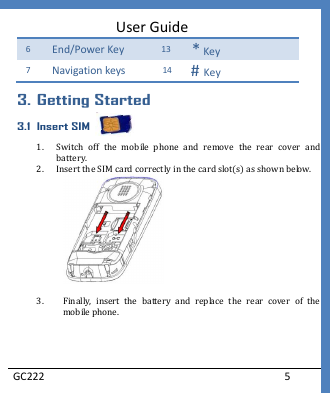
Switch off the mobile phone and remove the rear cover and
battery.
Insert the SIM card correctly in the card slot(s) as shown below.
3.
Finally, insert the battery and replace the rear cover of the
mobile phone.
GC222 5
�
Please charge the battery before you use the newly
purchased phone. We suggest you to charge the battery for
at least 4 hours continuously for the first time.
3.2 Insert Memory Card
1. Switch off the phone and remove the rear cover and the battery.
2. Open the memory card slot, and insert the memory card into the
slot.
3. Close the memory card slot.
4. Finally, insert the battery and the rear cover of the mobile phone.
The Memory Card gives you extra storage capacity for
content such as pictures, music and video clips.
Do not remove the memory card while reading or writing to
the card. Doing so may cause data corruption on the card or
on the phone.
6
GC222
�
User Guide
Use only compatible memory cards approved by Micromax.
Incompatible cards may damage the slot or corrupt the data
stored in the card.
4. How to use Your Phone
4.1 Switch On/OFF
Long Press the End/Power key to switch on and off your phone.
4.2 Lock/Unlock the phone
From the home screen Press Call key ‘G/C’ and then immediately
press *key to lock the keypad.
To unlock, press Call key ‘G/C’ and then immediately press *.
4.3 Make a Call
Dial a number and press either call key ‘C’ or ‘G’ to make a call.
You can also call a number from the phonebook or dialed or missed
call list in the same way.
GC222 7
�
4.4 Answer/Reject a call
To answer, press call key ‘G/C’ or ‘G’. To reject, press End/Power key.
4.5 Make an International call
From the home screen, long press the * key till + displays on screen.
Enter the desired international code and then complete the phone
number and make the call.
4.6 Send Messages
You can compose a new message or reply to existing messages in the
list.
You can also send and receive multimedia messages.
4.7 Add contacts to Phonebook
Menu>Phonebook>Add new contact
This feature enables you to add new contacts.
4.8 Browse the Net
You can use WAP for browsing your favorite websites.
You can connect to the Internet via GPRS connection. For this you need
to set up a data account.
1.
Go to Menu> Connectivity>Data account
8
GC222
�



 2023年江西萍乡中考道德与法治真题及答案.doc
 2012年重庆南川中考生物真题及答案.doc
 2013年江西师范大学地理学综合及文艺理论基础考研真题.doc
 2020年四川甘孜小升初语文真题及答案I卷.doc
 2020年注册岩土工程师专业基础考试真题及答案.doc
 2023-2024学年福建省厦门市九年级上学期数学月考试题及答案.doc
 2021-2022学年辽宁省沈阳市大东区九年级上学期语文期末试题及答案.doc
 2022-2023学年北京东城区初三第一学期物理期末试卷及答案.doc
 2018上半年江西教师资格初中地理学科知识与教学能力真题及答案.doc
 2012年河北国家公务员申论考试真题及答案-省级.doc
 2020-2021学年江苏省扬州市江都区邵樊片九年级上学期数学第一次质量检测试题及答案.doc
 2022下半年黑龙江教师资格证中学综合素质真题及答案.doc