1
CPU Sim
USER'S MANUAL
Version 3.4
January, 2007
by
Dale Skrien
assisted by Raymond Mazza III, Joshua Ladieu, Jonathan Weinberg, Andreea Olea,
Thomas Cook, Patrick Rodjito, Tim Monahan, Mike Liedtke, Peter Landwehr, Taylor
Snook, Charlie White, Brian Putnam, Tom Goth, Mike Wolk and Cadran Cowansage
Preface
This manual is describes how to use version 3.4 of the CPU Sim simulation
system. This simulator is based on the ideas in the STARTLE simulator developed by
J.M. Kerridge of the Department of Computer Science, University of Sheffield, Sheffield,
England. Report any problems or suggestions to Dale Skrien, Department of Computer
Science, 5851 Mayflower Hill, Colby College, Waterville, Maine 04901, phone 207-859-
5851. (Email: djskrien@colby.edu) (Web page:
www.cs.colby.edu/~djskrien/CPUSim/)
Acknowledgments
The author and programmers would like to acknowledge the following people
whose code was used in this package:
• Mark Fisher for his JavaHelp demo code1,
1 “JavaHelp for the Java Programmer” by Mark Fisher, JavaReport, June, 1999.
�
2
• David Flanagan for his PageableText class2,
• Mark Johnson for his HtmlEncoder and LAX classes3,
• Philip Milne for his TableSorter and TableMap classes4,
• Matthew Robinson and Pavel Vorobiev for their FindDialog, DialogLayout and
PrintPreview classes5,
• Robb Shecter for his OOTableModel class6,
• Klaus Berg for his EFileChooser package7,
• Tom Tessier for his JScrollableDesktopPane package8,
• Slava Pestov for his JEditTextArea package9,
• Benjamin Michotte for his Text utility class10
• The ACM Java Task Force group for the IOConsole class11.
CPU Sim is an interactive computer simulation package in which the user
CPU Sim simulates computer architectures at the register-transfer level. That is,
INTRODUCTION
specifies the details of the CPU to be simulated, including the register set, memory, the
microinstruction set, machine instruction set, and assembly language instructions.
Users can write machine or assembly language programs and run them on the CPU
they’ve created.
the basic hardware units from which a hypothetical CPU is constructed consist of
registers, condition bits, and memory (RAM). The user does not need to deal with
individual transistors or gates on the digital logic level of a machine. The basic units
used to define machine instructions consist of microinstructions of a variety of types.
The details of how the microinstructions get executed by the hardware are not
important at this level.
specify the hardware units and microinstructions for the CPU and then create the
machine instruction set. Each machine instruction is implemented via an associated
sequence of microinstructions specified by the user.
2 Java Foundation Classes in a Nutshell by David Flanagan, copyright (c) 1999 by O'Reilly & Associates.
3 “Programming XML in Java” by Mark Johnson, JavaWorld, April, 2000.
4 “The Java Tutorial” at http://java.sun.com/docs/books/tutorial.
5 Swing by Matthew Robinson and Pavel Vorobiev, Manning Publications Company, 1999.
6 “Object-Oriented Widgets” by Robb Shecter, JavaReport, December, 1999
7 http://www.javaworld.com/javaworld/javatips/jw-javatip100.html
8 http://www.javaworld.com/javaworld/jw-11-2001/jw-1130-jscroll_p.html
9 http://www.jedit.org/
10 http://www.usixml.org/javadocs/michotte/be/michotte/util/Text.html
11 http://jtf.acm.org/
13 www.cs.colby.edu/~djskrien/CPUSim
Once the instruction set has been specified, the user can write programs for the
A user of CPU Sim who wants to simulate a new hypothetical CPU must first
�
3
CPU Sim has many useful features for running programs and debugging them.
CPU Sim executes a program through repeated execution of machine cycles.
new CPU, in either machine language or assembly language, which can be run in the
CPU Sim environment.
One cycle has two parts: the fetch sequence, which is a sequence of microinstructions
that typically loads the next instruction to be executed into an instruction register and
decodes it, and the execute sequence, which is the sequence of microinstructions
associated with the newly-decoded instruction. The fetch sequence is the same for all
cycles, but the execute sequence can, and usually does, vary from cycle to cycle.
Execution of machine cycles halts when a “halt” bit is set to 1.
For example, CPU Sim has a built-in text editor and assembler for creating and
assembling programs. The editor will highlight the offending section of the program
when the assembler finds an error. Assembled programs can be executed without
stopping or they can be executed in debugging mode, which allows the users to step
through the execution of a program, one machine instruction or microinstruction at a
time. After each step, users can edit the contents of any register or memory and then
continue stepping or even back up one microinstruction or machine instruction at a
time, all the way back to the initial state of the machine.
J.M. Kerridge of the University of Sheffield.
The ideas for this simulator came from the “STARTLE” simulator developed by
STARTING CPU Sim
environment (JRE) installed on your computer. CPU Sim should run with JRE 1.5 or
later.
CPU Sim is a Java application and so requires that you have a Java runtime
After having successfully downloaded and unzipped CPU Sim from the CPU
Sim web page13, you can start up the program using a command line or terminal
window, as described in the “InstallationInstructions.txt” file that is included in the
download:
• Open a command or terminal window and navigate to the "CPUSim3.4.X" folder.
• Type in one of the following commands (all on one line):
o (Windows users)
java -cp CPUSim3.4.jar;jhall.jar;CPUSimHelp3.4.jar
cpusim.Main
o (Mac or Linux users)
java -cp CPUSim3.4.jar:jhall.jar:CPUSimHelp3.4.jar
• You can also add four optional arguments at the end of the command line in any
cpusim.Main
order:
-m
-p
-t
-c
�
4
If you specify a machine file using the –m flag, then that machine is loaded into CPU
Sim during startup. If you specify a text file using the –t flag, then that file is
opened during startup. If you specify the -c flag, which can only be used together
with the –t and –m flags, then the corresponding text file and machine file will be
loaded and run from the command line. If you specify a properties file using the –p
flag, then the properties in that file are loaded into CPU Sim during startup. A
properties file contains information regarding the preferred fonts for text, register,
and RAM windows and a list of the recently opened machines and text files.
For example, to start up the Wombat1 machine and load the W1-0.a assembly
language program that appear in the SampleAssignments folder, you could type in
the following command (all on one line) on Windows:
java -cp CPUSim3.4.jar;jhall.jar;CPUSimHelp3.4.jar cpusim.Main -m
SampleAssignments/Wombat1.cpu -t SampleAssignments/W1-0.a
Notes:
o If the user does not specify a machine file, a new empty machine is opened.
o CPU Sim searches its directory for any files you specify on the command line, so
you must include the directories relative to that location.
o If you use the –c flag, you must also specify a machine and text file using the –m
and –t flags. In that case, the CPU Sim GUI windows never appear. Any input
or output channels in the machine normally directed to a console window or to a
dialog are redirected to the command line. Input and output channels directed
to a file are not redirected to the command line.
As always, users can create short cuts to avoid typing such a long command. For
example, Linux users can put the above command in a script file. Windows users can
create a .bat file containing the command above that they can double-click to start up
CPU Sim. Such a file, named "CPUSim.bat", is including in the CPU Sim installation
package. Macintosh users can create AppleScript documents that do the same thing.
This section demonstrates how to use CPU Sim to run a program on a
RUNNING PROGRAMS IN CPU SIM, A Tour using the Wombat1
hypothetical machine. In this tour, we will (a) load into CPU Sim the hypothetical
machine “Wombat1” that has already been defined and saved in a file, (b) open an
assembly language program for the Wombat1, (c) assemble the program, (d) load it into
the Wombat1’s memory, and (e) run it.
To begin, start up CPU Sim without any of the four optional flags mentioned in
the preceding section. The window that will appear is the main “desktop” window for
CPU Sim. Except for some dialog boxes, all windows used by CPU Sim are windows
internal to the desktop window. Such windows include text windows for writing and
editing assembly programs and display windows for viewing and editing the contents
of registers and memory.
If you do not specify a machine on the command line when starting CPU Sim,
�
5
then the title of the main display window is “New” since, if no machine is specified, a
new virtual machine is created that has no registers and no memory.
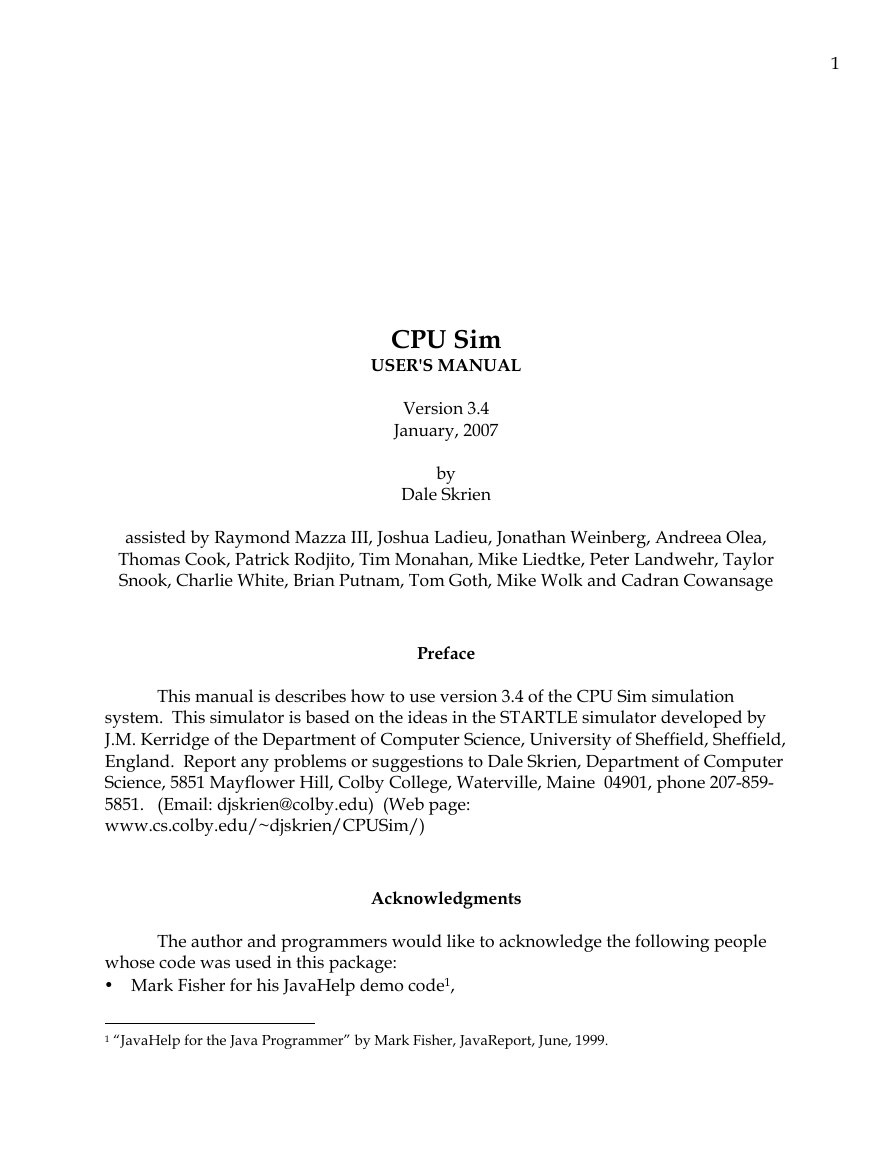
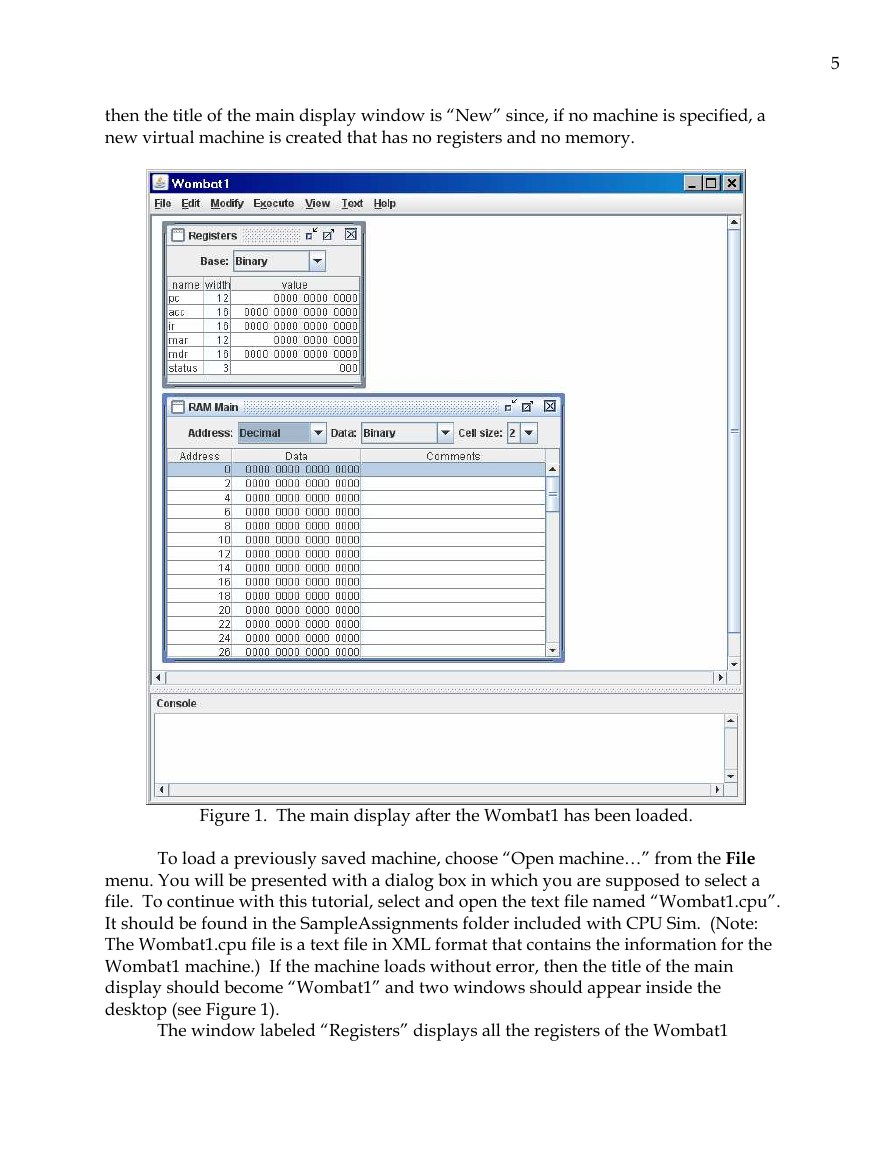
Figure 1. The main display after the Wombat1 has been loaded.
To load a previously saved machine, choose “Open machine…” from the File
menu. You will be presented with a dialog box in which you are supposed to select a
file. To continue with this tutorial, select and open the text file named “Wombat1.cpu”.
It should be found in the SampleAssignments folder included with CPU Sim. (Note:
The Wombat1.cpu file is a text file in XML format that contains the information for the
Wombat1 machine.) If the machine loads without error, then the title of the main
display should become “Wombat1” and two windows should appear inside the
desktop (see Figure 1).
The window labeled “Registers” displays all the registers of the Wombat1
�
6
Leave the registers and RAM windows open for the remainder of this tour.
Note: The table columns in any of these windows can be reordered by dragging
including their widths and current values. To see the values in every register displayed
in binary (base 2), signed 2's complement decimal (base 10), unsigned decimal (base 10),
hexadecimal (base 16), or as characters (ASCII or Unicode), select the appropriate item
from the popup menu at the top of the window. Values in binary and hexadecimal
format are displayed in four digit groups for readability. The values of the registers can
be edited in any of these display formats by clicking in the appropriate cell of the table,
typing in a new value, and then pressing the enter or return key. The edited values will
be automatically reformatted into groups of four characters if the user is working in
binary or hexadecimal.
The window labeled “RAM Main” shows the contents of the RAM named
“Main”. As with the registers, you can display the values in base 2, 10 (signed or
unsigned), 16, or in ASCII or Unicode, and, as with the registers, values in binary and
hexadecimal format are grouped in four digit units. You can also view the addresses as
positive integers in base 2, 10, or 16. You can view the contents of RAM in units of 1-8
bytes instead of just 1 byte. Since the Wombat1 uses 16-bit instructions, it is helpful to
view RAM in 16-bit units, so we have selected a cell size of 2 in the popup menu in the
RAM window. The values of all cells are editable except the cells in the address column.
the column headers left or right to a new position. The column widths can also be
adjusted by dragging the line dividing the columns. In all windows except the RAM
windows, the rows can be resorted by column by clicking in any column header.
The bottom panel of the main display is labeled “Console” and is used for
console input and output. That is, the user can type data into the Console panel when
prompted for input and CPU Sim can type data in the panel for output.
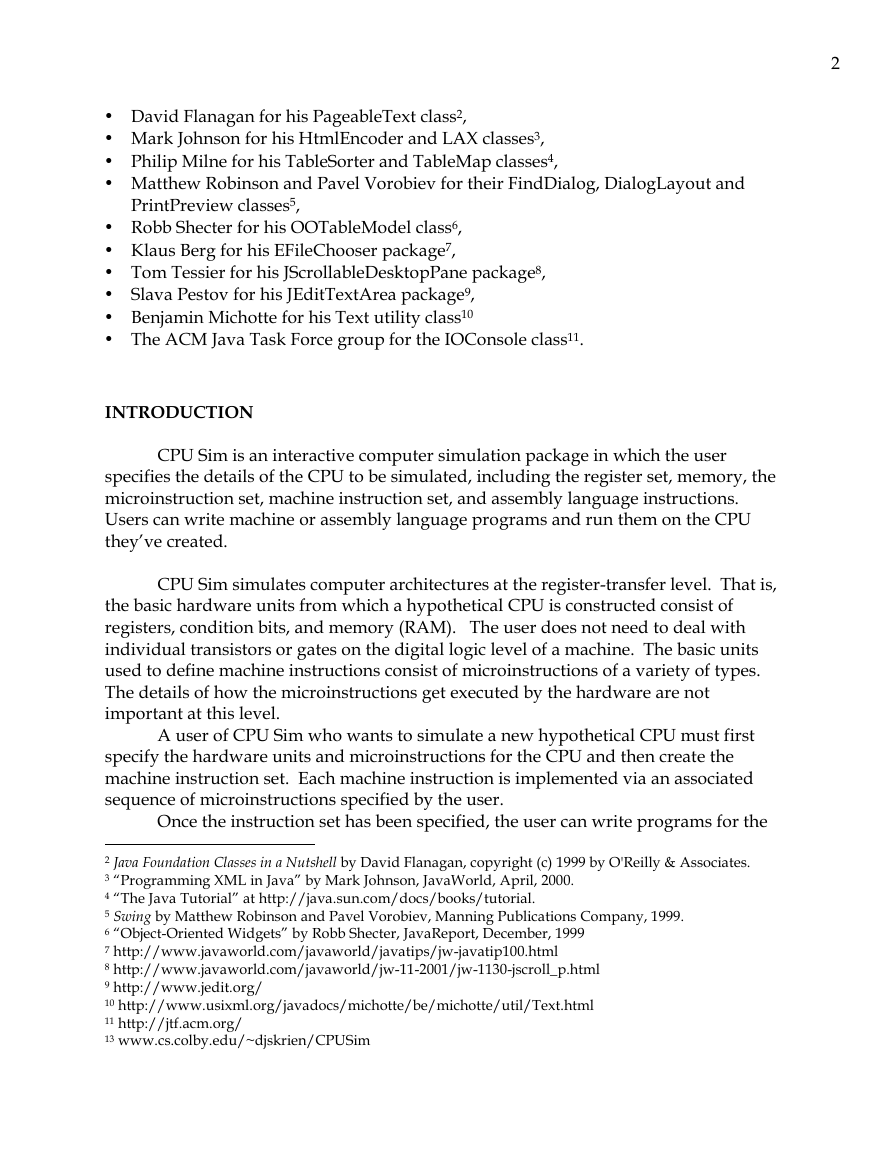
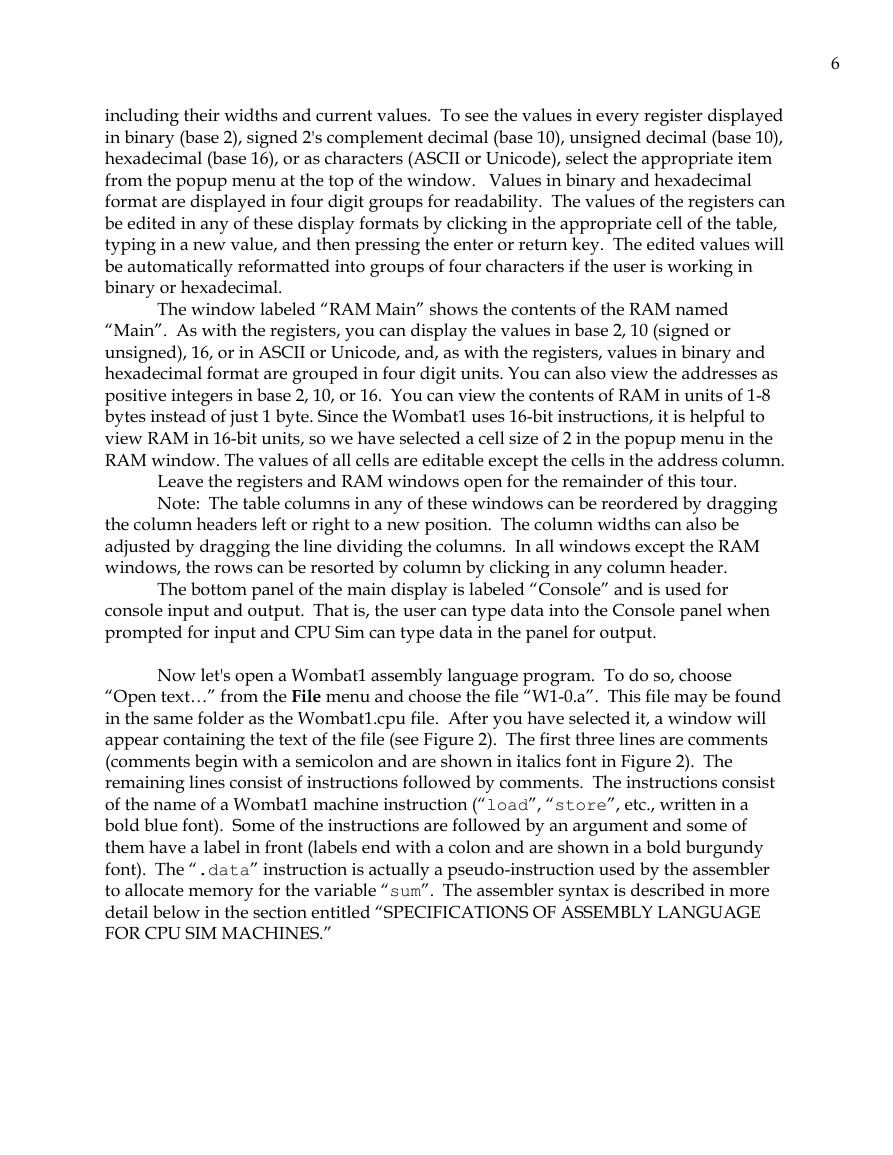
“Open text…” from the File menu and choose the file “W1-0.a”. This file may be found
in the same folder as the Wombat1.cpu file. After you have selected it, a window will
appear containing the text of the file (see Figure 2). The first three lines are comments
(comments begin with a semicolon and are shown in italics font in Figure 2). The
remaining lines consist of instructions followed by comments. The instructions consist
of the name of a Wombat1 machine instruction (“load”, “store”, etc., written in a
bold blue font). Some of the instructions are followed by an argument and some of
them have a label in front (labels end with a colon and are shown in a bold burgundy
font). The “.data” instruction is actually a pseudo-instruction used by the assembler
to allocate memory for the variable “sum”. The assembler syntax is described in more
detail below in the section entitled “SPECIFICATIONS OF ASSEMBLY LANGUAGE
FOR CPU SIM MACHINES.”
Now let's open a Wombat1 assembly language program. To do so, choose
�
7
Figure 2. A Wombat1 assembly language program.
Before you can run this program, you must assemble it into machine language
instructions that the Wombat1 can understand and then load those instructions into the
Wombat1’s memory. To do so, choose “Assemble & Load” from the Execute menu.
(Note: If this menu item is disabled, the assembly language text window W1-0.a is not
the currently-selected, i.e., highlighted, window. In that case, click on the text window
before choosing “Assembly & Load”.) You should see numbers and comments appear
in the first few rows of the table in the RAM window. The numbers in the data column
of the RAM window are the machine language instructions generated by the assembler
from the assembly language program. The comments column of the RAM window
displays the lines of assembly code from which the corresponding machine instruction
was generated.
Now the program in the main memory is ready to be run. Make sure all the
registers have been cleared (set to 0). If some of them are not 0, then either edit the
values to make them 0 or choose “Clear all registers & arrays” from the Execute menu.
Then choose “Run” from the Execute menu. The program will begin execution with the
instruction whose address (namely, 0) is stored in the program counter pc. The machine
runs by repeatedly executing machine cycles consisting of the fetch sequence, which
loads into the ir the instruction whose address is in the pc and then decodes the
instruction, followed by the execute sequence, which executes the machine instruction
�
8
that was just decoded. At this point, the console panel should ask you for input. Type a
positive integer into the console panel and press the return key or enter key. Notice that
the program will halt execution until an input value has been typed into the console.
Repeat this process several times and then type in a negative number. The program
will display an output message in the console panel giving the sum of all the positive
numbers you typed in. This will be followed by a second output message in a new
dialog box indicating that the program has ceased execution because a condition bit was
set to 1. When execution is complete, you can see the final state of the registers and
RAM in the registers and RAM windows.
If you wish to rerun the program with different input, you can proceed in two
ways. You can either perform a two step process of selecting “Clear everything” from
the Execute menu, and then choose “Assemble, load, & run” from the Execute menu, or
you can select “Clear, assemble, load & run” from the Execute menu. While both of
these methods perform the same function, “Clear everything” and “Assemble, load, &
run” are divided into two separate operations in case you want to debug your program,
as explained below.
When you are debugging assembly code, it is useful to be able to step through
the execution, one instruction or microinstruction at a time, and to set break points in
the code. To practice debugging using the Wombat1 and the program W1-0.a, first
select “Clear everything” from the Execute menu, and then choose “Assemble & load”
from the Execute menu. Then select "Debug Mode" from the Execute menu. You will
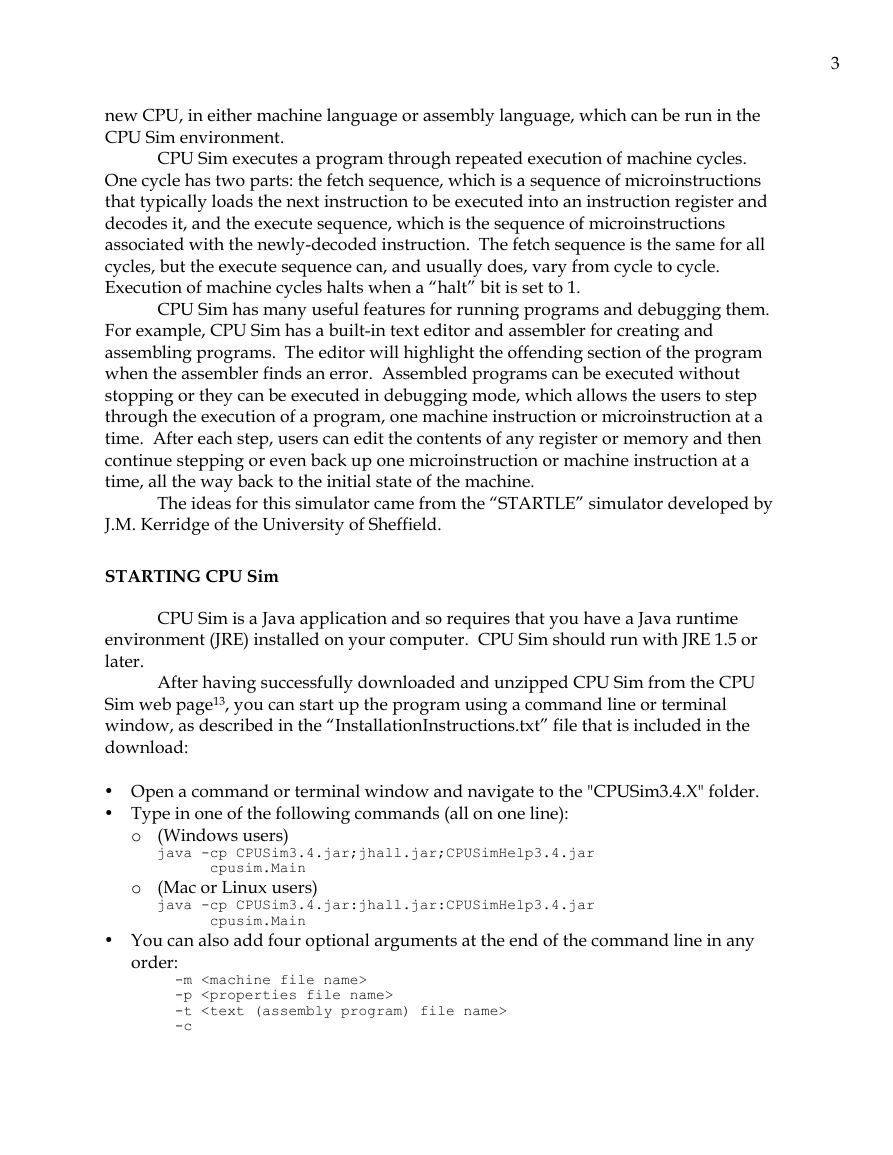
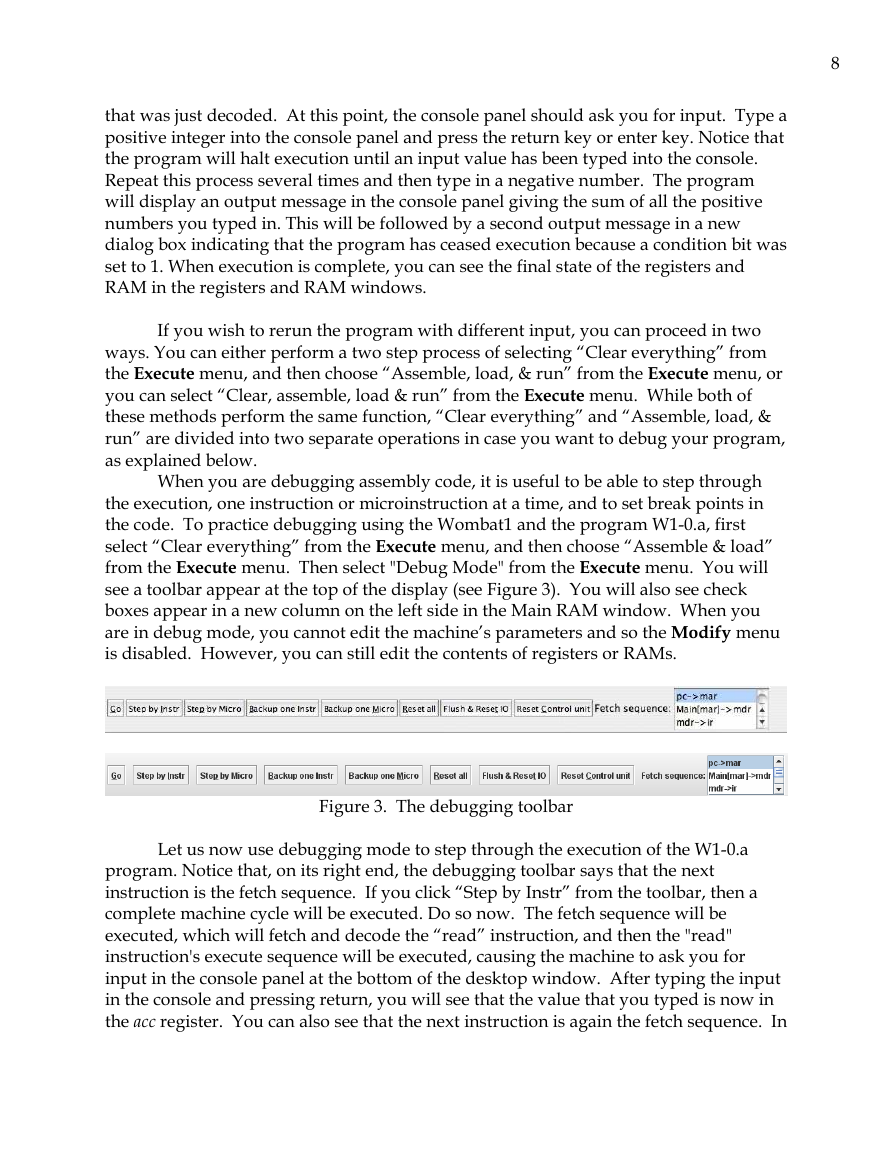
see a toolbar appear at the top of the display (see Figure 3). You will also see check
boxes appear in a new column on the left side in the Main RAM window. When you
are in debug mode, you cannot edit the machine’s parameters and so the Modify menu
is disabled. However, you can still edit the contents of registers or RAMs.
Figure 3. The debugging toolbar
Let us now use debugging mode to step through the execution of the W1-0.a
program. Notice that, on its right end, the debugging toolbar says that the next
instruction is the fetch sequence. If you click “Step by Instr” from the toolbar, then a
complete machine cycle will be executed. Do so now. The fetch sequence will be
executed, which will fetch and decode the “read” instruction, and then the "read"
instruction's execute sequence will be executed, causing the machine to ask you for
input in the console panel at the bottom of the desktop window. After typing the input
in the console and pressing return, you will see that the value that you typed is now in
the acc register. You can also see that the next instruction is again the fetch sequence. In
�



 2023年江西萍乡中考道德与法治真题及答案.doc
 2012年重庆南川中考生物真题及答案.doc
 2013年江西师范大学地理学综合及文艺理论基础考研真题.doc
 2020年四川甘孜小升初语文真题及答案I卷.doc
 2020年注册岩土工程师专业基础考试真题及答案.doc
 2023-2024学年福建省厦门市九年级上学期数学月考试题及答案.doc
 2021-2022学年辽宁省沈阳市大东区九年级上学期语文期末试题及答案.doc
 2022-2023学年北京东城区初三第一学期物理期末试卷及答案.doc
 2018上半年江西教师资格初中地理学科知识与教学能力真题及答案.doc
 2012年河北国家公务员申论考试真题及答案-省级.doc
 2020-2021学年江苏省扬州市江都区邵樊片九年级上学期数学第一次质量检测试题及答案.doc
 2022下半年黑龙江教师资格证中学综合素质真题及答案.doc