PSS A319 / A320 / A321
Systems Manual
February 23, 2002
�
Phoenix Simulation Software
A319/320/321
Systems Manual
TABLE OF CONTENTS
P 2
SEQ 001
REV 01
Panel Overview
Main Panel Components
General Notes
Primary Flight Display
Navigation Display
Engine / Warning Display
System Display
Autoight
MCDU
Backup Instruments
Landing Gear
Controls on Center Pedestal
APU
Electrical System
Fuel System
Powerplane
Hydraulics
Pneumatics
Air Conditioning
Pressurization
GPWS
Other Controls
Chronometer
Panel Conguration utility
3
5
6
7
15
24
28
30
40
66
67
68
71
72
74
76
77
79
81
83
85
86
87
88
�
Phoenix Simulation Software
A319/320/321
Systems Manual
Panel views
PANEL OVERVIEW
P 3
SEQ 001
REV 01
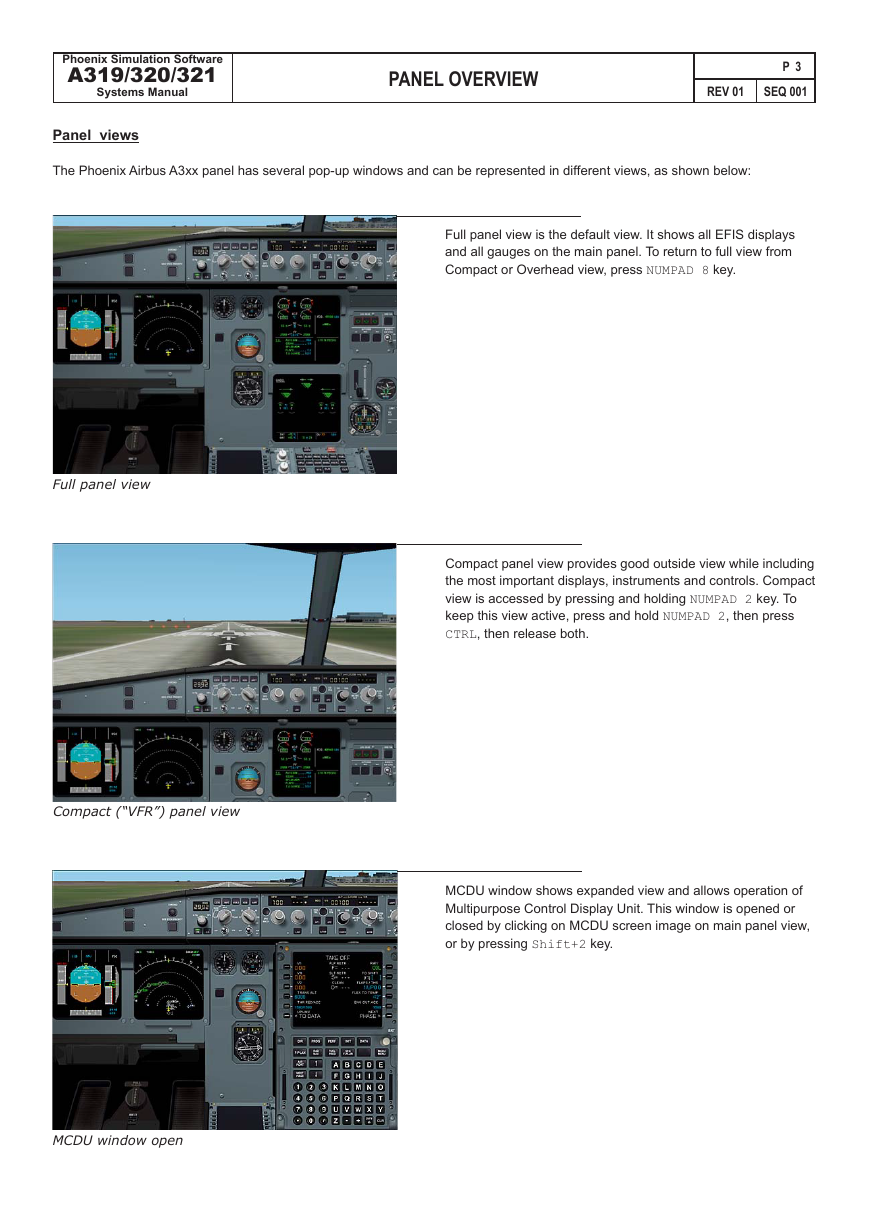
The Phoenix Airbus A3xx panel has several pop-up windows and can be represented in different views, as shown below:
Full panel view is the default view. It shows all EFIS displays
and all gauges on the main panel. To return to full view from
Compact or Overhead view, press NUMPAD 8 key.
Full panel view
Compact (“VFR”) panel view
MCDU window open
Compact panel view provides good outside view while including
the most important displays, instruments and controls. Compact
view is accessed by pressing and holding NUMPAD 2 key. To
keep this view active, press and hold NUMPAD 2, then press
CTRL, then release both.
MCDU window shows expanded view and allows operation of
Multipurpose Control Display Unit. This window is opened or
closed by clicking on MCDU screen image on main panel view,
or by pressing Shift+2 key.
�
Phoenix Simulation Software
A319/320/321
Systems Manual
PANEL OVERVIEW
P 4
SEQ 001
REV 01
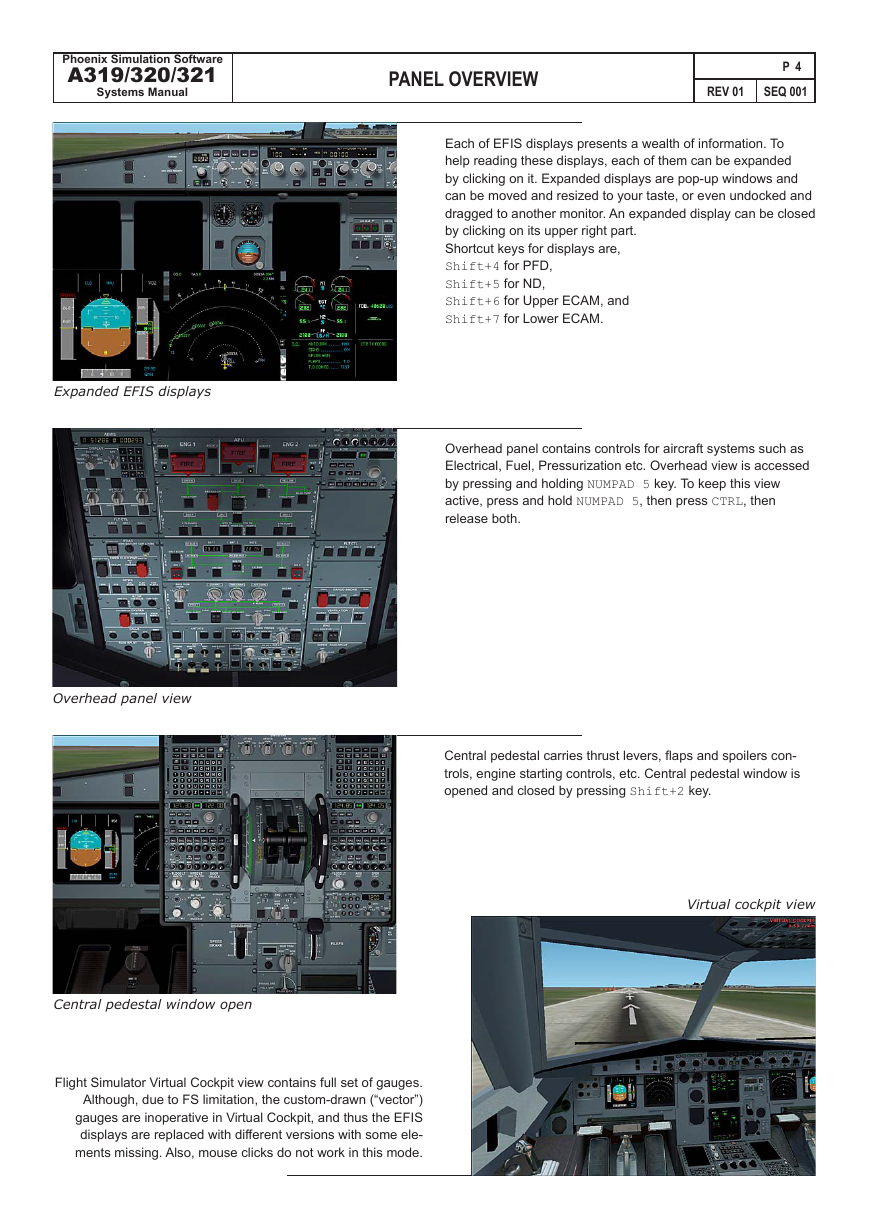
Each of EFIS displays presents a wealth of information. To
help reading these displays, each of them can be expanded
by clicking on it. Expanded displays are pop-up windows and
can be moved and resized to your taste, or even undocked and
dragged to another monitor. An expanded display can be closed
by clicking on its upper right part.
Shortcut keys for displays are,
Shift+4 for PFD,
Shift+5 for ND,
Shift+6 for Upper ECAM, and
Shift+7 for Lower ECAM.
Overhead panel contains controls for aircraft systems such as
Electrical, Fuel, Pressurization etc. Overhead view is accessed
by pressing and holding NUMPAD 5 key. To keep this view
active, press and hold NUMPAD 5, then press CTRL, then
release both.
Central pedestal carries thrust levers, aps and spoilers con-
trols, engine starting controls, etc. Central pedestal window is
opened and closed by pressing Shift+2 key.
Virtual cockpit view
Expanded EFIS displays
Overhead panel view
Central pedestal window open
Flight Simulator Virtual Cockpit view contains full set of gauges.
Although, due to FS limitation, the custom-drawn (“vector”)
gauges are inoperative in Virtual Cockpit, and thus the EFIS
displays are replaced with different versions with some ele-
ments missing. Also, mouse clicks do not work in this mode.
�
Phoenix Simulation Software
A319/320/321
Systems Manual
MAIN PANEL COMPONENTS
P 5
SEQ 001
REV 01
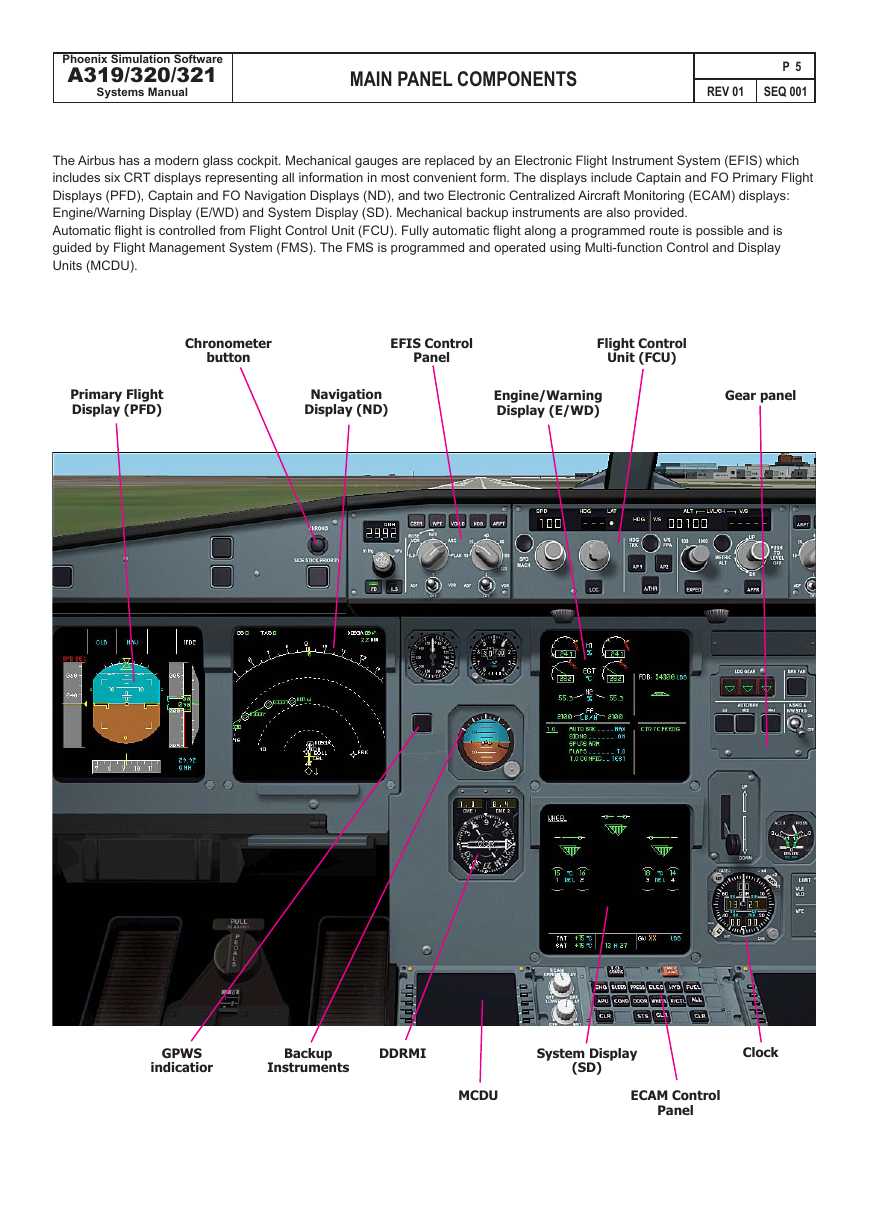
The Airbus has a modern glass cockpit. Mechanical gauges are replaced by an Electronic Flight Instrument System (EFIS) which
includes six CRT displays representing all information in most convenient form. The displays include Captain and FO Primary Flight
Displays (PFD), Captain and FO Navigation Displays (ND), and two Electronic Centralized Aircraft Monitoring (ECAM) displays:
Engine/Warning Display (E/WD) and System Display (SD). Mechanical backup instruments are also provided.
Automatic ight is controlled from Flight Control Unit (FCU). Fully automatic ight along a programmed route is possible and is
guided by Flight Management System (FMS). The FMS is programmed and operated using Multi-function Control and Display
Units (MCDU).
Chronometer
button
EFIS Control
Panel
Flight Control
Unit (FCU)
Primary Flight
Display (PFD)
Navigation
Display (ND)
Engine/Warning
Display (E/WD)
Gear panel
GPWS
indicatior
Backup
Instruments
DDRMI
System Display
(SD)
Clock
MCDU
ECAM Control
Panel
�
Phoenix Simulation Software
A319/320/321
Systems Manual
EFIS displays
GENERAL NOTES
P 6
SEQ 001
REV 01
EFIS displays contain a wealth of information. At standard display resolutions, they can be hard to read. To solve this, any display
can be expanded by clicking it with the mouse. This brings a pop-up window with enlarged display picture. Such windows are
standard Flight Simulator pop-up windows. They can be resized, moved to any position and arranged to your taste. You can drag
a window clicking at any place, except for the area in upper right corner - clicking there will close the window. A window can be
undocked by right-clicking it and selecting “Undock” in pop-up menu. This allows the window to be moved outside main FS window
and placed anywhere on desktop, or on second monitor. The same can be done with MCDU pop-up window.
Thrust control
The A320 aircraft thrust levers are different from those found on Boeing-type or other common aircraft. The thrust levers move
through distinct detents, or gates, marked “MREV”, “IDLE”, “CL”, “FLX/MCT”, and “TO-GA”. Takeoff power is applied by moving
the levers to TO-GA or FLX-MCT gate, which commands autothrust system to produce computed takeoff thrust corresponding
to current conditions. At thrust reduction altitude, thrust levers are retarded to CL gate, which automatically engages autothrust
system. From this point, the levers are normally left in CL detent through all the ight until just before touchdown.
Autothrust system controls engine thrust corresponding to active thrust modes and thrust limits. The A320 thrust levers are not
back-driven by autothrust system, and don’t move as the thrust is automatically adjusted. Unless needed, they are left in CL gate
until synthesized voice announces “RETARD” 20 feet above landing runway.
Due to this, thrust control is implemented differently than on other Flight Simulator panels. Instead of using joystick throttle or Flight
Simulator keys, the panel uses custom keys (Numpad PLUS and Numpad MINUS by default) to move thrust levers between gates.
You can also use pedestal view and move levers with the mouse. Thrust levers position can be checked by looking at thrust Flight
Mode Annunciator on PFD, the thrust limit name on E/WD, or by checking the pedestal view.
Manual thrust control is still possible, using joystick throttle or Flight Simulator keys. Make sure that the panel-simulated thrust
levers are left at IDLE, or set at CL but the autothrust is disengaged.
Please check Autothrust discussion in Autoight section of this manual for further information.
Flight controls
The PSS A320 panel attempts to simulate electronic y-by-wire ight control system of the real aircraft. The conventional ight
yokes are replaced on Airbus aircraft with side-sticks, much like a computer joystick. Sidesticks send electronic signals to ight
computers, which drive the control surfaces.
Left-right stick deection controls bank rate, and computers will not allow to exceed bank limits of ±67° bank.
Forward-aft stick deection controls aircraft G load. Neutral stick position commands load of 1 G, resulting in level ight or constant
vertical speed, regardless of airspeed, altitude or weight. This is simulated in PSS panel by auto-trimming the aircraft, although
this can be done only when the joystick is centered.
The joystick inputs to Flight Simulator are disabled when the autopilot is engaged. This is done to prevent joystick noise from
interferring with autopilot operation.
�
Phoenix Simulation Software
A319/320/321
Systems Manual
General
PRIMARY FLIGHT DISPLAY
P 7
SEQ 001
REV 01
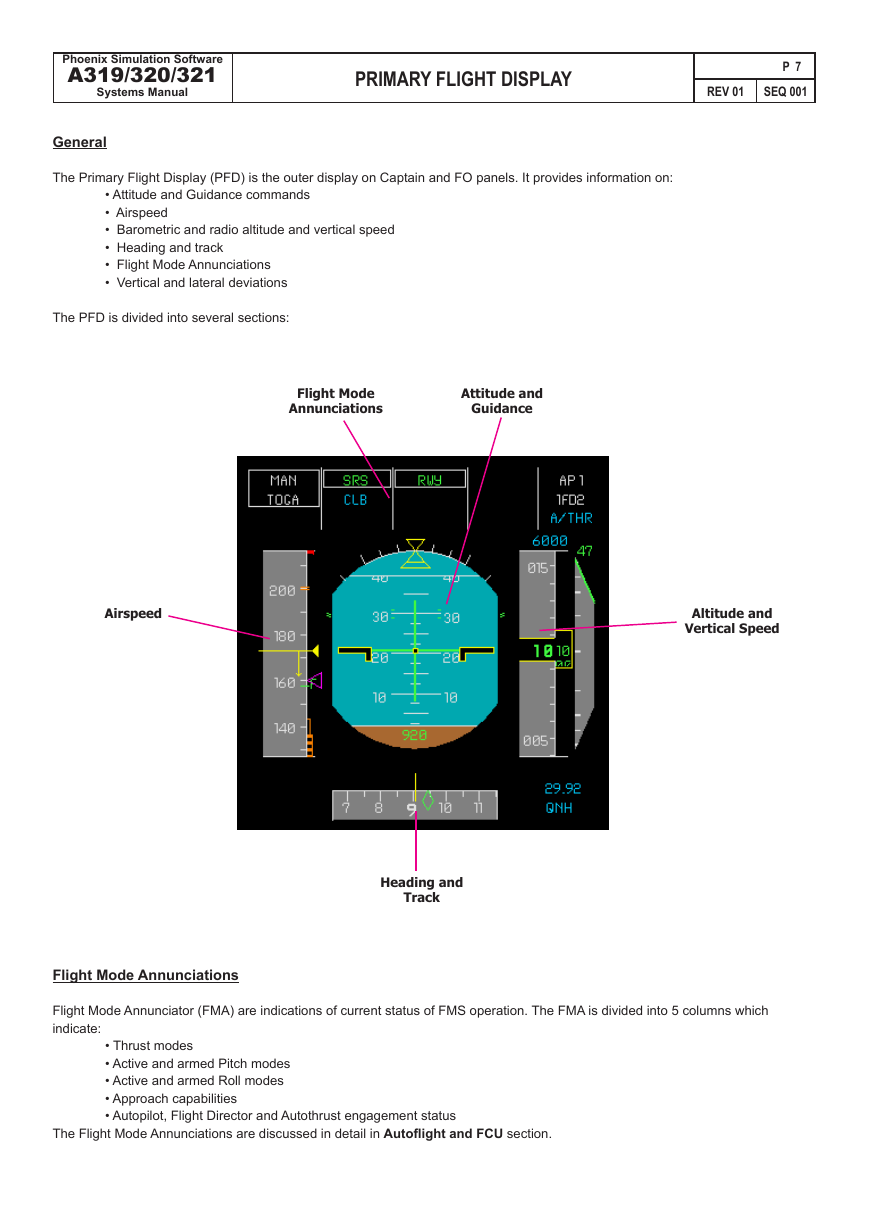
The Primary Flight Display (PFD) is the outer display on Captain and FO panels. It provides information on:
• Attitude and Guidance commands
• Airspeed
• Barometric and radio altitude and vertical speed
• Heading and track
• Flight Mode Annunciations
• Vertical and lateral deviations
The PFD is divided into several sections:
Flight Mode
Annunciations
Attitude and
Guidance
Airspeed
Altitude and
Vertical Speed
Heading and
Track
Flight Mode Annunciations
Flight Mode Annunciator (FMA) are indications of current status of FMS operation. The FMA is divided into 5 columns which
indicate:
The Flight Mode Annunciations are discussed in detail in Autoight and FCU section.
• Thrust modes
• Active and armed Pitch modes
• Active and armed Roll modes
• Approach capabilities
• Autopilot, Flight Director and Autothrust engagement status
�
Phoenix Simulation Software
A319/320/321
Systems Manual
PRIMARY FLIGHT DISPLAY
P 8
SEQ 001
REV 01
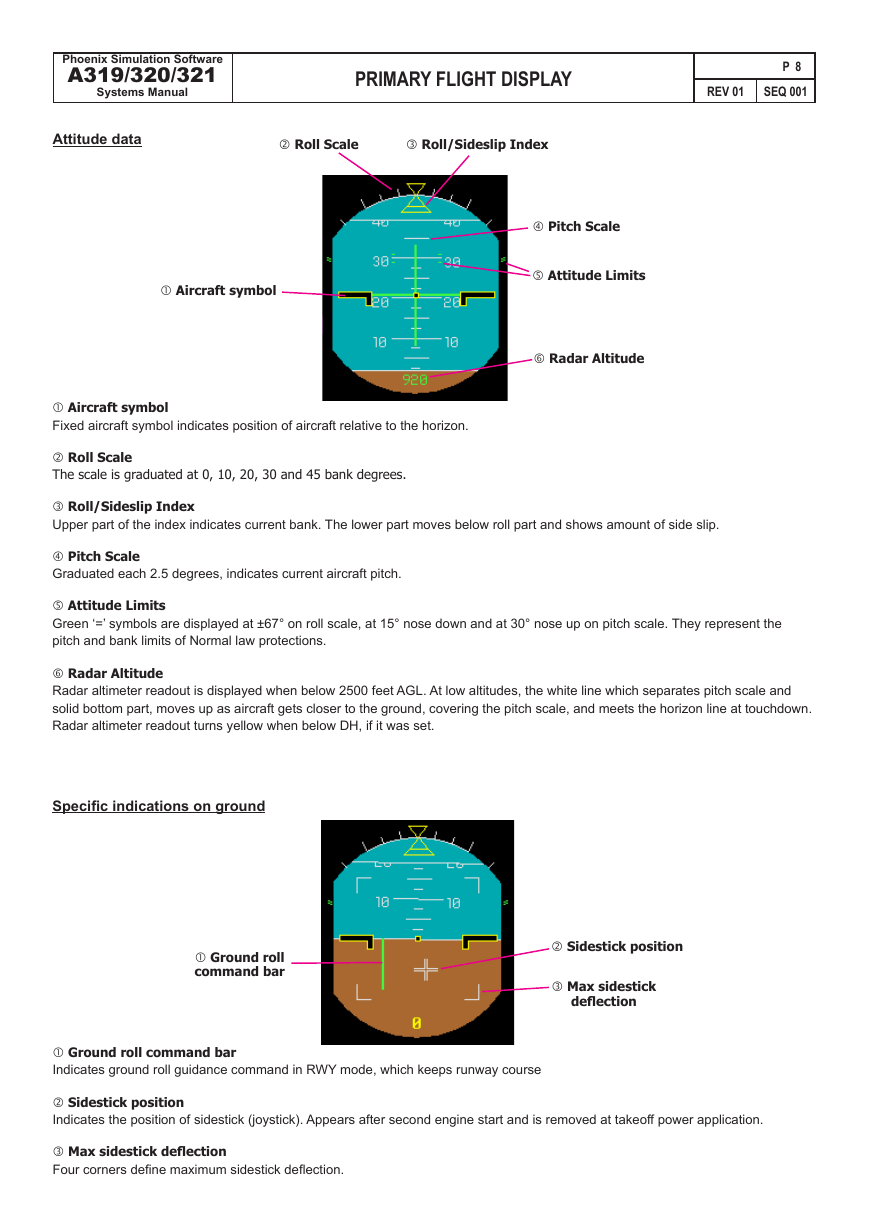
Attitude data
Roll Scale
Roll/Sideslip Index
Aircraft symbol
Pitch Scale
Attitude Limits
Radar Altitude
Aircraft symbol
Fixed aircraft symbol indicates position of aircraft relative to the horizon.
Roll Scale
The scale is graduated at 0, 10, 20, 30 and 45 bank degrees.
Roll/Sideslip Index
Upper part of the index indicates current bank. The lower part moves below roll part and shows amount of side slip.
Pitch Scale
Graduated each 2.5 degrees, indicates current aircraft pitch.
Attitude Limits
Green ‘=’ symbols are displayed at ±67° on roll scale, at 15° nose down and at 30° nose up on pitch scale. They represent the
pitch and bank limits of Normal law protections.
Radar Altitude
Radar altimeter readout is displayed when below 2500 feet AGL. At low altitudes, the white line which separates pitch scale and
solid bottom part, moves up as aircraft gets closer to the ground, covering the pitch scale, and meets the horizon line at touchdown.
Radar altimeter readout turns yellow when below DH, if it was set.
Specic indications on ground
Ground roll
command bar
Sidestick position
Max sidestick
deection
Ground roll command bar
Indicates ground roll guidance command in RWY mode, which keeps runway course
Sidestick position
Indicates the position of sidestick (joystick). Appears after second engine start and is removed at takeoff power application.
Max sidestick deection
Four corners dene maximum sidestick deection.
�


 2023年江西萍乡中考道德与法治真题及答案.doc
 2012年重庆南川中考生物真题及答案.doc
 2013年江西师范大学地理学综合及文艺理论基础考研真题.doc
 2020年四川甘孜小升初语文真题及答案I卷.doc
 2020年注册岩土工程师专业基础考试真题及答案.doc
 2023-2024学年福建省厦门市九年级上学期数学月考试题及答案.doc
 2021-2022学年辽宁省沈阳市大东区九年级上学期语文期末试题及答案.doc
 2022-2023学年北京东城区初三第一学期物理期末试卷及答案.doc
 2018上半年江西教师资格初中地理学科知识与教学能力真题及答案.doc
 2012年河北国家公务员申论考试真题及答案-省级.doc
 2020-2021学年江苏省扬州市江都区邵樊片九年级上学期数学第一次质量检测试题及答案.doc
 2022下半年黑龙江教师资格证中学综合素质真题及答案.doc