logo资料库

Rollei禄莱数码相机-Rollei dk4010说明书.pdf

第1页 / 共187页
第2页 / 共187页
第3页 / 共187页
第4页 / 共187页
第5页 / 共187页
第6页 / 共187页
第7页 / 共187页
第8页 / 共187页
资料共187页,剩余部分请下载后查看
Contents
Introduction
What Your Camera Can Do
System Map
Nomenclature
Names of the menus and icons shown on the screen
Display in Camera AUTO, Continuous shooting AUTO, EXT., SCENE or Movie mode
Display in Playback mode
Image Information Display (INFORMATION/Quick View)
LED display
Self-timer LED (red)
Card access LED (orange)
FCC Compliance Statement for American Users
Handling Precautions
Caution and Warning Symbols
Getting Ready
Inserting the Batteries
Removing the Batteries
Inserting the Memory Card
Write-protect Switch (*SD memory cards only)
Removing the Memory Card
Turning the Camera On
Guide to viewing the low battery warnings and replacing the batteries
Setting the Date and Time
Date display format
Using the Accessories
Attaching the Shoulder Strap
Attaching the lens cap
Attaching the adapter ring
Taking Pictures
Taking Still Images
Holding the camera
Pressing the shutter release button half way
When the Memory Card is Full
Using Continuous Shooting Mode
Shooting Movies
[SOUND] Shooting Movies Without Sound
Setting the Frame Rate for Movies (frames per second)
Selecting Scenes to Automatically Set the Focus and Flash
Selecting the Scene Mode
Switching Between Macro and Landscape Mode
Using Macro Mode
Using Self-Timer
Using Zoom (Wide-angle and Telephoto)
Switching the Digital Zoom ON and OFF
Using Flash
Flash Modes
Setting the Flash Mode
Flash variations in Macro/Landscape mode, AE mode and Drive mode
Effective flash range
Avoiding camera shake
Adjusting Brightness
Using Exposure Compensation
[AE MODE] Selecting the Exposure Setting Method
[METERING] Selecting the Area Used for Setting the Exposure
[LONG EXP.] Using Slow Shutter Speeds to Shoot Dark Subjects
[ISO] Changing the ISO Sensitivity to Shoot Fast Moving Subjects
Setting Focus
Focusing Off-Center (Focus Lock)
Subjects That Are Difficult to Focus On
[FOCUSING] Selecting the focusing method
[AF MODE] Still and Moving Subjects
Displaying Information on the LCD Monitor
[REC REVIEW] Checking Images Right After You Shoot Them
Quickly Checking/Erasing Your Shots (Quick View)
Selecting the Number of Pixels (Image Size) and the Quality
Selecting the Number of Pixels
Selecting the Quality (Compression Ratio)
Available shots and capacities for different image size and quality (compression ratio) combinations
Guide to choosing the image size and image quality
Adjusting Image Colors and Other Settings
Selecting the Light Source (White Balance)
[WB PRESET] Setting Your Own Value for White
[COLOR MODE] Selecting Color, Black & White or Sepia
[CHROMA] Changing the color intensity
[SHARPNESS] Enhancing the Image Outlines
[CONTRAST] Enhancing the Contrast
Switching Display Screen (Electronic Viewfinder and LCD Monitor)
Setting the exposure and focus during continuous shooting (Drive mode)
Playback
Viewing Still Images
Viewing Your Images Enlarged
Viewing Movies
Viewing Images Automatically as a Slideshow (slideshow)
[AUTO PLAY] settings
Starting and Ending an [AUTO PLAY] Slideshow
Viewing Multiple Images
Displaying multiple images
Using the multi playback screen
To return to normal playback (single-image display)
Erasing Images in the Multi Playback Screen
[INFORMATION] Viewing Image Information
Erasing Unwanted Images
Erasing individual images (ERASE)
Erasing selected images (SELECT AND ERASE)
Erasing all the images (ERASE ALL)
Protecting Images from Accidental Erasing (PROTECT)
Protecting an image
Unprotecting images
Tips for Erasing Images Using [PROTECT] and [ERASE ALL]
Adding Voice Messages to Still Images (POSTRECORDING)
Recording a message
Playing back a recorded message
Erasing voice messages
Resizing and Trimming Images (RESIZE)
Resizing an image
Checking and erasing resized images
Resizing all the images
Erasing all resized images
Rotating an Image
Using DPOF to specify print settings
Specifying DPOF settings
Specifying index print settings
Deleting all the DPOF print settings
Printing by Connecting the Camera Directly to a Printer (PictBridge)
Connecting the camera to the printer
Specifying the print settings
Printing individual images
Printing multiple images
Printing using DPOF settings
Ending PictBridge
Connecting to a Windows PC
Computer hardware and software requirements
Installing the USB drivers (Windows 98 and Windows 98SE only)
If you no longer need the USB drivers
Viewing images on a Windows PC
Memory card folder configuration
Disconnecting the USB cable from a Windows PC
Deleting the Device (Windows 98 and Windows 98SE only)
Connecting to a Macintosh
Computer hardware and software requirements
Viewing images on a Macintosh
Memory card folder configuration
Disconnecting the USB cable from a Macintosh
Set Up
[BRIGHT CNTRL] Adjusting the LCD Monitor Brightness
[FORMAT] Initializing Memory Cards
[POWER SAVE] Having the Camera Turn Off Automatically to Save Power
Notes on using Power Save
[MODE LOCK] Preserving Your Function Settings
[BEEP] Adjusting the Volume of the Camera Button Beep
[SHUTTER VOL] Adjusting the Volume of the Shutter Sound
[SELECT LCD] Selecting the Display Used at Startup
[START SCREEN] Selecting the Startup Screen
To set the Rollei logo screen
To set a user-defined screen
Turning the startup screen off
[LANGUAGE] Selecting the Menu Language
[VIDEO OUT] Setting the Output Format for a TV Connection
[FILE NO.] Starting Image File Numbers from 0001
[MODE RESET] Resetting Function Settings
Mode-locked Menu Options and Default Settings
Troubleshooting
Problems and Solutions
Messages and Responses
Basic Glossary of Digital Camera Terms
Detailed Contents
INDEX
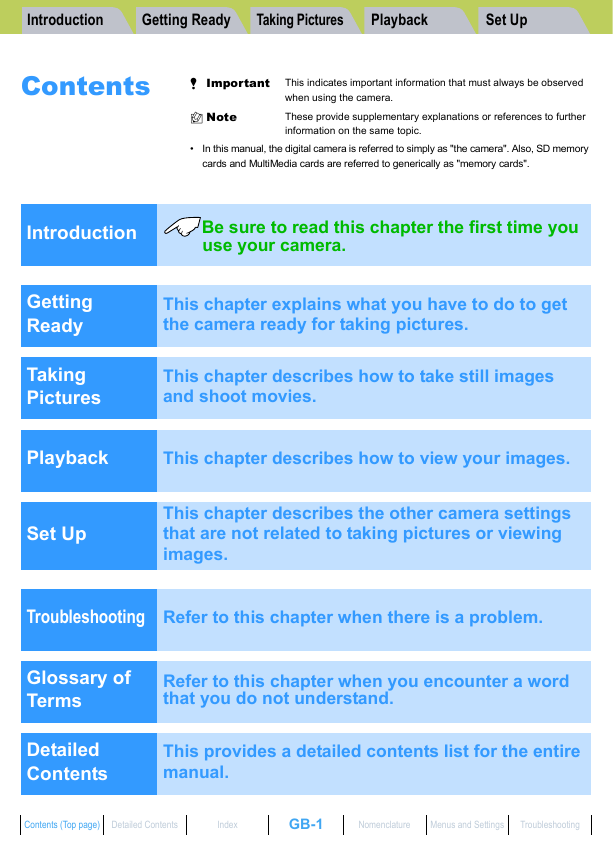
Introduction Getting Ready Taking Pictures Playback Set Up Contents A Important B Note This indicates important information that must always be observed when using the camera. These provide supplementary explanations or references to further information on the same topic. • In this manual, the digital camera is referred to simply as "the camera". Also, SD memory cards and MultiMedia cards are referred to generically as "memory cards". Introduction Be sure to read this chapter the first time you use your camera. Getting Ready Taking Pictures This chapter explains what you have to do to get the camera ready for taking pictures. This chapter describes how to take still images and shoot movies. Playback This chapter describes how to view your images. Set Up This chapter describes the other camera settings that are not related to taking pictures or viewing images. Troubleshooting Refer to this chapter when there is a problem. Glossary of Terms Detailed Contents Refer to this chapter when you encounter a word that you do not understand. This provides a detailed contents list for the entire manual. Contents (Top page) Detailed Contents Index GB-1 Nomenclature Menus and Settings Troubleshooting
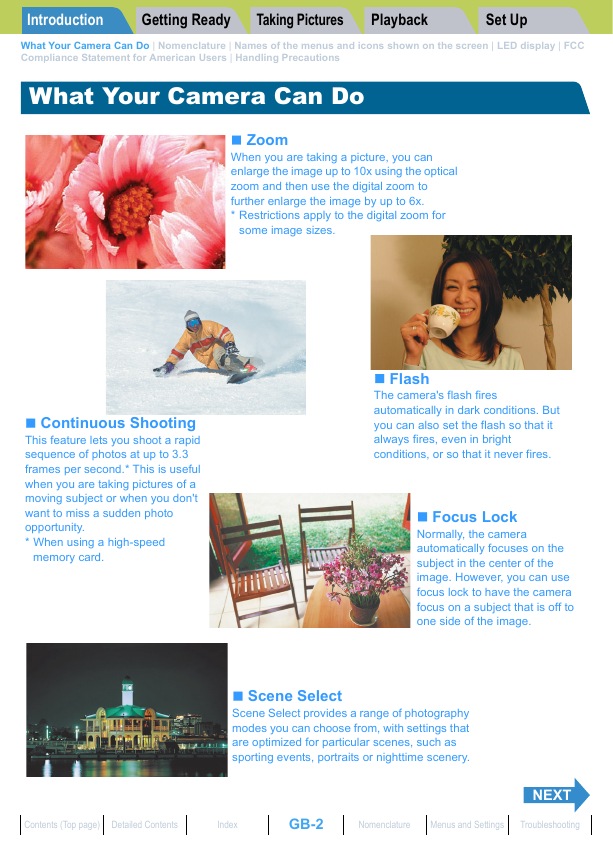
Getting Ready Introduction What Your Camera Can Do | Nomenclature | Names of the menus and icons shown on the screen | LED display | FCC Compliance Statement for American Users | Handling Precautions Introduction Set Up Taking Pictures Playback What Your Camera Can Do Zoom When you are taking a picture, you can enlarge the image up to 10x using the optical zoom and then use the digital zoom to further enlarge the image by up to 6x. * Restrictions apply to the digital zoom for some image sizes. Continuous Shooting This feature lets you shoot a rapid sequence of photos at up to 3.3 frames per second.* This is useful when you are taking pictures of a moving subject or when you don't want to miss a sudden photo opportunity. * When using a high-speed memory card. Flash The camera's flash fires automatically in dark conditions. But you can also set the flash so that it always fires, even in bright conditions, or so that it never fires. Focus Lock Normally, the camera automatically focuses on the subject in the center of the image. However, you can use focus lock to have the camera focus on a subject that is off to one side of the image. Scene Select Scene Select provides a range of photography modes you can choose from, with settings that are optimized for particular scenes, such as sporting events, portraits or nighttime scenery. Contents (Top page) Detailed Contents Index GB-2 Nomenclature Menus and Settings Troubleshooting NEXT
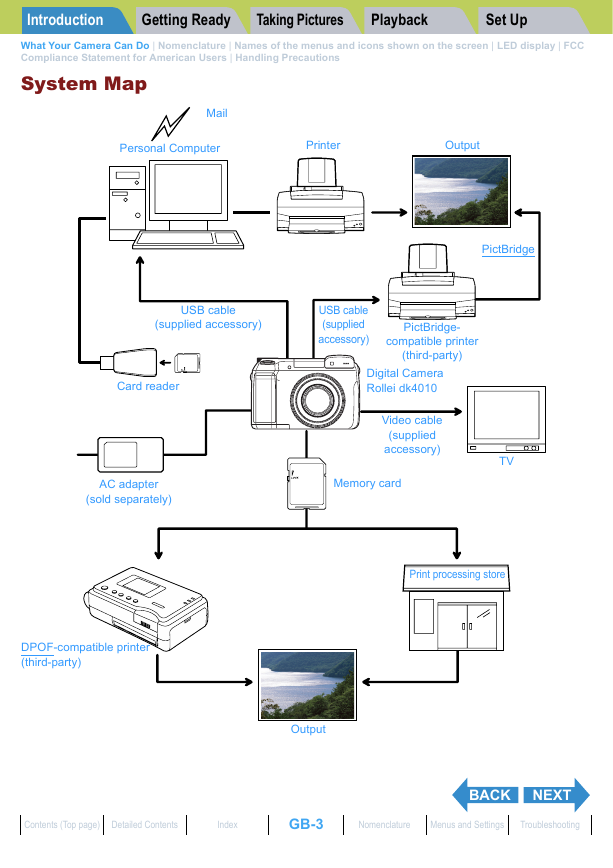
Getting Ready Introduction What Your Camera Can Do | Nomenclature | Names of the menus and icons shown on the screen | LED display | FCC Compliance Statement for American Users | Handling Precautions System Map Taking Pictures Playback Set Up Mail Personal Computer Printer Output PictBridge USB cable (supplied accessory) USB cable (supplied accessory) PictBridge- compatible printer (third-party) Card reader AC adapter (sold separately) Digital Camera Rollei dk4010 Video cable (supplied accessory) Memory card TV Print processing store DPOF-compatible printer (third-party) Output Contents (Top page) Detailed Contents Index GB-3 Nomenclature Menus and Settings Troubleshooting BACK NEXT
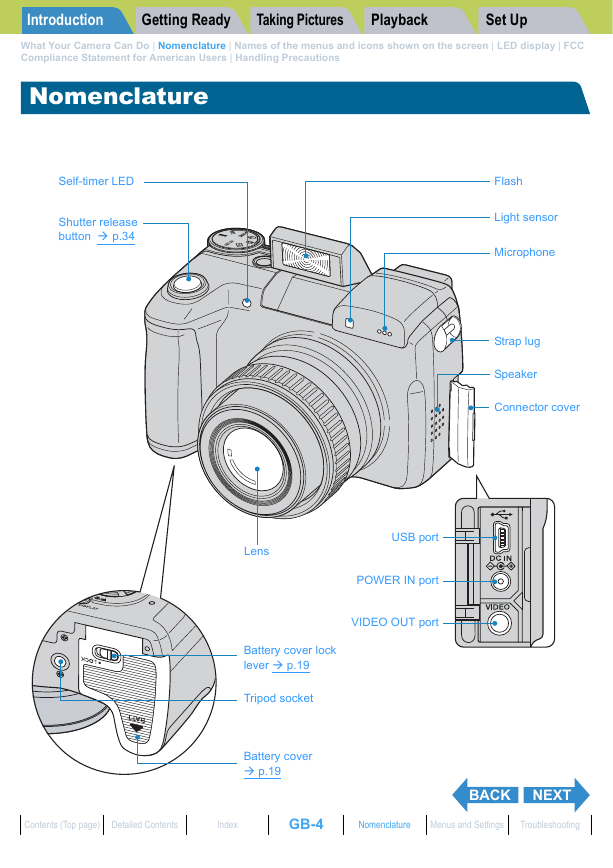
Introduction What Your Camera Can Do | Nomenclature | Names of the menus and icons shown on the screen | LED display | FCC Compliance Statement for American Users | Handling Precautions Getting Ready Set Up Taking Pictures Playback Nomenclature Self-timer LED Shutter release button p.34 Flash Light sensor Microphone Strap lug Speaker Connector cover USB port POWER IN port VIDEO OUT port Lens Battery cover lock lever p.19 Tripod socket Battery cover p.19 Contents (Top page) Detailed Contents Index GB-4 Nomenclature Menus and Settings Troubleshooting BACK NEXT
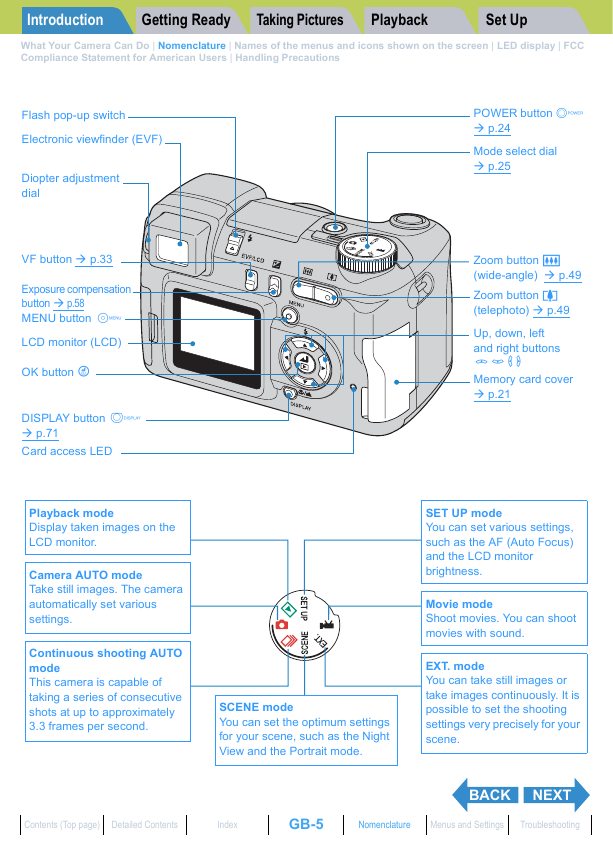
Introduction What Your Camera Can Do | Nomenclature | Names of the menus and icons shown on the screen | LED display | FCC Compliance Statement for American Users | Handling Precautions Getting Ready Set Up Taking Pictures Playback Flash pop-up switch Electronic viewfinder (EVF) Diopter adjustment dial VF button p.33 Exposure compensation button p.58 MENU button K LCD monitor (LCD) OK button E DISPLAY button J p.71 Card access LED Playback mode Display taken images on the LCD monitor. Camera AUTO mode Take still images. The camera automatically set various settings. Continuous shooting AUTO mode This camera is capable of taking a series of consecutive shots at up to approximately 3.3 frames per second. SCENE mode You can set the optimum settings for your scene, such as the Night View and the Portrait mode. POWER button H p.24 Mode select dial p.25 Zoom button W (wide-angle) p.49 Zoom button T (telephoto) p.49 Up, down, left and right buttons udlr Memory card cover p.21 SET UP mode You can set various settings, such as the AF (Auto Focus) and the LCD monitor brightness. Movie mode Shoot movies. You can shoot movies with sound. EXT. mode You can take still images or take images continuously. It is possible to set the shooting settings very precisely for your scene. BACK NEXT Contents (Top page) Detailed Contents Index GB-5 Nomenclature Menus and Settings Troubleshooting
Introduction What Your Camera Can Do | Nomenclature | Names of the menus and icons shown on the screen | LED display | FCC Compliance Statement for American Users | Handling Precautions Getting Ready Taking Pictures Playback Set Up Names of the menus and icons shown on the screen Display in "C" Camera AUTO, "N" Continuous shooting AUTO, "S" EXT., "I" SCENE or "M" Movie mode Display in the normal screen "C" Camera AUTO mode "N" Continuous shooting AUTO mode "S" EXT. mode "I" SCENE mode q e t u o w r y i X2.0 +1.0 !8 !9 @0 10 2272 F ISO200 1234 F2.8 LT4S SAF +1 +1 +1 !0 !2 !4 !6 !1 !3 !5 !7 2004.09.01 @1 @2 @3 @4 @5 @6 q Flash mode ( p.52) w White balance/Color mode ( p.78/p.80) e Metering mode ( p.61) r Shooting mark t Continuous shooting ( p.36) y ISO sensitivity ( p.65) u Number of pixels ( p.75) i Quality ( p.76) o Number of available shots !0 AE mode (aperture) ( p.59) !1 Shutter speed/Long exposure ( p.63) !2 AF mode ( p.70) !3 Chroma ( p.81) !4 Sharpness ( p.83) !5 Contrast ( p.84) "M" Movie mode @7 w r u X2.0 +1.0 !8 @0 10 00:00 30fps SAF @8 @9 !2 !6 !7 2004.09.01 @2 @3 @5 @6 !6 Focus frame (WIDE AF) ( p.68) !7 Focus frame (SPOT AF) ( p.68) !8 Macro and Landscape mode ( p.45) !9 Scene mode ( p.43) @0 Self-timer ( p.47) @1 Histogram @2 Digital zoom ( p.49) @3 Exposure compensation ( p.58) @4 Camera shake warning @5 Date (At startup only) @6 Low battery indicator @7 Audio mode ( p.40) @8 Remaining movie shooting time (seconds) @9 Frame rate ( p.41) Contents (Top page) Detailed Contents Index GB-6 Nomenclature Menus and Settings Troubleshooting BACK NEXT
Getting Ready Taking Pictures Set Up Introduction What Your Camera Can Do | Nomenclature | Names of the menus and icons shown on the screen | LED display | FCC Compliance Statement for American Users | Handling Precautions Display when the MENU button K is pressed "C" Camera AUTO mode "S" EXT. mode/"I" SCENE mode Playback PIXELS q w e DRIVE MODE q w e r y u "N" Continuous shooting AUTO mode "M" Movie mode PIXELS q w e r q SELF TIMER ( p.47) w PIXELS ( p.75) e QUALITY ( p.76) r DRIVE MODE ( p.87) PIXELS q w t y u t FRAME/SEC ( p.41) y WHITE BALANCE ( p.78) u SETTINGS Contents (Top page) Detailed Contents Index GB-7 Nomenclature Menus and Settings Troubleshooting BACK NEXT
Getting Ready Introduction What Your Camera Can Do | Nomenclature | Names of the menus and icons shown on the screen | LED display | FCC Compliance Statement for American Users | Handling Precautions Display in "P" Playback mode Set Up Taking Pictures Playback Display when the MENU button K is pressed MULTI RESIZE q w e r t y u i o !0 q MULTI ( p.98) w POSTRECORDING ( p.110) e PROTECT ( p.107) r ERASE ( p.103) t ERASE MULTIPLE ( p.104) y RESIZE ( p.114) u ROTATE ( p.121) i AUTO PLAY ( p.93) o DPOF ( p.122) !0 PictBridge ( p.127) Image Information Display (INFORMATION/Quick View) r q e u !0 !1 INFORMATION 100–RIF_0001.JPG 1600KB F 2272X1704 1/2000 F16.0 ±0.3 ISO200 DPOF 1 PRTS DATE 2004.09.01 12:34:56 !2 w y o i t q Folder name and file name ( p.140) w File size e Quality (compression ratio) ( p.76) r Number of pixels ( p.75) t Protection status y Whether or not voice is used u Shutter speed ( p.59/p.63) !3 ISO sensitivity ( p.65) i Aperture ( p.59) o Exposure compensation setting ( p.58) !0 !1 DPOF settings ( p.122) !2 Photography date and time !3 Histogram Contents (Top page) Detailed Contents Index GB-8 Nomenclature Menus and Settings Troubleshooting BACK NEXT
分享到:
收藏