ASA 8.3 and Later: Radius Authorization (ACS 5.x)
for VPN Access Using Downloadable ACL with CLI
and ASDM Configuration Example
Document ID: 113449
Contents
Introduction
Prerequisites
Requirements
Components Used
Conventions
Background Information
Configure
Network Diagram
Configure Remote Access VPN (IPsec)
Configure the ASA with CLI
Configure ACS for Downloadable ACL for Individual User
Configure ACS for Downloadable ACL for Group
Configure ACS for Downloadable ACL for a Network Device Group
Configure IETF RADIUS Settings for a User Group
Cisco VPN Client Configuration
Verify
Show Crypto Commands
Downloadable ACL for User/Group
Filter−Id ACL
Troubleshoot
Clear Security Associations
Troubleshooting Commands
Related Information
Introduction
This document describes how to configure the security appliance to authenticate users for network access.
Since you can implicitly enable RADIUS authorizations, this document contains no information about the
configuration of RADIUS authorization on the security appliance. It does provide information about how the
security appliance handles access list information received from RADIUS servers.
You can configure a RADIUS server to download an access list to the security appliance or an access list
name at the time of authentication. The user is authorized to do only what is permitted in the user−specific
access list.
Downloadable access lists are the most scalable means when you use Cisco Secure Access Control Server
(ACS) to provide the appropriate access lists for each user. For more information on Downloadable Access
List Features and the Cisco Secure ACS, refer to Configuring a RADIUS Server to Send Downloadable
Access Control Lists and Downloadable IP ACLs.
�
Refer to ASA/PIX 8.x: Radius Authorization (ACS) for Network Access using Downloadable ACL with CLI
and ASDM Configuration Example for the identical configuration on Cisco ASA with versions 8.2 and
earlier.
Prerequisites
Requirements
This document assumes that the Adaptive Security Appliance (ASA) is fully operational and configured to
allow the Cisco Adaptive Security Device Manager (ASDM) or CLI to make configuration changes.
Note: Refer to Allowing HTTPS Access for ASDM in order to allow the device to be remotely configured by
the ASDM or Secure Shell (SSH).
Components Used
The information in this document is based on these software and hardware versions:
•
•
•
•
Cisco ASA Software version 8.3 and later
Cisco ASDM version 6.3 and later
Cisco VPN Client version 5.x and later
Cisco Secure ACS 5.x
The information in this document was created from the devices in a specific lab environment. All of the
devices used in this document started with a cleared (default) configuration. If your network is live, make sure
that you understand the potential impact of any command.
Conventions
Refer to Cisco Technical Tips Conventions for more information on document conventions.
Background Information
You can use downloadable IP ACLs in order to create sets of ACL definitions that you can apply to many
users or user groups. These sets of ACL definitions are called ACL contents.
Downloadable IP ACLs operate this way:
1.
2.
3.
When ACS grants a user access to the network, ACS determines whether a downloadable IP ACL is
assigned to the Authorization Profile in the result section.
If ACS locates a downloadable IP ACL that is assigned to the Authorization Profile, ACS sends an
attribute (as part of the user session, in the RADIUS access−accept packet) that specifies the named
ACL, and the version of the named ACL.
If the AAA client responds that it does not have the current version of the ACL in its cache (that is,
the ACL is new or has changed), ACS sends the ACL (new or updated) to the device.
Downloadable IP ACLs are an alternative to the configuration of ACLs in the RADIUS Cisco cisco−av−pair
attribute [26/9/1] of each user or user group. You can create a downloadable IP ACL once, give it a name, and
then assign the downloadable IP ACL to any Authorization Profile if you reference its name. This method is
more efficient than if you configure the RADIUS Cisco cisco−av−pair attribute for Authorization Profile.
�
When you enter the ACL definitions in the ACS web interface, do not use keyword or name entries; in all
other respects, use standard ACL command syntax and semantics for the AAA client on which you intend to
apply the downloadable IP ACL. The ACL definitions that you enter into ACS comprise one or more ACL
commands. Each ACL command must be on a separate line.
In ACS, you can define multiple Downloadable IP ACLs and use them in different Authorization Profiles.
Based on the conditions in the Access Service Authorization rules, you can send different Authorization
Profiles containing downloadable IP ACLs to different AAA clients.
Further, you can change the order of the ACL contents in a downloadable IP ACL. ACS examines ACL
contents, starting from the top of the table, and downloads the first ACL content that it finds. When you set
the order, you can ensure system efficiency if you position the most widely applicable ACL contents higher
on the list.
In order to use a downloadable IP ACL on a particular AAA client, the AAA client must adhere to these rules:
•
•
Use RADIUS for authentication
Support downloadable IP ACLs
These are examples of Cisco devices that support downloadable IP ACLs:
•
•
ASA
Cisco devices that run IOS version 12.3(8)T and later
This is an example of the format that you must use in order to enter ASA ACLs in the ACL Definitions box:
permit ip 10.153.0.0 0.0.255.255 host 10.158.9.1
permit ip 10.154.0.0 0.0.255.255 10.158.10.0 0.0.0.255
permit 0 any host 10.159.1.22
deny ip 10.155.10.0 0.0.0.255 10.159.2.0 0.0.0.255 log
permit TCP any host 10.160.0.1 eq 80 log
permit TCP any host 10.160.0.2 eq 23 log
permit TCP any host 10.160.0.3 range 20 30
permit 6 any host HOSTNAME1
permit UDP any host HOSTNAME2 neq 53
deny 17 any host HOSTNAME3 lt 137 log
deny 17 any host HOSTNAME4 gt 138
deny ICMP any 10.161.0.0 0.0.255.255 log
permit TCP any host HOSTNAME5 neq 80
Configure
In this section, you are presented with the information to configure the features described in this document.
Network Diagram
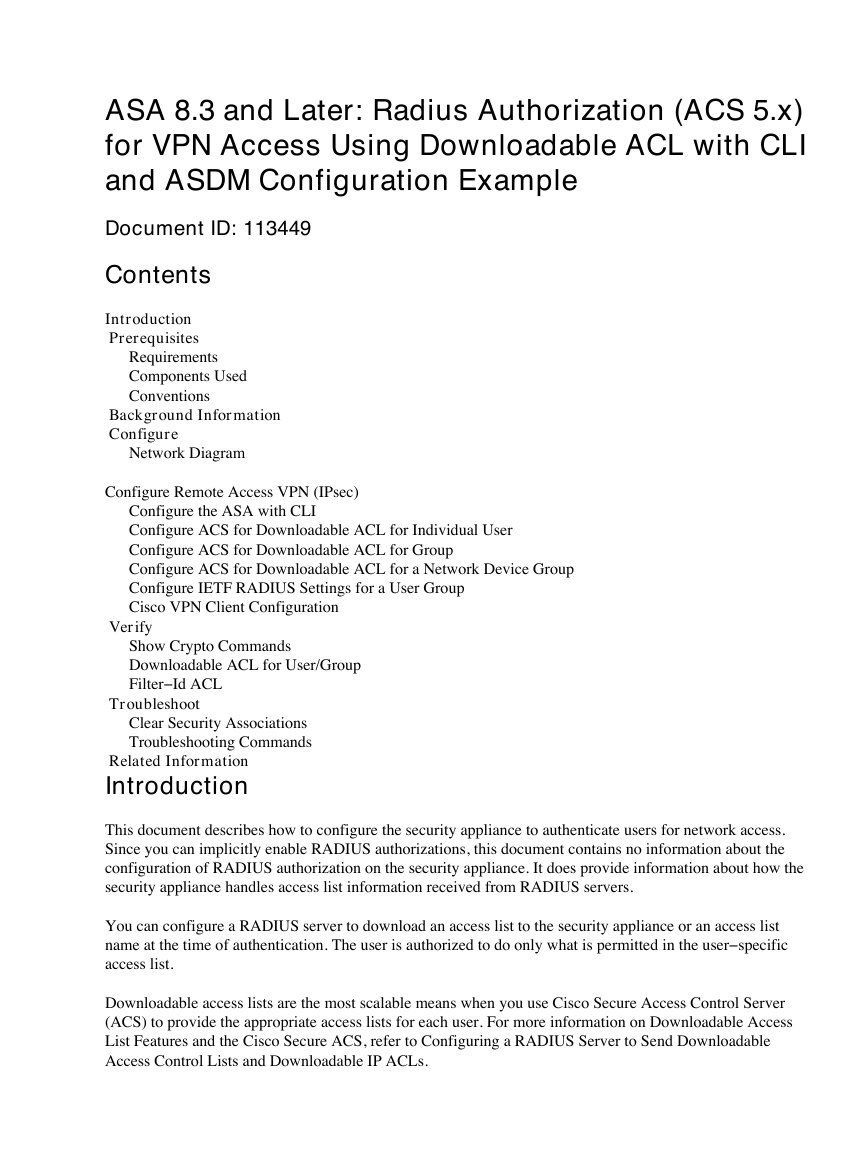
This document uses this network setup:
�
Note: The IP addressing schemes used in this configuration are not legally routable on the Internet. They are
RFC 1918 addresses which were used in a lab environment.
Configure Remote Access VPN (IPsec)
ASDM Procedure
Complete these steps in order to configure the remote access VPN:
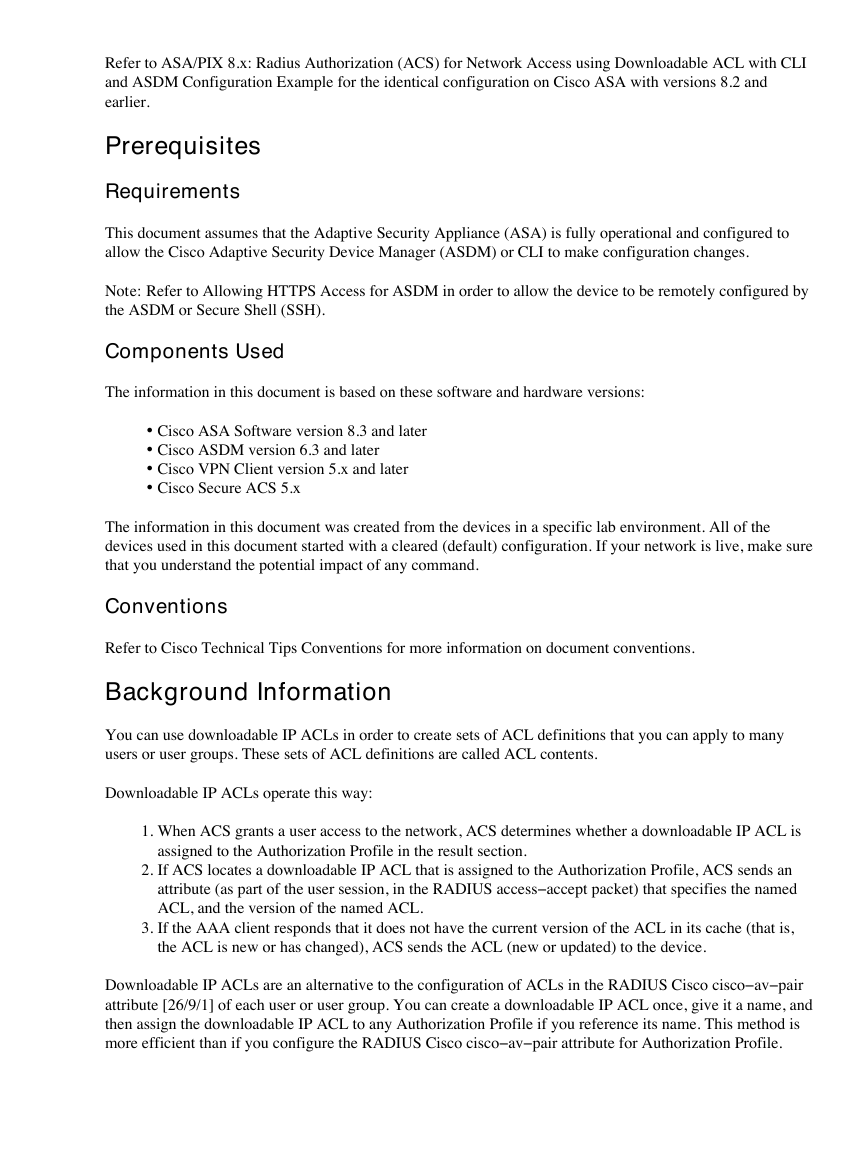
1.
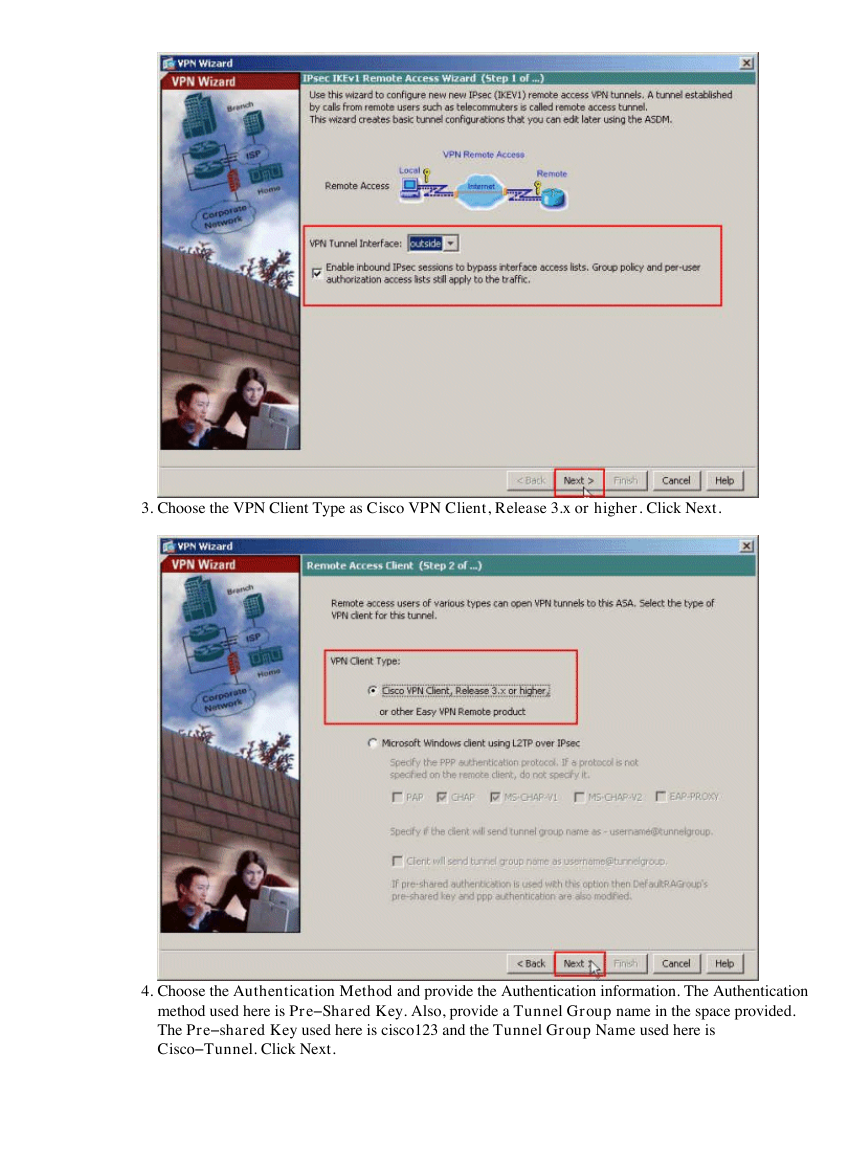
Select Wizards > VPN Wizards > IPsec(IKEv1) Remote Access VPN Wizard from the Home
window.
2.
Select the VPN Tunnel Interface as required (Outside, in this example), and also make sure that the
checkbox next to Enable inbound IPsec sessions to bypass interface access lists is checked.
�
3.
Choose the VPN Client Type as Cisco VPN Client, Release 3.x or higher. Click Next.
4.
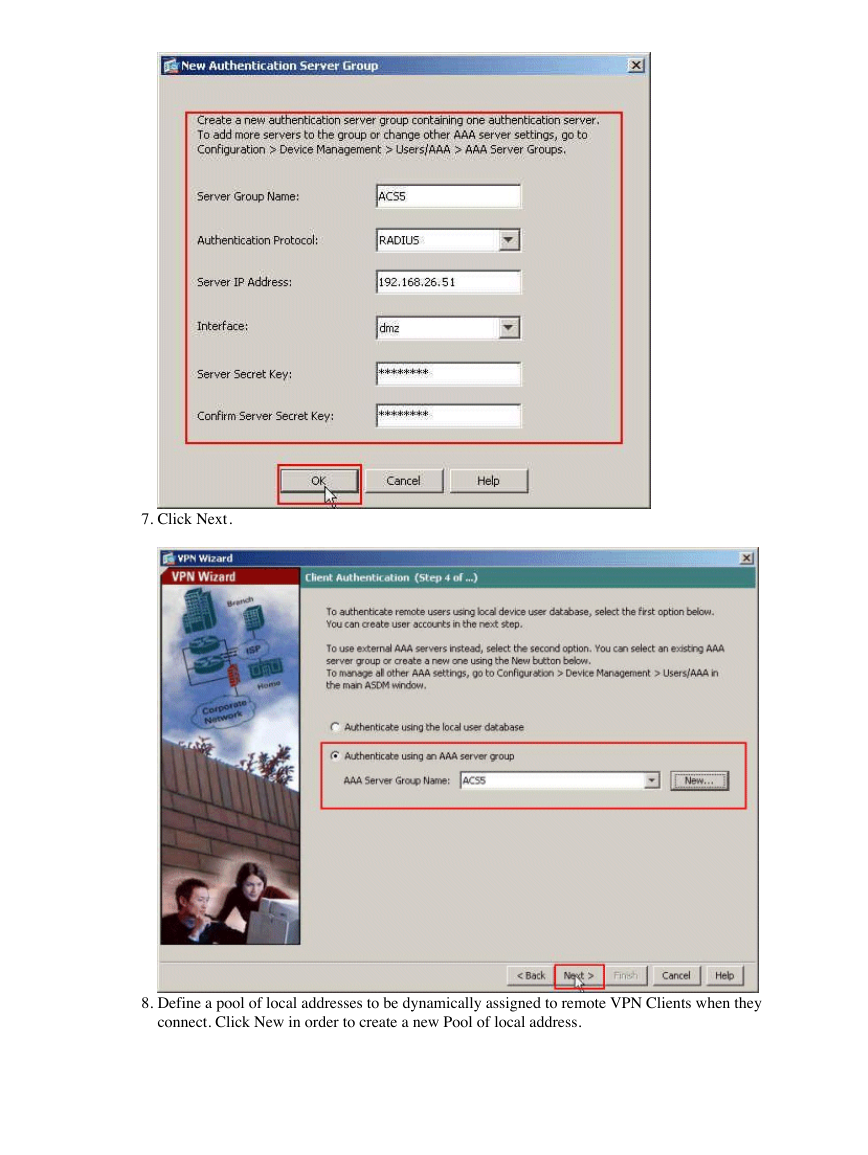
Choose the Authentication Method and provide the Authentication information. The Authentication
method used here is Pre−Shared Key. Also, provide a Tunnel Group name in the space provided.
The Pre−shared Key used here is cisco123 and the Tunnel Group Name used here is
Cisco−Tunnel. Click Next.
�
5.
Choose whether you want remote users to be authenticated to the local user database or to an external
AAA server group. Here, we choose Authenticate using an AAA server group. Click New next to
the AAA Server Group Name field in order to create a new AAA Server Group Name.
6.
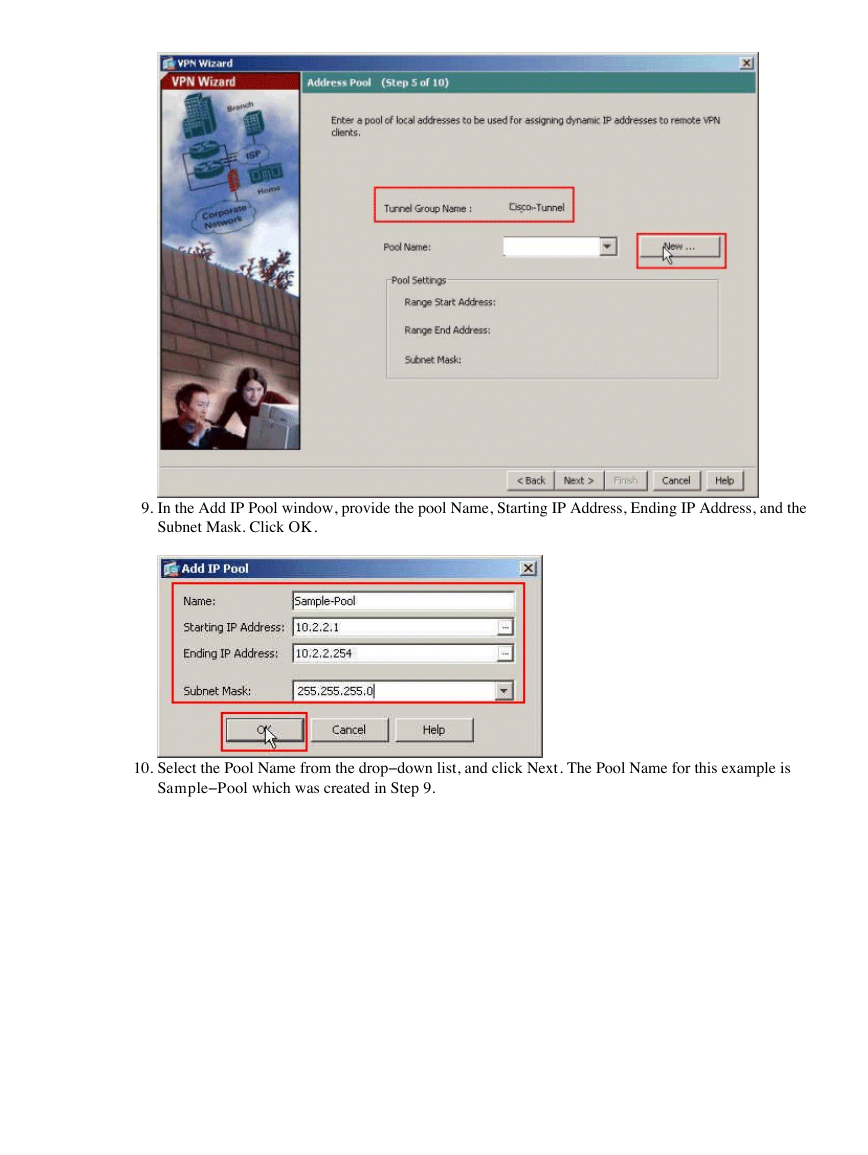
Provide the Server Group Name, Authentication Protocol, Server IP Address, Interface name, and the
Server Secret Key in the respective spaces provided, and click OK.
�
7.
Click Next.
8.
Define a pool of local addresses to be dynamically assigned to remote VPN Clients when they
connect. Click New in order to create a new Pool of local address.
�
9.
In the Add IP Pool window, provide the pool Name, Starting IP Address, Ending IP Address, and the
Subnet Mask. Click OK.
10.
Select the Pool Name from the drop−down list, and click Next. The Pool Name for this example is
Sample−Pool which was created in Step 9.
�



 2023年江西萍乡中考道德与法治真题及答案.doc
 2012年重庆南川中考生物真题及答案.doc
 2013年江西师范大学地理学综合及文艺理论基础考研真题.doc
 2020年四川甘孜小升初语文真题及答案I卷.doc
 2020年注册岩土工程师专业基础考试真题及答案.doc
 2023-2024学年福建省厦门市九年级上学期数学月考试题及答案.doc
 2021-2022学年辽宁省沈阳市大东区九年级上学期语文期末试题及答案.doc
 2022-2023学年北京东城区初三第一学期物理期末试卷及答案.doc
 2018上半年江西教师资格初中地理学科知识与教学能力真题及答案.doc
 2012年河北国家公务员申论考试真题及答案-省级.doc
 2020-2021学年江苏省扬州市江都区邵樊片九年级上学期数学第一次质量检测试题及答案.doc
 2022下半年黑龙江教师资格证中学综合素质真题及答案.doc