10/30/2017
How to colorize black & white photos with just 100 lines of neural network code
Emil Wallnér
Developer and writer. I explore human & machine learning.
Oct 29 · 22 min read
How to colorize black & white photos with
just 100 lines of neural network code
Earlier this year, Amir Avni used neural networks to troll the
subreddit/r/Colorization — a community where people colorize
historical black and white images manually using Photoshop.
They were astonished with Amir’s deep learning bot. What could take
up to a month of manual labour could now be done in just a few
seconds.
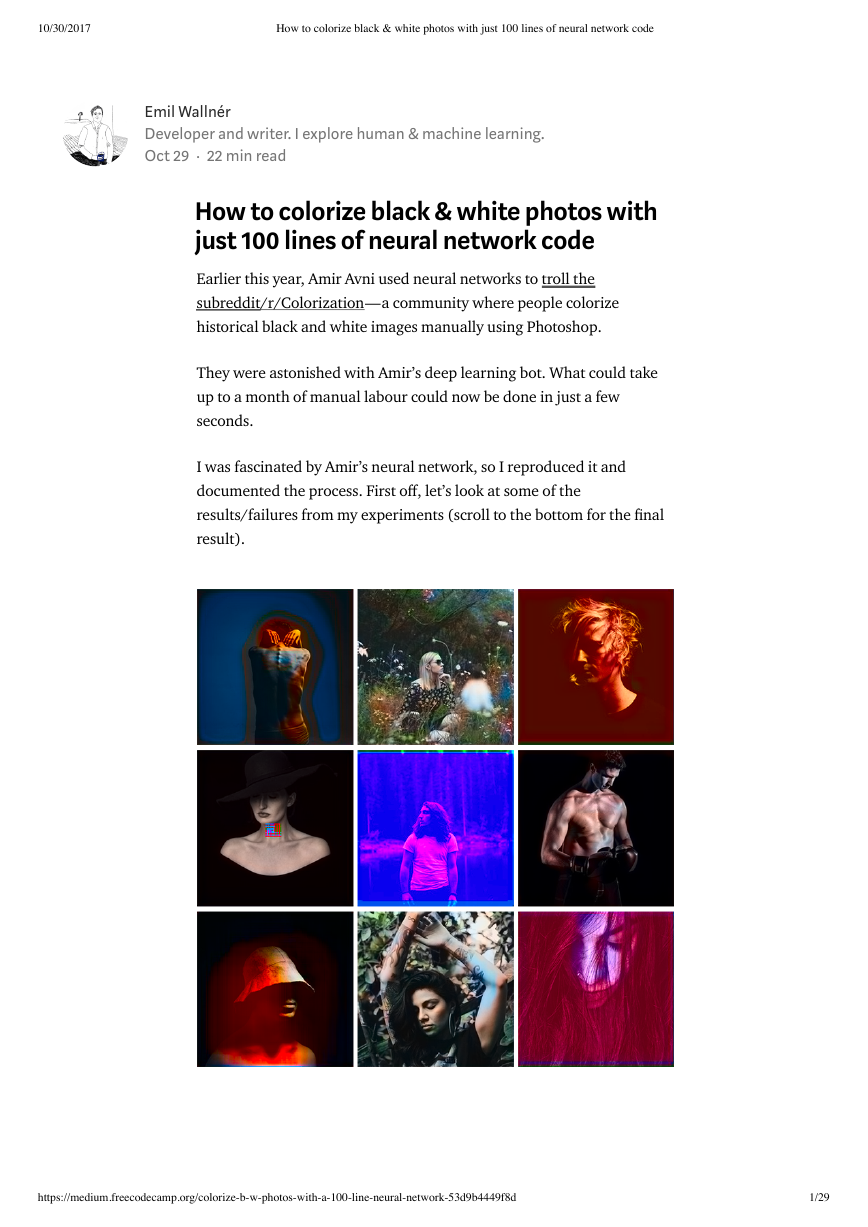
I was fascinated by Amir’s neural network, so I reproduced it and
documented the process. First o�, let’s look at some of the
results/failures from my experiments (scroll to the bottom for the �nal
result).
https://medium.freecodecamp.org/colorize-b-w-photos-with-a-100-line-neural-network-53d9b4449f8d
1/29
�
10/30/2017
How to colorize black & white photos with just 100 lines of neural network code
Today, colorization is usually done by hand in Photoshop. To appreciate
all the hard work behind this process, take a peek at this gorgeous
colorization memory lane video:
This embedded content is from a site that
does not comply with the Do Not Track
(DNT) setting now enabled on your browser.
Please note, if you click through and view it
anyway, you may be tracked by the website
hosting the embed.
Learn More about Medium's DNT policy
In short, a picture can take up to one month to colorize. It requires
extensive research. A face alone needs up to 20 layers of pink, green
and blue shades to get it just right.
This article is for beginners. Yet, if you’re new to deep learning
terminology, you can read my previous two posts here and here, and
watch Andrej Karpathy’s lecture for more background.
I’ll show you how to build your own colorization neural net in three
steps.
The �rst section breaks down the core logic. We’ll build a bare-bones
40-line neural network as an “alpha” colorization bot. There’s not a lot
of magic in this code snippet. This well help us become familiar with
the syntax.
The next step is to create a neural network that can generalize — our
“beta” version. We’ll be able to color images the bot has not seen before.
For our “�nal” version, we’ll combine our neural network with a
classi�er. We’ll use an Inception Resnet V2 that has been trained on 1.2
million images. To make the coloring pop, we’ll train our neural
network on portraits from Unsplash.
If you want to look ahead, here’s a Jupyter Notebook with the Alpha
version of our bot. You can also check out the three versions on
https://medium.freecodecamp.org/colorize-b-w-photos-with-a-100-line-neural-network-53d9b4449f8d
2/29
�
10/30/2017
How to colorize black & white photos with just 100 lines of neural network code
FloydHub and GitHub, along with code for all the experiments I ran on
FloydHub’s cloud GPUs.
Core logic
In this section, I’ll outline how to render an image, the basics of digital
colors, and the main logic for our neural network.
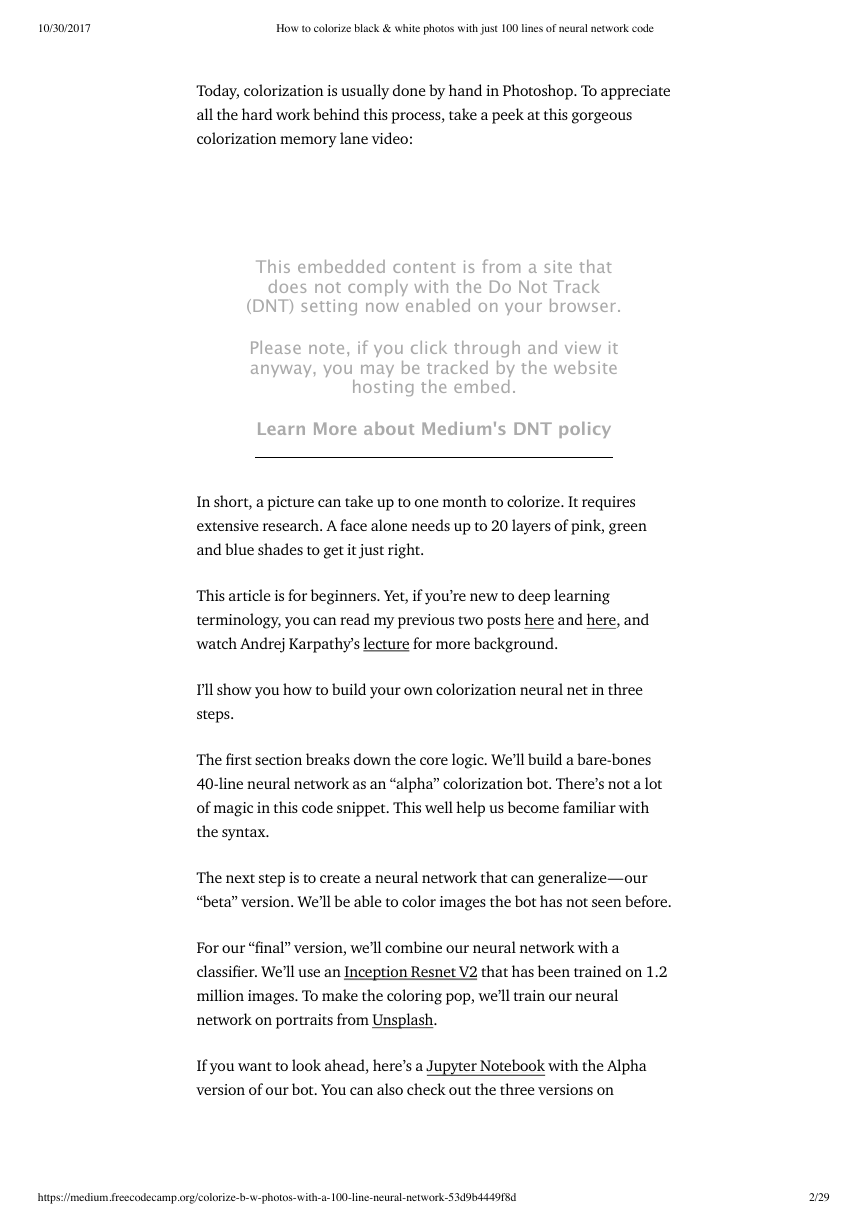
Black and white images can be represented in grids of pixels. Each pixel
has a value that corresponds to its brightness. The values span from 0–
255, from black to white.
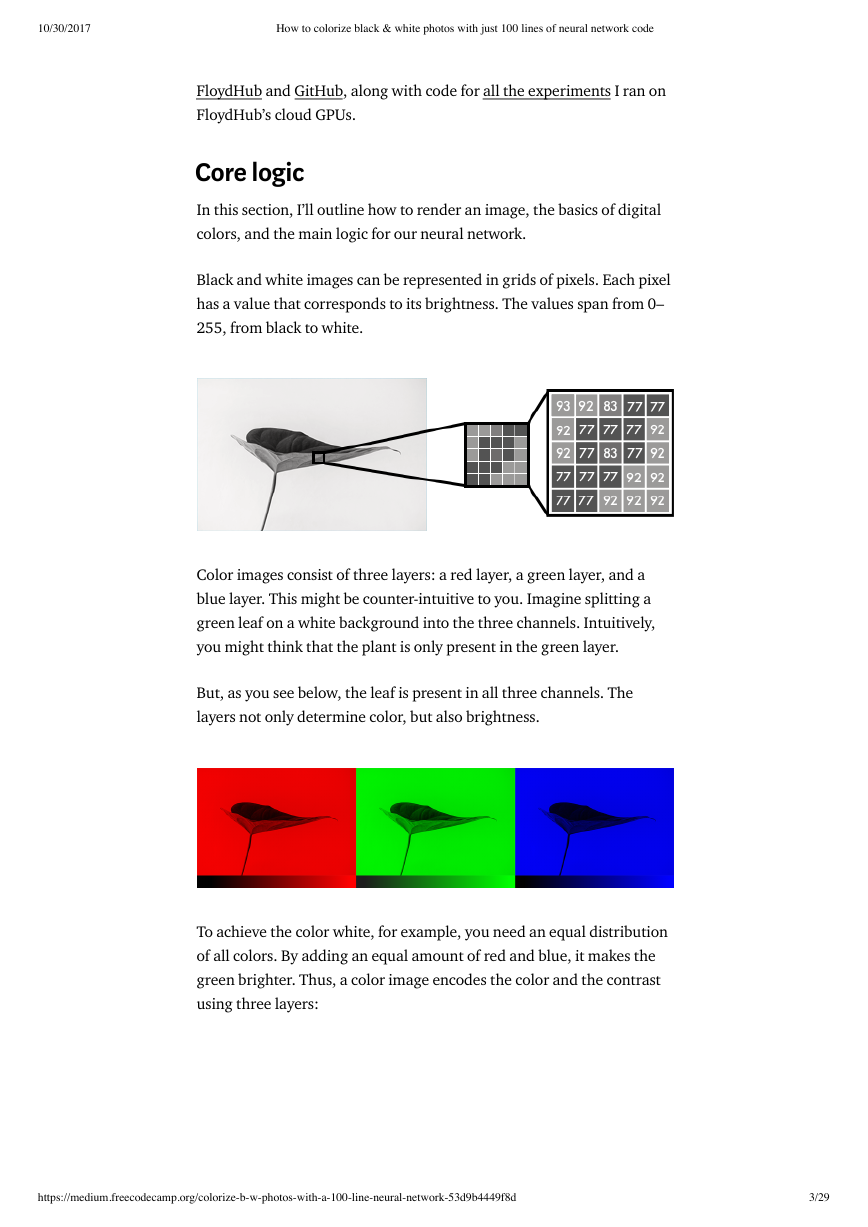
Color images consist of three layers: a red layer, a green layer, and a
blue layer. This might be counter-intuitive to you. Imagine splitting a
green leaf on a white background into the three channels. Intuitively,
you might think that the plant is only present in the green layer.
But, as you see below, the leaf is present in all three channels. The
layers not only determine color, but also brightness.
To achieve the color white, for example, you need an equal distribution
of all colors. By adding an equal amount of red and blue, it makes the
green brighter. Thus, a color image encodes the color and the contrast
using three layers:
https://medium.freecodecamp.org/colorize-b-w-photos-with-a-100-line-neural-network-53d9b4449f8d
3/29
�
10/30/2017
How to colorize black & white photos with just 100 lines of neural network code
Just like black and white images, each layer in a color image has a value
from 0–255. The value 0 means that it has no color in this layer. If the
value is 0 for all color channels, then the image pixel is black.
As you may know, a neural network creates a relationship between an
input value and output value. To be more precise with our colorization
task, the network needs to �nd the traits that link grayscale images
with colored ones.
In sum, we are searching for the features that link a grid of grayscale
values to the three color grids.
Alpha version
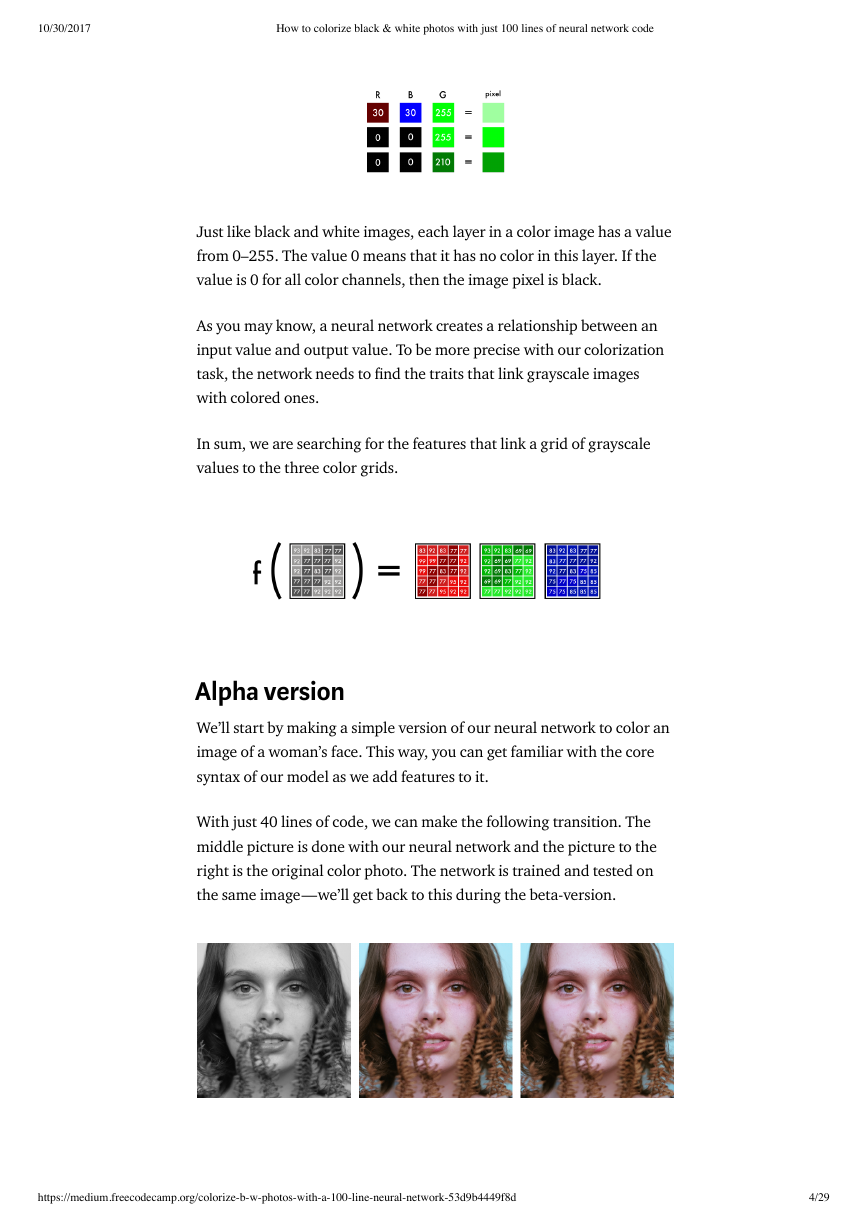
We’ll start by making a simple version of our neural network to color an
image of a woman’s face. This way, you can get familiar with the core
syntax of our model as we add features to it.
With just 40 lines of code, we can make the following transition. The
middle picture is done with our neural network and the picture to the
right is the original color photo. The network is trained and tested on
the same image — we’ll get back to this during the beta-version.
https://medium.freecodecamp.org/colorize-b-w-photos-with-a-100-line-neural-network-53d9b4449f8d
4/29
�
10/30/2017
How to colorize black & white photos with just 100 lines of neural network code
Color space
First, we’ll use an algorithm to change the color channels, from RGB to
Lab. L stands for lightness, and a and b for the color spectra green–red
and blue–yellow.
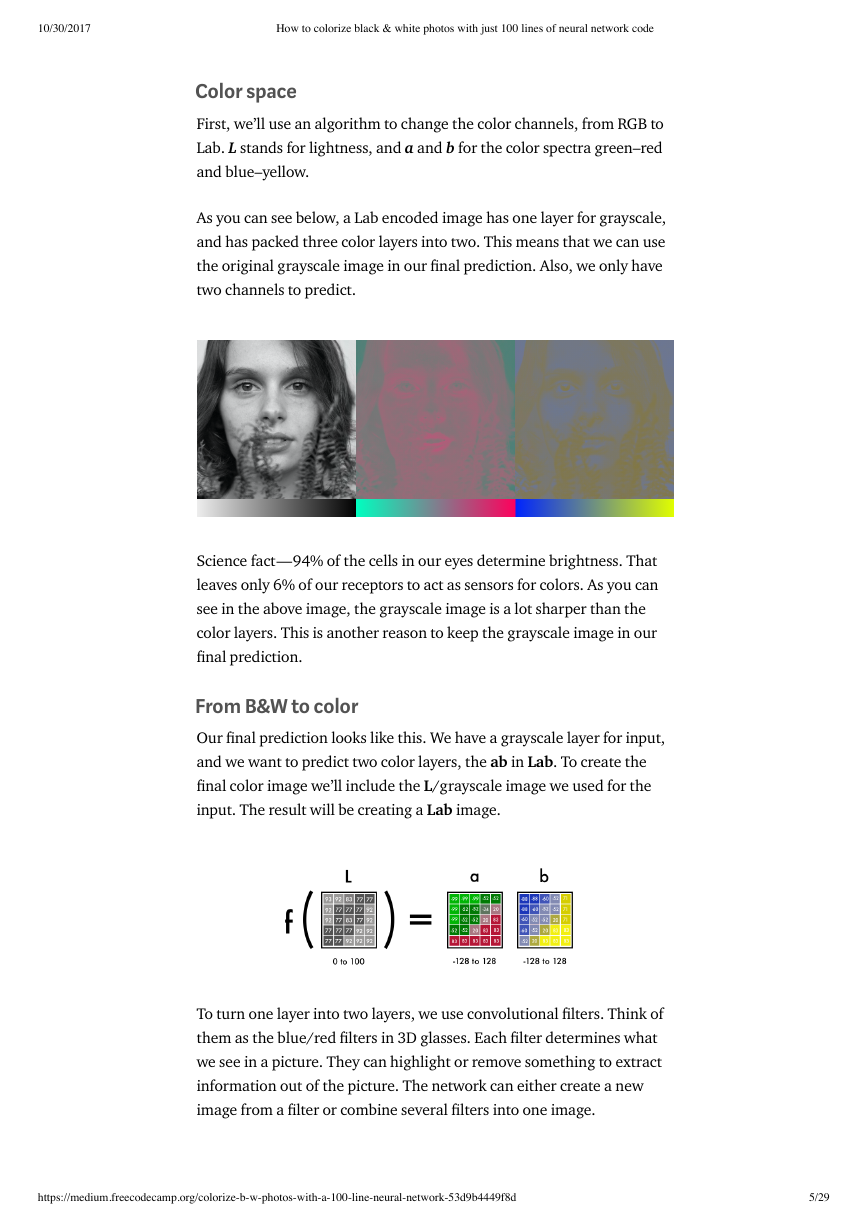
As you can see below, a Lab encoded image has one layer for grayscale,
and has packed three color layers into two. This means that we can use
the original grayscale image in our �nal prediction. Also, we only have
two channels to predict.
Science fact — 94% of the cells in our eyes determine brightness. That
leaves only 6% of our receptors to act as sensors for colors. As you can
see in the above image, the grayscale image is a lot sharper than the
color layers. This is another reason to keep the grayscale image in our
�nal prediction.
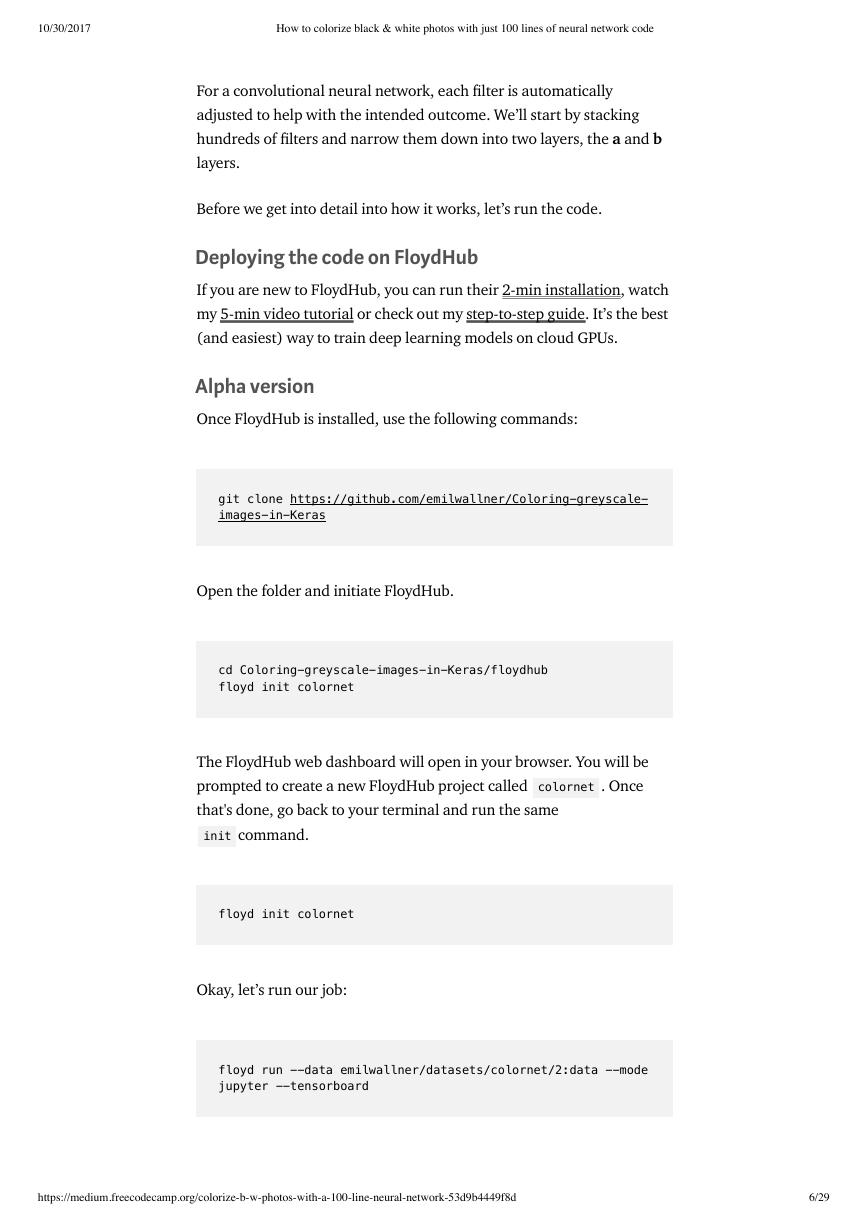
From B&W to color
Our �nal prediction looks like this. We have a grayscale layer for input,
and we want to predict two color layers, the ab in Lab. To create the
�nal color image we’ll include the L/grayscale image we used for the
input. The result will be creating a Lab image.
To turn one layer into two layers, we use convolutional �lters. Think of
them as the blue/red �lters in 3D glasses. Each �lter determines what
we see in a picture. They can highlight or remove something to extract
information out of the picture. The network can either create a new
image from a �lter or combine several �lters into one image.
https://medium.freecodecamp.org/colorize-b-w-photos-with-a-100-line-neural-network-53d9b4449f8d
5/29
�
10/30/2017
How to colorize black & white photos with just 100 lines of neural network code
For a convolutional neural network, each �lter is automatically
adjusted to help with the intended outcome. We’ll start by stacking
hundreds of �lters and narrow them down into two layers, the a and b
layers.
Before we get into detail into how it works, let’s run the code.
Deploying the code on FloydHub
If you are new to FloydHub, you can run their 2-min installation, watch
my 5-min video tutorial or check out my step-to-step guide. It’s the best
(and easiest) way to train deep learning models on cloud GPUs.
Alpha version
Once FloydHub is installed, use the following commands:
git clone https://github.com/emilwallner/Coloring-greyscale-
images-in-Keras
Open the folder and initiate FloydHub.
cd Coloring-greyscale-images-in-Keras/floydhub
floyd init colornet
The FloydHub web dashboard will open in your browser. You will be
prompted to create a new FloydHub project called colornet . Once
that's done, go back to your terminal and run the same
init command.
floyd init colornet
Okay, let’s run our job:
floyd run --data emilwallner/datasets/colornet/2:data --mode
jupyter --tensorboard
https://medium.freecodecamp.org/colorize-b-w-photos-with-a-100-line-neural-network-53d9b4449f8d
6/29
�
10/30/2017
How to colorize black & white photos with just 100 lines of neural network code
Some quick notes about our job:
•
We mounted a public dataset on FloydHub (which I’ve already
uploaded) at the data directory with the below line:
--dataemilwallner/datasets/colornet/2:data
You can explore and use this dataset (and many other public datasets)
by viewing it on FloydHub
•
•
•
We enabled Tensorboard with --tensorboard
We ran the job in Jupyter Notebook mode with --mode jupyter
If you have GPU credit, you can also add the GPU �ag --gpu to
your command. This will make it approximately 50x faster
Go to the Jupyter notebook. Under the Jobs tab on the FloydHub
website, click on the Jupyter Notebook link and navigate to this �le:
floydhub/Alpha version/working_floyd_pink_light_full.ipynb
Open it and click Shift+Enter on all the cells.
Gradually increase the epoch value to get a feel for how the neural
network learns.
model.fit(x=X, y=Y, batch_size=1, epochs=1)
Start with an epoch value of 1 and the increase it to 10, 100, 500, 1000
and 3000. The epoch value indicates how many times the neural
network learns from the image. You will �nd the image
img_result.png in the main folder once you’ve trained your neural
network.
# Get images
image = img_to_array(load_img('woman.png'))
https://medium.freecodecamp.org/colorize-b-w-photos-with-a-100-line-neural-network-53d9b4449f8d
7/29
�
10/30/2017
How to colorize black & white photos with just 100 lines of neural network code
image = np.array(image, dtype=float)
# Import map images into the lab colorspace
X = rgb2lab(1.0/255*image)[:,:,0]
Y = rgb2lab(1.0/255*image)[:,:,1:]
Y = Y / 128
X = X.reshape(1, 400, 400, 1)
Y = Y.reshape(1, 400, 400, 2)
model = Sequential()
model.add(InputLayer(input_shape=(None, None, 1)))
# Building the neural network
model = Sequential()
model.add(InputLayer(input_shape=(None, None, 1)))
model.add(Conv2D(8, (3, 3), activation='relu',
padding='same', strides=2))
model.add(Conv2D(8, (3, 3), activation='relu',
padding='same'))
model.add(Conv2D(16, (3, 3), activation='relu',
padding='same'))
model.add(Conv2D(16, (3, 3), activation='relu',
padding='same', strides=2))
model.add(Conv2D(32, (3, 3), activation='relu',
padding='same'))
model.add(Conv2D(32, (3, 3), activation='relu',
padding='same', strides=2))
model.add(UpSampling2D((2, 2)))
model.add(Conv2D(32, (3, 3), activation='relu',
padding='same'))
model.add(UpSampling2D((2, 2)))
model.add(Conv2D(16, (3, 3), activation='relu',
padding='same'))
model.add(UpSampling2D((2, 2)))
model.add(Conv2D(2, (3, 3), activation='tanh',
padding='same'))
# Finish model
model.compile(optimizer='rmsprop',loss='mse')
#Train the neural network
model.fit(x=X, y=Y, batch_size=1, epochs=3000)
print(model.evaluate(X, Y, batch_size=1))
# Output colorizations
output = model.predict(X)
output = output * 128
canvas = np.zeros((400, 400, 3))
canvas[:,:,0] = X[0][:,:,0]
canvas[:,:,1:] = output[0]
imsave("img_result.png", lab2rgb(cur))
imsave("img_gray_scale.png", rgb2gray(lab2rgb(cur)))
FloydHub command to run this network:
https://medium.freecodecamp.org/colorize-b-w-photos-with-a-100-line-neural-network-53d9b4449f8d
8/29
�


 2023年江西萍乡中考道德与法治真题及答案.doc
 2012年重庆南川中考生物真题及答案.doc
 2013年江西师范大学地理学综合及文艺理论基础考研真题.doc
 2020年四川甘孜小升初语文真题及答案I卷.doc
 2020年注册岩土工程师专业基础考试真题及答案.doc
 2023-2024学年福建省厦门市九年级上学期数学月考试题及答案.doc
 2021-2022学年辽宁省沈阳市大东区九年级上学期语文期末试题及答案.doc
 2022-2023学年北京东城区初三第一学期物理期末试卷及答案.doc
 2018上半年江西教师资格初中地理学科知识与教学能力真题及答案.doc
 2012年河北国家公务员申论考试真题及答案-省级.doc
 2020-2021学年江苏省扬州市江都区邵樊片九年级上学期数学第一次质量检测试题及答案.doc
 2022下半年黑龙江教师资格证中学综合素质真题及答案.doc