Vivicam 2755 User Manual
English
021011
�
Contents
Getting Started.....................................................................................................9
W hat’s Inside.......................................................................................................9
Optional Items....................................................................................................9
CD Disk contents..............................................................................................10
System Requirements (W indows) ........................................................10
System Requirements (Macintosh) ......................................................10
Getting to know the camera ...................................................................1 1
Using the camera .............................................................................................12
Power Supply .....................................................................................................12
Inserting Batteries ...........................................................................................12
Battery Life Indicator.....................................................................................13
Flash Memory ........................................................................................................13
Extended Flash Memory ................................................................................13
Using AC Power....................................................................................................14
Auto Power Off ...................................................................................................14
Taking Pictures.......................................................................................................15
Using the LCD Display .....................................................................................16
Adjusting LCD Brightness ..............................................................................16
Viewing Pictures on the LCD .......................................................................16
Viewing Thumbnails .........................................................................................1 7
Menu Mode..............................................................................................................1 7
7
�
Erasing Pictures from Memory ...........................................................20
Defining Picture Quality .........................................................................20
Using the Flash ...............................................................................................2 1
Using the Self-Timer ...................................................................................2 1
Memory Full .....................................................................................................2 1
Installing capture driver and software..........................................22
Installing the TW AIN Driver..................................................................22
Installing MGI PhotoSuite SE...............................................................22
Introducing MGI PhotoSuite SE..........................................................23
Launching MGI PhotoSuite SE.............................................................23
The MGI Activity Guide..........................................................................23
Downloading Pictures from the Camera......................................24
Connecting to your Computer............................................................24
For RS232 interface (Optional for Macintosh).......................24
For USB interface (Optional for Macintosh).............................25
Select camera TW AIN device and download........................25
Downloading Pictures...............................................................................25
Appendix 1 : LCD Icons ............................................................................26
Appendix 2 : Record Mode Icons ....................................................26
Appendix 3 : Digital Camera Specifications ..........................27
8
�
Getting Started
Congratulations on purchasing your new Digital Camera. This camera is a
state-of-the-art camera bringing to you the ease of use of traditional
cameras combined with such high-tech functionality as full-color LCD
(Liquid Crystal Display) photo previewing, allowing you to immediately
see the pictures you have just taken; a built-in, non-expiring flash, up to
8MB or more of digital memory for storing your pictures; and an auto-
flash sensor, which automatically detects whether the flash should be
engaged or not while taking a photo.
Once you have finished taking your pictures, and have uploaded them to a
computer, you can then use image editing software to enhance them before
sending them off to print or you can print the pictures you took through
the direct printing interface.
I
What’s Inside:
1 Digital camera
I
Quickstart guide
Owner’s manual
I
Serial cable for PC (Optional for Macintosh)
I
USB cable
I
Driver & Image software CD Disk
I
4 x AA alkaline batteries
I
6.0V AC power adaptor
I
Optional Items:
4MB,8MB,16MB,32MB,48MB Compact Flash card.
I
9
�
CD Disk Contents
Photo image editing software - allows you to quickly and easily touch up
any photo captured with your camera.
TWAIN Acquire module - lets you download pictures from all TWAIN-
compliant devices straight into your computer.
I
I
System Requirements (Windows)
Personal computer with minimum 486-33MHz processor
Microsoft Windows operating system ( Windows95/98 ready)
I
8MB or more of RAM
30MB of hard disk space
I
Available serial or USB port and CD-ROM drive
I
Color display (800x600 24-bit or higher recommended)
I
I
I
I
System Requirements (Macintosh)
Power PC or above
System 7.5 or higher
8MB or more of RAM
30MB of hard disk space
Available serial or USB port and CD-ROM drive
Color display (800x600 24-bit or higher recommended)
I
I
I
I
I
10
�
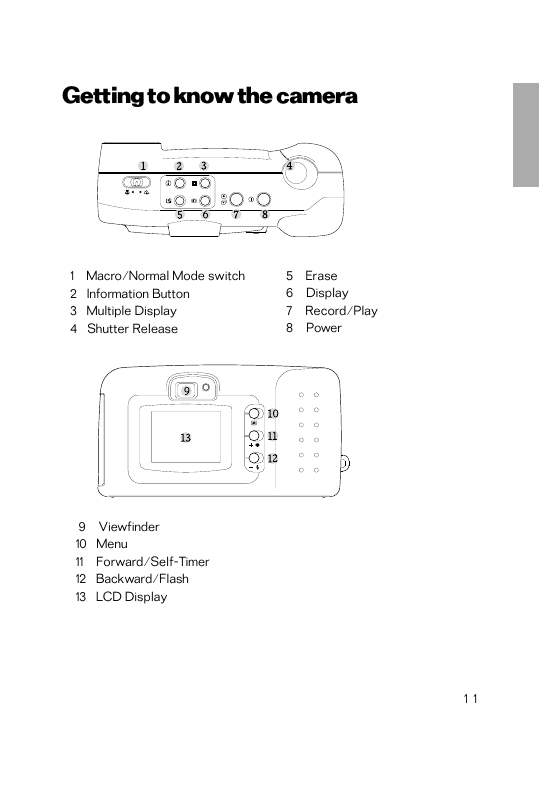
Getting to know the camera
1 Macro/Normal Mode switch
2 Information Button
3 Multiple Display
4 Shutter Release
5 Erase
6 Display
7 Record/Play
8 Power
9 Viewfinder
10 Menu
11 Forward/Self-Timer
12 Backward/Flash
13 LCD Display
1 1
�
Using the camera
Power Supply
This camera features a two-way power supply that lets you use either
batteries (AA-size Alkaline) or a household AC current.
Inserting Batteries
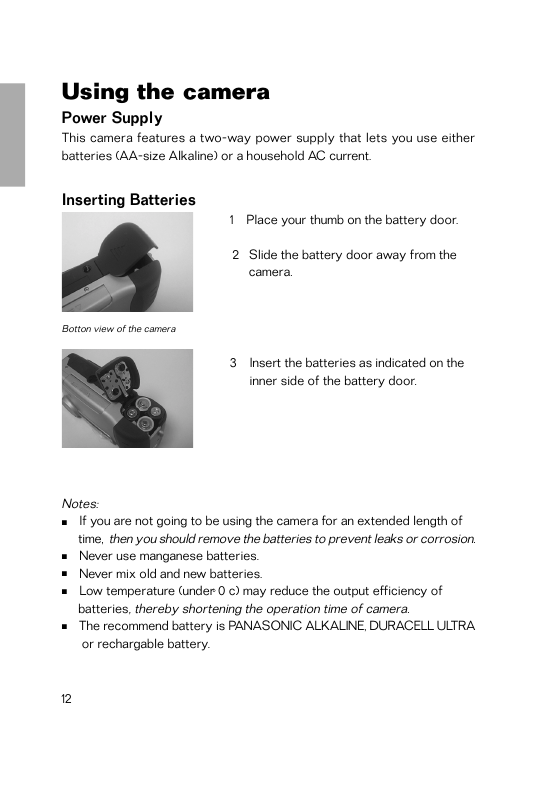
1 Place your thumb on the battery door.
2 Slide the battery door away from the
camera.
Botton view of the camera
3 Insert the batteries as indicated on the
inner side of the battery door.
I
Notes:
If you are not going to be using the camera for an extended length of
time, then you should remove the batteries to prevent leaks or corrosion.
Never use manganese batteries.
I
Never mix old and new batteries.
I
Low temperature (under 0 c) may reduce the output efficiency of
batteries, thereby shortening the operation time of camera.
The recommend battery is PANASONIC ALKALINE, DURACELL ULTRA
or rechargable battery.
I
I
12
�
Battery Life Indicator
When the camera has sufficient power, the Power icon on the LCD display
of the camera remains dark. When the power is low, the Low Power icon is
Flashed to indicate that the batteries are weak and need to be replaced.
Also, do not use the Flash or Auto-Flash features while battery power is
low. Generally, once the Low Power icon comes on, 10 minutes of operation
time is available. (When the batteries are completely dead, the camera will
not turn on.)
Flash Memory
Extended Flash Memory
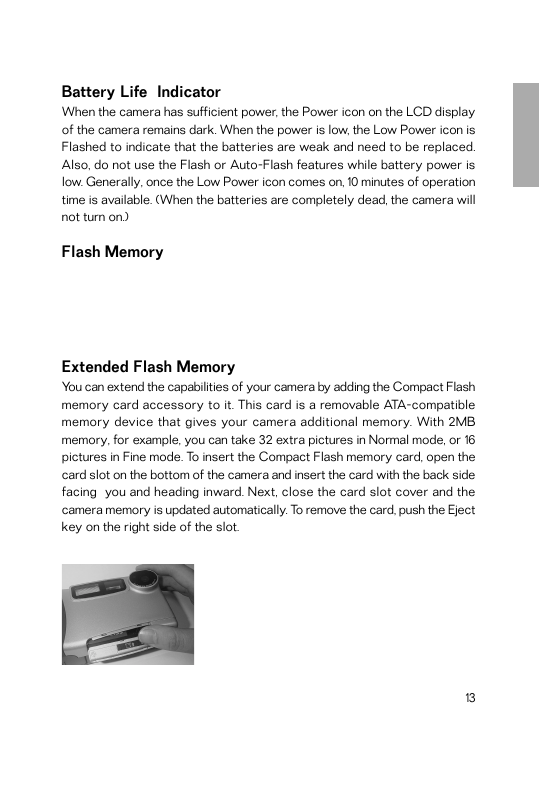
You can extend the capabilities of your camera by adding the Compact Flash
memory card accessory to it. This card is a removable ATA-compatible
memory device that gives your camera additional memory. With 2MB
memory, for example, you can take 32 extra pictures in Normal mode, or 16
pictures in Fine mode. To insert the Compact Flash memory card, open the
card slot on the bottom of the camera and insert the card with the back side
facing you and heading inward. Next, close the card slot cover and the
camera memory is updated automatically. To remove the card, push the Eject
key on the right side of the slot.
13
�



 2023年江西萍乡中考道德与法治真题及答案.doc
 2012年重庆南川中考生物真题及答案.doc
 2013年江西师范大学地理学综合及文艺理论基础考研真题.doc
 2020年四川甘孜小升初语文真题及答案I卷.doc
 2020年注册岩土工程师专业基础考试真题及答案.doc
 2023-2024学年福建省厦门市九年级上学期数学月考试题及答案.doc
 2021-2022学年辽宁省沈阳市大东区九年级上学期语文期末试题及答案.doc
 2022-2023学年北京东城区初三第一学期物理期末试卷及答案.doc
 2018上半年江西教师资格初中地理学科知识与教学能力真题及答案.doc
 2012年河北国家公务员申论考试真题及答案-省级.doc
 2020-2021学年江苏省扬州市江都区邵樊片九年级上学期数学第一次质量检测试题及答案.doc
 2022下半年黑龙江教师资格证中学综合素质真题及答案.doc