Get more from your printer
Look inside for detailed illustrated steps that te...
See Snapshots in Color
Handy Printing Hints
What if Printing Doesn’t Go Perfectly?
The HP DeskJet 720C Series Printer User’s Guide En...
Titlepg.pdf
The HP DeskJet 720C Series Printer User’s Guide
English
Chap1ugTOC.pdf
Table of Contents
Chap1UG.pdf
Printing Basics
lthough your printer can do some pretty fancy stuf...
If you want to know more about the printing basics...
How to Choose Paper
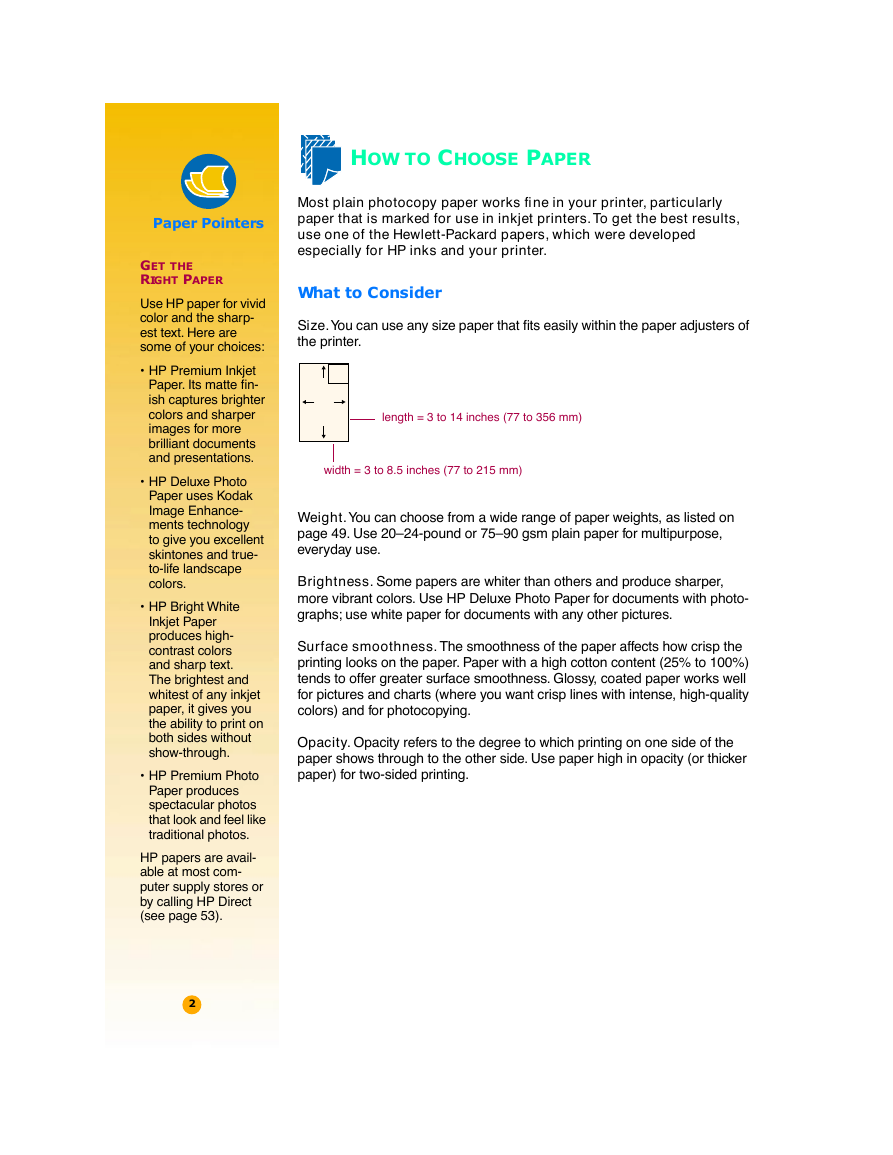
What to Consider
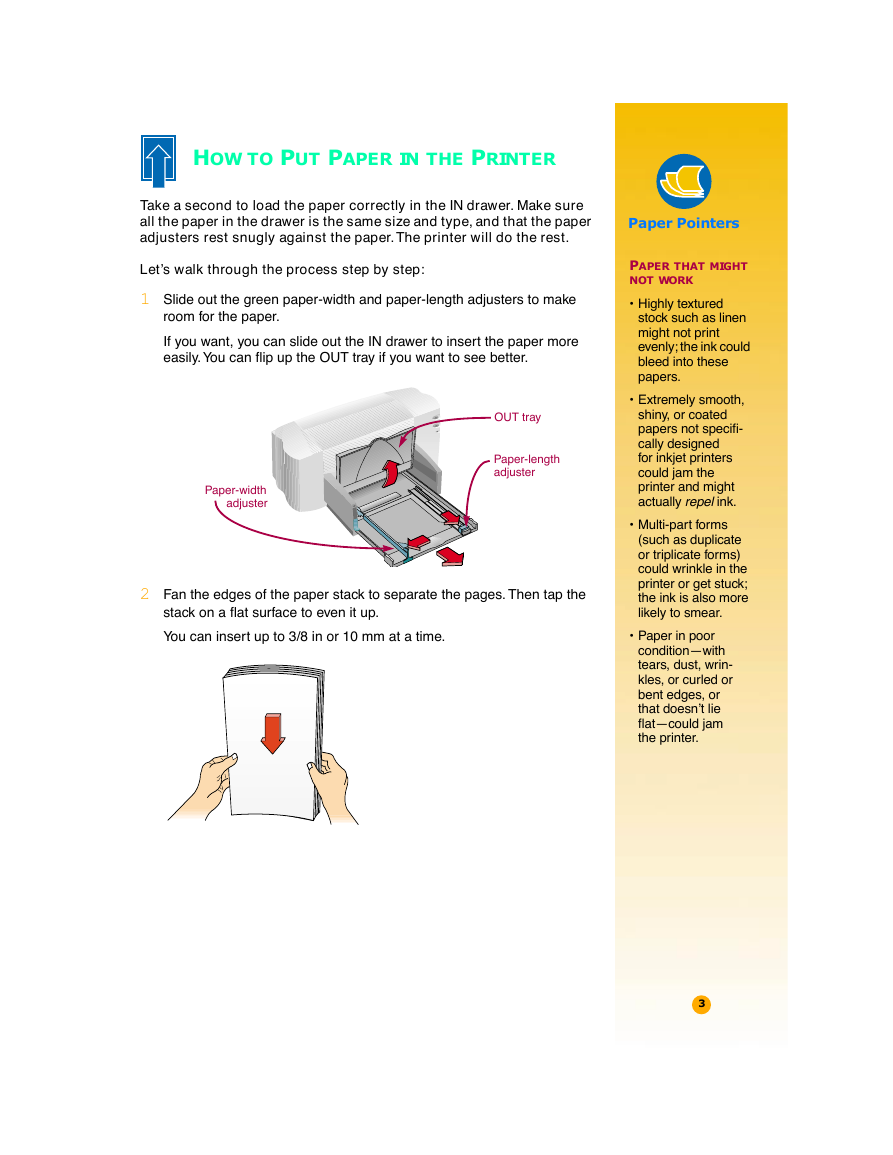
How to Put Paper in the Printer
1 Slide out the green paper-width and paper-length...
2 Fan the edges of the paper stack to separate the...
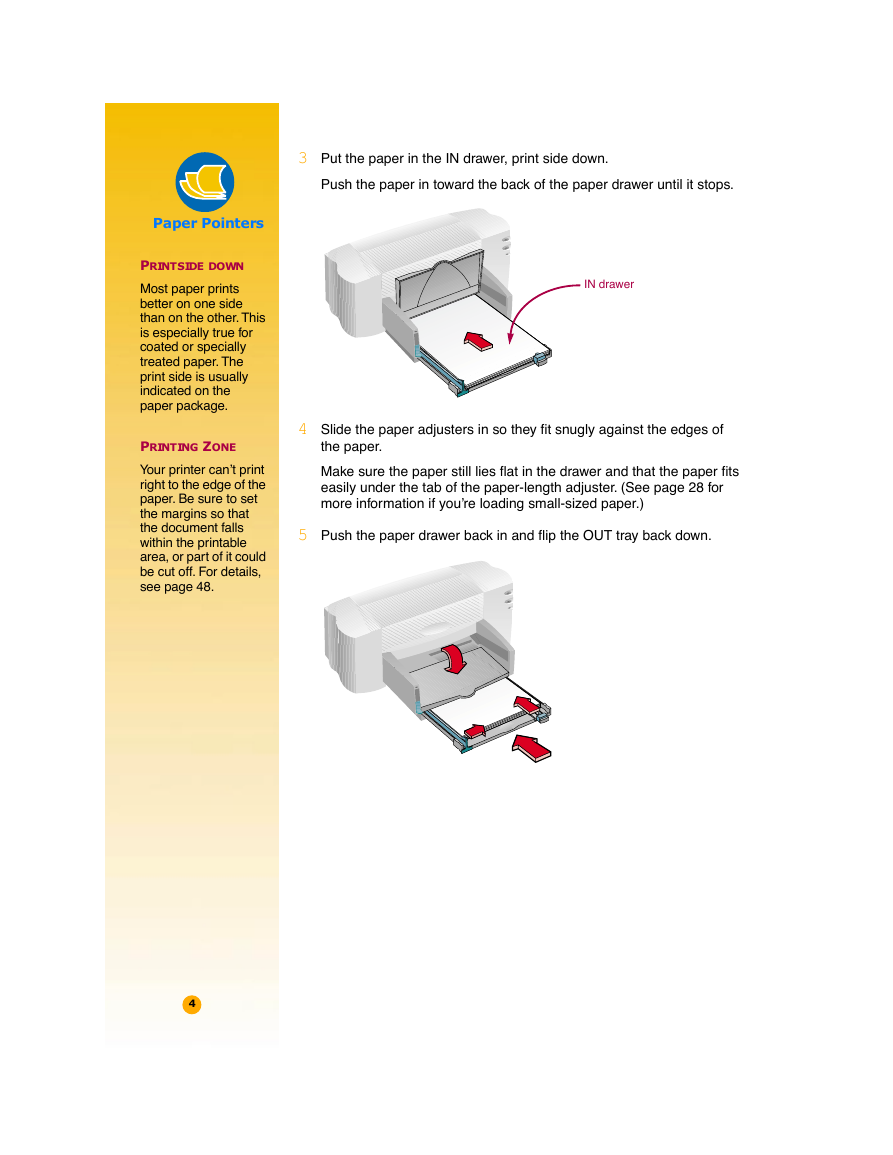
3 Put the paper in the IN drawer, print side down....
4 Slide the paper adjusters in so they fit snugly ...
5 Push the paper drawer back in and flip the OUT t...
How to Print
1 Check your print settings in the HP print settin...
2 Click OK in the HP print settings box to save yo...
3 Click OK in the Print box of your software progr...
While You’re Printing
If you run out of paper before you’ve finished
If the paper jams in the printer
Troubleshooting
Printer Software: Your Printer’s Remote Control
Tell the Printer What You Want
Printer Software
HP Print Settings Box
HP Toolbox
Chapter
1
Paper Pointers
Paper Pointers
Paper Pointers
Handy Hints
What If
What If
Handy Hints
How to Choose Paper
How to Put Paper in the Printer
How to Print
The HP Print Settings Box: How to find it
Printer Software: Your Printer’s Remote Control
2 Then click whichever 2 button you see— 2 Propert...
3 If you still don’t see 3 the box, click Setup, 3...
1 Click File and then 1 click Print.
Or Try This
2 Then click whichever 2 button you see— 2 Setup o...
1 If Print isn’t 1 there, then click 1 Printer Set...
You’re There!
Try This
The HP Print Settings Box: What it can do for you
Click a tab and then click a setting.
Click OK to save your settings.
The HP Toolbox: How to find it
Windows 95 and Windows NT 4.0
Windows 3.1x
The HP Toolbox: What it can do for you
Chap2UG.pdf
Beyond the Basics
ith the printing basics down, you’re ready to lear...
How to Print on Different Paper Sizes
1 In the HP print settings dialog box, click the S...
2 Type the dimensions of the paper in the Custom P...
3 Load the paper in the printer and print as you w...
How to Print on Both Sides of the Paper
1 Load the paper in the IN drawer.
2 In the HP print settings box, click the Features...
3 Then click Book or Tablet.
4 Print your document.
5 Put the printed pages back in the IN drawer of t...
6 When the paper is ready, flip the OUT tray down ...
How to Flip a Document
1 Load the paper in the IN drawer.
2 In the HP print settings box, click the Features...
3 Print your document.
About Color
Turning Off Color
Adjusting the Color
1 In the HP print settings dialog box, click the C...
2 Change the Intensity or Halftoning settings.
About pictures
About Text
Choosing Fonts
Using Fonts
Buying Fonts
Chapter
2
Paper Pointers
Paper Pointers
What If
Paper Pointers
What If
What If
Handy Hints
Handy Hints
Handy Hints
Handy Hints
What If
Handy Hints
How to Print on Different Paper Sizes
How to Print on Both Sides of the Paper
How to Flip a Document
About Color
About Pictures
About Text
Chap3UG.pdf
What You Can Print
ith the printing basics down, you’re ready for som...
One envelope at a time or a stack of envelopes.
Labels—label your file folders or get those monthl...
Transparencies for important presentations.
Photographs—make personalized buttons or name tags...
Business cards, recipe cards, or invitations to op...
Banners to attract visitors to your sales booth.
Iron-on transfers on sun visors printed with your ...
Envelopes
How to Print a Single Envelope
1 In the HP print settings box, click the Setup ta...
2 Slide the envelope into the single-envelope slot...
3 Print the envelope.
How to Print a Stack of Envelopes
1 In the HP print settings box, click the Setup ta...
2 Slide both of the paper adjusters out.
3 Put a stack of up to 15 envelopes in the printer...
4 Slide the paper adjusters so that they fit snugl...
Small Envelopes
5 Push the IN drawer back in and flip the OUT tray...
6 Print the envelopes.
Labels
1 Click the Setup tab in the HP print settings box...
2 Fan the edges of the label sheets to separate th...
3 Remove all paper from the IN drawer and insert u...
4 Slide the green paper adjusters in to fit snugly...
5 Push the IN drawer back in and flip the OUT tray...
6 Print the labels.
Transparencies
1 In the HP print settings box, click the Setup ta...
2 Put the transparencies in your printer with the ...
3 Slide in the green paper adjusters, just as you ...
4 Print the transparency.
5 Be patient.
Photographs
1 Click the Setup tab in the HP print settings box...
2 Load the paper as you would for normal printing....
3 Print the document.
Cards
1 In the HP print settings box, click the Setup ta...
2 Slide out the IN drawer, slide out the green pap...
3 Place a stack of up to 30 cards (6 mm or 1/4 inc...
4 Slide the green paper adjusters in so that they ...
5 Push in the IN drawer and flip down the OUT tray...
6 Print the cards.
Banners
1 In the HP print settings box, click the Setup ta...
2 Flip the banner switch up.
3 Remove all paper from the IN drawer.
4 Get the banner paper ready for the printer:
5 Put the paper in the IN drawer so that the unatt...
6 Slide the paper adjusters so that they fit snugl...
7 Push the IN drawer back in.
8 Print the banner.
9 After your banner is printed, if the Resume ligh...
Iron-On Transfers
1 On your computer, open the document containing t...
2 In the HP print settings box, click the Setup ta...
3 If you want the text or picture to print as you ...
4 Load the transfer paper transparent-side down in...
5 Print the transfer.
6 Follow the instructions included with the iron-o...
Chapter
3
What If
Handy Hints
Paper Pointers
Paper Pointers
Paper Pointers
Paper Pointers
Paper Pointers
Paper Pointers
What If
Handy Hints
Paper Pointers
Paper Pointers
Handy Hints
Paper Pointers
What If
What If
Paper Pointers
Chap4UG.pdf
Getting Help When Things Go Wrong
hen problems occur, the quickest way to find a sol...
Click your way to a solution
Printer Communications
1 Make sure the printer cable is securely connecte...
2 Make sure both the printer and the computer are ...
3 Click the Printer Services tab of the HP Toolbox...
4 Click Test printer communication.
Buttons and Lights
Customer Support
Troubleshooting Using the Toolbox
Electronic Support Information
User Forums
HP Web Site
Printer Software
Calling HP Customer Support
After the Warranty
2 Click the Toubleshooting 2 Tab.
3 Click the appropriate 3 category. (The following...
4 What seems to be the 4 problem?
5 Explore the possibilities.
1 Double-click the Toolbox 1 shortcut (or icon) on...
Chapter
4
The print quality is poor
Something on the page is wrong or missing
You’re having trouble printing a banner
No page came out of the printer
The text or graphics are in the wrong place
Handy Hints
chap5ug.pdf
More About Your Printer
ntil now, we’ve been talking about the what, where...
System Requirements
A Word about Windows NT 4.0
Minimum printing margins
Cartridges and ink
Poor Print Quality
Potential Damage
Specifications
Print Technology
Black Print Speed��\
Color Print Speed (mixed text and graphics)��\
Color Print Speed (full page color)��\
Black Resolution��\���\
Color Resolution (depends on paper type)��\��\
Software Compatibility
Duty Cycle
Product Certifications
Recommended Media Weight
Media Handling
Buttons/Lights
I/O Interface
Dimensions
Weight
Power Requirements
Power Consumption
Operating Environment
Normal Mode
Printing from DOS
1 Make sure the 720C driver is set as the default ...
2 Run the DOS application within Windows.
3 In the DOS application, select DeskJet 660C 3 or...
4 Print the document.
Additional symbol sets and fonts
Installing a special symbol set or font on your co...
1 First install the printer software as described ...
2 Put the first installation disk into your com2 p...
3 If you are running Windows 95, click Start, and ...
4 Type the letter of the computer’s floppy disk 4 ...
5 Follow the directions on the computer screen.
6 Remove the last installation disk from 6 the flo...
Available symbol sets and fonts
Hebrew
Arabic
Cyrillic
Greek
Baltic
Thai
Ordering supplies and accessories
Ordering information
Elsewhere in the world
Regulatory Notices
FCC Statement (USA)
LED Indicator Statement
Power Adapter Statement
Limited warranty statement
European Contact: Your local Hewlett-Packard Sales...
Declaration of Conformity
according to ISO/IEC Guide 22 and EN 45014
chapter
5
Chap1UGIX.pdf
Symbols
A
B
C
D
E
F
G
H
I
J
K
L
M
N
O
P
Q
R
S
T
U
W
Incovers.pdf
Reduce, Reuse, Recycle
Protecting the Environment
Reduction and Elimination
Recycling
Energy Consumption
Cover.pdf
Get more from your printer
Look inside for detailed illustrated steps that te...
See Snapshots in Color
Handy Printing Hints
What if Printing Doesn’t Go Perfectly?
The HP DeskJet 720C Series Printer User’s Guide En...



 2023年江西萍乡中考道德与法治真题及答案.doc
 2012年重庆南川中考生物真题及答案.doc
 2013年江西师范大学地理学综合及文艺理论基础考研真题.doc
 2020年四川甘孜小升初语文真题及答案I卷.doc
 2020年注册岩土工程师专业基础考试真题及答案.doc
 2023-2024学年福建省厦门市九年级上学期数学月考试题及答案.doc
 2021-2022学年辽宁省沈阳市大东区九年级上学期语文期末试题及答案.doc
 2022-2023学年北京东城区初三第一学期物理期末试卷及答案.doc
 2018上半年江西教师资格初中地理学科知识与教学能力真题及答案.doc
 2012年河北国家公务员申论考试真题及答案-省级.doc
 2020-2021学年江苏省扬州市江都区邵樊片九年级上学期数学第一次质量检测试题及答案.doc
 2022下半年黑龙江教师资格证中学综合素质真题及答案.doc