1. 实验环境
节点 1:
节点 2:
v1.shenmin.com
v2.shenmin.com
192.168.137.11
192.168.137.12
iscsi 存储/配置服务器:
rhel6.shenmin.com
192.168.137.6
1.1. Hosts 文件或 DNS 设置
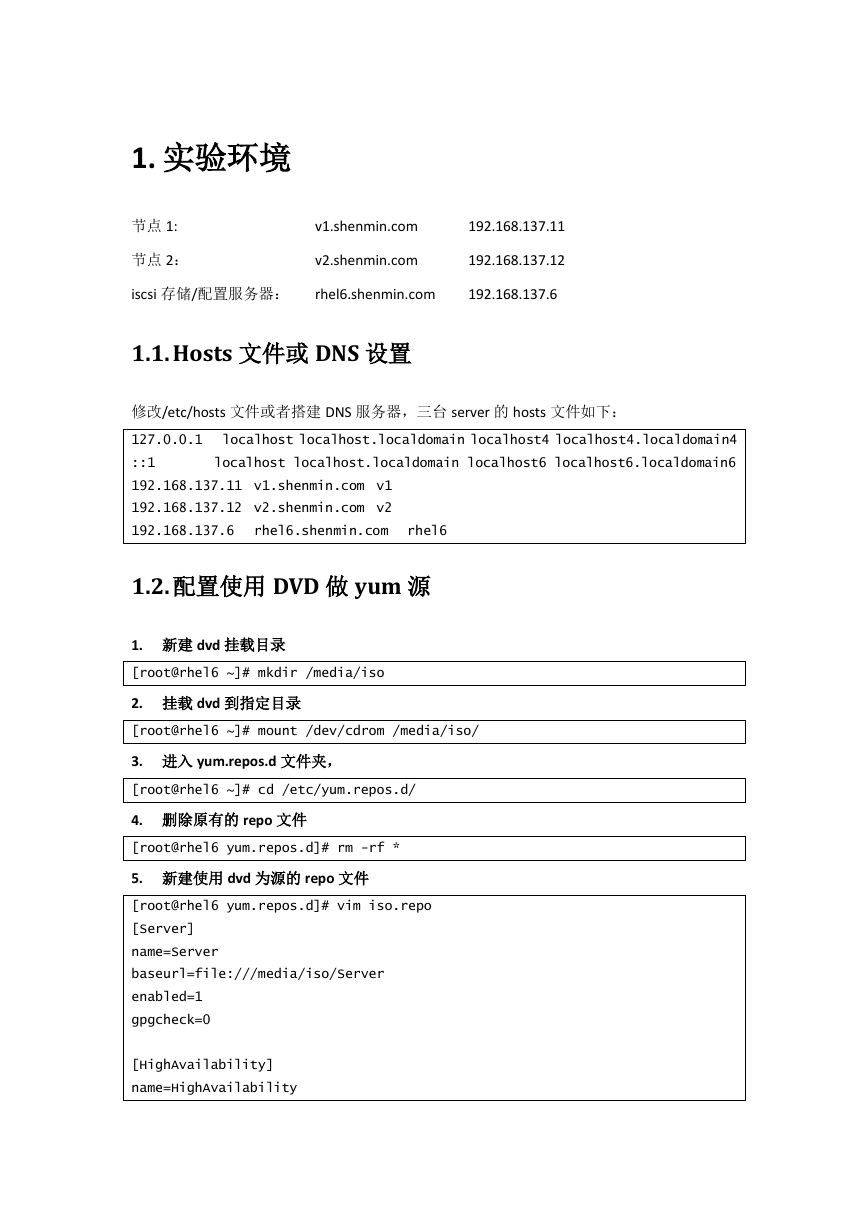
修改/etc/hosts 文件或者搭建 DNS 服务器,三台 server 的 hosts 文件如下:
127.0.0.1 localhost localhost.localdomain localhost4 localhost4.localdomain4
::1 localhost localhost.localdomain localhost6 localhost6.localdomain6
192.168.137.11 v1.shenmin.com v1
192.168.137.12 v2.shenmin.com v2
192.168.137.6 rhel6.shenmin.com rhel6
1.2. 配置使用 DVD 做 yum 源
1. 新建 dvd 挂载目录
[root@rhel6 ~]# mkdir /media/iso
2. 挂载 dvd 到指定目录
[root@rhel6 ~]# mount /dev/cdrom /media/iso/
3. 进入 yum.repos.d 文件夹,
[root@rhel6 ~]# cd /etc/yum.repos.d/
4. 删除原有的 repo 文件
[root@rhel6 yum.repos.d]# rm -rf *
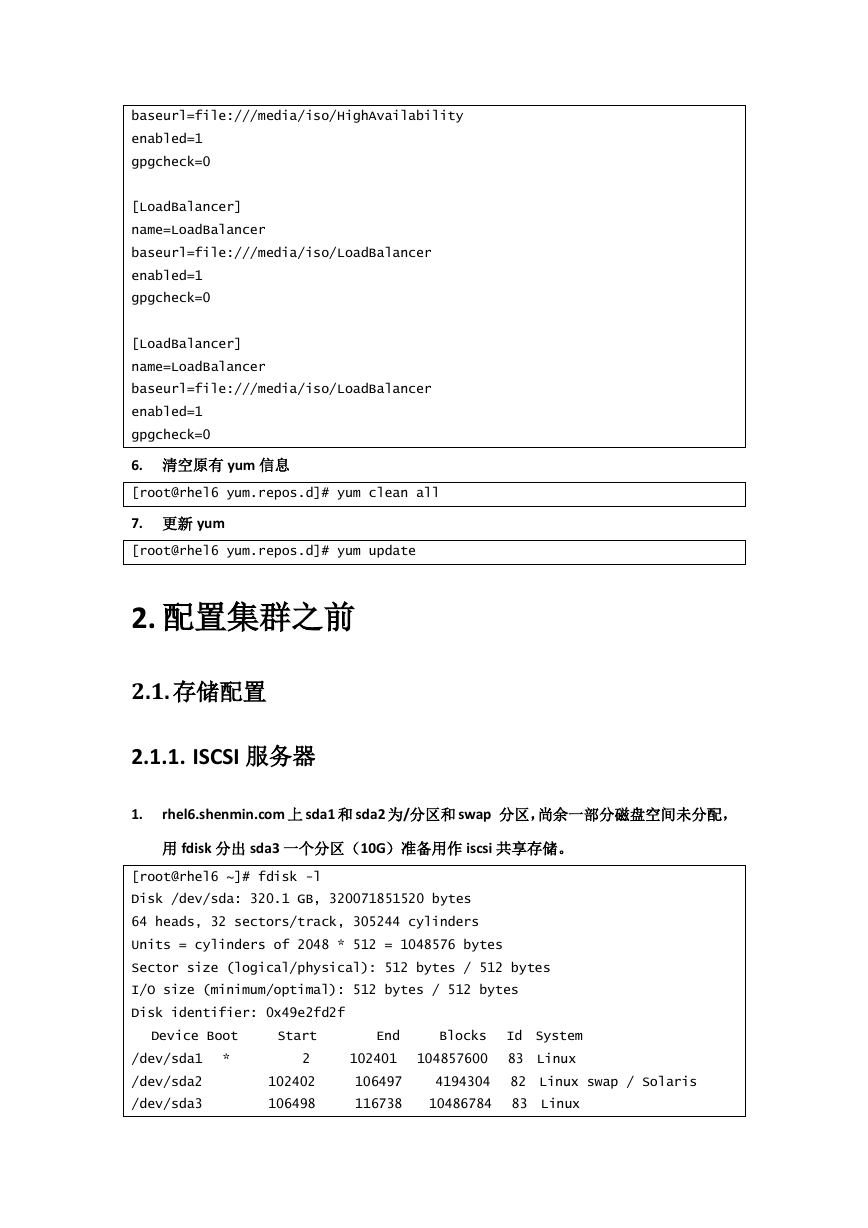
5. 新建使用 dvd 为源的 repo 文件
[root@rhel6 yum.repos.d]# vim iso.repo
[Server]
name=Server
baseurl=file:///media/iso/Server
enabled=1
gpgcheck=0
[HighAvailability]
name=HighAvailability
�
baseurl=file:///media/iso/HighAvailability
enabled=1
gpgcheck=0
[LoadBalancer]
name=LoadBalancer
baseurl=file:///media/iso/LoadBalancer
enabled=1
gpgcheck=0
[LoadBalancer]
name=LoadBalancer
baseurl=file:///media/iso/LoadBalancer
enabled=1
gpgcheck=0
6. 清空原有 yum 信息
[root@rhel6 yum.repos.d]# yum clean all
7. 更新 yum
[root@rhel6 yum.repos.d]# yum update
2. 配置集群之前
2.1. 存储配置
2.1.1. ISCSI 服务器
1.
rhel6.shenmin.com 上 sda1 和 sda2 为/分区和 swap 分区,尚余一部分磁盘空间未分配,
用 fdisk 分出 sda3 一个分区(10G)准备用作 iscsi 共享存储。
[root@rhel6 ~]# fdisk -l
Disk /dev/sda: 320.1 GB, 320071851520 bytes
64 heads, 32 sectors/track, 305244 cylinders
Units = cylinders of 2048 * 512 = 1048576 bytes
Sector size (logical/physical): 512 bytes / 512 bytes
I/O size (minimum/optimal): 512 bytes / 512 bytes
Disk identifier: 0x49e2fd2f
Device Boot Start End Blocks Id System
/dev/sda1 * 2 102401 104857600 83 Linux
/dev/sda2 102402 106497 4194304 82 Linux swap / Solaris
/dev/sda3 106498 116738 10486784 83 Linux
�
2. 安装 scsi-target-utils 软件提供 iscsi 服务
[root@rhel6 ~]# yum install scsi-target-utils
3. 修改/etc/tgt/targets.conf,添加:
backing-store /dev/sda3
这只是最简单的配置,其他设定请参考 target.cong 中的注释说明
4. 重启 tgtd 服务,并将其设为开机启动:
[root@rhel6 ~]# /etc/init.d/tgtd restart
停止 SCSI target daemon:not running [失败]
正在启动 SCSI target daemon: [确定]
[root@rhel6 ~]# chkconfig tgtd on
[root@rhel6 ~]# chkconfig tgtd --list
tgtd 0:关闭 1:关闭 2:启用 3:启用 4:启用 5:启用 6:关闭
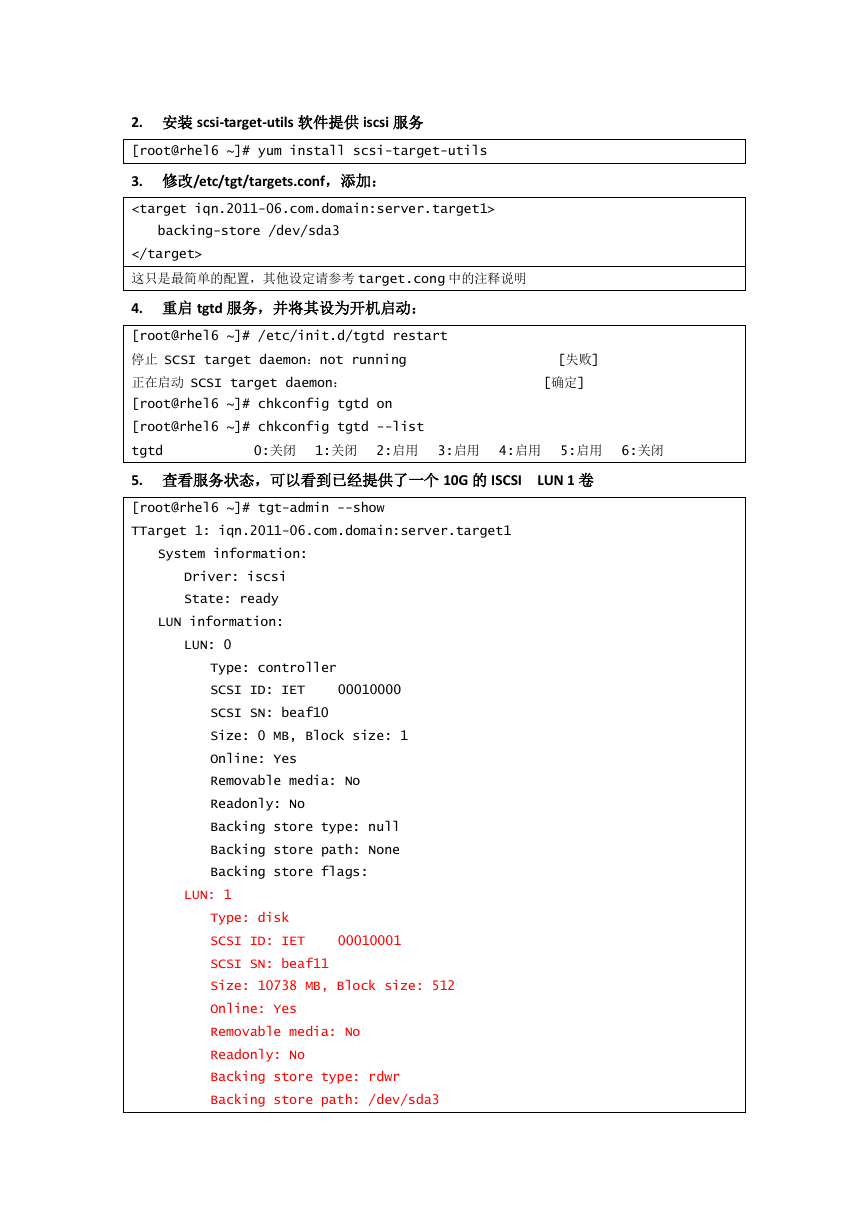
5. 查看服务状态,可以看到已经提供了一个 10G 的 ISCSI LUN 1 卷
[root@rhel6 ~]# tgt-admin --show
TTarget 1: iqn.2011-06.com.domain:server.target1
System information:
Driver: iscsi
State: ready
LUN information:
LUN: 0
Type: controller
SCSI ID: IET 00010000
SCSI SN: beaf10
Size: 0 MB, Block size: 1
Online: Yes
Removable media: No
Readonly: No
Backing store type: null
Backing store path: None
Backing store flags:
LUN: 1
Type: disk
SCSI ID: IET 00010001
SCSI SN: beaf11
Size: 10738 MB, Block size: 512
Online: Yes
Removable media: No
Readonly: No
Backing store type: rdwr
Backing store path: /dev/sda3
�
Backing store flags:
Account information:
ACL information:
ALL
6. 打开防火墙端口 3260 或者关闭防火墙,具体设置自行解决。
2.1.2. ISCSI 客户机
1. 安装 iscsi 客户端软件 iscsi-initiator-utils
[root@v1 ~]# yum install iscsi-initiator-utils
2. 发现服务器 rhel6.shenmin.com 的 iscsi 共享卷
[root@v1 ~]# iscsiadm -m discovery -t sendtargets -p rhel6
192.168.137.6:3260,1 iqn.2011-06.com.domain:server.target1
[root@v2 ~]# iscsiadm -m discovery -t sendtargets -p 192.168.137.6
192.168.137.6:3260,1 iqn.2011-06.com.domain:server.target1
Rhel6 为主机名,使用 ip 地址也可
3. 登录 ISCSI 存储:
[root@v1 ~]# iscsiadm -m node -T iqn.2011-06.com.domain:server.target1 -p
192.168.137.6:3260 -l
Logging in to [iface: default, target: iqn.2011-06.com.domain:server.target1,
portal: 192.168.137.6,3260]
Login to [iface: default, target: iqn.2011-06.com.domain:server.target1, portal:
192.168.137.6,3260] successful.
使用 iscsiadm -m node -T target 名称 -p targetIP 地址:端口号 –login 命令
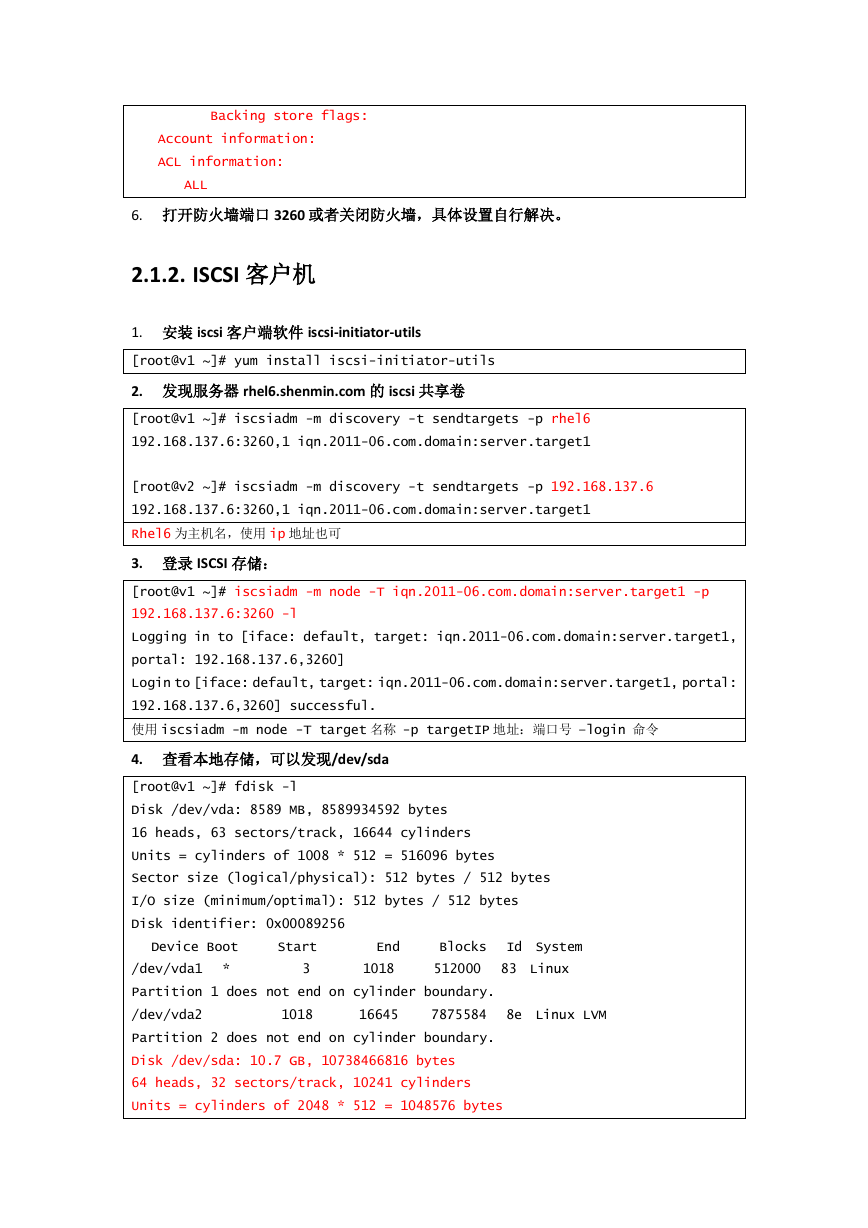
4. 查看本地存储,可以发现/dev/sda
[root@v1 ~]# fdisk -l
Disk /dev/vda: 8589 MB, 8589934592 bytes
16 heads, 63 sectors/track, 16644 cylinders
Units = cylinders of 1008 * 512 = 516096 bytes
Sector size (logical/physical): 512 bytes / 512 bytes
I/O size (minimum/optimal): 512 bytes / 512 bytes
Disk identifier: 0x00089256
Device Boot Start End Blocks Id System
/dev/vda1 * 3 1018 512000 83 Linux
Partition 1 does not end on cylinder boundary.
/dev/vda2 1018 16645 7875584 8e Linux LVM
Partition 2 does not end on cylinder boundary.
Disk /dev/sda: 10.7 GB, 10738466816 bytes
64 heads, 32 sectors/track, 10241 cylinders
Units = cylinders of 2048 * 512 = 1048576 bytes
�
Sector size (logical/physical): 512 bytes / 512 bytes
I/O size (minimum/optimal): 512 bytes / 512 bytes
Disk identifier: 0x00000000
Disk /dev/sda doesn't contain a valid partition table
5. 卸载 ISCSI 存储
[root@v1 ~]# iscsiadm -m node -T iqn.2011-06.com.domain:server.target1 -p
192.168.137.6:3260 -u
Logging out of session [sid: 1, target: iqn.2011-06.com.domain:server.target1,
portal: 192.168.137.6,3260]
Logout of [sid: 1, target: iqn.2011-06.com.domain:server.target1, portal:
192.168.137.6,3260] successful.
6. 再次查看本地存储,/dev/sda 已经卸载
[root@v1 ~]# fdisk -l
Disk /dev/vda: 8589 MB, 8589934592 bytes
16 heads, 63 sectors/track, 16644 cylinders
Units = cylinders of 1008 * 512 = 516096 bytes
Sector size (logical/physical): 512 bytes / 512 bytes
I/O size (minimum/optimal): 512 bytes / 512 bytes
Disk identifier: 0x00089256
Device Boot Start End Blocks Id System
/dev/vda1 * 3 1018 512000 83 Linux
Partition 1 does not end on cylinder boundary.
/dev/vda2 1018 16645 7875584 8e Linux LVM
Partition 2 does not end on cylinder boundary.
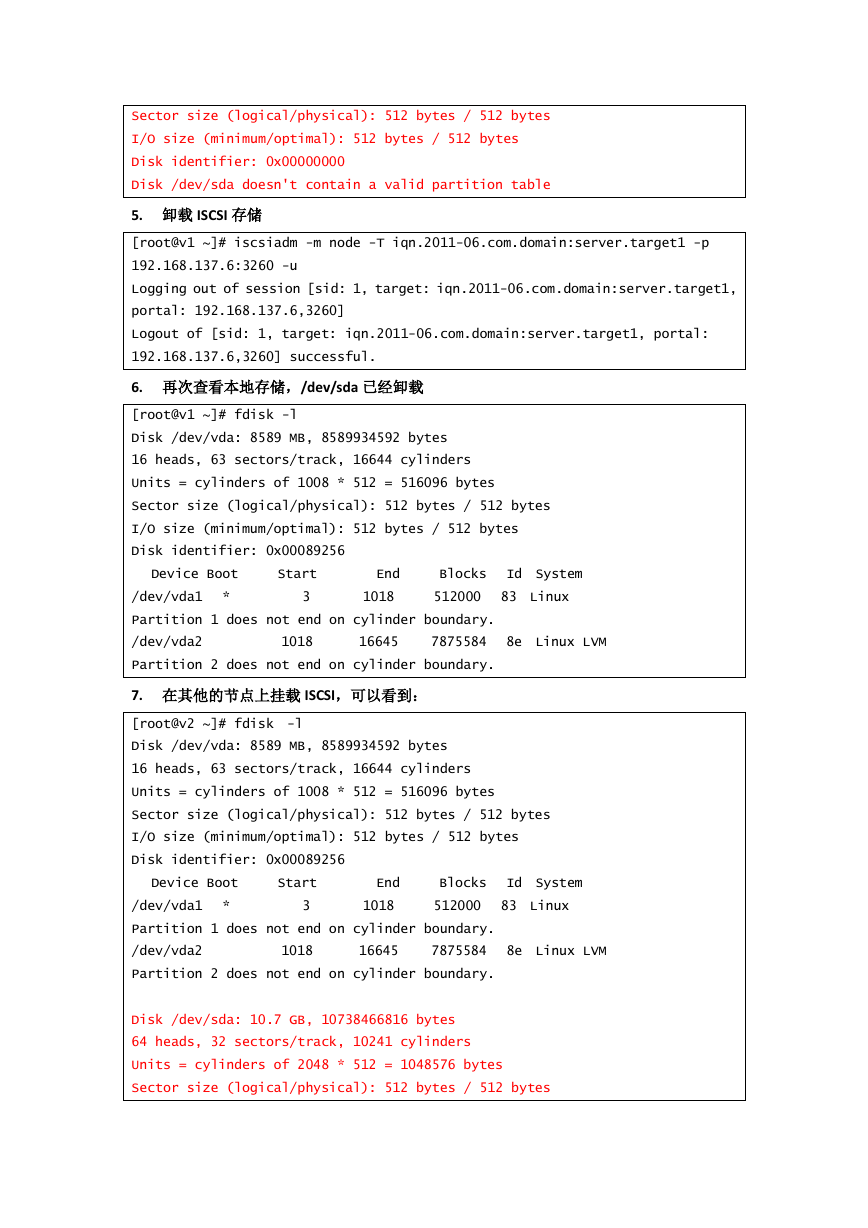
7. 在其他的节点上挂载 ISCSI,可以看到:
[root@v2 ~]# fdisk -l
Disk /dev/vda: 8589 MB, 8589934592 bytes
16 heads, 63 sectors/track, 16644 cylinders
Units = cylinders of 1008 * 512 = 516096 bytes
Sector size (logical/physical): 512 bytes / 512 bytes
I/O size (minimum/optimal): 512 bytes / 512 bytes
Disk identifier: 0x00089256
Device Boot Start End Blocks Id System
/dev/vda1 * 3 1018 512000 83 Linux
Partition 1 does not end on cylinder boundary.
/dev/vda2 1018 16645 7875584 8e Linux LVM
Partition 2 does not end on cylinder boundary.
Disk /dev/sda: 10.7 GB, 10738466816 bytes
64 heads, 32 sectors/track, 10241 cylinders
Units = cylinders of 2048 * 512 = 1048576 bytes
Sector size (logical/physical): 512 bytes / 512 bytes
�
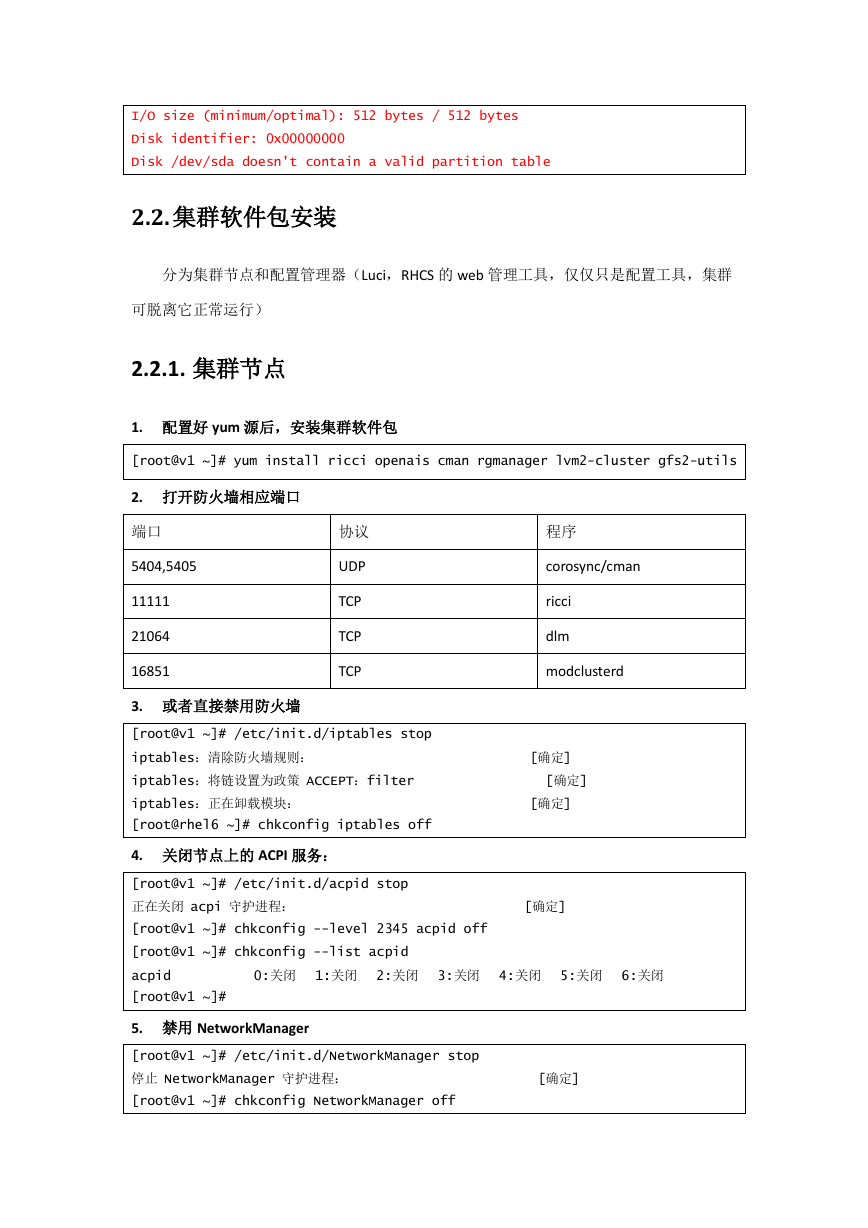
I/O size (minimum/optimal): 512 bytes / 512 bytes
Disk identifier: 0x00000000
Disk /dev/sda doesn't contain a valid partition table
2.2. 集群软件包安装
分为集群节点和配置管理器(Luci,RHCS 的 web 管理工具,仅仅只是配置工具,集群
可脱离它正常运行)
2.2.1. 集群节点
1. 配置好 yum 源后,安装集群软件包
[root@v1 ~]# yum install ricci openais cman rgmanager lvm2-cluster gfs2-utils
2. 打开防火墙相应端口
端口
5404,5405
11111
21064
16851
协议
UDP
TCP
TCP
TCP
程序
corosync/cman
ricci
dlm
modclusterd
3. 或者直接禁用防火墙
[root@v1 ~]# /etc/init.d/iptables stop
iptables:清除防火墙规则: [确定]
iptables:将链设置为政策 ACCEPT:filter [确定]
iptables:正在卸载模块: [确定]
[root@rhel6 ~]# chkconfig iptables off
4. 关闭节点上的 ACPI 服务:
[root@v1 ~]# /etc/init.d/acpid stop
正在关闭 acpi 守护进程: [确定]
[root@v1 ~]# chkconfig --level 2345 acpid off
[root@v1 ~]# chkconfig --list acpid
acpid 0:关闭 1:关闭 2:关闭 3:关闭 4:关闭 5:关闭 6:关闭
[root@v1 ~]#
5. 禁用 NetworkManager
[root@v1 ~]# /etc/init.d/NetworkManager stop
停止 NetworkManager 守护进程: [确定]
[root@v1 ~]# chkconfig NetworkManager off
�
6. 给软件用户 ricci 设置密码:
[root@v1 ~]# passwd ricci
更改用户 ricci 的密码 。
新的 密码:
重新输入新的 密码:
passwd: 所有的身份验证令牌已经成功更新。
[root@v1 ~]#
7. 启动 ricci 服务
[root@v1 ~]# /etc/init.d/ricci start
正在启动 oddjobd: [确定]
generating SSL certificates... done
Generating NSS database... done
启动 ricci: [确定]
[root@v1 ~]#
2.2.2. 集群配置管理器(luci)
可以安装在节点上,我现在安装在存储服务器上,更利于监控集群状态。
1. 配置好 yum 源后,安装管理软件:
[root@rhel6 ~]# yum install luci
2. 打开软件相应端口(iptables 命令)
端口
8084
协议
TCP
3. 或者直接禁用防火墙
程序
luci
[root@rhel6 ~]# /etc/init.d/iptables stop
iptables:清除防火墙规则: [确定]
iptables:将链设置为政策 ACCEPT:filter [确定]
iptables:正在卸载模块: [确定]
[root@rhel6 ~]# chkconfig iptables off
4. 启动 luci:
[root@rhel6 ~]# /etc/init.d/luci start
Adding following auto-detected host IDs (IP addresses/domain names),
corresponding to `rhel6.shenmin.com' address, to the configuration of
self-managed certificate `/var/lib/luci/etc/cacert.config' (you can change them
by editing `/var/lib/luci/etc/cacert.config', removing the generated certificate
`/var/lib/luci/certs/host.pem' and restarting luci):
(none suitable found, you can still do it manually as mentioned above)
Generating a 2048 bit RSA private key
�
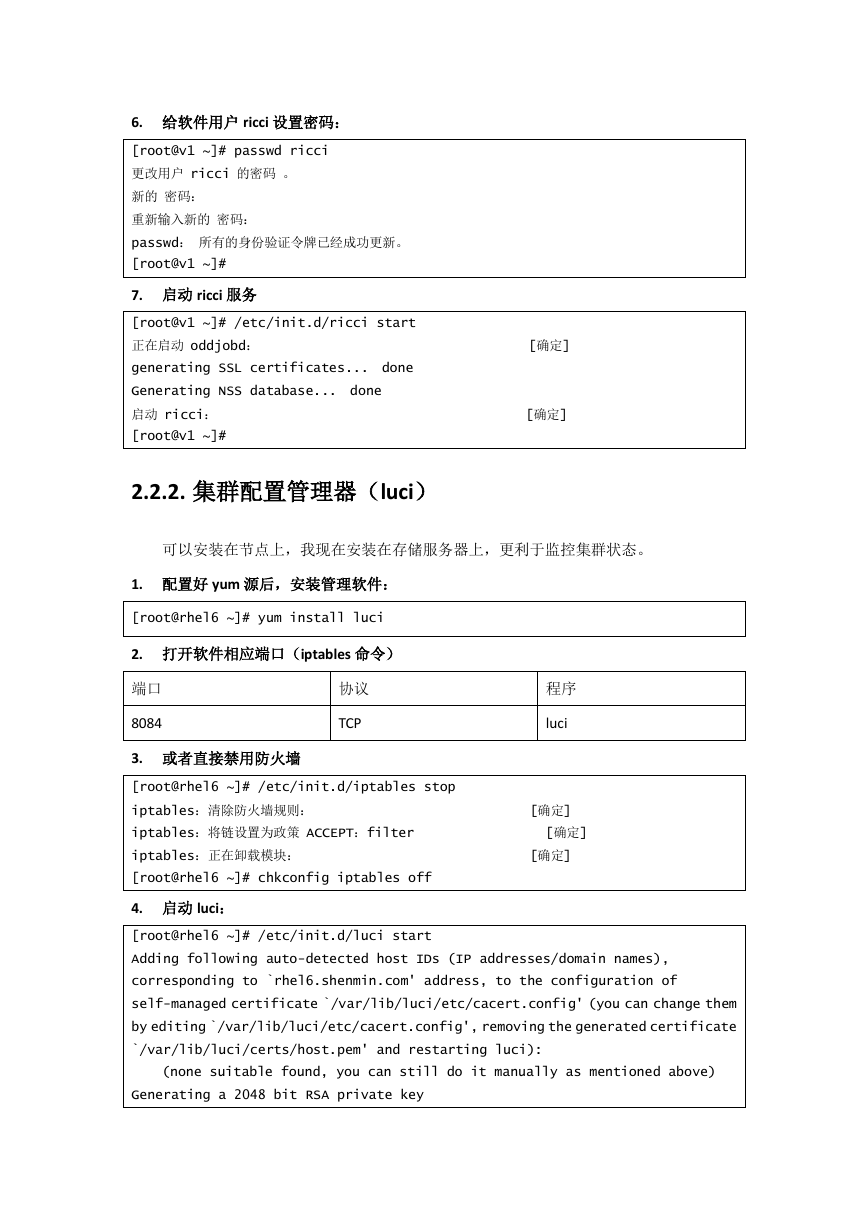
writing new private key to '/var/lib/luci/certs/host.pem'
正在启动 saslauthd: [确定]
Start luci... [确定]
Point your web browser to https://rhel6.shenmin.com:8084 (or equivalent) to
access luci
[root@rhel6 ~]#
3. 创建集群
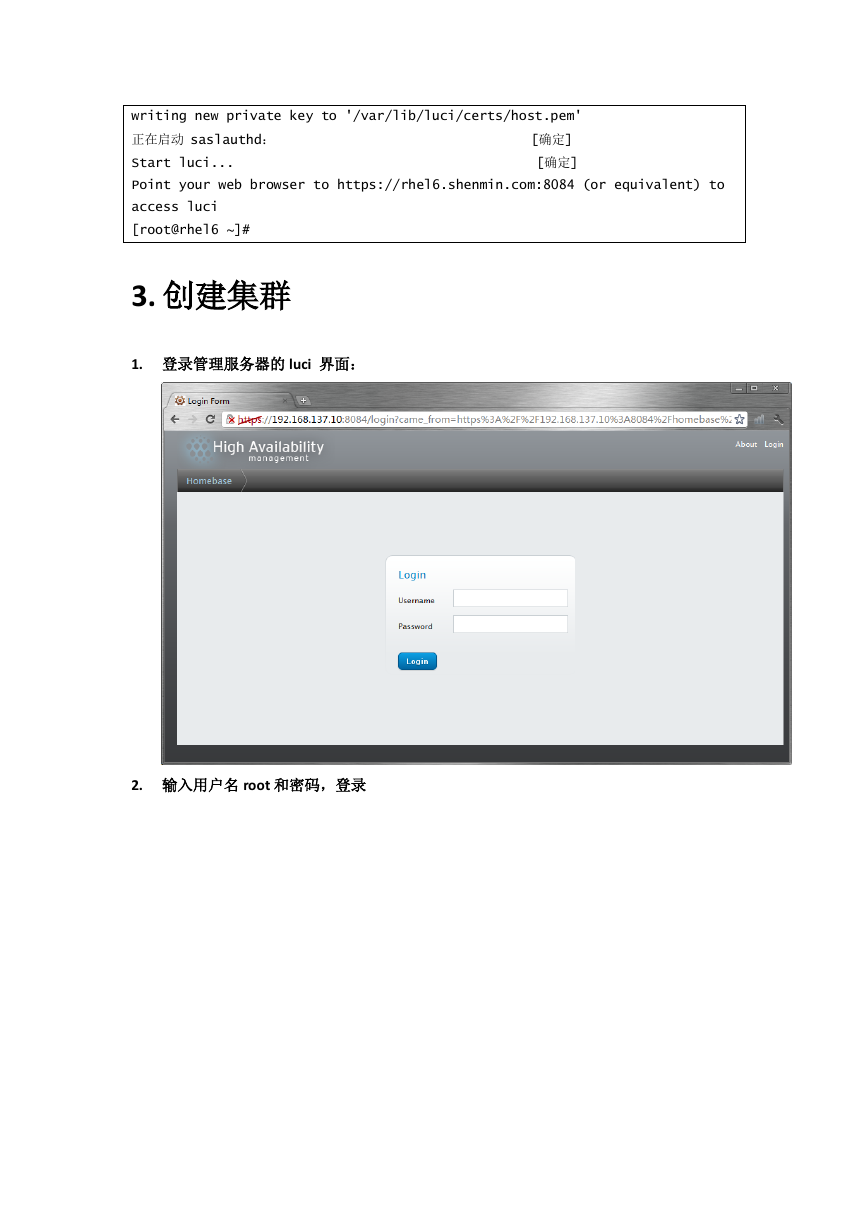
1. 登录管理服务器的 luci 界面:
2. 输入用户名 root 和密码,登录
�


 2023年江西萍乡中考道德与法治真题及答案.doc
 2012年重庆南川中考生物真题及答案.doc
 2013年江西师范大学地理学综合及文艺理论基础考研真题.doc
 2020年四川甘孜小升初语文真题及答案I卷.doc
 2020年注册岩土工程师专业基础考试真题及答案.doc
 2023-2024学年福建省厦门市九年级上学期数学月考试题及答案.doc
 2021-2022学年辽宁省沈阳市大东区九年级上学期语文期末试题及答案.doc
 2022-2023学年北京东城区初三第一学期物理期末试卷及答案.doc
 2018上半年江西教师资格初中地理学科知识与教学能力真题及答案.doc
 2012年河北国家公务员申论考试真题及答案-省级.doc
 2020-2021学年江苏省扬州市江都区邵樊片九年级上学期数学第一次质量检测试题及答案.doc
 2022下半年黑龙江教师资格证中学综合素质真题及答案.doc