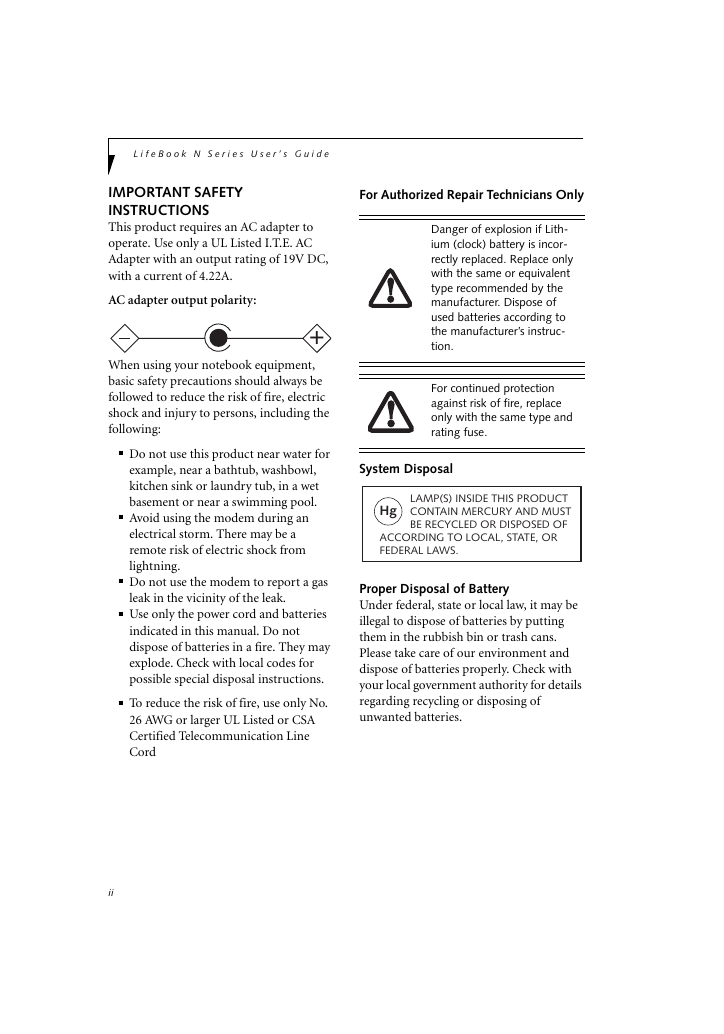
IMPORTANT SAFETY INSTRUCTIONS
For Authorized Repair Technicians Only
System Disposal
Proper Disposal of Battery
IMPORTANT SAFETY INSTRUCTIONS
NOTE ON USE REQUIRED HIGH SAFETY
NOTE ON BACKUP DATA
AUSTRALIAN WARNINGS
WARNING
Connection of Non Certified/Approved
peripherals may result in the equipment operating outside the Australian EMI Standards.
Call Attempts/Retries:
NEW ZEALAND WARNINGS
For repeat calls to the same number.
For Automatic calls to different numbers.
For Automatically answered Incoming Calls.
WARNING:
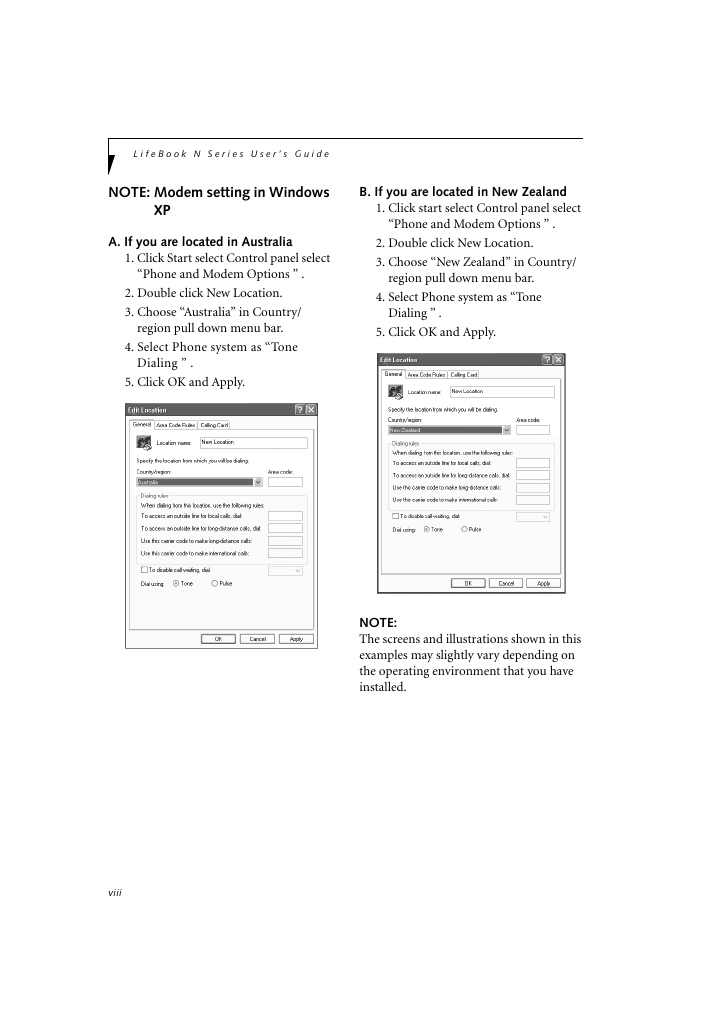
NOTE: Modem setting in Windows XP
A. If you are located in Australia
B. If you are located in New Zealand
NOTE:
About This Guide
Conventions Used in the Guide
Top and Front Components
Channel Button
TV Button
Record Button
Wireless LAN Switch
Media Player Buttons
Power/Suspend/Resume Button
Volume Level
Volume Control
DVD/CD Button
Display Panel Latch
Display Panel
Keyboard
Remote Control IR Port
Status Indicator Panel
Stereo Speakers
Scrolling Button
Touchpad Pointing Device
Left-Side Panel Components
Microphone Jack
Headphone Jack
ExpressCard Slot
PC Card Slot
PC Card Eject Button
Antenna Mini-Jack
S-Video Input Port
Video Input Jack (composite)
Audio Input Jacks
Anti-theft Lock Slot
Right-Side Panel Components
Memory Stick/SD/xD Card Slot
USB 2.0 Ports
Optical Drive Eject Button
Optical Drive
Rear Panel Components
DC Power Jack
LAN Port
Modem Port
USB 2.0 Ports
S-Video Input Port
IEEE 1394 Port
Air Flow Vents
External Monitor Port
Bottom Components
Lithium ion Battery Bay
Subwoofer
Battery Latch
Memory Compartment Cover
Air Flow Vents
Tilt Foot
Battery Charging Indicator
Battery Status Indicator
Hard Drive/Optical Drive Access Indicator
NumLock Indicator
CapsLock Indicator
ScrLock Indicator
Controlling the Volume
Volume Control Button
Other Ways to Control Volume
Connecting the AC Adapter
Connecting the AC Adapter
Switching from AC Adapter Power to Battery Power
Recharging the Batteries
Low Battery State
Shorted Batteries
Replacing the Battery
Installing Memory Stick/SD/ xD Cards
Removing A Memory Stick/ SD/xD Card
Installing a Memory Module
Removing a Memory Upgrade Module
Checking the Memory Capacity
Communications Ports
LAN Port
IEEE 1394 Jack
Universal Serial Bus (USB) 2.0 Ports
S-Video Out Port
Microphone Jack
Headphone Jack
External Monitor Port
TV Tuner User’s Guide
TV Tuner Applications
Introducing the TV Tuner
TV Tuner Features
Top/Front Features
Left Side Features
Right Side Features
Rear Panel Features
Remote Control Features
Connecting the TV tuner
Connecting an Antenna
1. Connect the wide coaxial connector end of the RF antenna adapter to the coaxial connector on the antenna (this includes cable TV antennas).
2. Connect the other end of the adapter to the antenna jack on the left side of the notebook, as shown in Figure B-6.
Connecting an External Audio Device
1. Connect the cable to the audio output jacks on the external device by matching the colors of the cable with the colors of the jacks.
2. Connect the cable to the audio input jacks on the notebook by matching the colors of the cable with the colors of the jacks (See Figure B-8).
Connecting an External Video Device
1. Connect the cable to the video output jack on the external device.
2. Connect the cable to the video input jack on the notebook (See Figure B- 10).
3. Connect the audio cable between the external device and the notebook, as described in “Connecting an External Audio Device” .
1. Connect the cable to the video output jack on the external device.
2. Connect the cable to the video input jack on the notebook (See Figure B- 12).
3. Connect the audio cable between the external device and the notebook, as described in “Connecting an External Audio Device” .
Getting Started
1. Verify that the system is not powered on, then press the MyMedia button on the remote control. During the first portion of th...
2. Verify that the power indicator is not lit.
3. Press the MyMedia button on the remote control again. The last portion of the installation will begin. At the completion of installation, the notebook will turn off.
4. Press the MyMedia button on the remote control again. The Instant MyMedia main menu will appear. Instant MyMedia is now ready to use.
Setting Up/Skipping Channels
Setting Up Channels
2. If it’s not already selected, select TV with the cursor buttons, then press the [Enter] button on the remote control. Instant MyMedia enters TV mode.
3. Press the [Menu] button to display the menu.
4. Select Antenna or Cable, depending upon how your tuner is connected. Press [Enter].
5. In the left hand panel, select Favorite Channel List. To automatically assign a broadcast station to unassigned channels, set the selection to On.
6. Select Auto Scan with the cursor buttons, select Run, then press [Enter].
7. A channel search will begin. During the channel search, channels are switched one after another; this could take some time. Each time a channel search is performed, different channels may be detected due to changing reception conditions.
Skipping Channels
1. Press [Menu] button to display the menu. Select TV Channel using Cursor Move buttons.
2. Press the right-cursor move button to enter the list of channels. Select a channel and press the [Enter] button. Channels with a circle to the left are the channels that are set; they will not be skipped.
3. If you want to skip a detected channel, select the channel you want to skip and press the [Enter] button. The circle will disappear, indicating that the channel will be skipped.
4. When you have finished setting the skip status of the channels, press the left-cursor button, select [Exit], and press the [Enter] button.
Starting/closing Instant MyMedia
Starting Instant MyMedia
1. Start Instant MyMedia by pressing MyMedia on the remote control.
2. Select the mode you want using the cursor buttons, then press the [Enter] button.
Starting with one button
Exiting Instant MyMedia
1. Press the MyMedia button to display the main menu.
2. Select Power Off, then press the [Enter] button. Instant MyMedia will be terminated and the notebook will be powered off.
Watching TV and External Video without Booting Up
Watching Television
1. Display the main menu of Instant MyMedia (“Starting Instant MyMedia” ).
2. Select TV using the cursor buttons on the remote control, then press the [Enter] button.
3. If the TV is not selected, press the [TV/Video] button on the remote control to switch to TV mode. Each time the button is pressed, the input signals will cycle from TV -> S-Video -> Composite Video.
1. To select channels with the remote control, use the numeric buttons (0 - 9).
2. To select a channel, press the number of the channel. For channels above 9, press the sequence of buttons (e.g., channel 42: press [4] + [2]; channel 156: press [1] + [5] + [6].)
3. To select channels using the Channel Up and Channel Down buttons, press Channel Up for the next highest channel, or Channel D...
1. Use the [Vol +] and [Vol -] buttons on the remote control to increase and decrease the volume. Note that when changing the volume, the screen display may temporarily stop.
2. Adjust the volume to a comfortable level. Do not raise the volume to the point that the sound is distorted. Doing so could damage the speakers.
1. To mute the sound completely, press the [Mute] button on the remote control.
2. To un-mute the volume, press the [Mute] button again.
Watching Video from External Devices
1. Press the [TV/Video] button on the remote control. Each time the button is pressed, the input signals will cycle from TV -> S-Video -> Composite Video. Select the input type corresponding to the input port that is connected to the external device.
2. For instructions on operating the external device, refer to the manufacturer’s user guide.
Copying from an External Device to DVD
1. Connect the external device in accordance with “Connecting the TV tuner” .
2. Start Instant MyMedia by pressing the TV button on the remote control.
3. Insert a blank DVD-RAM disc in the notebook media player.
4. Press the TV/Video button on the remote control and select Composite or S-Video, depending upon which type of cable is connected to the external device. (See “Connecting the TV tuner” ).
5. Insert the tape or disc in the external device and start playing it.
6. Press the [REC] button on the remote control. If it is not copy-protected, the program being viewed will be copied to the DVD-RAM in the notebook.
RECORDING TV Programs to HDD
1. Push the Menu button in TV mode. The TV Settings menu will appear.
2. Using the cursor button, move the cursor to the bottom, then press the cursor button again. “Record Media” will appear.
Recording TV Programs on a DVD
Usable Disc Formats
Before recording
1. Insert the DVD-RAM disc you want to format into the notebook’s multi- format drive. If a disc for PC data is installed, a message stating so will appear. Follow the instructions on the screen to format the disc.
2. Press the [MyMedia] button.
3. Using the cursor control buttons, select “Settings”.
4. Select “Quick format” or “Full format” and press the [Enter] button. Formatting will start.
5. When formatting has been completed, recordable time for the disc is indicated. Note that the percentage indicator showing pro...
1. Press the [Menu] button to display the menu.
2. Move the cursor down to select “Recording modes”.
3. Select the recording mode you like with the up and down cursor buttons and press the [Enter] button.
Recording TV programs
1. Display the channel to be recorded. See “Watching TV and External Video without Booting Up” .
2. Insert a formatted DVD-RAM disc into the optical drive of the notebook. Wait until “Loading a disc...” disappears. You cannot start the recording until “Loading a disc...” disappears.
3. Press the [REC] button. Recording starts.
4. Press the Stop/Eject button on the remote control or the Stop/Eject button on the notebook when the recording has been comple...
Watching Recorded TV Programs or Videos
Playing TV programs or videos recorded on the notebook
1. Press the [MyMedia] button on the remote control to display the main menu.
2. Select “Playback” from the menu and press the [Enter] button.
3. Select the folder in which TV programs or videos to be played are stored and press the [Enter] button.
4. Select the TV program or video you want to play and press the [Enter] button. Three options are displayed: “Play”, “Delete”, ...
Playing CD/DVDs
Playing CDs
1. Press the [MyMedia] button to display the main menu.
2. Insert a CD disc you want to play into the optical drive of the notebook.
3. Select “DVD/CD” and press the [Enter] button.
4. The CD play screen appears and the first track automatically starts to play.
Playing DVDs
1. Press the [MyMedia] button to display the main menu.
2. Insert the DVD you want to play into the optical drive of the notebook. Refer to the notebook user’s guide for additional information on using the optical drive and caring for discs.
3. Select “DVD/CD” from the menu and press the [Enter] button. The DVD will start playing automatically.
1. Press the [Menu] button and select Menu from the screen.
2. Select “Root menu” or “Title menu” and press the [Enter] button. The menu screen unique to the disc is displayed.
Playing the TV programs or videos recorded on a DVD
Changing the play settings for DVDs
1. Press the [Menu] button to display the menu.
2. Confirm the current region code. The item with a “O” attached on the left side is the region code that is currently set.
3. Select a new region and press the [Enter] button. Only the DVDs having the region code newly set can be played.
1. Press the [Menu] button to display the menu and select Auto Resume from the list.
2. In the right column, select the setting you would like and press the [Enter] button. Start from the beginning: Play from the ...
1. Press the [Menu] button to display the menu and select Audio Language or Subtitle Language from the list. The language for au...
2. Select a language you would like from the right column and press the [Enter] button.
1. Pause at the scene to be recorded by pressing the [Play/Pause] button.
2. Press the [Menu] button to display the menu and select Menu from the list.
3. Select “Bookmark” in the right column and press the [Enter] button.
4. Select “Add Bookmark” and press the [Enter] button.
1. Press the [Menu] button and select “Menu”.
2. Select “Bookmark” and press the [Enter] button.
3. Select a bookmark you want to read and press the [Enter] button. Pressing the [Enter] button after selecting “Preview” enables you to view thumbnails of the scenes bookmarked.
4. Select the scene you would like to view and press the [Enter] button. Play is started from the position of the bookmark.
5. Select “Delete” and press the [Enter] button to delete the bookmark.
1. Press the [Menu] button.
2. Select the Vocal option you prefer and press the [Enter] button.
Changing the parental lock settings
1. While in TV mode, press the [MyMedia] button, select “Settings”, then press the [Enter] button. Select the Parental Control tab and press the [Enter] button.
2. If you have already set a password, go to Password Change and enter the password in Input Password. Press the [Enter] button.
3. If you have not yet set a password, select “Password change” and select “New password” and press the [Enter] button.
4. Input a password with the (1)-(9) buttons and press the [Enter] button.
5. Select “Confirm new password”, enter the password again, and press the [Enter] button. If the passwords entered in the two steps do not match each other, you will receive a message. Press the [Enter] button to erase the message, then start again.
6. Once the password has been successfully entered, press the [Enter] button. A password is set, making the parental lock effective. After this, to cancel the parental lock or change the protection levels, this password is required.
7. Select “Level change” and select the level you would like. An “X” indicates that a level is unlocked. To lock a level, highlight the desired box and press the [Enter] key. The symbol will change from “X” to “\/”, indicating that the level is locked.
8. Select “Exit” and press the [Enter] button.
1. Press the [Menu] button to display the menu and select “Parental Control”.
2. Select “Password change”. When “****” is displayed in the column, an effective password has already been entered.
3. If a password has not been selected, select “Input password” and press the [Enter] button.
4. Input password with the (1)-(9) buttons of the remote control and press the [Enter] button.
5. Select the “New password” and press the [Enter] button.
6. Input a new password with the (1)- (9) buttons of the remote control and press the [Enter] button.
7. Select “Confirm new password” and press the [Enter] button.
8. Input a new password again with the (1)-(9) buttons of the remote control and press the [Enter] button. The password is chang...
9. Press the [Enter] button to erase the message.
Adjusting the Display Setting
Changing display types
1. Press the [Menu] button to display the menu and select “Display Type”.
2. Select the screen type you like and press the [Enter] button.
Setting the Timer
1. Press the [Menu] button to display the menu and select “Off-timer”.
2. Select the duration for the power to be turned off and press the [Enter] button. The off-timer is set and the menu screen disappears. -To change the setting to the off- timer, perform the same steps again. -To cancel the off-timer, select “Disable”.
3. When the time specified has elapsed, Instant MyMedia is automatically terminated, powering off the notebook.
Adjusting the display quality
1. Press the [Menu] button to display the menu and select “Video Adjust”.
2. Select an item you would like to adjust from “Brightness,” “Hue” or “Contrast” (TV mode) or “Brightness,” “Color1” or “Color2” (DVD mode) and press the [Enter] button. A bar is indicated below the screen.
3. Adjust to a value you like using the up and down cursor buttons.
Returning to the initial state
1. Press the [Menu] button to display the menu and select “Video Adjust”.
2. Select “Reset to default setting” and press the [Enter] button.
TV Tuner troubleshooting
Recovery of Instant MyMedia
1. Turn off your notebook and locate the [F12] key on the keyboard. Be ready to press this key immediately after you turn on the notebook.
2. Press the power button and press the [F12] key as soon as the Fujitsu logo appears. The Boot Menu will appear.
3. Insert the Restore DVD in your drive. Wait approximately 10 seconds so the disc can be identified, then proceed to the next step.
4. Press the cursor down key to select “CD-ROM drive” and press the [Enter] key.
5. Using the cursor keys, select “Restore the Instant MyMedia” and press the [Enter] key.
6. Following the instruction in the screen, eject the Restore DVD and insert the Instant MyMedia Restore disc.
7. Press the [Y] key. A message showing “Restore is in process” is displayed, and your notebook will start copying files.
8. When restore is complete, a message appears prompting you to remove the Restore disc. Remove the disc and press the [Y] key. The system will reboot.
Identifying the Problem
Specific Problems
Using the Troubleshooting Table
Troubleshooting Table


 2023年江西萍乡中考道德与法治真题及答案.doc
 2012年重庆南川中考生物真题及答案.doc
 2013年江西师范大学地理学综合及文艺理论基础考研真题.doc
 2020年四川甘孜小升初语文真题及答案I卷.doc
 2020年注册岩土工程师专业基础考试真题及答案.doc
 2023-2024学年福建省厦门市九年级上学期数学月考试题及答案.doc
 2021-2022学年辽宁省沈阳市大东区九年级上学期语文期末试题及答案.doc
 2022-2023学年北京东城区初三第一学期物理期末试卷及答案.doc
 2018上半年江西教师资格初中地理学科知识与教学能力真题及答案.doc
 2012年河北国家公务员申论考试真题及答案-省级.doc
 2020-2021学年江苏省扬州市江都区邵樊片九年级上学期数学第一次质量检测试题及答案.doc
 2022下半年黑龙江教师资格证中学综合素质真题及答案.doc