Getting Started Using ADAMS/Controls
Overview
This guide introduces you to the most basic concepts of Using
ADAMS/Controls, part of the MSC.ADAMS
software. If you’ve never used ADAMS/Controls before, this
guide is a good place to start.
suite of
You begin learning ADAMS/Controls with Introducing and
Starting the Tutorials on page 3. This material explains the
basics of the MSC.ADAMS side of the ADAMS/Controls
interface. Then, you continue with the tutorial that is associated
with the specific controls application you are using, including
EASY5, Control System Import, or MATLAB.
■
■
■
■
■
■
Introducing and Starting the Tutorials, 3
Learning ADAMS/Controls with MATLAB, 19
Learning ADAMS/Controls with Control System
Import, 39
Learning ADAMS/Controls with MSC.EASY5, 55
Learning ADAMS/Controls with Dynamic Systems
Import from MSC.EASY5, 75
TCP/IP Communication Mode in
ADAMS/Controls, 87
�
2
Getting Started Using ADAMS/Controls
Copyright
The information in this document is furnished for informational use only, may be revised from time to time, and
should not be construed as a commitment by MSC.Software Corporation. MSC.Software Corporation assumes no
responsibility or liability for any errors or inaccuracies that may appear in this document.
Copyright Information
This document contains proprietary and copyrighted information. MSC.Software Corporation permits licensees of
software products to print out or copy this document or portions thereof solely for internal use in
MSC.ADAMS
connection with the licensed software. No part of this document may be copied for any other purpose or distributed or
translated into any other language without the prior written permission of MSC.Software Corporation.
Copyright © 2004 MSC.Software Corporation. All rights reserved. Printed in the United States of America.
Trademarks
ADAMS, EASY5, MSC, MSC., MSC.ADAMS, MSC.EASY5, and all product names in the MSC.ADAMS Product
Line are trademarks or registered trademarks of MSC.Software Corporation and/or its subsidiaries.
NASTRAN is a registered trademark of the National Aeronautics Space Administration. MSC.Nastran is an enhanced
proprietary version developed and maintained by MSC.Software Corporation. All other trademarks are the property of
their respective owners.
Government Use
Use, duplication, or disclosure by the U.S. Government is subject to restrictions as set forth in FAR 12.212
(Commercial Computer Software) and DFARS 227.7202 (Commercial Computer Software and Commercial
Computer Software Documentation), as applicable. 3
�
� Introducing and Starting the Tutorials
Overview
This chapter starts you off on the process of adding controls to your
MSC.ADAMS model. Following this chapter are tutorials for each
of the controls applications you can use with ADAMS/Controls:
MSC.EASY5, Control System Import, and MATLAB. After you
finish this chapter, continue with the tutorial that is specific to the
controls application you are using.
This chapter contains the following sections:
■
About the Tutorial, 4
■ How You’ll Learn ADAMS/Controls, 4
■
■
■
Note:
Starting ADAMS/View, 4
Step One - Importing the MSC.ADAMS Model, 6
Step Two - Creating the MSC.ADAMS Plant Inputs and
Outputs, 10
Before doing these tutorials, you should be familiar with
the basic features of the ADAMS/View interface. Refer
to the online help for ADAMS/View for information
about the ADAMS/View interface.
This tutorial takes about two hours to complete.
�
4
Getting Started Using ADAMS/Controls
Introducing and Starting the Tutorials
About the Tutorial
The tutorials in this guide give you an overview of the four-step process of adding controls
to an MSC.ADAMS model. This chapter covers Steps One and Two of the process in
depth. You’ll learn how to:
■
Import an MSC.ADAMS model and run a trial simulation with ADAMS/View.
■ Use the ADAMS/Controls interface to identify the inputs and outputs from your
MSC.ADAMS model, and create the files for the plant model in MSC.EASY5
and MATLAB/Simulink.
Steps Three and Four are covered in the chapters that follow for each controls application.
How You’ll Learn ADAMS/Controls
By following the tutorials in this guide, you’ll apply the four-step process of using
ADAMS/Controls on a simple antenna-pointing problem. The objective of the problem is
to add a control system to the antenna that will move the antenna along a defined path to
track a satellite signal.
For this tutorial, you will supply the torque that pivots the antenna in the azimuthal
(horizontal) direction. The torque level will be computed by a control system, based on the
error between the actual antenna position and the desired antenna position. This is more
realistic than attaching an MSC.ADAMS motion to the pivot and driving the motion
directly. By applying a torque, you can look at issues related to motor size in an actual
mechanical system.
Starting ADAMS/View
In this section, you learn how to create a new directory and start ADAMS/Controls from
within ADAMS/View in the UNIX and Windows environments.
In the UNIX environment, you start ADAMS/View from the MSC.ADAMS Toolbar, and
then, from within ADAMS/View, you load the ADAMS/Controls plugin. For information
on the MSC.ADAMS Toolbar, see the online help for Running and Configuring
MSC.ADAMS.
�
Getting Started Using ADAMS/Controls
Introducing and Starting the Tutorials
5
In the Windows environment, you start ADAMS/View from the Start menu, and then load
the ADAMS/Controls plugin. For more information, see the online help for Running and
Configuring MSC.ADAMS.
To start ADAMS/View:
1
2
Copy all of the files in install_dir/controls/examples/antenna to a new directory.
Do either of the following depending on the platform on which you are running
ADAMS/View:
❖
❖
In UNIX, type the command to start the MSC.ADAMS Toolbar at the
command prompt, and then press Enter. Select the ADAMS/View tool
.
In Windows, from the Start menu, point to Programs, point to MSC.Software,
point to MSC.ADAMS 2005, point to AView, and then select ADAMS - View.
The Welcome dialog box appears, in the ADAMS/View main window.
�
6
Getting Started Using ADAMS/Controls
Introducing and Starting the Tutorials
Step One - Importing the MSC.ADAMS Model
Now you’ll import an MSC.ADAMS model and familiarize yourself with its construction
by following the next four sections:
■
■
■
Importing the MSC.ADAMS Model, 6
Loading ADAMS/Controls, 7
Familiarizing Yourself with the Model, 8
■ Running a Trial Simulation, 8
Importing the MSC.ADAMS Model
1
2
3
4
5
6
7
Select Import a File.
In the Start In text box on the ADAMS/View welcome screen, enter the name of
your new directory (the one created in Step 1 on page 5).
This sets your new directory as your working directory.
Select OK to close the ADAMS/View welcome screen.
In the File Import dialog box, right-click the File to Read text box, and then select
Browse.
The File Selection dialog box appears.
Select the file antenna.cmd.
Select OK.
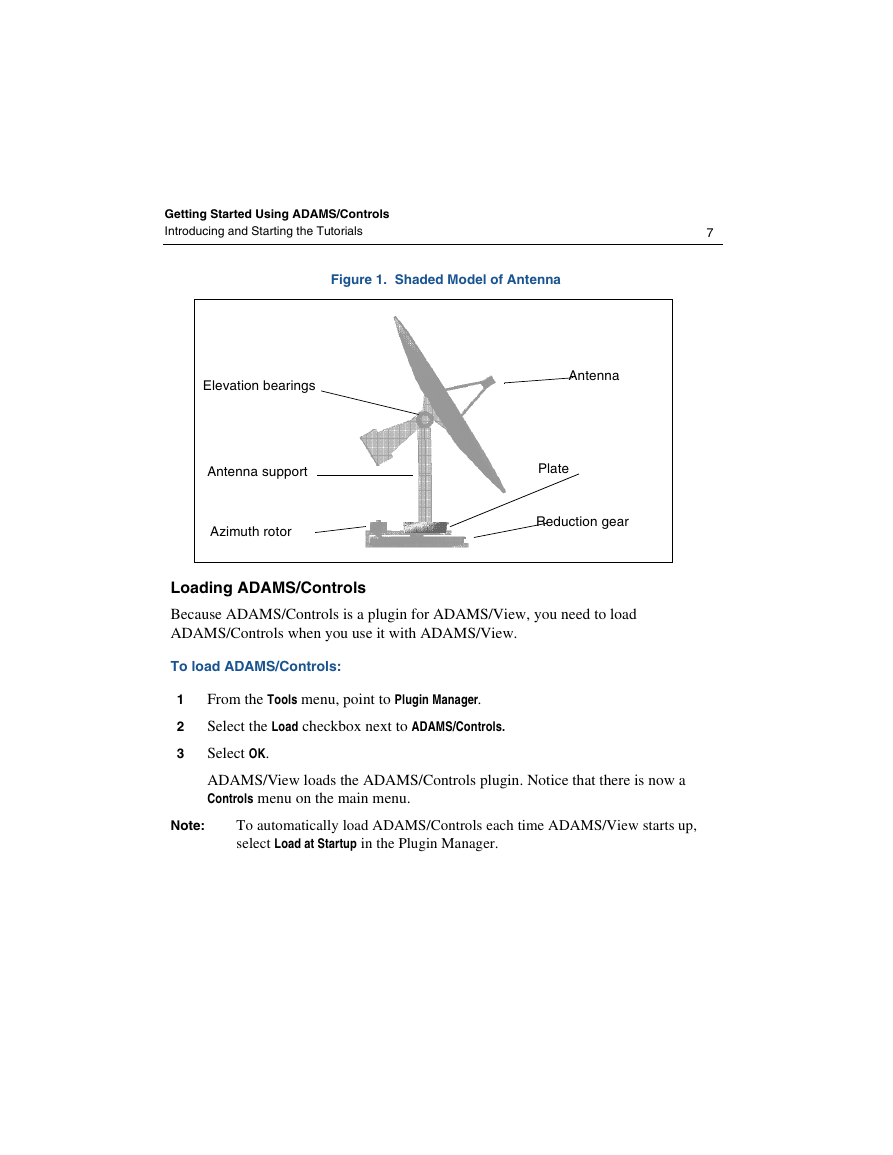
The antenna model main_olt appears as shown in Figure 1 on page 7.
To change the display of the antenna from a wire frame into a shaded, three-
dimensional image, from the Main Toolbox, select Render.
�
Getting Started Using ADAMS/Controls
Introducing and Starting the Tutorials
7
Figure 1. Shaded Model of Antenna
Elevation bearings
Antenna support
Azimuth rotor
Antenna
Plate
Reduction gear
Loading ADAMS/Controls
Because ADAMS/Controls is a plugin for ADAMS/View, you need to load
ADAMS/Controls when you use it with ADAMS/View.
To load ADAMS/Controls:
1
2
3
From the Tools menu, point to Plugin Manager.
Select the Load checkbox next to ADAMS/Controls.
Select OK.
ADAMS/View loads the ADAMS/Controls plugin. Notice that there is now a
Controls menu on the main menu.
Note:
To automatically load ADAMS/Controls each time ADAMS/View starts up,
select Load at Startup in the Plugin Manager.
�
8
Getting Started Using ADAMS/Controls
Introducing and Starting the Tutorials
Familiarizing Yourself with the Model
This model is designed so that its base turns in the azimuthal (horizontal) direction and its
antenna tilts in the vertical direction.
To familiarize yourself with the model, locate the following components:
■ Azimuth rotor (peach) connected to ground by revolute joint.
■ Azimuth reduction gear (sky blue) connected to ground by revolute joint.
■ Azimuth plate (magenta) connected to ground by revolute joint.
■ Antenna support (silver) connected to plate by fixed joint.
■ Elevation bearings (peach) connected to support by fixed joint.
■ Antenna (sky blue) connected to bearings by revolute joint.
■
■
rotor_gear, couples the revolute joint at the rotor to the revolute joint at the
reduction gear.
gear_plate, couples the revolute joint at the reduction gear to the revolute joint
at the plate.
Running a Trial Simulation
To run a trial simulation with ADAMS/View:
1
2
3
4
From the Simulate menu, select Interactive Controls.
Enter the following in the Simulation Controls dialog box:
■ End Time: 0.5
■ Steps: 250
Select Start at equilibrium.
Select the Start tool
.
The base of the mechanism turns counterclockwise as the antenna tilts up and
down.
�




 2023年江西萍乡中考道德与法治真题及答案.doc
 2012年重庆南川中考生物真题及答案.doc
 2013年江西师范大学地理学综合及文艺理论基础考研真题.doc
 2020年四川甘孜小升初语文真题及答案I卷.doc
 2020年注册岩土工程师专业基础考试真题及答案.doc
 2023-2024学年福建省厦门市九年级上学期数学月考试题及答案.doc
 2021-2022学年辽宁省沈阳市大东区九年级上学期语文期末试题及答案.doc
 2022-2023学年北京东城区初三第一学期物理期末试卷及答案.doc
 2018上半年江西教师资格初中地理学科知识与教学能力真题及答案.doc
 2012年河北国家公务员申论考试真题及答案-省级.doc
 2020-2021学年江苏省扬州市江都区邵樊片九年级上学期数学第一次质量检测试题及答案.doc
 2022下半年黑龙江教师资格证中学综合素质真题及答案.doc