�
�
�
�
1
2
2
m
m
+
-
2
165mm+-2
Getting Ready
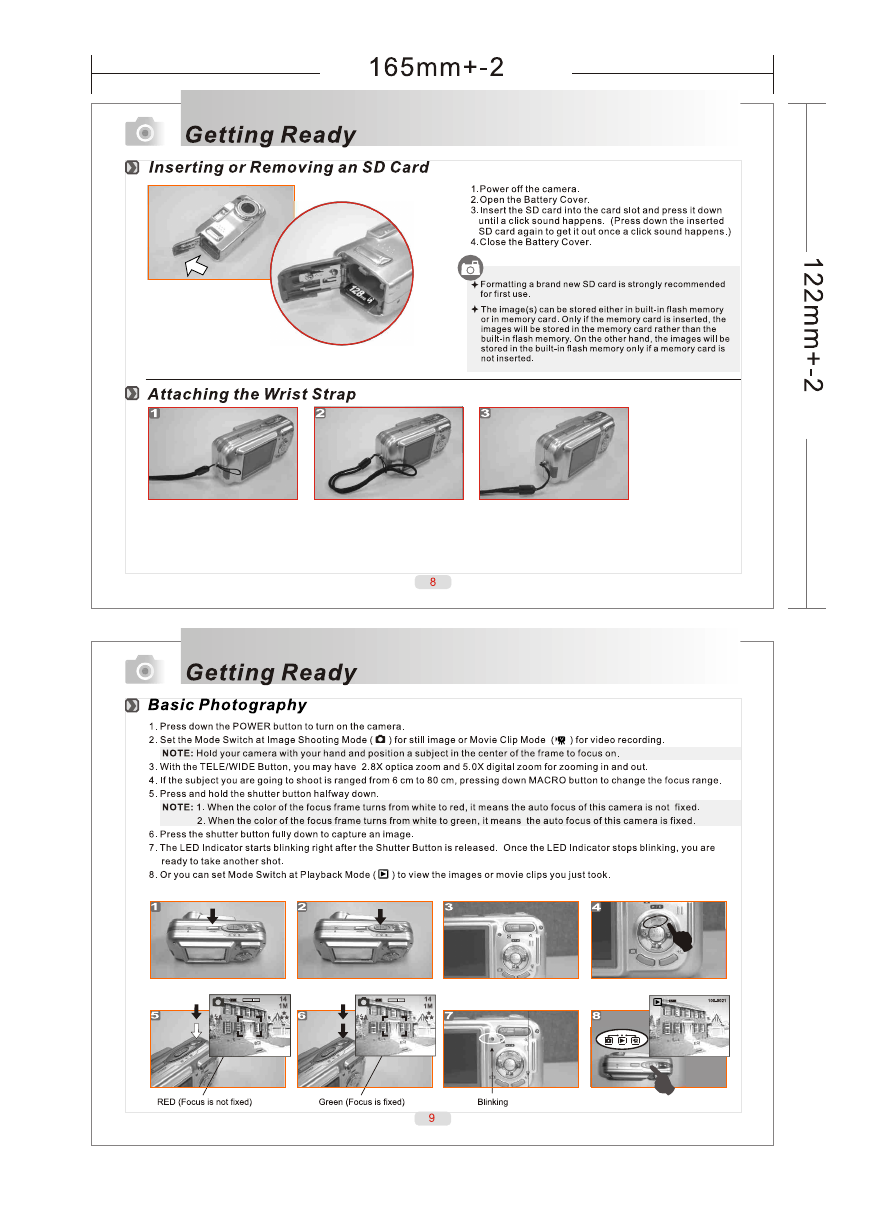
A message of "Low Light!" appearing on the TFT LCD Monitor as a warning to remind you to go to the Flash Mode and select Auto Flash or
Fill-in flash to get more light sources so as to compose a superior quality image.
In such cases shown as follows, please release the shutter button, then try to re-compose the shot and focus again because the Auto Focus
function may be difficult to use with.
The subject is far away from the photographer or in the dark.
The subject is viewed through a piece of glass or window.
A fast-moving or a flashing subject is passing through.
The subject has a reflection attribute like a mirror, a luminous body, or a lustrous subject.
Optical Zoom
Digital Zoom
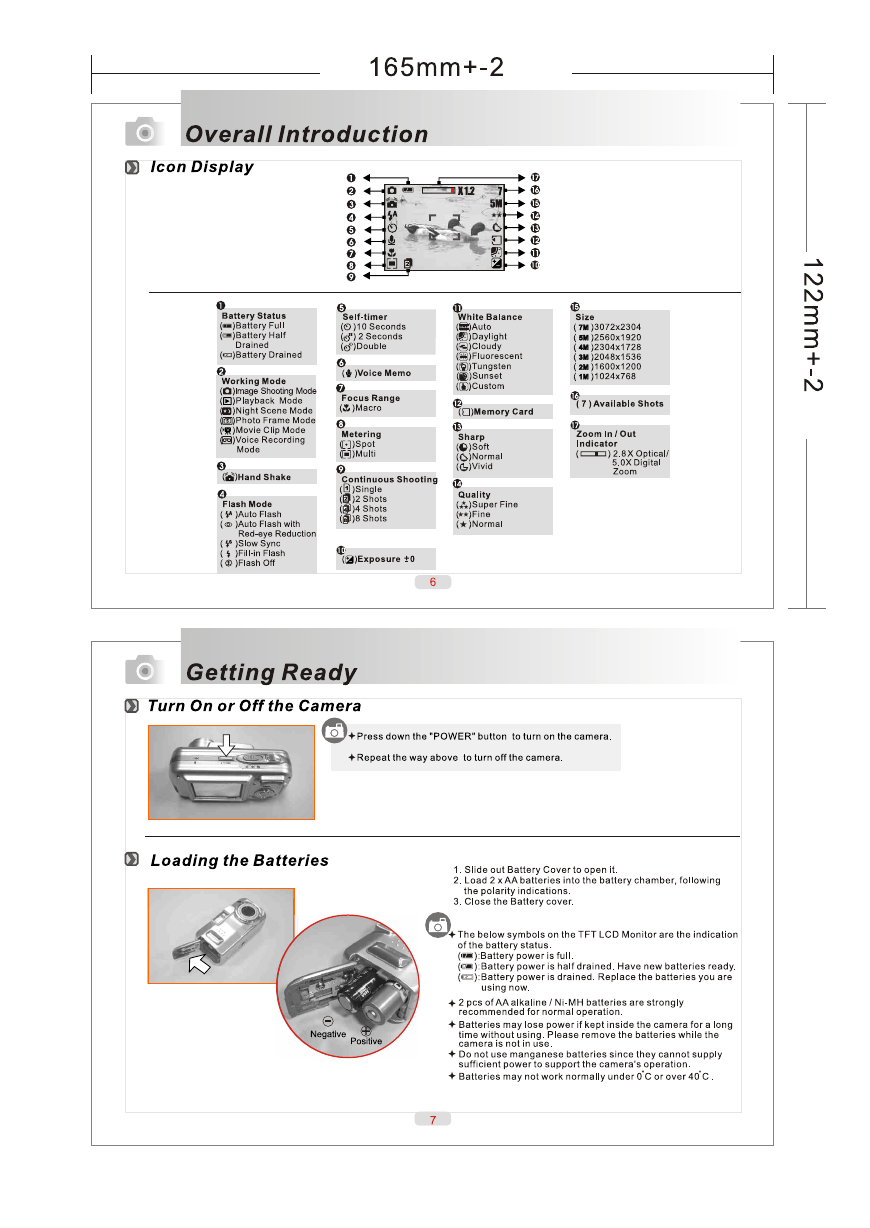
X 1.2
Do not touch the zoom lens when it is in use.
When the optical zoom exceeds 2.8X, enlargement is carried out using digital
processing image and the image can be enlarged up to 5X using the
digital zoom feature. (Unlike the image quality carried out by optical zoom, it would
deteriorate in digital zoom.)
Regarding any advanced functionality settings, please refer to the next section --
Advanced functionality Settings. Note that press the MENU Button to enter the advanced
settings and please press down the MENU Button again anytime if you would like to exit
the setting.
Types of focus modes and focus ranges ( W: Wide,T: Tele )
Focus type
Auto
Macro ( )
Focus range
80cm~Infinity
W: 6 ~ 80 cm
T: 20 ~ 80 cm
X 1.2
14
1M
10
Advanced Functionality Settings
Under Image Shooting Mode ( )
TELE / WIDE Button (Continuous Optical Zoom 2.8X and Digital Zoom 5.0X )
W
T
The zoom Indicator, appearing on the top of the TFT LCD monitor, shows the
current digital and optical zoom position.
When the optical zoom exceeds 2.8X, enlargement is carried out by using digital
processing, and the image can be enlarged up to 5.0X by using the digital zoom
feature.
The image quality in optical zoom will be more superior than that in digital zoom.
TFT LCD Monitor Button
By pressing the LCD button in order, you may have the TFT LCD
Display full icons.
Display simple icons.
Turn off.
11
�
165mm+-2
Advanced Functionality Settings
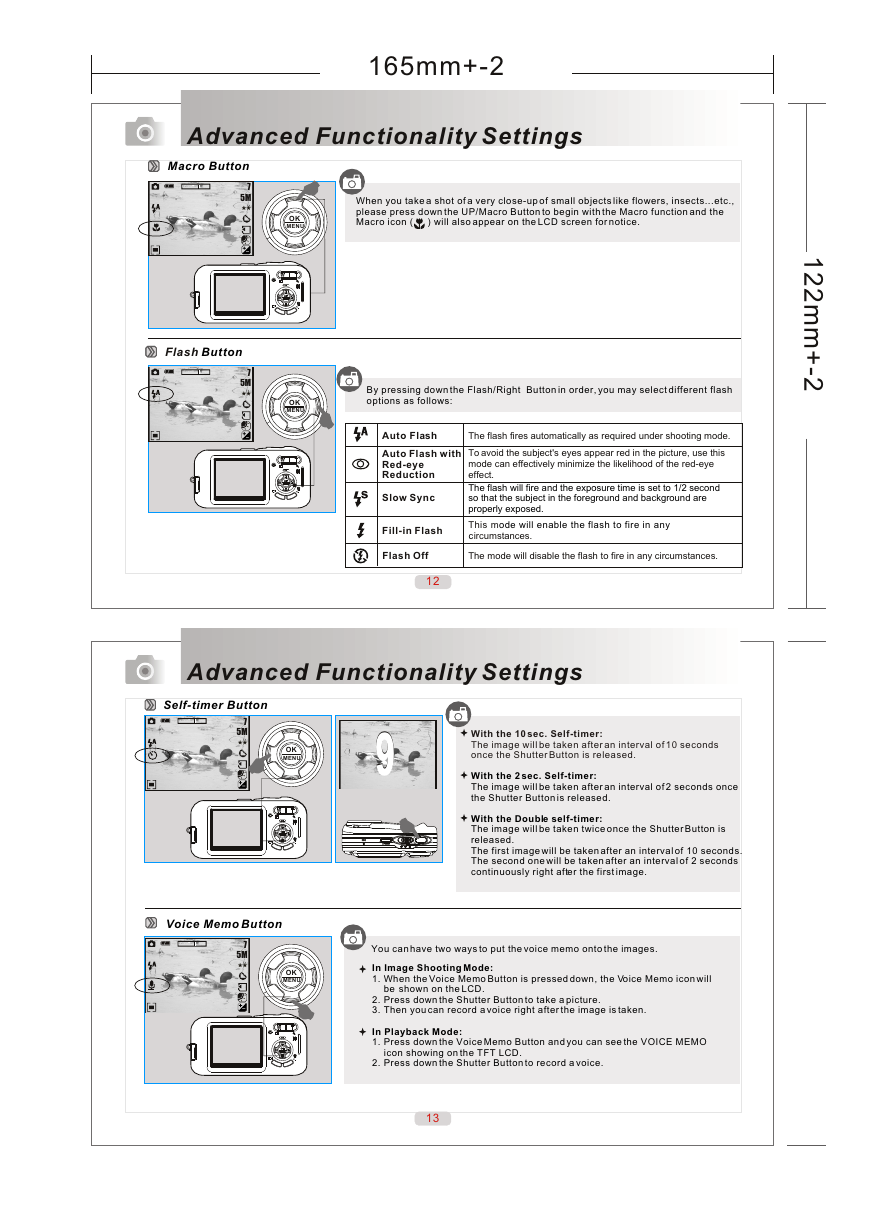
Macro Button
7
5M
OK
MENU
When you take a shot of a very close-up of small objects like flowers, insects...etc.,
please press down the UP/Macro Button to begin with the Macro function and the
Macro icon ( ) will also appear on the LCD screen for notice.
Flash Button
7
5M
OK
MENU
By pressing down the Flash/Right Button in order, you may select different flash
options as follows:
1
2
2
m
m
+
-
2
The flash fires automatically as required under shooting mode.
To avoid the subject's eyes appear red in the picture, use this
mode can effectively minimize the likelihood of the red-eye
effect.
The flash will fire and the exposure time is set to 1/2 second
so that the subject in the foreground and background are
properly exposed.
This m
ircumstances.
c
ode will enable the flash to fire in any
The mode will disable the flash to fire in any circumstances.
Auto Flash
Auto Flash with
Red-eye
Reduction
Slow Sync
Fill-in Flash
Flash Off
12
99
Advanced Functionality Settings
Self-timer Button
7
5M
OK
MENU
Voice Memo Button
7
5M
OK
MENU
With the 10 sec. Self-timer:
The image will be taken after an interval of 10 seconds
once the Shutter Button is released.
With the 2 sec. Self-timer:
The image will be taken after an interval of 2 seconds once
the Shutter Button is released.
With the Double self-timer:
The image will be taken twice once the Shutter Button is
released.
The first image will be taken after an interval of 10 seconds.
The second one will be taken after an interval of 2 seconds
continuously right after the first image.
You can have two ways to put the voice memo onto the images.
In Image Shooting Mode:
1. When the Voice Memo Button is pressed down, the Voice Memo icon will
be shown on the LCD.
2. Press down the Shutter Button to take a picture.
3. Then you can record a voice right after the image is taken.
In Playback Mode:
1. Press down the Voice Memo Button and you can see the VOICE MEMO
icon showing on the TFT LCD.
2. Press down the Shutter Button to record a voice.
13
�
165mm+-2
Advanced Functionality Settings
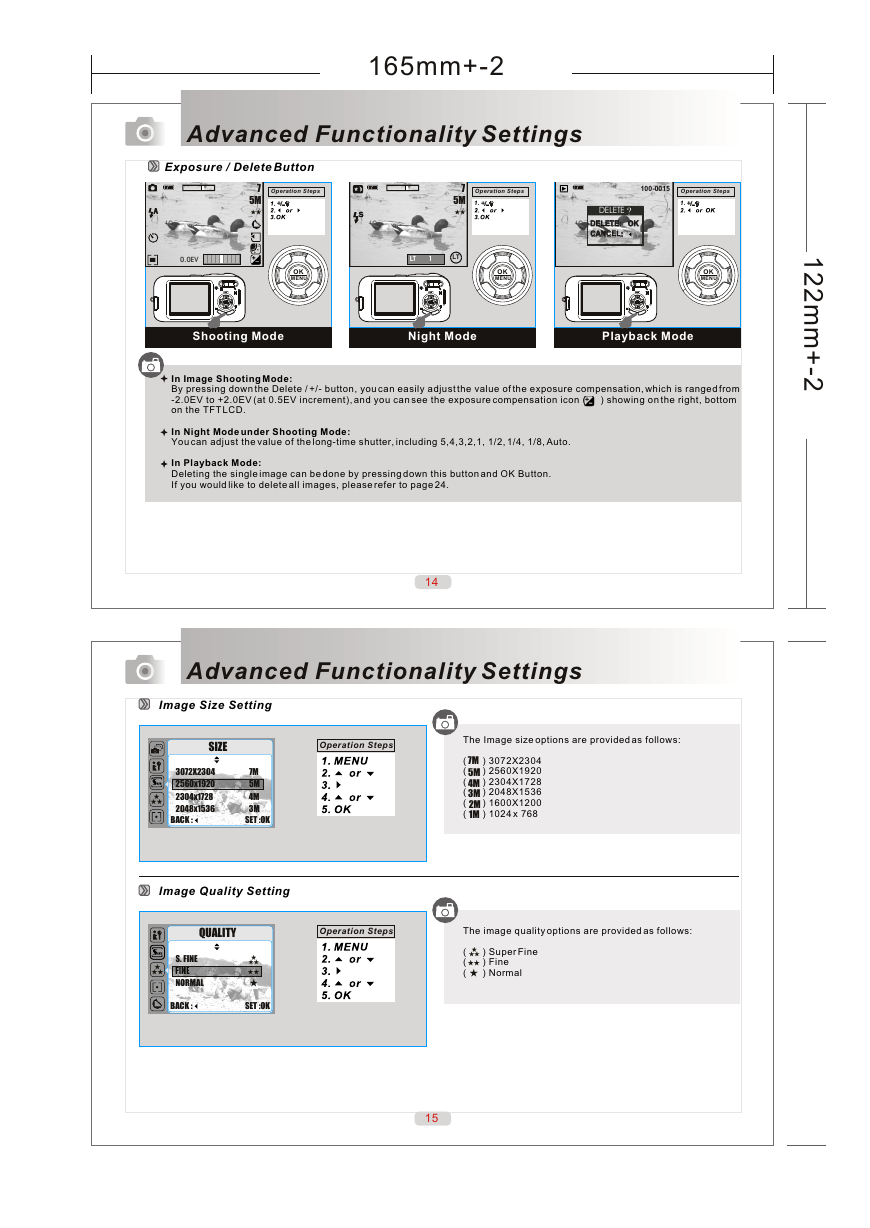
Exposure / Delete Button
7
5M
Operation Steps
7
5M
Operation Steps
1.
0.0EV
OK
MENU
LT 1
LT
OK
MENU
100-0015
Operation Steps
1.
DELETE
DELETE: OK
DELETE: OK
CANCEL:
CANCEL:
OK
MENU
Shooting Mode
Night Mode
Playback Mode
In Image Shooting Mode:
By pressing down the Delete / +/- button, you can easily adjust the value of the exposure compensation, which is ranged from
-2.0EV to +2.0EV (at 0.5EV increment), and you can see the exposure compensation icon ( ) showing on the right, bottom
on the TFT LCD.
In Night Mode under Shooting Mode:
You can adjust the value of the long-time shutter, including 5,4,3,2,1, 1/2, 1/4, 1/8, Auto.
In Playback Mode:
Deleting the single image can be done by pressing down this button and OK Button.
If you would like to delete all images, please refer to page 24.
1
2
2
m
m
+
-
2
14
Advanced Functionality Settings
Image Size Setting
SIZE
Operation Steps
3072X2304 7M
2560x1920 5M
2304x1728 4M
2048x1536 3M
BACK : SET :OK
Image Quality Setting
QUALITY
S. FINE
FINE
NORMAL
BACK : SET :OK
The Image size options are provided as follows:
7M
( ) 3072X2304
5M
( ) 2560X1920
4M
( ) 2304X1728
3M
( ) 2048X1536
2M
( ) 1600X1200
1M
( ) 1024 x 768
Operation Steps
The image quality options are provided as follows:
( ) Super Fine
( ) Fine
( ) Normal
15
�




 2023年江西萍乡中考道德与法治真题及答案.doc
 2012年重庆南川中考生物真题及答案.doc
 2013年江西师范大学地理学综合及文艺理论基础考研真题.doc
 2020年四川甘孜小升初语文真题及答案I卷.doc
 2020年注册岩土工程师专业基础考试真题及答案.doc
 2023-2024学年福建省厦门市九年级上学期数学月考试题及答案.doc
 2021-2022学年辽宁省沈阳市大东区九年级上学期语文期末试题及答案.doc
 2022-2023学年北京东城区初三第一学期物理期末试卷及答案.doc
 2018上半年江西教师资格初中地理学科知识与教学能力真题及答案.doc
 2012年河北国家公务员申论考试真题及答案-省级.doc
 2020-2021学年江苏省扬州市江都区邵樊片九年级上学期数学第一次质量检测试题及答案.doc
 2022下半年黑龙江教师资格证中学综合素质真题及答案.doc