DAVE™ v4.4.2 Installation Instructions
The following are the prerequisite for the installation of the DAVETM version 4
PC with Windows Vista, Windows 7, Windows 8.1, Windows 10
– 32bit
or
PC with Windows Vista, Windows 7, Windows 8.1, Windows 10
– 64bit
4 GB (recommended)
Computer
RAM
Notes
With DAVE v4.4.2 the installation concept has been changed. DAVE v4.4.2 will be provided as zip file
that can simply be unzipped to a folder on a local drive.
This download package contains:
The DAVE zip file:
DAVE-IDE-4.4.2-32Bit.zip (if the 32-bit version has been downloaded) or
DAVE-IDE-4.4.2-64Bit.zip (if the 64-bit version has been downloaded)
The SEGGER J-Link driver for ARM v6.30e including a USB driver for J-Link OB with CDC:
JLink_Windows_V630e.exe
The DAVE license text: DAVE_LicenseText.pdf
Release Note
DAVE-Quick_Start_1.pdf (refers to an older DAVE version but can be used as is for DAVE
v4.4.2)
This document
It is not possible to update a previously installed older DAVE v4.x to this new version DAVE v4.4.2.
DAVE v4.4.2 has to be installed as a new instance.
If the older version of DAVE should still be used two separate local library stores should also be
installed, one for each installed DAVE version. Per default, this is implicitly the case for DAVE v4.4.2
as the local library store is now located in the DAVE v4.4.2 installation path.
DAVE v4.4.2 is full backward compatible to earlier DAVE v4.1.x / v4.2.x / v4.3.x version. This means
projects created with these older DAVE versions can be imported in this new DAVE version. As
Eclipse has been upgraded older workspaces cannot be used, existing projects from older
workspaces must be imported into a new workspace created with DAVE v4.4.2.
Sections in this Document
1. Procedure to install DAVE™ version 4.4.2
2. Update of DAVE™ Libraries and update of DAVE™
3. Procedure to install DAVE™ APPs, Device Descriptions and Device Pack
4. Procedure to import example projects
5. Hints in case of network errors
6. Update from DAVE previous versions / Further Information
Further information can be found in the user manuals located in the help content of DAVE, or in the
release notes.
Copyright © Infineon Technologies AG 2018. All rights reserved
1/7
2018-02-23
�
DAVE™ v4.4.2 Installation Instructions
1. Procedure to Install DAVETM version 4.4.2:
1.1 Unzip “DAVE-IDE-4.4.2-32Bit.zip” or “DAVE-IDE-4.4.2-64Bit.zip” to a folder on a local drive.
The zip file includes DAVE including the GNU compiler and including the local library store (DAVE
APPs libraries, Device Descriptions of XMC4000 and XMC1000 microcontrollers, XMC peripheral
drivers (XMC Lib), TLE drivers and Device support package (CMSIS files).
DAVE includes also the java runtime (JRE) hence installation of Java is not required.
Important note: Please avoid using regional language characters (like "ö") in the installation path and
workspace path. DAVE will give build errors in such scenarios, please use only English characters in
the path.
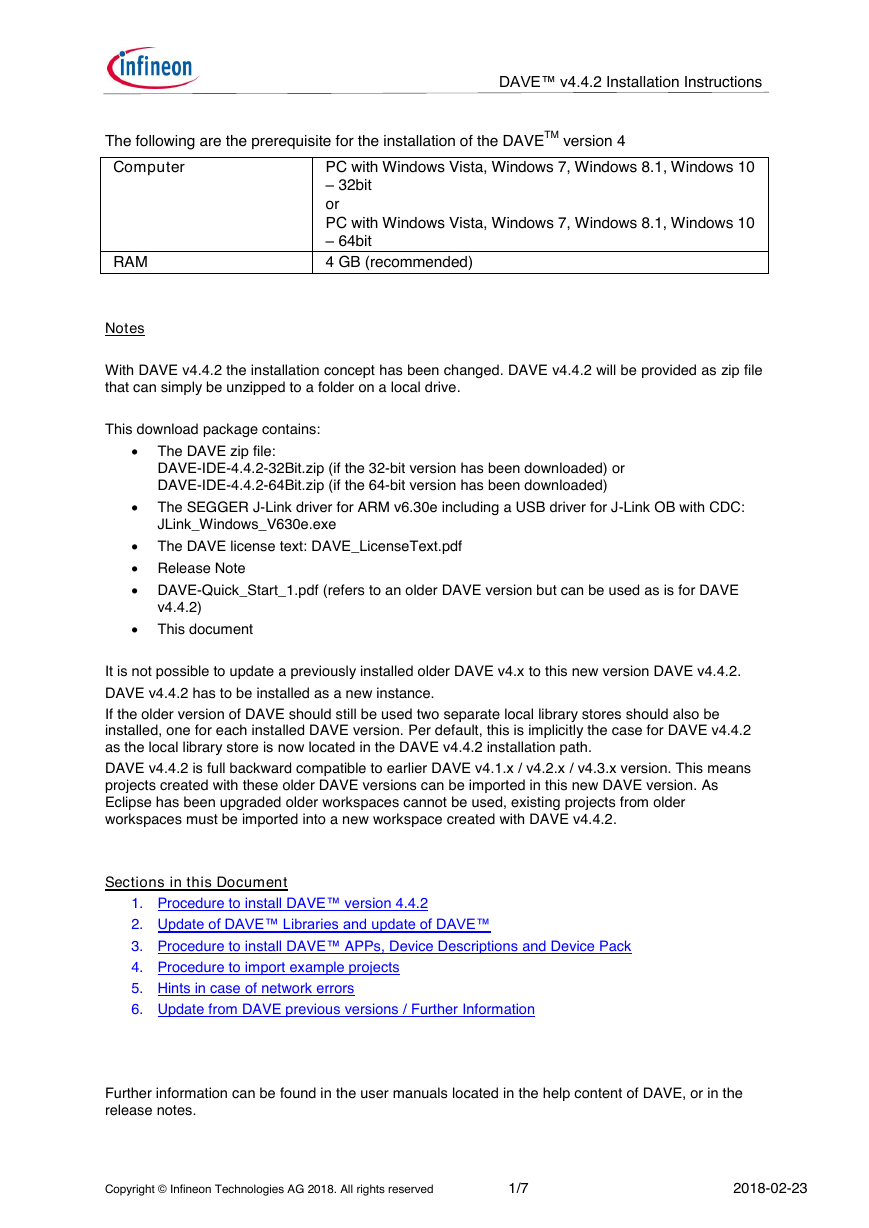
1.2 SEGGER J-Link
If SEGGER J-Link is not installed yet, it can be installed by running the J-Link installer included in the
download package: JLink_Windows_V630e.exe.
Please check the installation options as shown below.
You may also download and install a newer version of the J-Link driver from www.segger.com
We do not recommend using older J-Link versions.
1.3 Create a shortcut to DAVE.exe
DAVE can now be started by running DAVE.exe located in the eclipse folder on your local drive where
the DAVE zip file has been unzipped (described in 1.1).
For conveniently starting of DAVE from the Desktop a shortcut to DAVE.exe can be created (right
mouse click) then this short cut can be moved to the desktop.
Now you are ready to go. If DAVE v4 is new to you, you my check the quick start document included
in the download package.
A second independent installation of DAVE can be created by just copying the target folder from 1.1
that contains DAVE to a new location.
2. Update of DAVE™ Libraries and update of DAVE™
To ensure that really the latest updates are installed we recommend to check for updates and if
updates available to update them (patch releases may have been published in the meantime that are
not included in the downloaded zip file).
Copyright © Infineon Technologies AG 2018. All rights reserved
2/7
2018-02-23
�
DAVE™ v4.4.2 Installation Instructions
2.1 Start DAVE-4.4.2 as described in 1.3
2.2 Select a workspace folder.
Please create a new workspace the first time you start DAVE v4.4.2
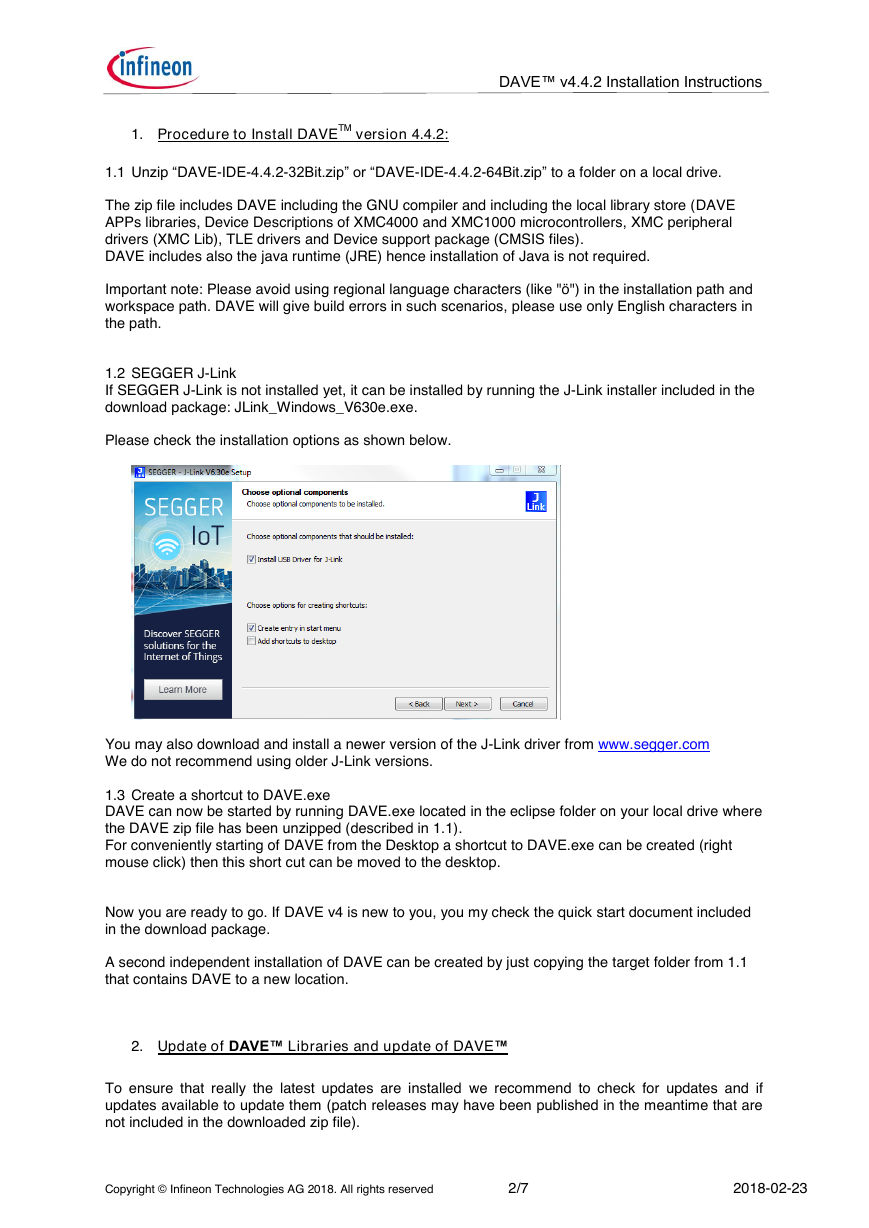
2.3 Check for DAVE APP updates as described below.
Click Menu Option “Help -> Check for DAVE APP Updates”
If an update is available, chose all shown options.
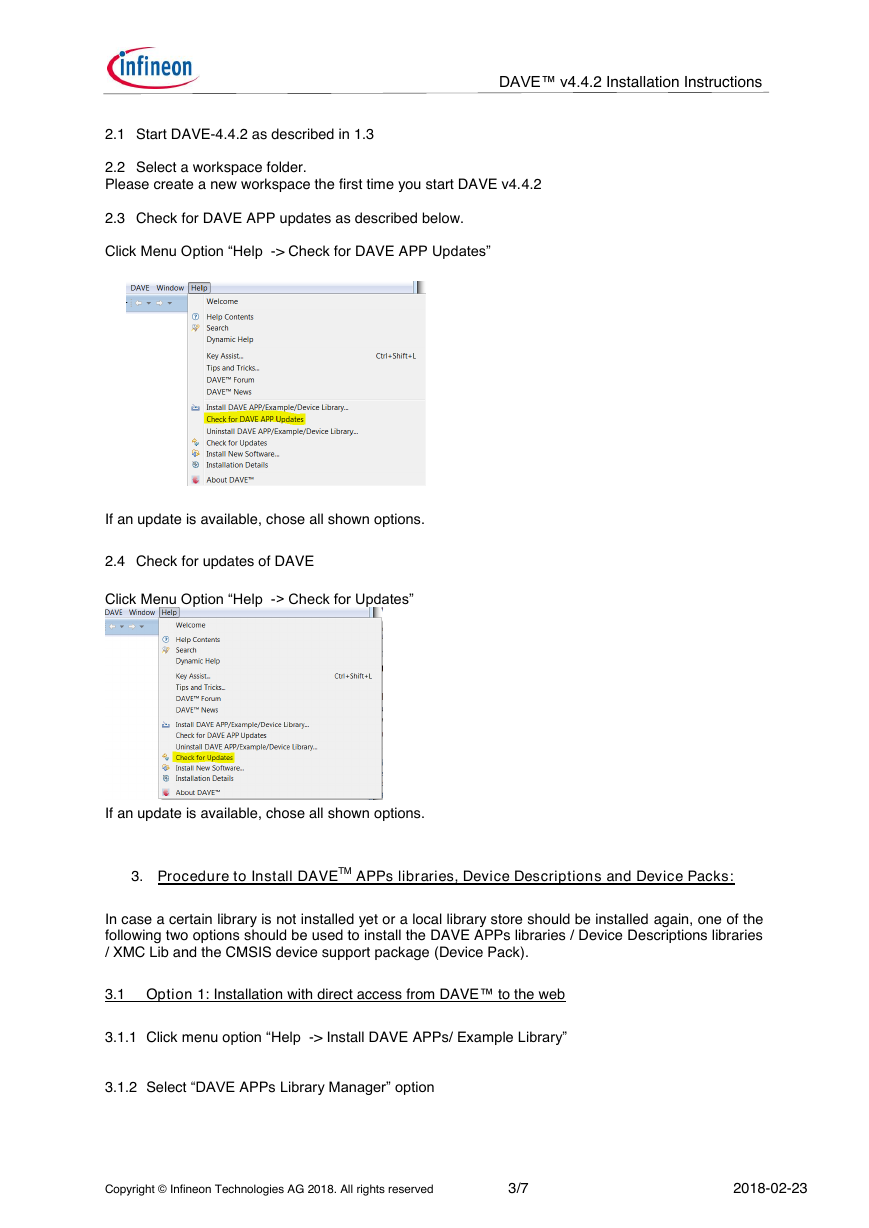
2.4 Check for updates of DAVE
Click Menu Option “Help -> Check for Updates”
If an update is available, chose all shown options.
3. Procedure to Install DAVETM APPs libraries, Device Descriptions and Device Packs:
In case a certain library is not installed yet or a local library store should be installed again, one of the
following two options should be used to install the DAVE APPs libraries / Device Descriptions libraries
/ XMC Lib and the CMSIS device support package (Device Pack).
3.1 Option 1: Installation with direct access from DAVE™ to the web
3.1.1 Click menu option “Help -> Install DAVE APPs/ Example Library”
3.1.2 Select “DAVE APPs Library Manager” option
Copyright © Infineon Technologies AG 2018. All rights reserved
3/7
2018-02-23
�
DAVE™ v4.4.2 Installation Instructions
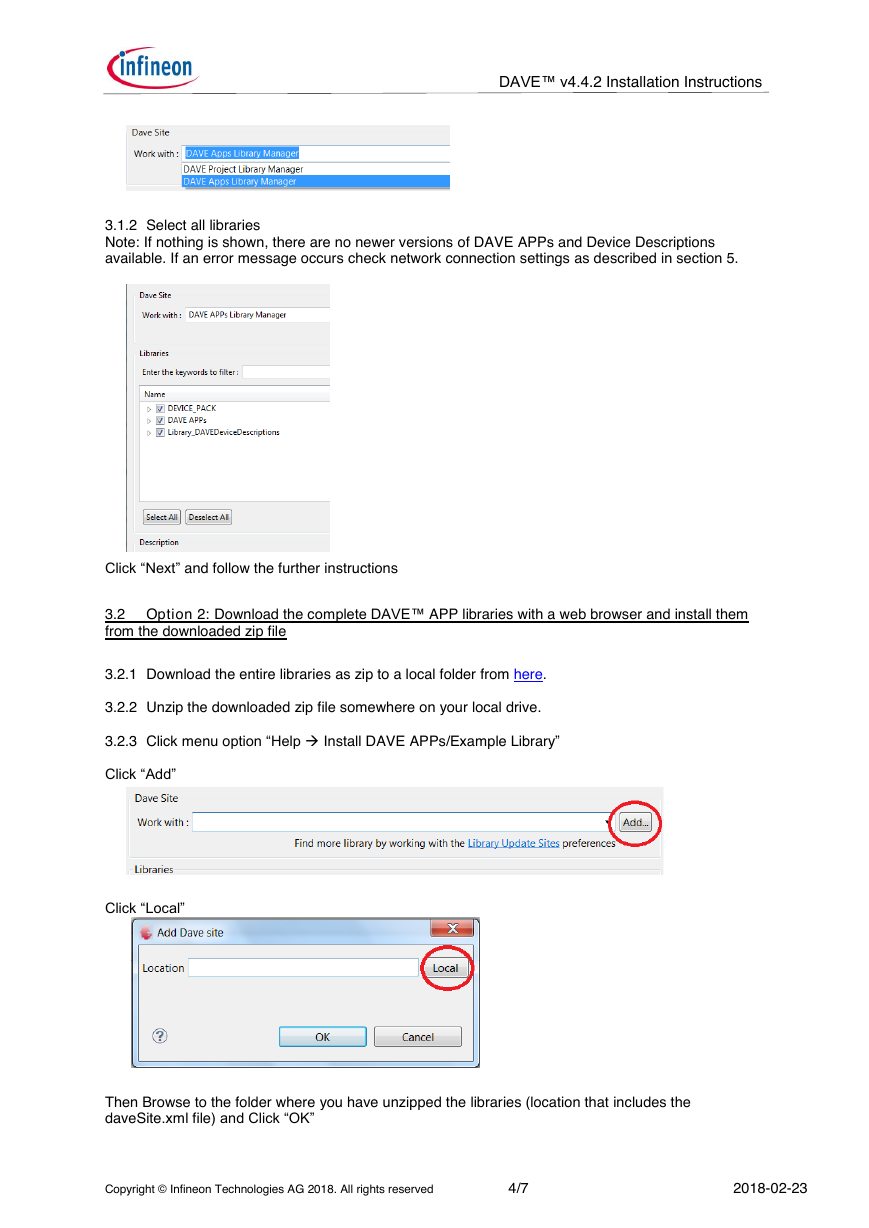
3.1.2 Select all libraries
Note: If nothing is shown, there are no newer versions of DAVE APPs and Device Descriptions
available. If an error message occurs check network connection settings as described in section 5.
Click “Next” and follow the further instructions
3.2 Option 2: Download the complete DAVE™ APP libraries with a web browser and install them
from the downloaded zip file
3.2.1 Download the entire libraries as zip to a local folder from here.
3.2.2 Unzip the downloaded zip file somewhere on your local drive.
3.2.3 Click menu option “Help Install DAVE APPs/Example Library”
Click “Add”
Click “Local”
Then Browse to the folder where you have unzipped the libraries (location that includes the
daveSite.xml file) and Click “OK”
Copyright © Infineon Technologies AG 2018. All rights reserved
4/7
2018-02-23
�
DAVE™ v4.4.2 Installation Instructions
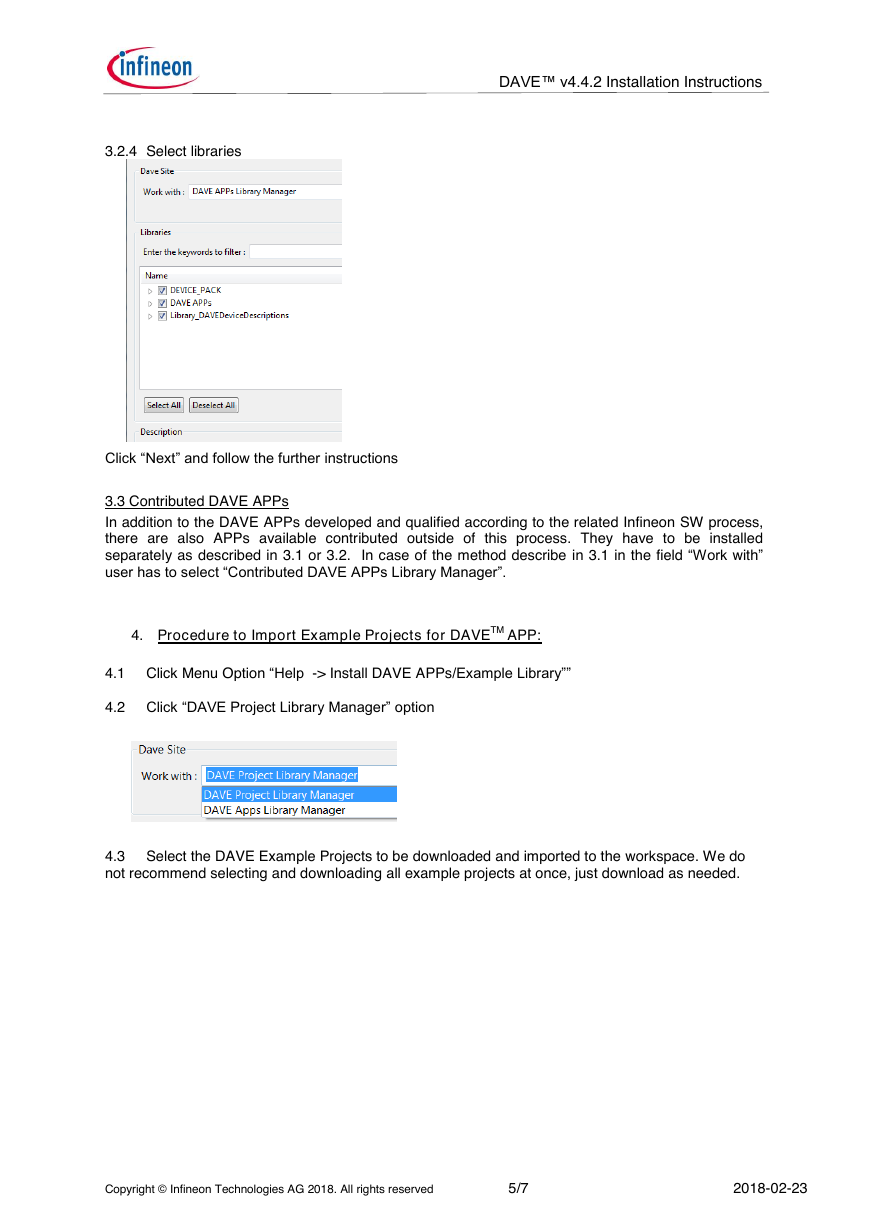
3.2.4 Select libraries
Click “Next” and follow the further instructions
3.3 Contributed DAVE APPs
In addition to the DAVE APPs developed and qualified according to the related Infineon SW process,
there are also APPs available contributed outside of this process. They have to be installed
separately as described in 3.1 or 3.2. In case of the method describe in 3.1 in the field “Work with”
user has to select “Contributed DAVE APPs Library Manager”.
4. Procedure to Import Example Projects for DAVETM APP:
4.1 Click Menu Option “Help -> Install DAVE APPs/Example Library””
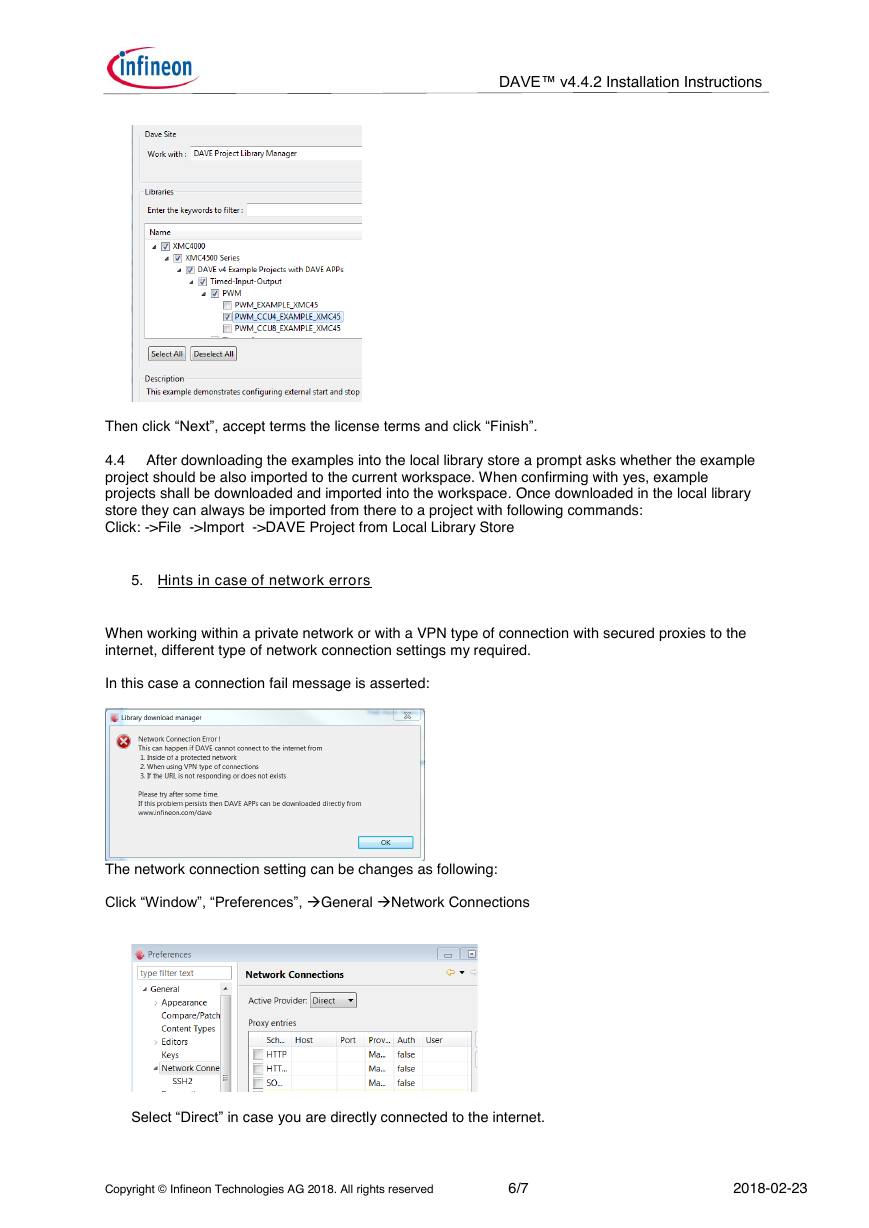
4.2 Click “DAVE Project Library Manager” option
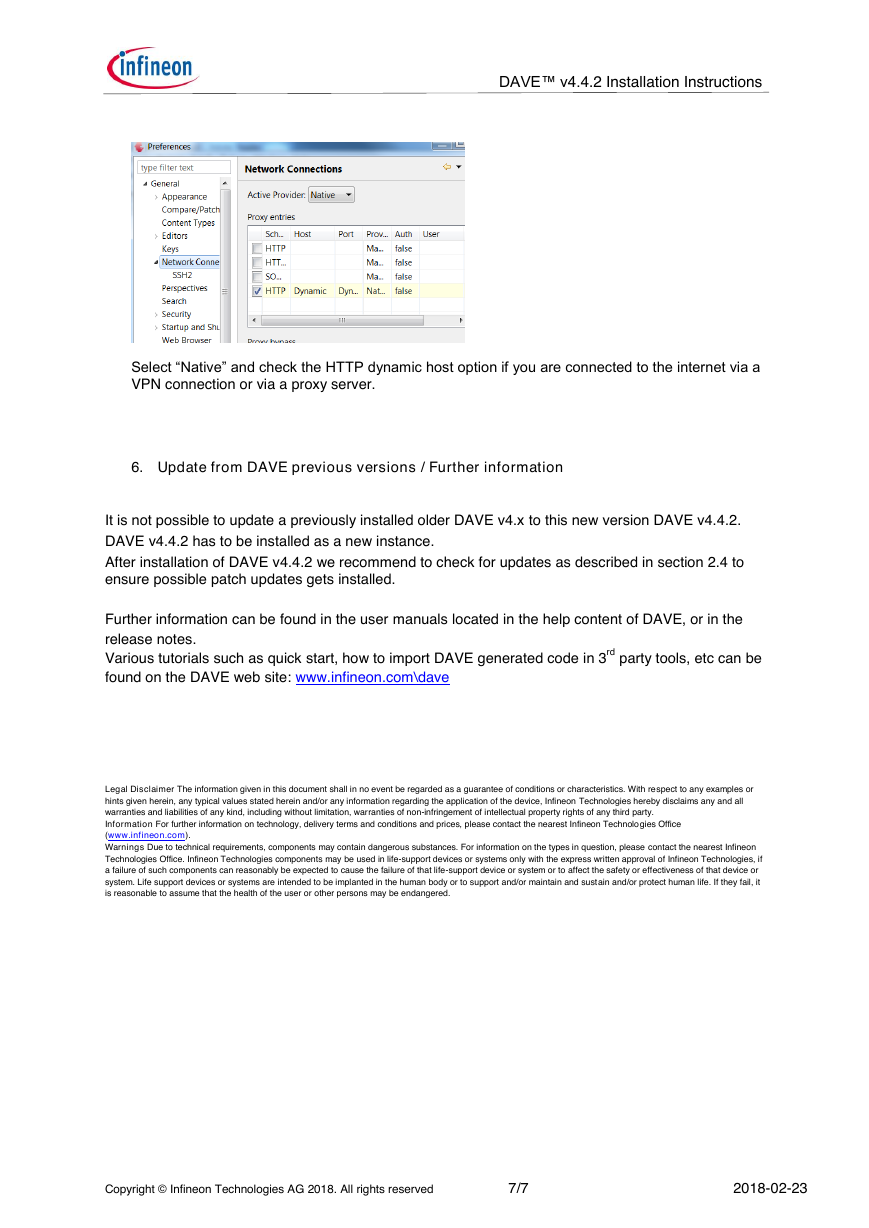
4.3 Select the DAVE Example Projects to be downloaded and imported to the workspace. We do
not recommend selecting and downloading all example projects at once, just download as needed.
Copyright © Infineon Technologies AG 2018. All rights reserved
5/7
2018-02-23
�
DAVE™ v4.4.2 Installation Instructions
Then click “Next”, accept terms the license terms and click “Finish”.
4.4 After downloading the examples into the local library store a prompt asks whether the example
project should be also imported to the current workspace. When confirming with yes, example
projects shall be downloaded and imported into the workspace. Once downloaded in the local library
store they can always be imported from there to a project with following commands:
Click: ->File ->Import ->DAVE Project from Local Library Store
5. Hints in case of network errors
When working within a private network or with a VPN type of connection with secured proxies to the
internet, different type of network connection settings my required.
In this case a connection fail message is asserted:
The network connection setting can be changes as following:
Click “Window”, “Preferences”, General Network Connections
Select “Direct” in case you are directly connected to the internet.
Copyright © Infineon Technologies AG 2018. All rights reserved
6/7
2018-02-23
�
DAVE™ v4.4.2 Installation Instructions
Select “Native” and check the HTTP dynamic host option if you are connected to the internet via a
VPN connection or via a proxy server.
6. Update from DAVE previous versions / Further information
It is not possible to update a previously installed older DAVE v4.x to this new version DAVE v4.4.2.
DAVE v4.4.2 has to be installed as a new instance.
After installation of DAVE v4.4.2 we recommend to check for updates as described in section 2.4 to
ensure possible patch updates gets installed.
Further information can be found in the user manuals located in the help content of DAVE, or in the
release notes.
Various tutorials such as quick start, how to import DAVE generated code in 3rd party tools, etc can be
found on the DAVE web site: www.infineon.com\dave
Legal Disclaimer The information given in this document shall in no event be regarded as a guarantee of conditions or characteristics. With respect to any examples or
hints given herein, any typical values stated herein and/or any information regarding the application of the device, Infineon Technologies hereby disclaims any and all
warranties and liabilities of any kind, including without limitation, warranties of non-infringement of intellectual property rights of any third party.
Information For further information on technology, delivery terms and conditions and prices, please contact the nearest Infineon Technologies Office
(www.infineon.com).
Warnings Due to technical requirements, components may contain dangerous substances. For information on the types in question, please contact the nearest Infineon
Technologies Office. Infineon Technologies components may be used in life-support devices or systems only with the express written approval of Infineon Technologies, if
a failure of such components can reasonably be expected to cause the failure of that life-support device or system or to affect the safety or effectiveness of that device or
system. Life support devices or systems are intended to be implanted in the human body or to support and/or maintain and sustain and/or protect human life. If they fail, it
is reasonable to assume that the health of the user or other persons may be endangered.
Copyright © Infineon Technologies AG 2018. All rights reserved
7/7
2018-02-23
�


 2023年江西萍乡中考道德与法治真题及答案.doc
 2012年重庆南川中考生物真题及答案.doc
 2013年江西师范大学地理学综合及文艺理论基础考研真题.doc
 2020年四川甘孜小升初语文真题及答案I卷.doc
 2020年注册岩土工程师专业基础考试真题及答案.doc
 2023-2024学年福建省厦门市九年级上学期数学月考试题及答案.doc
 2021-2022学年辽宁省沈阳市大东区九年级上学期语文期末试题及答案.doc
 2022-2023学年北京东城区初三第一学期物理期末试卷及答案.doc
 2018上半年江西教师资格初中地理学科知识与教学能力真题及答案.doc
 2012年河北国家公务员申论考试真题及答案-省级.doc
 2020-2021学年江苏省扬州市江都区邵樊片九年级上学期数学第一次质量检测试题及答案.doc
 2022下半年黑龙江教师资格证中学综合素质真题及答案.doc