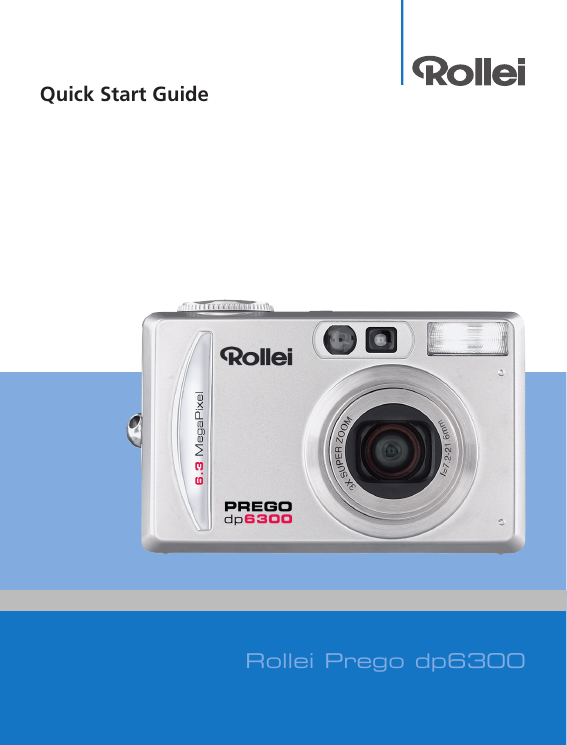
Quick Start Guide
Rollei Prego dp6300
1
�
Prior to operating the camera
This Quick start guide will help you to start
operating this camera. For detailed informa-
tion, please have a look into the manual
supplied.
To make the best out of this camera, we
strongly suggest that you read through the
manual prior to operating this camera.
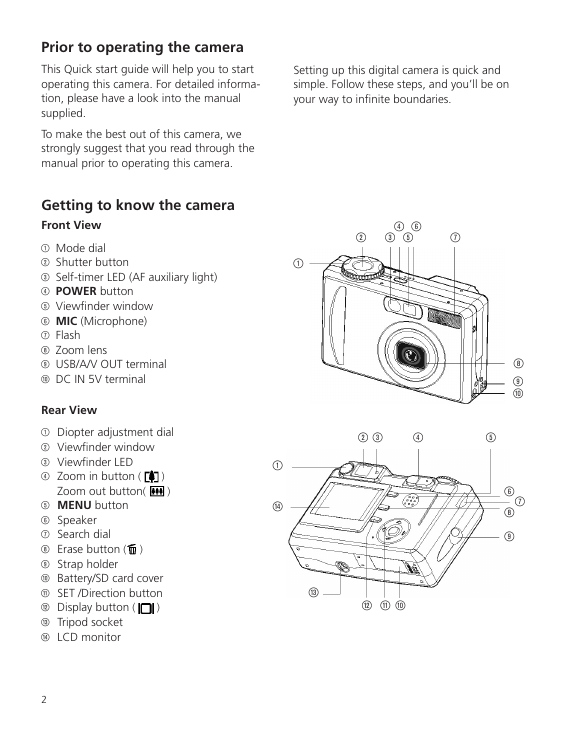
Getting to know the camera
Front View
1 Mode dial
2 Shutter button
3 Self-timer LED (AF auxiliary light)
4 POWER button
5 Viewfinder window
6 MIC (Microphone)
7 Flash
8 Zoom lens
9 USB/A/V OUT terminal
0 DC IN 5V terminal
Rear View
)
)
1 Diopter adjustment dial
2 Viewfinder window
3 Viewfinder LED
4 Zoom in button (
Zoom out button(
5 MENU button
6 Speaker
7 Search dial
8 Erase button (
9 Strap holder
0 Battery/SD card cover
q SET /Direction button
w Display button (
)
e Tripod socket
r LCD monitor
)
2
Setting up this digital camera is quick and
simple. Follow these steps, and you’ll be on
your way to infinite boundaries.
4
6
2 3
5
7
1
8
9
0
7
6
8
9
2 3
4
5
1
r
e
qw
0
�
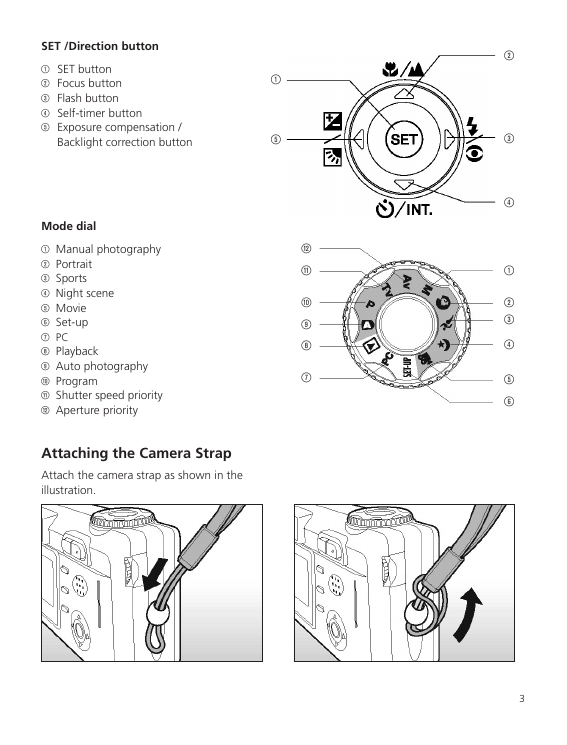
SET /Direction button
1 SET button
2 Focus button
3 Flash button
4 Self-timer button
5 Exposure compensation /
Backlight correction button
1
5
Mode dial
1 Manual photography
2 Portrait
3 Sports
4 Night scene
5 Movie
6 Set-up
7 PC
8 Playback
9 Auto photography
0 Program
q Shutter speed priority
w Aperture priority
Attaching the Camera Strap
Attach the camera strap as shown in the
illustration.
w
q
0
9
8
7
2
3
4
1
2
3
4
5
6
3
�
Inserting and Removing the
Battery (Optional Accessory)
We highly recommend using specified
rechargeable lithium-ion battery to fully dem-
onstrate this camera’s function. Charge the
battery before using the camera. Make sure
that the power of the camera is off before
inserting or removing the battery.
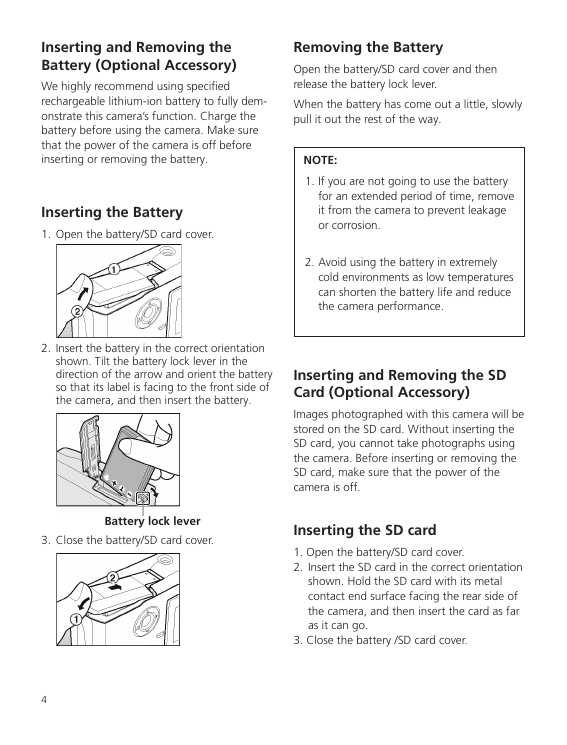
Inserting the Battery
1. Open the battery/SD card cover.
2. Insert the battery in the correct orientation
shown. Tilt the battery lock lever in the
direction of the arrow and orient the battery
so that its label is facing to the front side of
the camera, and then insert the battery.
Battery lock lever
3. Close the battery/SD card cover.
Removing the Battery
Open the battery/SD card cover and then
release the battery lock lever.
When the battery has come out a little, slowly
pull it out the rest of the way.
NOTE:
1. If you are not going to use the battery
for an extended period of time, remove
it from the camera to prevent leakage
or corrosion.
2. Avoid using the battery in extremely
cold environments as low temperatures
can shorten the battery life and reduce
the camera performance.
Inserting and Removing the SD
Card (Optional Accessory)
Images photographed with this camera will be
stored on the SD card. Without inserting the
SD card, you cannot take photographs using
the camera. Before inserting or removing the
SD card, make sure that the power of the
camera is off.
Inserting the SD card
1. Open the battery/SD card cover.
2. Insert the SD card in the correct orientation
shown. Hold the SD card with its metal
contact end surface facing the rear side of
the camera, and then insert the card as far
as it can go.
3. Close the battery /SD card cover.
4
�
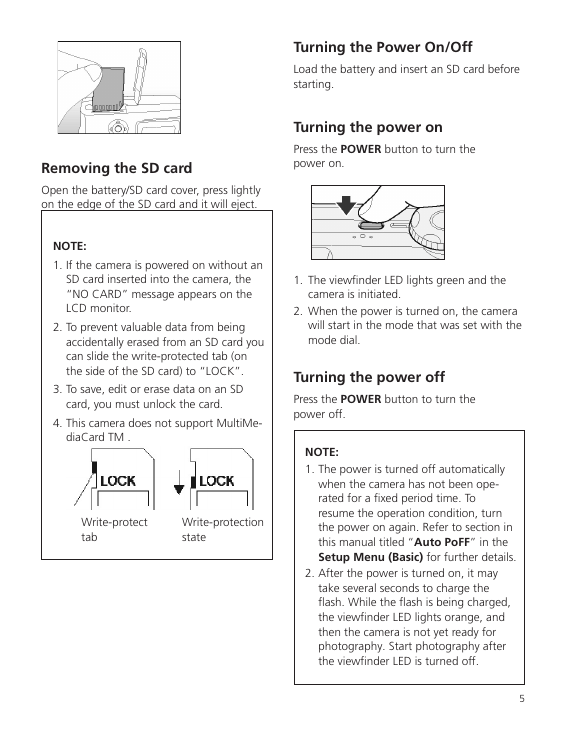
Removing the SD card
Open the battery/SD card cover, press lightly
on the edge of the SD card and it will eject.
NOTE:
1. If the camera is powered on without an
SD card inserted into the camera, the
“NO CARD” message appears on the
LCD monitor.
2. To prevent valuable data from being
accidentally erased from an SD card you
can slide the write-protected tab (on
the side of the SD card) to “LOCK”.
3. To save, edit or erase data on an SD
card, you must unlock the card.
4. This camera does not support MultiMe-
diaCard TM .
Write-protect
tab
Write-protection
state
Turning the Power On/Off
Load the battery and insert an SD card before
starting.
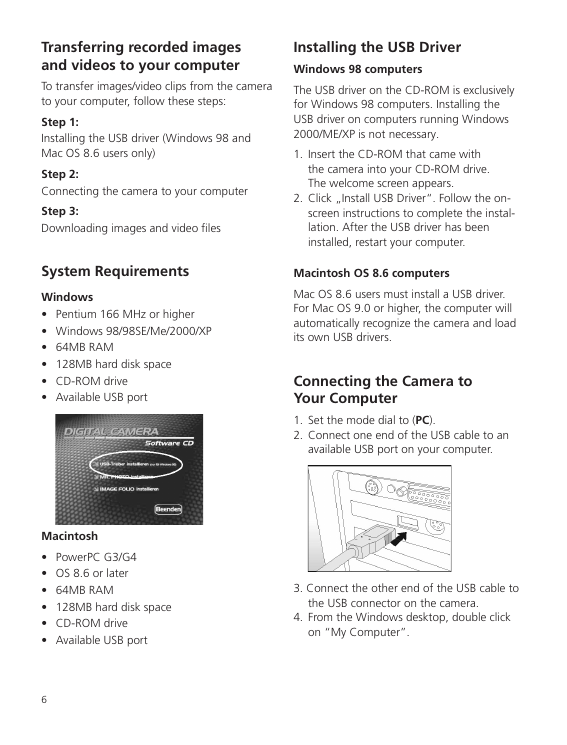
Turning the power on
Press the POWER button to turn the
power on.
1. The viewfinder LED lights green and the
camera is initiated.
2. When the power is turned on, the camera
will start in the mode that was set with the
mode dial.
Turning the power off
Press the POWER button to turn the
power off.
NOTE:
1. The power is turned off automatically
when the camera has not been ope-
rated for a fixed period time. To
resume the operation condition, turn
the power on again. Refer to section in
this manual titled “Auto PoFF” in the
Setup Menu (Basic) for further details.
2. After the power is turned on, it may
take several seconds to charge the
flash. While the flash is being charged,
the viewfinder LED lights orange, and
then the camera is not yet ready for
photography. Start photography after
the viewfinder LED is turned off.
5
�
Transferring recorded images
and videos to your computer
To transfer images/video clips from the camera
to your computer, follow these steps:
Step 1:
Installing the USB driver (Windows 98 and
Mac OS 8.6 users only)
Step 2:
Connecting the camera to your computer
Step 3:
Downloading images and video files
System Requirements
Windows
• Pentium 166 MHz or higher
• Windows 98/98SE/Me/2000/XP
• 64MB RAM
• 128MB hard disk space
• CD-ROM drive
• Available USB port
Installing the USB Driver
Windows 98 computers
The USB driver on the CD-ROM is exclusively
for Windows 98 computers. Installing the
USB driver on computers running Windows
2000/ME/XP is not necessary.
1. Insert the CD-ROM that came with
the camera into your CD-ROM drive.
The welcome screen appears.
2. Click „Install USB Driver“. Follow the on-
screen instructions to complete the instal-
lation. After the USB driver has been
installed, restart your computer.
Macintosh OS 8.6 computers
Mac OS 8.6 users must install a USB driver.
For Mac OS 9.0 or higher, the computer will
automatically recognize the camera and load
its own USB drivers.
Connecting the Camera to
Your Computer
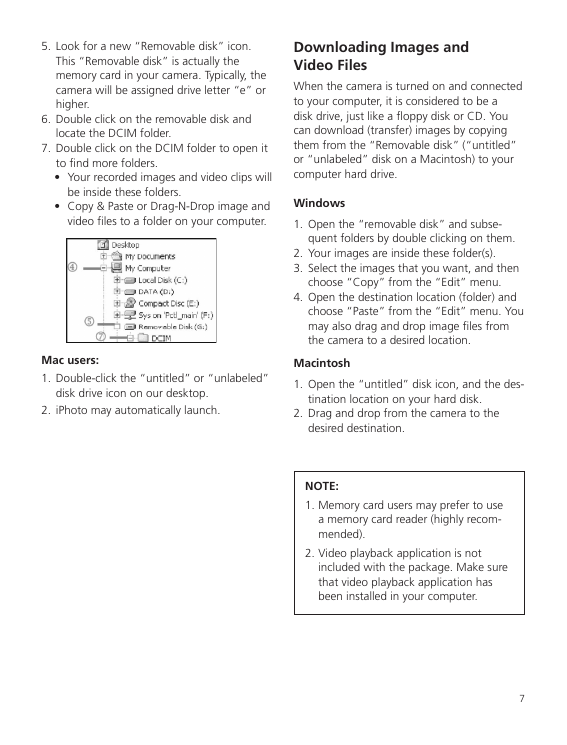
1. Set the mode dial to (PC).
2. Connect one end of the USB cable to an
available USB port on your computer.
Macintosh
• PowerPC G3/G4
• OS 8.6 or later
• 64MB RAM
• 128MB hard disk space
• CD-ROM drive
• Available USB port
6
3. Connect the other end of the USB cable to
the USB connector on the camera.
4. From the Windows desktop, double click
on “My Computer”.
�
5. Look for a new “Removable disk” icon.
This “Removable disk” is actually the
memory card in your camera. Typically, the
camera will be assigned drive letter “e” or
higher.
6. Double click on the removable disk and
locate the DCIM folder.
7. Double click on the DCIM folder to open it
to find more folders.
• Your recorded images and video clips will
be inside these folders.
• Copy & Paste or Drag-N-Drop image and
video files to a folder on your computer.
Mac users:
1. Double-click the “untitled” or “unlabeled”
disk drive icon on our desktop.
2. iPhoto may automatically launch.
Downloading Images and
Video Files
When the camera is turned on and connected
to your computer, it is considered to be a
disk drive, just like a floppy disk or CD. You
can download (transfer) images by copying
them from the “Removable disk” (“untitled”
or “unlabeled” disk on a Macintosh) to your
computer hard drive.
Windows
1. Open the “removable disk” and subse-
quent folders by double clicking on them.
2. Your images are inside these folder(s).
3. Select the images that you want, and then
choose “Copy” from the “Edit” menu.
4. Open the destination location (folder) and
choose “Paste” from the “Edit” menu. You
may also drag and drop image files from
the camera to a desired location.
Macintosh
1. Open the “untitled” disk icon, and the des-
tination location on your hard disk.
2. Drag and drop from the camera to the
desired destination.
NOTE:
1. Memory card users may prefer to use
a memory card reader (highly recom-
mended).
2. Video playback application is not
included with the package. Make sure
that video playback application has
been installed in your computer.
7
�
8
Rollei Fototechnic GmbH
P.O. Box 3245
D-38022 Braunschweig
www.rollei.de
Germany
4
0
-
5
0
/
A
P
�


 2023年江西萍乡中考道德与法治真题及答案.doc
 2012年重庆南川中考生物真题及答案.doc
 2013年江西师范大学地理学综合及文艺理论基础考研真题.doc
 2020年四川甘孜小升初语文真题及答案I卷.doc
 2020年注册岩土工程师专业基础考试真题及答案.doc
 2023-2024学年福建省厦门市九年级上学期数学月考试题及答案.doc
 2021-2022学年辽宁省沈阳市大东区九年级上学期语文期末试题及答案.doc
 2022-2023学年北京东城区初三第一学期物理期末试卷及答案.doc
 2018上半年江西教师资格初中地理学科知识与教学能力真题及答案.doc
 2012年河北国家公务员申论考试真题及答案-省级.doc
 2020-2021学年江苏省扬州市江都区邵樊片九年级上学期数学第一次质量检测试题及答案.doc
 2022下半年黑龙江教师资格证中学综合素质真题及答案.doc