Building JSBSim under Visual C++ 2008 Express, as Executable and Library
By Bill Galbraith
billg (at) holycows dot net
October 29, 2010
Preface: Okay, I’m an idiot sometimes. I’m not that good in Visual C++ 2008 Express, so
it took me a while, with the help of some other people, namely Csaba Halász, to get this
down. I took baby steps, and show them here, in case you are like me. These steps were
written on a 32-bit version of Windows XP. It may vary slightly with different versions
of Windows.
Preinstalled:
Visual C++ 2008 Express edition
CVS
Building the JSBSim program
1. Download JSBSim from CVS, using the normal checkout method as described on the
web page. At the time of this tutorial, here were the command that I used:
cvs -d:pserver:anonymous@jsbsim.cvs.sourceforge.net:/cvsroot/jsbsim login
cvs -z3 -d:pserver:anonymous@jsbsim.cvs.sourceforge.net:/cvsroot/jsbsim co -P JSBSim
Note that I used CygWin to do this, as it has all of the tools such as CVS that I
needed. You’ll have to figure this out yourself. For the password asked after the first
command, just press Enter.
�
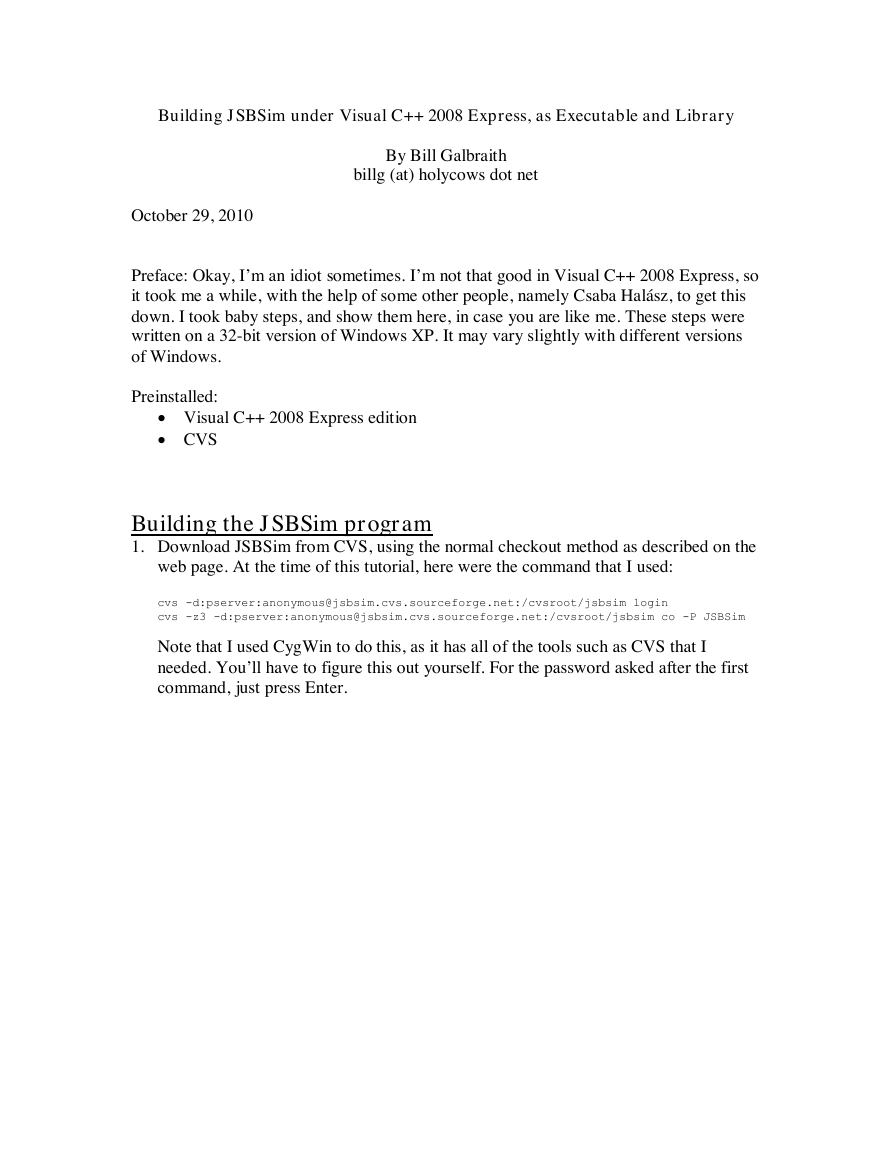
2. Open up the Visual C project file in the JSBSim directory, called JSBSim.vcproj.
This is what you should see, with the Solution Explorer on the left side being the only
window showing any significant information.
�
3. We will build the executable program first, so just press F7, or pull down the Build
menu and select either Build Solution or Rebuild Solution, the difference being that
Rebuild Solution cleans out all the generated files from a previous build. This is our
first build, so there is nothing to clean out.
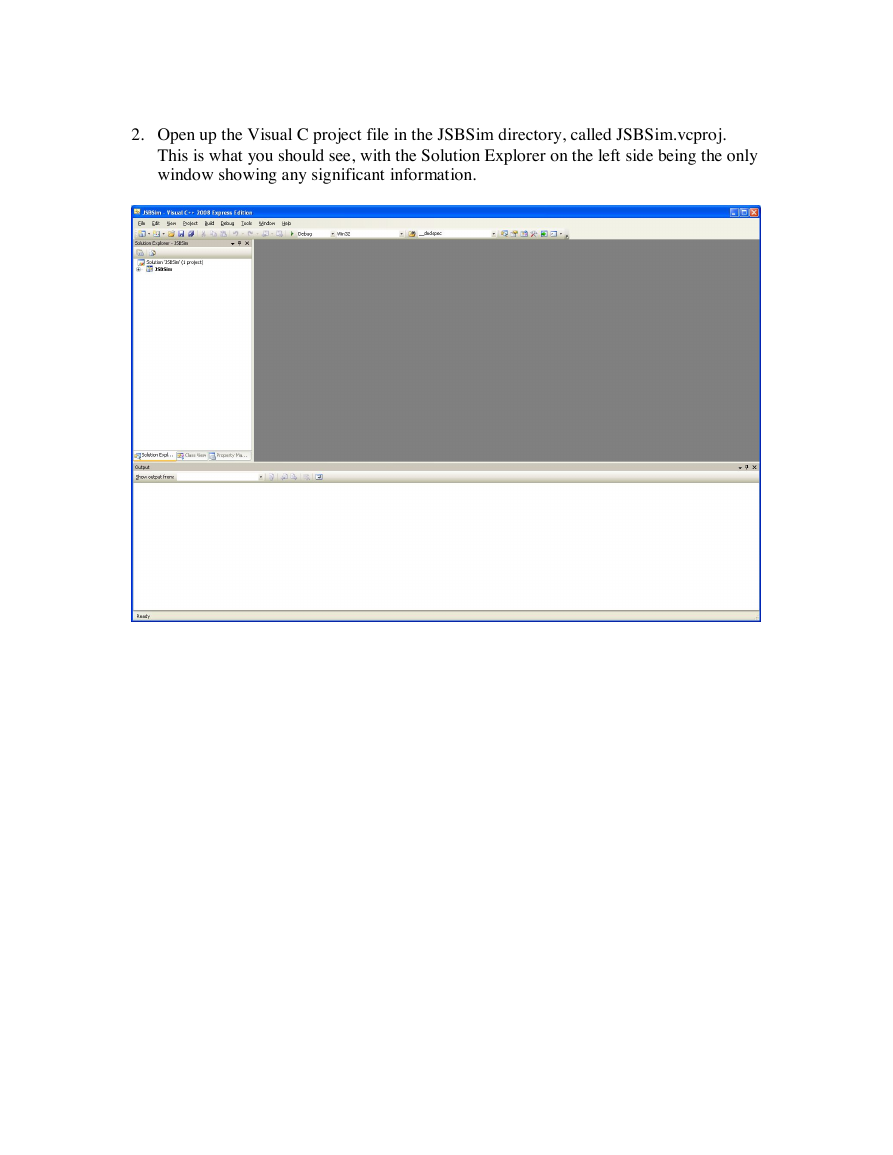
When the build starts for the first time, Visual C++ will ask for a file name for the
solution file, and will provide a default name.
You can accept the default name. I like to prepend an underscore on the name, to
make it _JSBSim.sln, just so that it is close to the top of the Explorer list of file, and
therefore easier to find. Name it whatever you would like, or accept the default name.
With the source code that I used, there were 4 warning issues, but no errors.
4. One way to run the program is directly from Visual C++, however, the program
accepts a script file name as an argument, so we have to set up Visual C++ to pass
this argument in when it is started. This method is fine if you want to always run
JSBSim with the same script, or rarely change the script file. If you want to run
JSBSim with different script files, skip to the next step and run it from the command
line.
Open up the the Project Properties. This menu box is easily called up by pressing Alt-
F7, or by pulling down the Project menu bar and selecting Properties, or by right
�
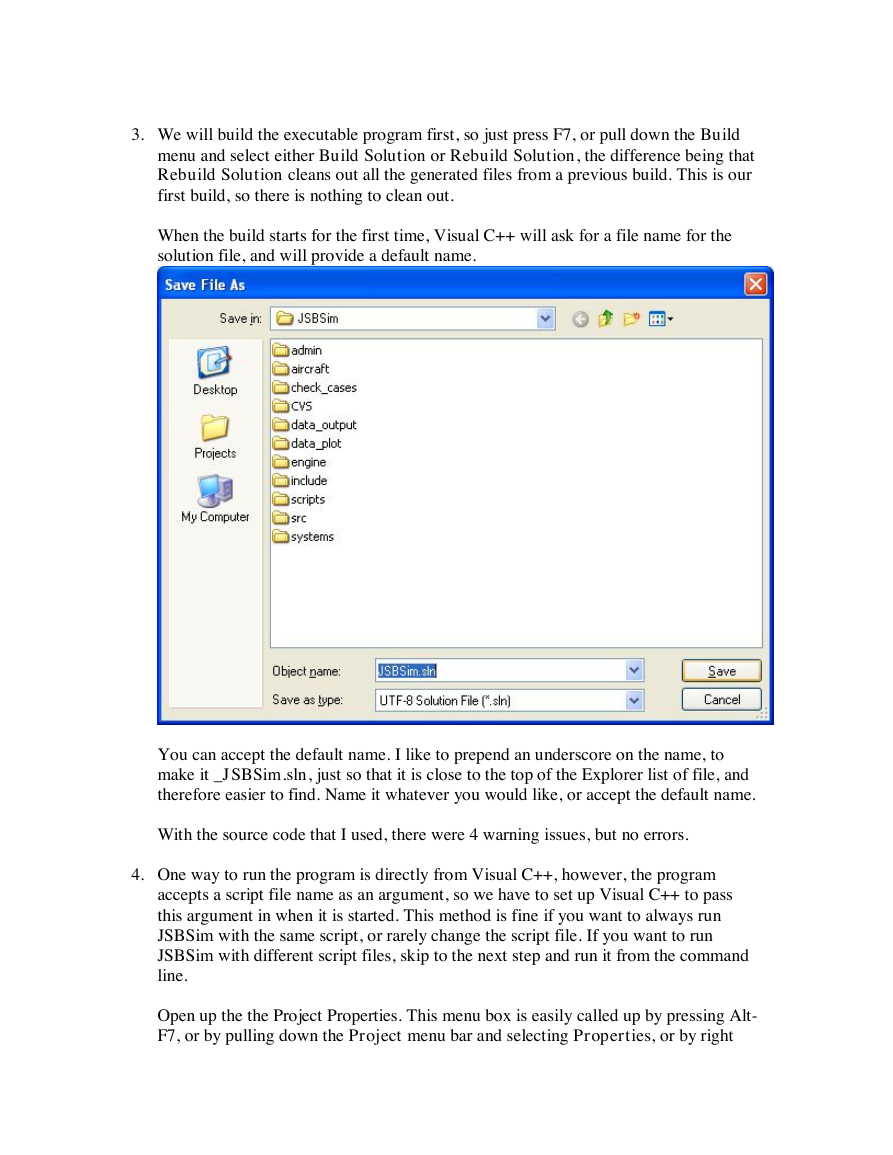
clicking the mouse on the JSBSim in the solution Explorer on the left side, and
selecting Properties. However you do it, this is the menu box that pops up.
�
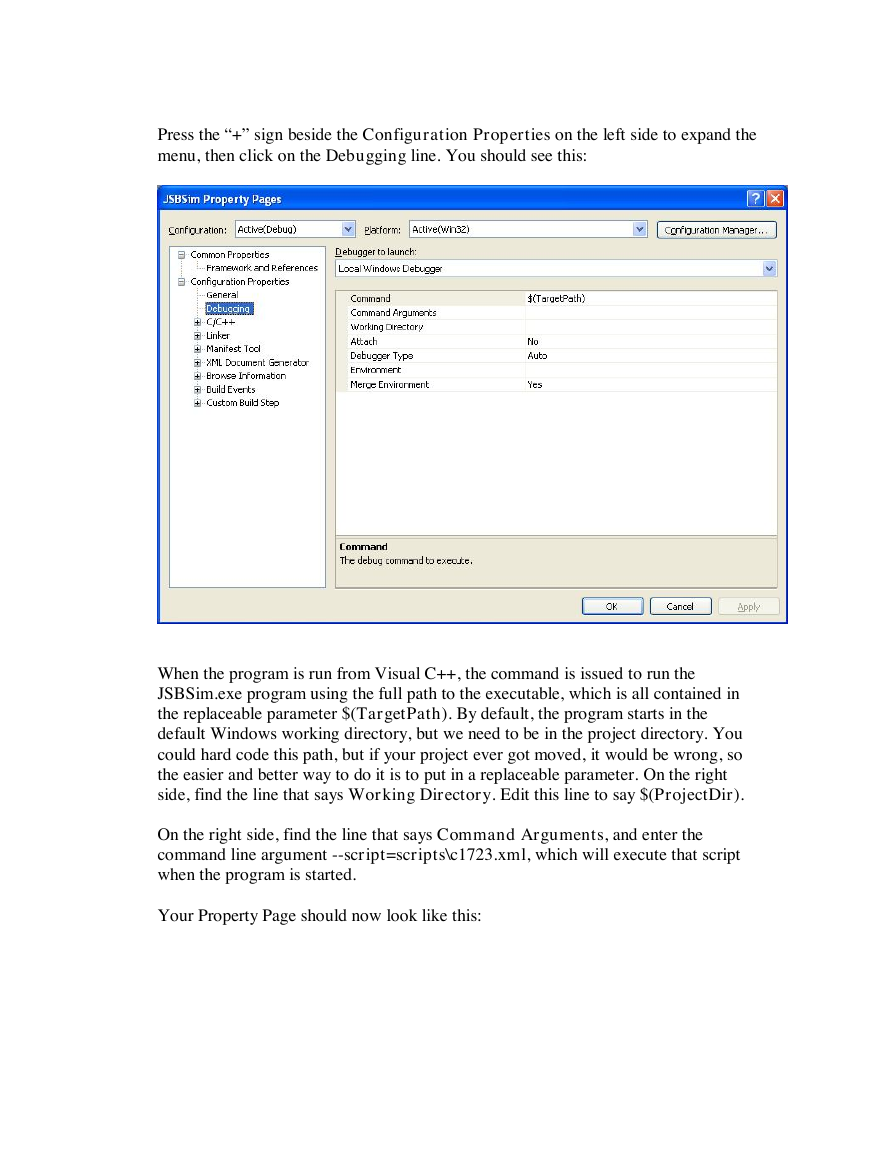
Press the “+” sign beside the Configuration Properties on the left side to expand the
menu, then click on the Debugging line. You should see this:
When the program is run from Visual C++, the command is issued to run the
JSBSim.exe program using the full path to the executable, which is all contained in
the replaceable parameter $(TargetPath). By default, the program starts in the
default Windows working directory, but we need to be in the project directory. You
could hard code this path, but if your project ever got moved, it would be wrong, so
the easier and better way to do it is to put in a replaceable parameter. On the right
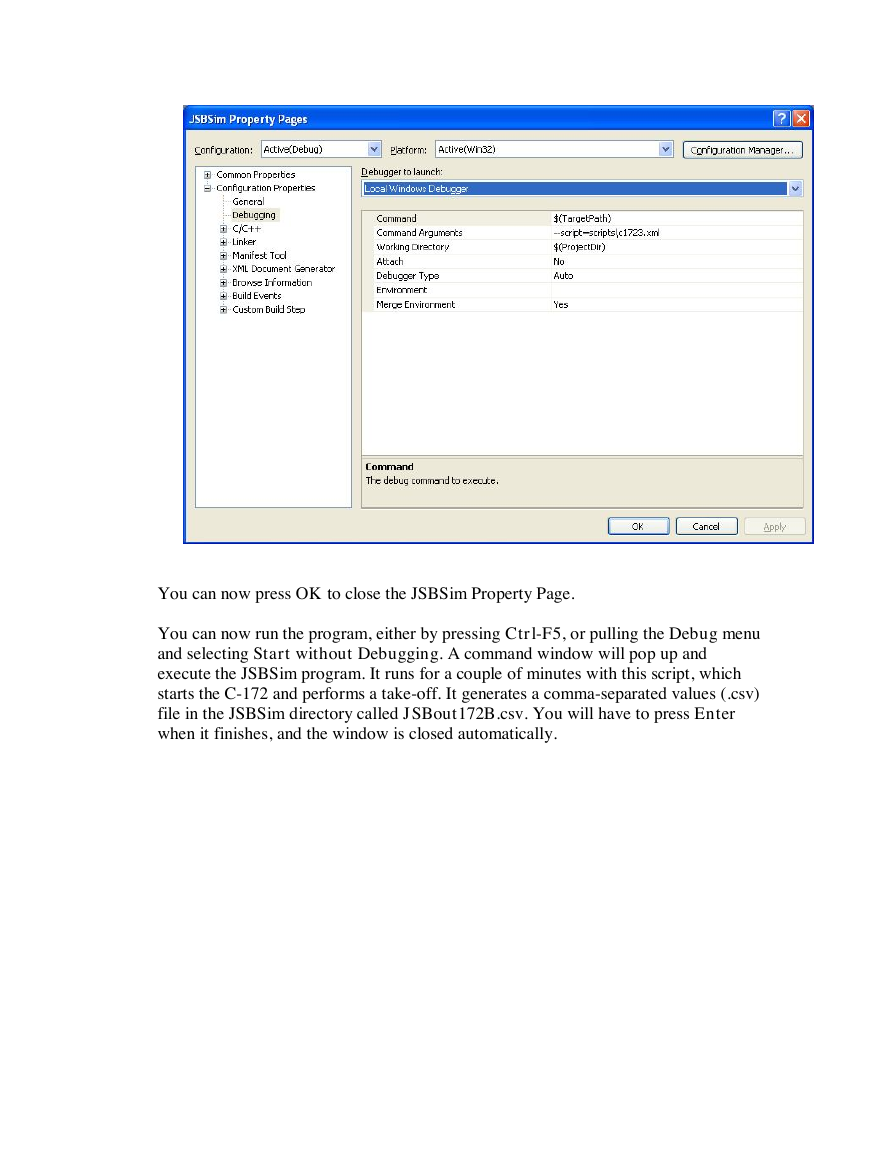
side, find the line that says Working Directory. Edit this line to say $(ProjectDir).
On the right side, find the line that says Command Arguments, and enter the
command line argument --script=scripts\c1723.xml, which will execute that script
when the program is started.
Your Property Page should now look like this:
�
You can now press OK to close the JSBSim Property Page.
You can now run the program, either by pressing Ctrl-F5, or pulling the Debug menu
and selecting Start without Debugging. A command window will pop up and
execute the JSBSim program. It runs for a couple of minutes with this script, which
starts the C-172 and performs a take-off. It generates a comma-separated values (.csv)
file in the JSBSim directory called JSBout172B.csv. You will have to press Enter
when it finishes, and the window is closed automatically.
�
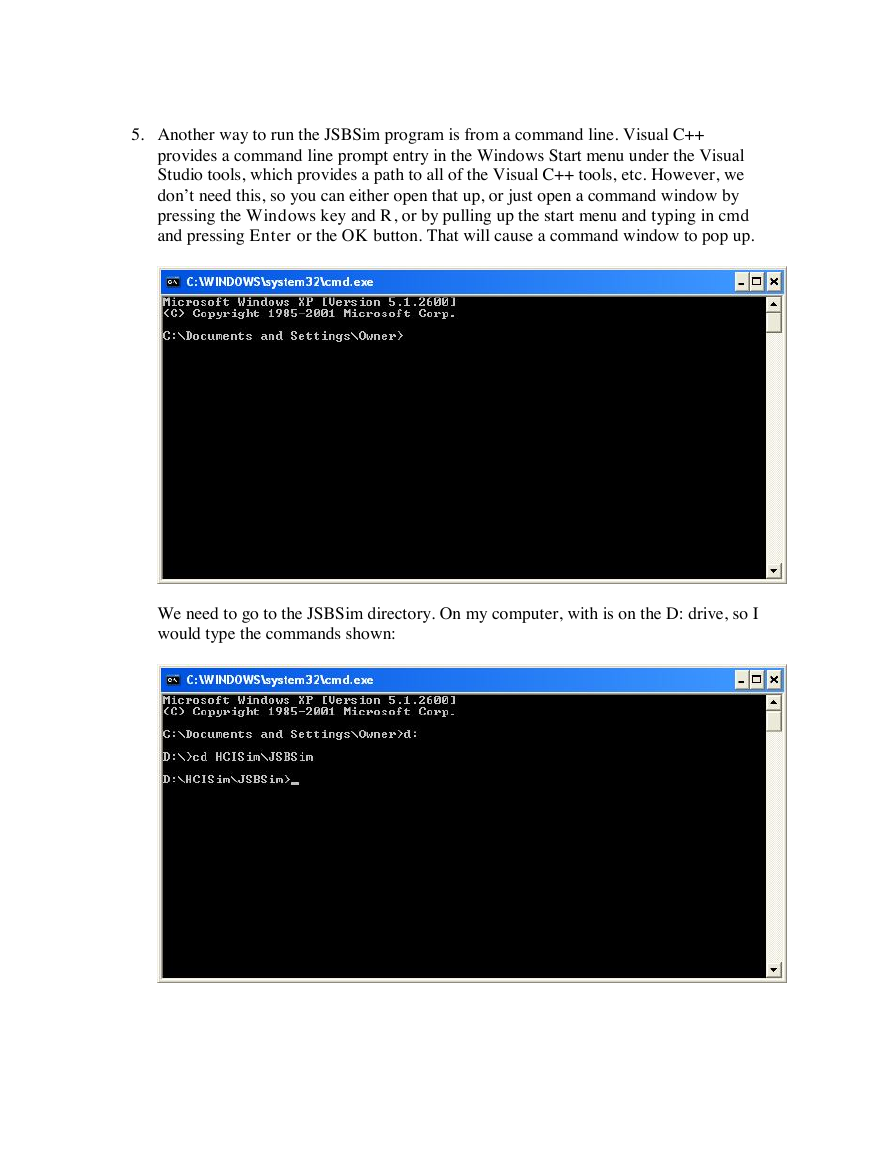
5. Another way to run the JSBSim program is from a command line. Visual C++
provides a command line prompt entry in the Windows Start menu under the Visual
Studio tools, which provides a path to all of the Visual C++ tools, etc. However, we
don’t need this, so you can either open that up, or just open a command window by
pressing the Windows key and R, or by pulling up the start menu and typing in cmd
and pressing Enter or the OK button. That will cause a command window to pop up.
We need to go to the JSBSim directory. On my computer, with is on the D: drive, so I
would type the commands shown:
�
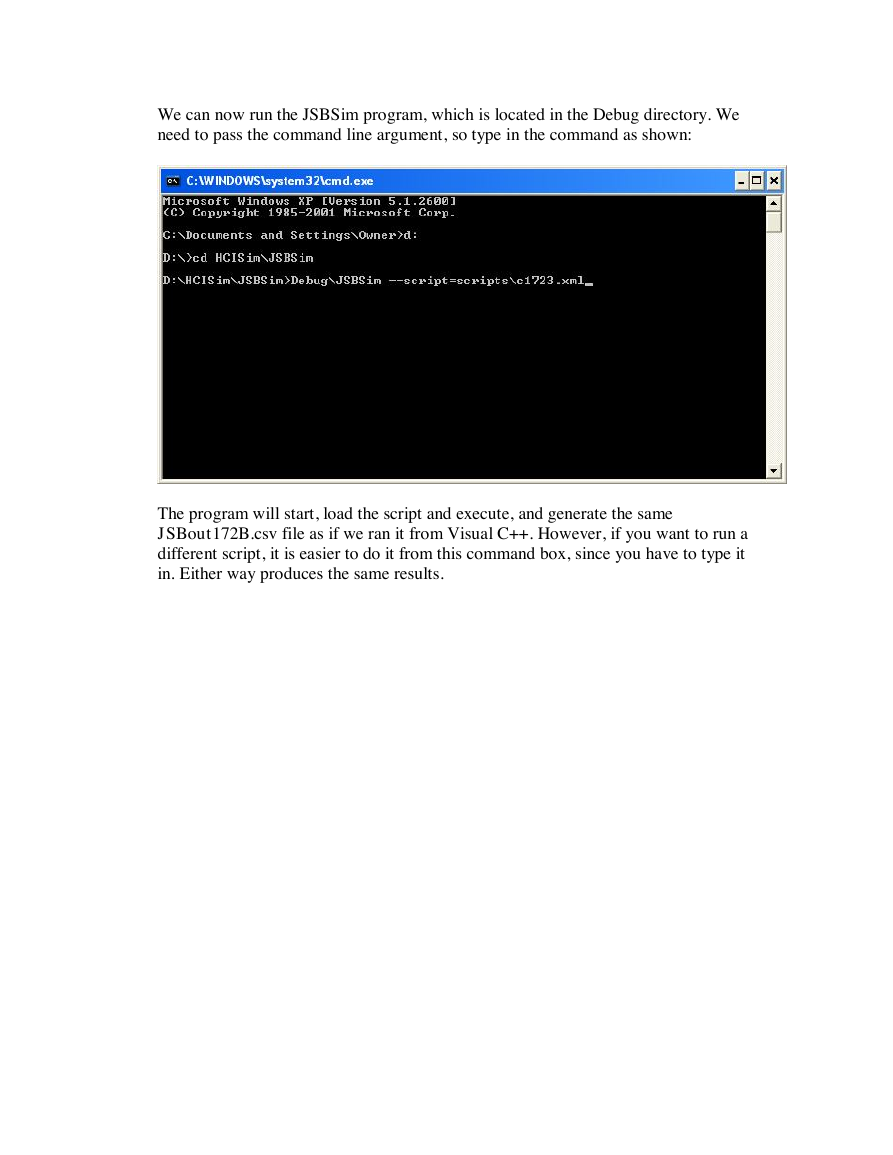
We can now run the JSBSim program, which is located in the Debug directory. We
need to pass the command line argument, so type in the command as shown:
The program will start, load the script and execute, and generate the same
JSBout172B.csv file as if we ran it from Visual C++. However, if you want to run a
different script, it is easier to do it from this command box, since you have to type it
in. Either way produces the same results.
�


 2023年江西萍乡中考道德与法治真题及答案.doc
 2012年重庆南川中考生物真题及答案.doc
 2013年江西师范大学地理学综合及文艺理论基础考研真题.doc
 2020年四川甘孜小升初语文真题及答案I卷.doc
 2020年注册岩土工程师专业基础考试真题及答案.doc
 2023-2024学年福建省厦门市九年级上学期数学月考试题及答案.doc
 2021-2022学年辽宁省沈阳市大东区九年级上学期语文期末试题及答案.doc
 2022-2023学年北京东城区初三第一学期物理期末试卷及答案.doc
 2018上半年江西教师资格初中地理学科知识与教学能力真题及答案.doc
 2012年河北国家公务员申论考试真题及答案-省级.doc
 2020-2021学年江苏省扬州市江都区邵樊片九年级上学期数学第一次质量检测试题及答案.doc
 2022下半年黑龙江教师资格证中学综合素质真题及答案.doc