Combat Design 101
Introduction
Welcome to Combat Design 101. This Article is designed to go over the fundamentals of combat design. In
specific, the basics of a melee combat system, as the principals covered in this article do not necessarily apply to
projectile combat or shooters in general. Every combat system has its own unique features and nuances, but
somewhere at the heart of every good combat game you’ll find the designs that are covered here, whether it’s a 2-D or
3-D fighter like Street Fighter or Soul Calibur or a 3-D beat-em up like God of War. Though this is an article geared
toward designers I will go into some detail on a few technical details. The first is a construct known as a State Machine.
The state machine is central to any combat system so the first section will be dedicated to describing what a state
machine is. If you are already familiar with state machines and are comfortable using them please feel free to skip the
first section.
What is a State Machine
State Machines are an idea that exist in many fields of study, and what they are will depend on whether you ask
a mathematician, a computer science researcher, or an AI Programmer for games. I find that it is easiest to think about
them in practical terms, and also in terms of their usage in video games. State Machines are a method to execute
different actions, behavior, or logic depending on a set of conditions. As a simple example you can think of what a game
does when the main character is alive versus what it does when it’s dead. When the player is alive the logic is that of
moving the character around, performing actions when buttons are pressed etc. When the player is dead the game will
run game over logic: play game over music, show a game over screen, and maybe give the player the option to retry
when a button is pressed. What I have described is a state machine with two states: Alive and dead and the conditions
for being in each state are self evident.
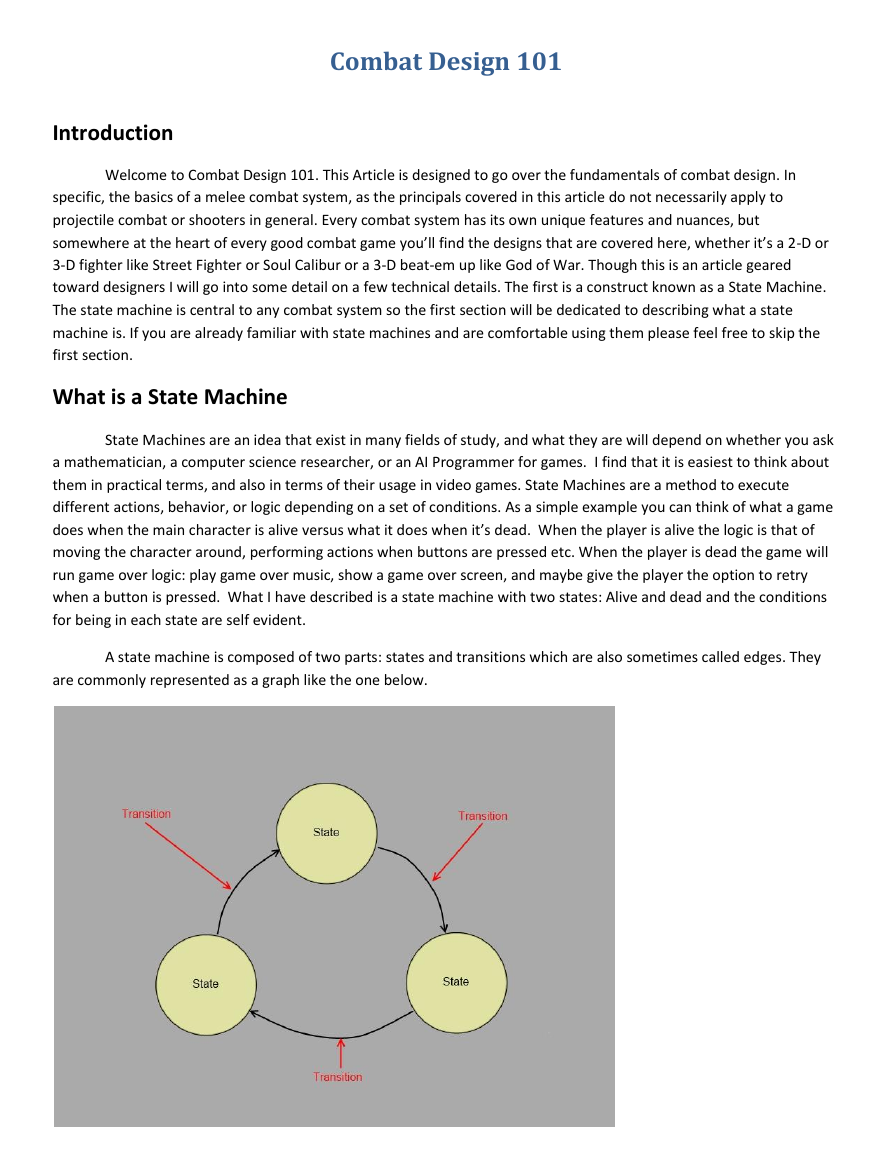
A state machine is composed of two parts: states and transitions which are also sometimes called edges. They
are commonly represented as a graph like the one below.
�
The yellow circles represent the different states, and the arrows are the transitions. The transitions are the conditions
that must be met in order for the state machine to transition from one state into another. Let’s use this graphical
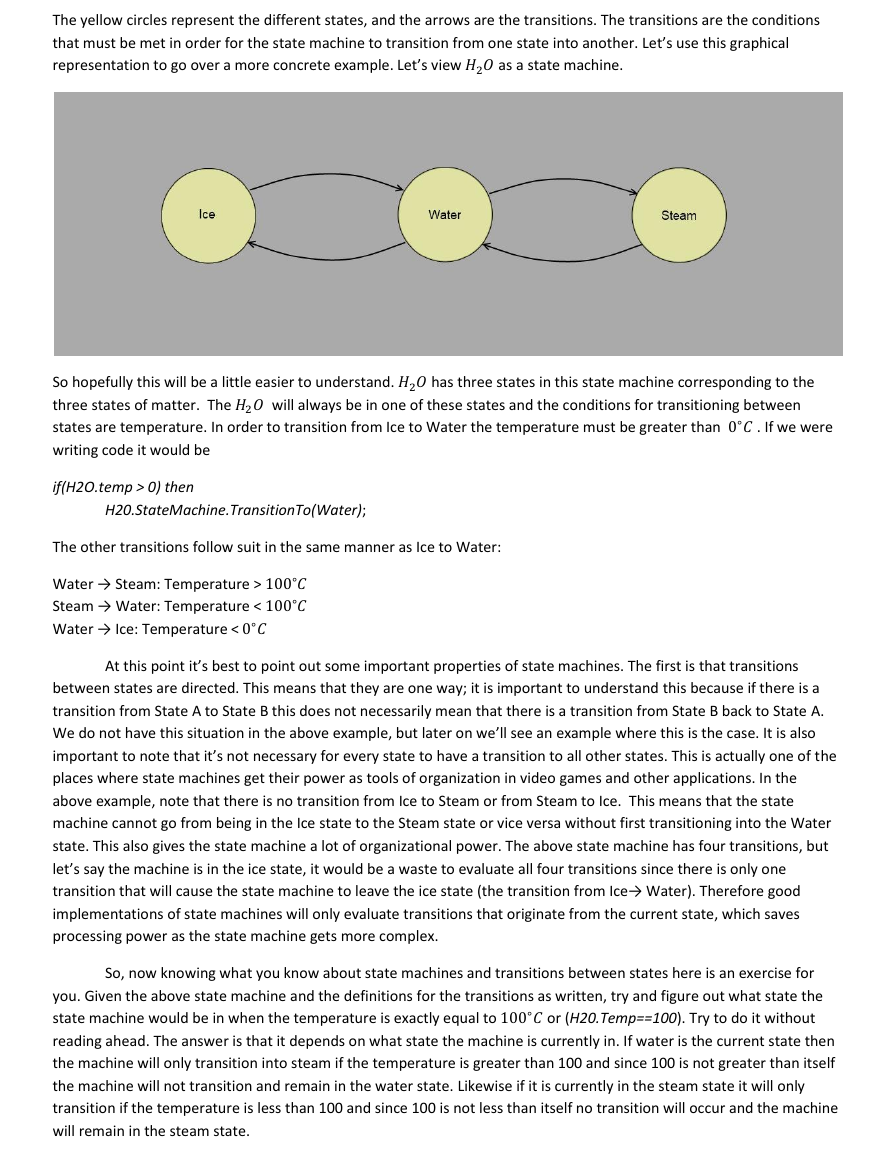
representation to go over a more concrete example. Let’s view as a state machine.
So hopefully this will be a little easier to understand. has three states in this state machine corresponding to the
three states of matter. The will always be in one of these states and the conditions for transitioning between
states are temperature. In order to transition from Ice to Water the temperature must be greater than . If we were
writing code it would be
if(H2O.temp > 0) then
H20.StateMachine.TransitionTo(Water);
The other transitions follow suit in the same manner as Ice to Water:
Water → Steam: Temperature >
Steam → Water: Temperature <
Water → Ice: Temperature <
At this point it’s best to point out some important properties of state machines. The first is that transitions
between states are directed. This means that they are one way; it is important to understand this because if there is a
transition from State A to State B this does not necessarily mean that there is a transition from State B back to State A.
We do not have this situation in the above example, but later on we’ll see an example where this is the case. It is also
important to note that it’s not necessary for every state to have a transition to all other states. This is actually one of the
places where state machines get their power as tools of organization in video games and other applications. In the
above example, note that there is no transition from Ice to Steam or from Steam to Ice. This means that the state
machine cannot go from being in the Ice state to the Steam state or vice versa without first transitioning into the Water
state. This also gives the state machine a lot of organizational power. The above state machine has four transitions, but
let’s say the machine is in the ice state, it would be a waste to evaluate all four transitions since there is only one
transition that will cause the state machine to leave the ice state (the transition from Ice→ Water). Therefore good
implementations of state machines will only evaluate transitions that originate from the current state, which saves
processing power as the state machine gets more complex.
So, now knowing what you know about state machines and transitions between states here is an exercise for
you. Given the above state machine and the definitions for the transitions as written, try and figure out what state the
state machine would be in when the temperature is exactly equal to or (H20.Temp==100). Try to do it without
reading ahead. The answer is that it depends on what state the machine is currently in. If water is the current state then
the machine will only transition into steam if the temperature is greater than 100 and since 100 is not greater than itself
the machine will not transition and remain in the water state. Likewise if it is currently in the steam state it will only
transition if the temperature is less than 100 and since 100 is not less than itself no transition will occur and the machine
will remain in the steam state.
�
A common mistake when thinking about state machines is to take into account all the conditions for transitions
all at once. In our example if a person were to think this way they might think that there are bugs in our transitions
at the situations Temperature == 0 and Temperature == 100 because none of the transitions apply to either of those
cases. When thinking about state machines though you should always be thinking in terms of the states: What state do I
begin in, what state am I currently in, and what states can I transition to? This mentality will lead to the creation of
useful and efficient state machines. It will also help with debugging, and keeping your logic clean.
Now that we’ve talked about transitions let’s talk more about the states themselves. The very first thing to know
about states is that is that a state machine can only ever be in one and only one state at a time. In our example the
can only be ice, water, or steam. With a state machine there is no concept of partially being in one state, no state, or
otherwise more than one state. If when creating a state machine you are having trouble figuring out how to make it so
that your machine doesn’t need to be in more than one state, then one of two things is probably happening. You are not
defining what your state is well enough or a state machine is not the proper tool for the problem you are trying to solve.
So, we’ve talked about transitioning between states and being in states, but what’s the point of being in a state? Well
the idea is that whatever your state machine applies to will behave differently depending on what state it’s in.
doesn’t have particularly interesting state based behaviors, but if it were some kind of game object maybe it would
interact with the player differently depending on what state it was in. For example if the player came in contact with the
object while it was in the Ice state the player would become frozen and take some damage. If it were in the water state
the Player could drink it up and regain health, and if it were in the steam state the player could use it to float into the air.
This way a single object can have multiple behaviors, and those behaviors would be clearly defined and the decision as
to what behavior to execute is done in a neat and organized way.
Let’s take a look at another example of a state machine, but this time we’ll look at one that was actually used in
a game. It should be easier to see the usefulness of the different states.
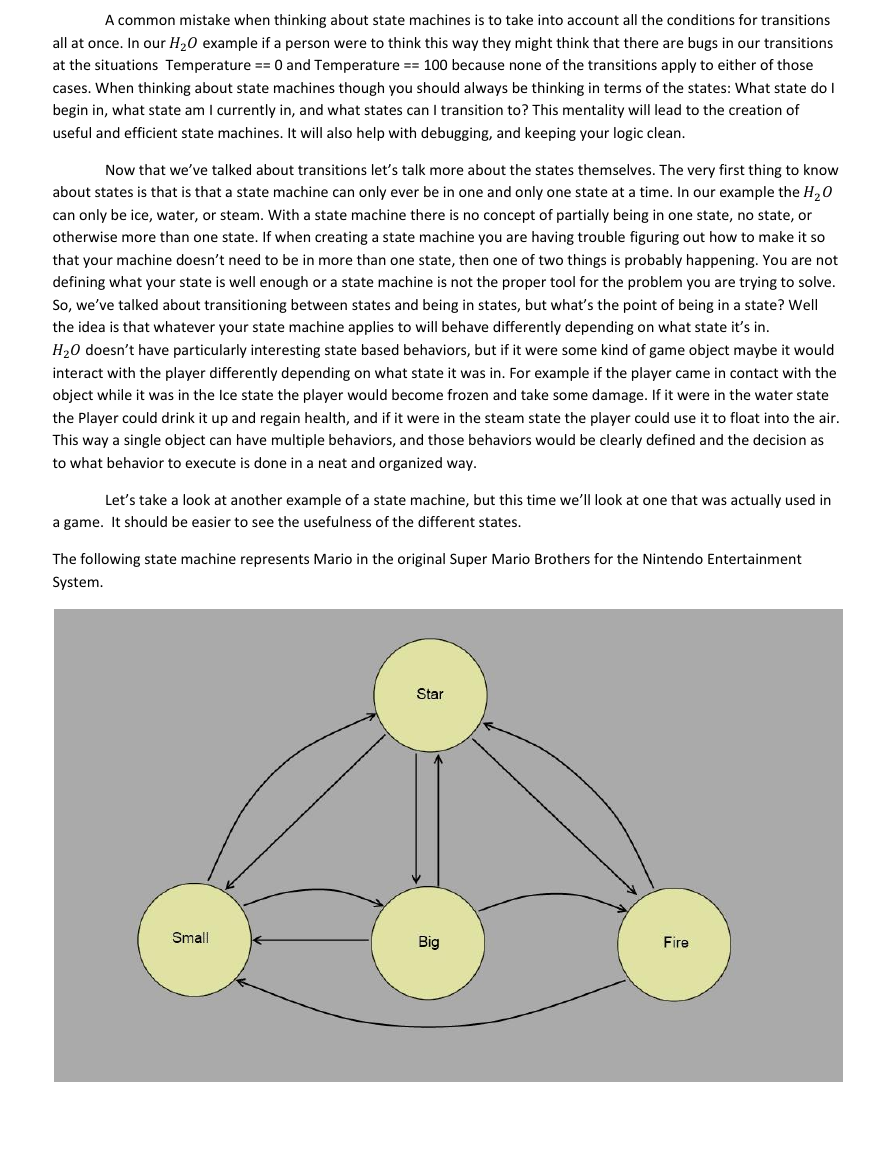
The following state machine represents Mario in the original Super Mario Brothers for the Nintendo Entertainment
System.
�
This one’s a little more complicated than the previous example so take a few moments to analyze it. Remember to look
at it one state at a time and see what states you can transition to from each state. If you’ll remember Mario always
started the game small so let’s take a look at the small state first.
The small state can only transition to the star state and to the big state. Those transitions would look like this.
Small → Star: If (Mario Picks up a Power Star)
Small → Big: If (Mario Picks up a Mushroom OR Mario Picks up a Fire Flower)
The Big State has three Transitions. It can go to small, Fire, or Star. The transitions look like this
Big → Small: If (Mario Hits an Enemy)
Big → Fire: If (Mario Picks up a Fire Flower)
Big → Star: If (Mario Picks up a Power Star)
Here we can already see a difference in behaviors based on State, namely what happens when Mario picks up a Fire
Flower. There is no transition from the Small state to the Fire state. This means the designer didn’t want picking up a fire
flower to take Mario directly from the Small state to the Fire state, and instead will take Mario to the Big. Only in the Big
state will picking up a fire flower move Mario into the Fire State.
The Fire State has two transitions: one to the star state and one to small state. Here it is useful to note that though there
is a transition that goes from Big to Fire there is no transition the goes from Fire back to Big. This means that once you’re
Fire Mario there is no way to go back to being regular big Mario without becoming small first. At first glance you might
think that you can do so by going to Star first but as we’ll see when we get to the Star state the game is not designed to
do that. In any case here are the transitions from the Fire state.
Fire → Small: If (Mario Hits an Enemy)
Fire → Star: If (Mario Picks up a Power Star)
And finally we have the Star state which has transitions to all the other states, they are as follows.
Star → Small: If (Mario was small when he picked up the Power Star AND Star time has run out)
Star → Big: If (Mario was big when he picked up the Power Star AND Star time has run out)
Star → Fire: If (Mario was fire when he picked up the Power Star AND Star time has run out)
Now the point of using this state machine is that Mario will behave differently depending on what state he is in. In
particular what happens when Mario gets hit by an enemy will be different in each state. The behaviors for each state
would look like the following.
-State: Small
{
if (Mario.CollisionWithEnemy() ==true) then
Mario.Die()
}
-State: Big
{
}
If(Mario.CollisionWithEnemy()==true) then
Mario.StateMachine.TransitionTo(Small)
�
If(Input.Pressed(B_Button) == true) then
Mario.ShootFire()
Mario.StateMachine.TransitionTo(Small)
If(Mario.CollisionWIthEnemy()==true) then
-State: Fire
{
}
-State: Star
{
}
So as you can see the behavior that is inside the states have dramatic differences between each other. Specifically
whether Mario dies, or whether the enemy dies in the case of the star state. Furthermore while in the Fire state Mario
can shoot Fireballs.
If(Mario.CollisionWithEnemy()==true) then
Enemy.Die()
Now the point of using a state machine, other than being able to represent the behavior with a clean graphical
representation, is that despite having four blocks of logic we only run the block that is within the current state. On the
technical side having the logic separated in this manner helps with debugging and keeps the logic clean and easy to read.
So now that you’ve learned about state machines I recommend that you try to create one for yourself. No need
to bust out a computer and write code or use any kind of software; a piece of paper is just fine. Here’s the exercise:
design a state machine for a boss in a 2-D top down shooter. Give him at least three states that he transitions between
depending on how much life he has left. Start him off with a simple behavior, but when he gets to 50% health make him
get angry and do something different and more challenging to the player. At 25% make him do an even more
challenging behavior. Feel free to include things like changing appearances, flashing red, using different weapons, or
playing different sounds. If you’re comfortable with that add more states and more complex transitions. You can use
things like checking the health or proximity of the player. If you have an idea for a state machine you like better than
that by all means try and do that instead.
If you have a mind to implement your own state machine in an actual game or program it’s important to realize
that state machines are a theoretical construct. As such there is no standard method of implementation for them like
there might be for other programming data structures. A novice or inexperienced programmer might try to implement a
state machine using a series of nested if statements such that the above Mario example would look like this:
If(Mario.CurrentState==”Small”) then
{
If(Mario.CollisionWIthEnemy()==true) then
Mario.Die()
If(Mario.PicksUp(“Mushroom”) OR Mario.PicksUp(“Flower”) ) then
Maro.StateMachine.TransitionTo(Big)
If(Mario.PicksUp(“PowerStar”)) then
Mario.StateMachine.TransitionTo(Star)
}
�
Else if(Mario.CurrentState==”Big”) then
{
Mario.StateMachine.TransitionTo(Small)
If(Mario.CollisionWithEnemy()==true) then
If(Mario.PicksUp(“PowerStar”) ) then
Mario.StateMachine.TransitionTo(Star)
}
Etc…
Though this does properly implement all the features of a state machine, it can get difficult to read very quickly.
Furthermore if you’re not careful you can create dependencies on scope, local variables, and the like, that can make the
state machine difficult to modify or replace in the future. As a result, in my opinion, this kind of implementation should
be avoided. A slightly more sophisticated implementation is the use of a switch statement. Not all programming
languages and platforms have them but all the more robust ones do. The Mario State Machine would look more like
this.
Switch(Mario.CurrentState)
{
Case “Small”:
Case “Big”:
Case “Fire”:
RunSmallState()
break
RunBigState()
Break
RunFireState()
Break
RunStarState()
Break
Case “Star”:
}
This is a lot neater and easier to read. Also, having the logic for each of the states separated not only from the logic that
controls the machine but also from the other states is consistent with good programming practices, in particular the idea
of modularity. This implementation works for simple state machines and many games have used this method
successfully. However this approach can become hard to maintain as you add more and more states, and because each
switch statement needs to be tailor made to a given state machine (via state names and corresponding function names)
it becomes even more difficult to maintain as you create more and more state machines. Though this can be alleviated
with good object oriented programming there are better implementation methods.
platforms like Unreal and Unreal Script have state machines built-in to their scripting language. Others like Java, C#, and
even C/C++ have features like delegates and function pointers that make implementing state machines clean and easy.
Using these, I believe, is the better and more common way to making a state machine system of your own. If you are
not familiar with function pointers or delegates I recommend finding a quick tutorial on the topic.
How you actually program a state machine is, of course, going to depend on the tool that you’re using. Some
�
As an example I will implement a small state machine using the LUA Scripting Language. LUA is well suited for
--Some Behavior Code
if(Some Condition==true) then
currentState = StateB
end
currentState=StateA
state machines thanks to its weakly typed variables, and thanks to the fact that functions are first order values.
currentState
function StateA ()
end
function StateB ()
end
currentState=StateA
while (true) do
end
--Some Behavior Code
if (Some Condition==true) then
end
currentState()
Let’s walk through the above code shall we. First of all the entire state machine is represented only by its current state
which in stored in memory with the variable currentState. I have written two functions StateA() and StateB(); these are
the states of the state machine. To run the behavior we need only call the current state with the line currentState(). As
you can see at the bottom of the code there is a while loop that runs infinitely for the simplicity of this example. This
while loop is responsible for running the state machine by running the current state, but what happens when
currentState() runs? Well right before the loop we initialized currentState to equal StateA(). This means that when
currentState() is called it runs the code that is located inside of StateA(). This is the process of defining the State
Machine’s initial state. At some point while running StateA() some condition will become true and currentState will be
set to StateB() and the next time the machine executes, StateB() will run. There is no need to check what state the
machine is currently in to decide what logic to run, all that is handled by simply calling currentState() and the right
function gets used. The states are implemented in their own functions, which keeps them modular and maintainable.
Adding new states is as easy as writing the states themselves, and because the whole control structure of the State
Machine is handled with a single variable (currentState) creating multiple state machines is trivial.
One final note on implementation, in all of the examples so far the logic for the transitions is written inside the
logic for the states themselves. This is how many state machine implementations handle it including Unreal Script.
However, there are more advanced implementations that handle the transitions as their own objects and evaluate them
separately. In my opinion this implementation is preferable and is more robust, but that requires a much more
advanced approach.
�
The Combat State Machine
At the heart of any melee combat system is what I call the combat state machine. This is a state machine that
controls any entity that’s going to be directly involved in the melee. It’s important to note that a game might not
explicitly implement their system using a state machine, however the behavior of the game will still likely fall in line with
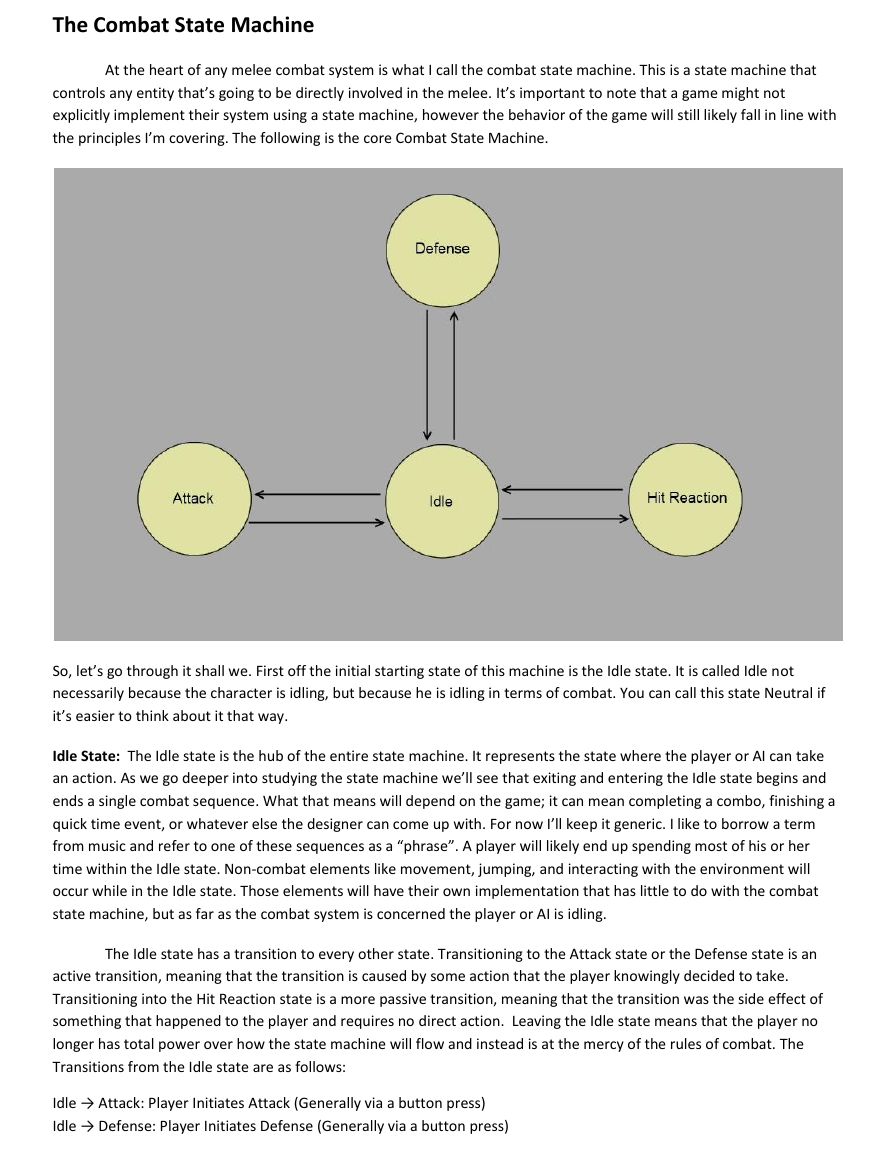
the principles I’m covering. The following is the core Combat State Machine.
So, let’s go through it shall we. First off the initial starting state of this machine is the Idle state. It is called Idle not
necessarily because the character is idling, but because he is idling in terms of combat. You can call this state Neutral if
it’s easier to think about it that way.
Idle State: The Idle state is the hub of the entire state machine. It represents the state where the player or AI can take
an action. As we go deeper into studying the state machine we’ll see that exiting and entering the Idle state begins and
ends a single combat sequence. What that means will depend on the game; it can mean completing a combo, finishing a
quick time event, or whatever else the designer can come up with. For now I’ll keep it generic. I like to borrow a term
from music and refer to one of these sequences as a “phrase”. A player will likely end up spending most of his or her
time within the Idle state. Non-combat elements like movement, jumping, and interacting with the environment will
occur while in the Idle state. Those elements will have their own implementation that has little to do with the combat
state machine, but as far as the combat system is concerned the player or AI is idling.
The Idle state has a transition to every other state. Transitioning to the Attack state or the Defense state is an
active transition, meaning that the transition is caused by some action that the player knowingly decided to take.
Transitioning into the Hit Reaction state is a more passive transition, meaning that the transition was the side effect of
something that happened to the player and requires no direct action. Leaving the Idle state means that the player no
longer has total power over how the state machine will flow and instead is at the mercy of the rules of combat. The
Transitions from the Idle state are as follows:
Idle → Attack: Player Initiates Attack (Generally via a button press)
Idle → Defense: Player Initiates Defense (Generally via a button press)
�


 2023年江西萍乡中考道德与法治真题及答案.doc
 2012年重庆南川中考生物真题及答案.doc
 2013年江西师范大学地理学综合及文艺理论基础考研真题.doc
 2020年四川甘孜小升初语文真题及答案I卷.doc
 2020年注册岩土工程师专业基础考试真题及答案.doc
 2023-2024学年福建省厦门市九年级上学期数学月考试题及答案.doc
 2021-2022学年辽宁省沈阳市大东区九年级上学期语文期末试题及答案.doc
 2022-2023学年北京东城区初三第一学期物理期末试卷及答案.doc
 2018上半年江西教师资格初中地理学科知识与教学能力真题及答案.doc
 2012年河北国家公务员申论考试真题及答案-省级.doc
 2020-2021学年江苏省扬州市江都区邵樊片九年级上学期数学第一次质量检测试题及答案.doc
 2022下半年黑龙江教师资格证中学综合素质真题及答案.doc