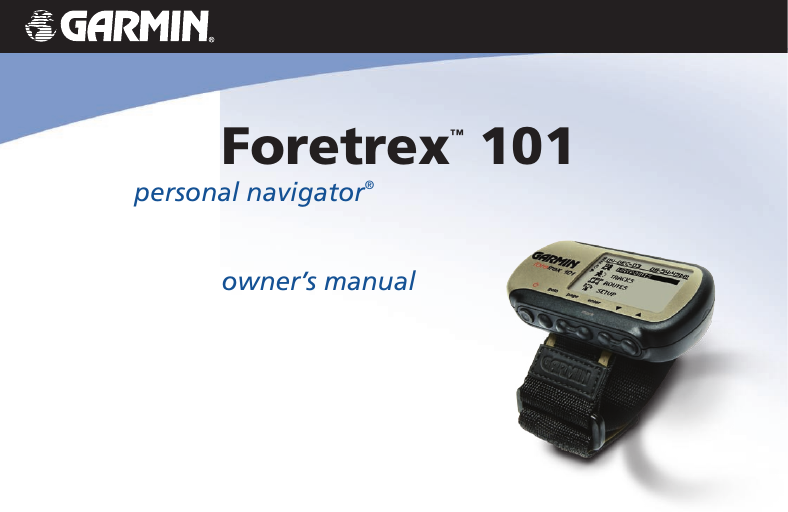
Foretrex™ 101
personal navigator®
owner’s manual
�
© Copyright 2004–2006 Garmin Ltd. or its subsidiaries
Garmin International, Inc.
1200 E 151st Street,
Olathe, Kansas 66062 U.S.A.
Tel. 913/397.8200
Fax. 913/397.8282
Garmin (Europe) Ltd.
Unit 5, The Quadrangle,
Abbey Park Industrial Estate,
Romsey, SO51 9DL, U.K.
Tel. 44/0870.8501241
Fax. 44/0870.8501251
Garmin Corporation
No. 68, Jangshu 2nd Road,
Shijr, Taipei County, Taiwan
Tel. 886/2.2642.9199
Fax. 886/2.2642.9099
All rights reserved. Except as expressly provided herein, no part of this manual may be reproduced, copied, transmitted, disseminated, down-
loaded, or stored in any storage medium for any purpose without prior written consent of Garmin. Garmin hereby grants permission to download
a single copy of this manual onto a hard drive or other electronic storage medium to be viewed for personal use, provided that such electronic or
printed copy of this manual or revision must contain the complete text of this copyright notice and provided further that any unauthorized com-
mercial distribution of this manual is strictly prohibited.
Information in this manual is subject to change without notice. Garmin reserves the right to change or improve its products and to make changes
in the content without obligation to notify any person or organization of such changes. Visit the Garmin Web site (www.Garmin.com) for current
updates and supplemental information concerning the use and operation of this and other Garmin products.
Garmin®, AutoLocate®, Personal Navigator®, MapSource®, TracBack®, and BlueChart® are registered trademarks and PanTrack™ and Foretrex™ are
trademarks of Garmin Ltd. or its subsidiaries and may not be used without the express permission of Garmin.
February 2006
Part Number 190-00360-00 Rev. B
Printed in Taiwan
�
Thank you for choosing the Garmin Foretrex 101. To get the most from your new
Foretrex 101, read through the Quick Start Guide first, then this Owner’s Manual to under-
stand all of the operating features.
The Quick Start Guide describes the process of navigating the Main Pages and the Option
Menus, along with some basic unit operations to familiarize you with your new Foretrex
101 right out of the box. Read the Quick Start Guide first.
This Owner’s Manual describes the Main Pages of the Foretrex 101 and their options in
detail. While the Owner’s Manual provides some direction on how to select and change
items, its main intention is to describe each Main Page, Option Menu, and feature in detail.
This manual is organized into the following sections:
The Introduction chapter provides care information and the Table of Contents.
The Overview chapter provides basic information about the Foretrex 101.
The Main Pages chapter provides information on each of the six Main Pages, listed in
the same order as viewed on the unit. The section for each page provides an overview that
discusses the page, how it functions, and step-by-step instructions for using the page and its
features.
The Main Menu chapter provides information on each page in the Main Menu:
Waypoints, Tracks, Routes, and Setup. The section for each page provides an overview that
discusses the page, how it functions, and step-by-step instructions for using the page and its
features.
The Appendix includes additional information about the Foretrex 101
The Index provides keywords and the pages on which they appear.
Introduction
About This Manual
Standard Package Contents:
1 Foretrex 101 Unit
1 Strap Extension
1 Wrist Strap
1 Owner’s Manual
1 Quick Start Guide
Check to see that your package in-
cludes the items listed above. If any parts
are missing, contact your Garmin dealer
immediately.
i
�
Introduction
Cleaning the Unit and Wrist Strap
Care Information
The Foretrex 101 is constructed of high quality materials and does not require user
maintenance other than cleaning. Clean the unit using a cloth dampened with a mild de-
tergent solution and then wipe dry. Avoid chemical cleaners and solvents that may damage
plastic components.
The wrist strap should be hand washed with mild detergent in warm or hot water. Blot
dry then air dry. Do not machine wash.
Storing the Foretrex 101
Do not store the Foretrex 101 where prolonged exposure to temperature extremes may
occur (such as in the trunk of a car) as permanent damage may result. User information,
such as waypoints and routes will be retained in the unit’s memory without the need for
battery power.
Immersing the Unit in Water
The Foretrex 101 is waterproof to IEC Standard 60529 IPX7. It can withstand im-
mersion in 1 meter of water for 30 minutes. Prolonged submersion can cause damage to
the unit. After submersion, be certain to wipe and air dry the unit (including the battery
compartment) before reuse or charging.
To resolve problems that cannot be remedied using this guide, contact Garmin Product
Support in the U.S.A. at 800/800.1020 or Garmin Europe at 44/1794.519944.
ii
�
Introduction .............................i
Care Information .......................................ii
Cleaning the Unit and Wrist Strap ........... ii
Storing the Foretrex 101 ......................... ii
Immersing the Unit in Water ................... ii
Table of Contents .....................................iii
Overview ................................1
Getting Started .........................................1
Foretrex 101 Overview ............................ 1
Using the Buttons .................................... 2
Using the Wrist Strap .............................. 3
Installing Batteries ................................... 5
Turning on the Foretrex 101 .................... 6
Using the Main Pages .............................. 7
Switching Between the Main Pages .......... 7
Main Pages .............................8
Satellite Page ............................................8
Using the Satellite Page ........................... 8
Using the Satellite Page Options .............. 8
Adjusting the Backlighting and Contrast . 9
Map Page .................................................10
Using the Map Page ............................... 10
Map Page Options ................................. 10
Navigation Page ......................................13
Using the Navigation Page ..................... 13
Navigation Page Options ....................... 13
Trip Computer ..........................................14
Using the Trip Computer ....................... 14
Trip Computer Options ......................... 14
Timer Page ...............................................15
Displaying the Timer Page ..................... 15
Setting the Timer ................................... 15
Using the Timer Page ............................ 17
Main Menu Pages .................18
Main Menu Page ......................................18
Main Menu Page Basics ......................... 18
Waypoints Menu Page .............................19
Waypoints Menu Page ........................... 19
Marking a Waypoint ............................. 21
Editing a Waypoint ................................ 21
Review Waypoint Page .......................... 24
Projecting a Waypoint ........................... 26
Hunting and Fishing Information .......... 27
Sun and Moon Information ................... 28
Tracks Menu Page ....................................29
Using the Tracks Menu Page .................. 29
Using the Track Log .............................. 30
Pan Options .......................................... 30
Using the Setup Track Page ................... 31
Using Saved Tracks ................................ 31
Track Page Options ............................... 33
Introduction
Table of Contents
iii
�
Introduction
Table of Contents
iv
Routes Menu Page ...................................34
Using the Routes Menu Page ................. 34
Creating a Route .................................... 34
Using the Route Page ............................. 35
Deleting All Routes ................................ 36
Route Setup ........................................... 37
Route Setup Options ....................... 37
Editing a Route ...................................... 38
Navigating a Route ................................ 40
Setup Menu: Set Timer ............................41
Using the Setup Menu ........................... 41
Set Timer Page ....................................... 41
Setting the Timer ............................. 42
Expired and Interval Timer Tones ... 43
Setup Menu: Set Time ..............................44
Set Time Page ........................................ 44
Time Zone ....................................... 44
Daylight Savings Time ..................... 45
Setup Menu: Set Display .........................46
Set Display Page .................................... 46
Light Timeout ................................. 46
Contrast .......................................... 46
Setup Menu: Set Units .............................47
Set Units Page ....................................... 47
Position Format ............................... 47
Map Datums .................................... 48
Distance/Speed, Elevation,
and Vertical Speed ..................... 49
Defaults ........................................... 49
Setup Menu: Set Heading ........................50
Set Heading Page ................................... 50
North Reference .............................. 50
Setup Menu: Set Interface .......................51
Set Interface Page .................................. 51
Setup Menu: Set System ..........................52
Set System Page ..................................... 52
GPS Mode ....................................... 53
Owner Info ..................................... 53
Appendix ..............................54
Specifications ..........................................54
Optional Accessories ............................. 54
Physical ................................................. 54
Performance .......................................... 54
Power .................................................... 54
Data Field Options ...................................55
Compliance, License,
and Warranty Information .................57
FCC Compliance ................................... 57
Software License Agreement .................. 58
Product Registration .............................. 58
Limited Warranty .................................. 59
Safety Information ..................................61
Index .....................................62
�
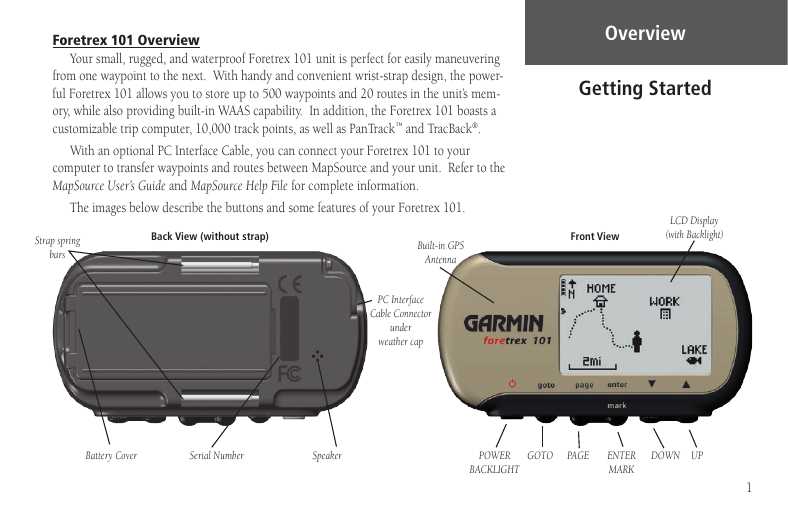
Foretrex 101 Overview
Your small, rugged, and waterproof Foretrex 101 unit is perfect for easily maneuvering
from one waypoint to the next. With handy and convenient wrist-strap design, the power-
ful Foretrex 101 allows you to store up to 500 waypoints and 20 routes in the unit’s mem-
ory, while also providing built-in WAAS capability. In addition, the Foretrex 101 boasts a
customizable trip computer, 10,000 track points, as well as PanTrack™ and TracBack®.
With an optional PC Interface Cable, you can connect your Foretrex 101 to your
computer to transfer waypoints and routes between MapSource and your unit. Refer to the
MapSource User’s Guide and MapSource Help File for complete information.
The images below describe the buttons and some features of your Foretrex 101.
Strap spring
bars
Back View (without strap)
Built-in GPS
Antenna
PC Interface
Cable Connector
under
weather cap
Overview
Getting Started
Front View
LCD Display
(with Backlight)
Battery Cover
Serial Number
Speaker
POWER
GOTO
PAGE
BACKLIGHT
ENTER
MARK
DOWN UP
1
�
Overview
Using the Buttons
Getting Started
POWER
GOTO
PAGE
ENTER/
MARK
DOWN
UP
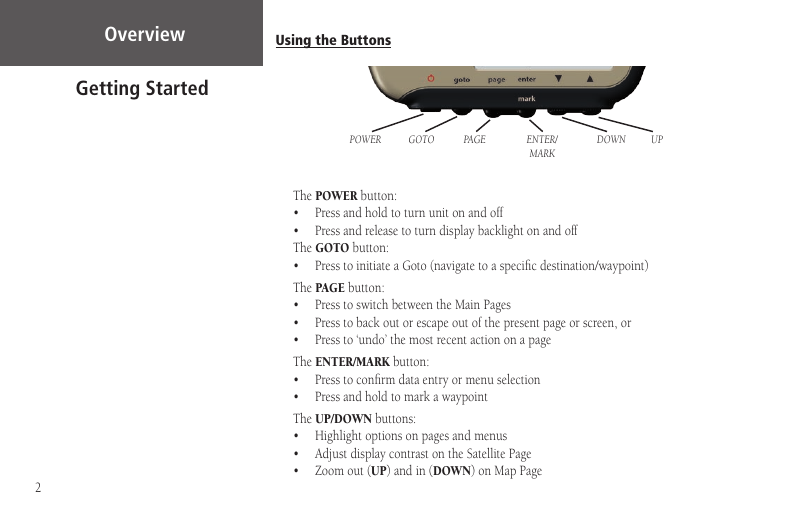
The POWER button:
• Press and hold to turn unit on and off
• Press and release to turn display backlight on and off
The GOTO button:
• Press to initiate a Goto (navigate to a specific destination/waypoint)
The PAGE button:
• Press to switch between the Main Pages
• Press to back out or escape out of the present page or screen, or
• Press to ‘undo’ the most recent action on a page
The ENTER/MARK button:
• Press to confirm data entry or menu selection
• Press and hold to mark a waypoint
The UP/DOWN buttons:
• Highlight options on pages and menus
• Adjust display contrast on the Satellite Page
• Zoom out (UP) and in (DOWN) on Map Page
2
�



 2023年江西萍乡中考道德与法治真题及答案.doc
 2012年重庆南川中考生物真题及答案.doc
 2013年江西师范大学地理学综合及文艺理论基础考研真题.doc
 2020年四川甘孜小升初语文真题及答案I卷.doc
 2020年注册岩土工程师专业基础考试真题及答案.doc
 2023-2024学年福建省厦门市九年级上学期数学月考试题及答案.doc
 2021-2022学年辽宁省沈阳市大东区九年级上学期语文期末试题及答案.doc
 2022-2023学年北京东城区初三第一学期物理期末试卷及答案.doc
 2018上半年江西教师资格初中地理学科知识与教学能力真题及答案.doc
 2012年河北国家公务员申论考试真题及答案-省级.doc
 2020-2021学年江苏省扬州市江都区邵樊片九年级上学期数学第一次质量检测试题及答案.doc
 2022下半年黑龙江教师资格证中学综合素质真题及答案.doc