C
M
Y
CM MY CY CMY K
H
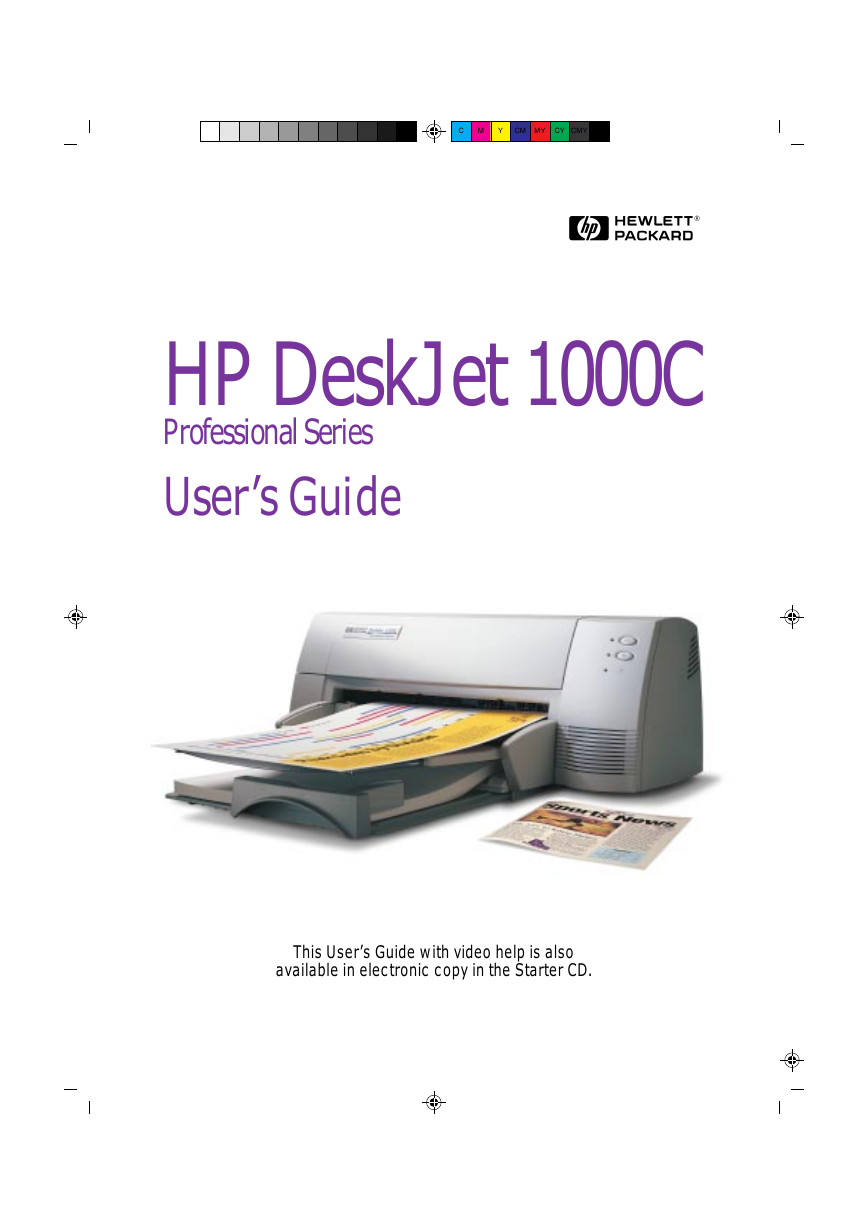
HP DeskJet 1000C
Professional Series
User’s Guide
This User’s Guide with video help is also
available in electronic copy in the Starter CD.
�
###E###
Chapter0 Page 1 Wednesday, March 12, 1997 9:10 AM
Acknowledgements
ColorSmart and HP ZoomSmart Scaling Technology
are trademarks of Hewlett-Packard Company.
TABLE OF CONTENTS
1 Getting Started
Microsoft is a U.S. registered trademark of Microsoft
Corporation.
Windows is a trademark of Microsoft Corporation.
Notice
The information contained in this document is
subject to change without notice.
Hewlett-Packard makes no warranty of any kind with
regard to this material, including, but not limited to,
the implied warranties of merchantability and fitness
for a particular purpose.
Hewlett-Packard shall not be liable for errors
contained herein or for incidental or consequential
damages in connection with the furnishing,
performance, or use of this material.
No part of this document may be photocopied,
reproduced, or translated to another language
without the prior written consent of Hewlett-Packard
Company.
Print History
Edition 1 – June 1997
©Copyright 1997 by Hewlett-Packard Company
450 Alexandra Road Singapore 119960
Singapore
Packing List.......................................................... 1-1
Printer Parts......................................................... 1-1
Setting up the Printer.......................................... 1-2
STEP 1: Installing the Tray............................ 1-2
STEP 2: Connecting the Power Cable.......... 1-2
STEP 3: Connecting the Parallel Cable ........ 1-2
STEP 4: Installing the Print Cartridges ........ 1-3
STEP 5: Loading Paper ................................. 1-4
STEP 6: Installing the Printer Software ....... 1-5
STEP 7: Align Cartridge and Printer Test..... 1-6
2 Getting the Most Out of Your Printer
Changing Print Settings...................................... 2-1
Using the DJ1000C Toolbox............................... 2-1
Printing on Standard-Size Paper........................ 2-2
Printing on Custom-Size Paper.......................... 2-2
Printing on Envelopes......................................... 2-3
Printing on Labels ............................................... 2-3
Printing on Cards ................................................ 2-4
Printing on Thick (0.3mm) Cards ....................... 2-5
Printing on HP Premium Transparencies
and Slides....................................................... 2-5
Printing on HP Premium Paper.......................... 2-6
Printing With Special Features........................... 2-7
HP ZoomSmart Scaling Technology ............ 2-7
Printing Booklet ............................................. 2-7
Printing Billboard........................................... 2-8
Printing Handouts.......................................... 2-8
2-sided Printing.............................................. 2-9
Printing Banner.............................................. 2-9
Printing Mirror Image.................................. 2-10
Printing in Normal Mode ............................ 2-10
Printing in DOS Box.......................................... 2-11
3 Solving Problems
Problem Solving Guidelines .............................. 3-1
When the Printer Does Not Print ....................... 3-1
When the Lights Blink......................................... 3-2
When Paper is Jammed in the Printer .............. 3-4
Media does not Feed Through the Printer
Correctly............................................................... 3-5
When the Print Quality Is Not Satisfactory ....... 3-6
When the Ink Nozzles are Clogged.................... 3-8
Testing the Printer............................................... 3-8
4 Appendices
Customer Support............................................... 4-1
Printer Specifications.......................................... 4-2
Regulatory Notices.............................................. 4-5
Declaration of Conformity.................................. 4-7
Hewlett-Packard Limited Warranty Statement . 4-8
�
###E###
Chapter1 Page 1 Friday, March 14, 1997 9:42 AM
1
P R O F E S S I O N A L SE R I E SH
3
4
6
H
DeskJet 1000C
PR OFESSIO NAL SERIES
U ser's G uid e
8
2
5
7
1
Getting Started
PACKING LIST
1
2
3
4
5
6
7
8
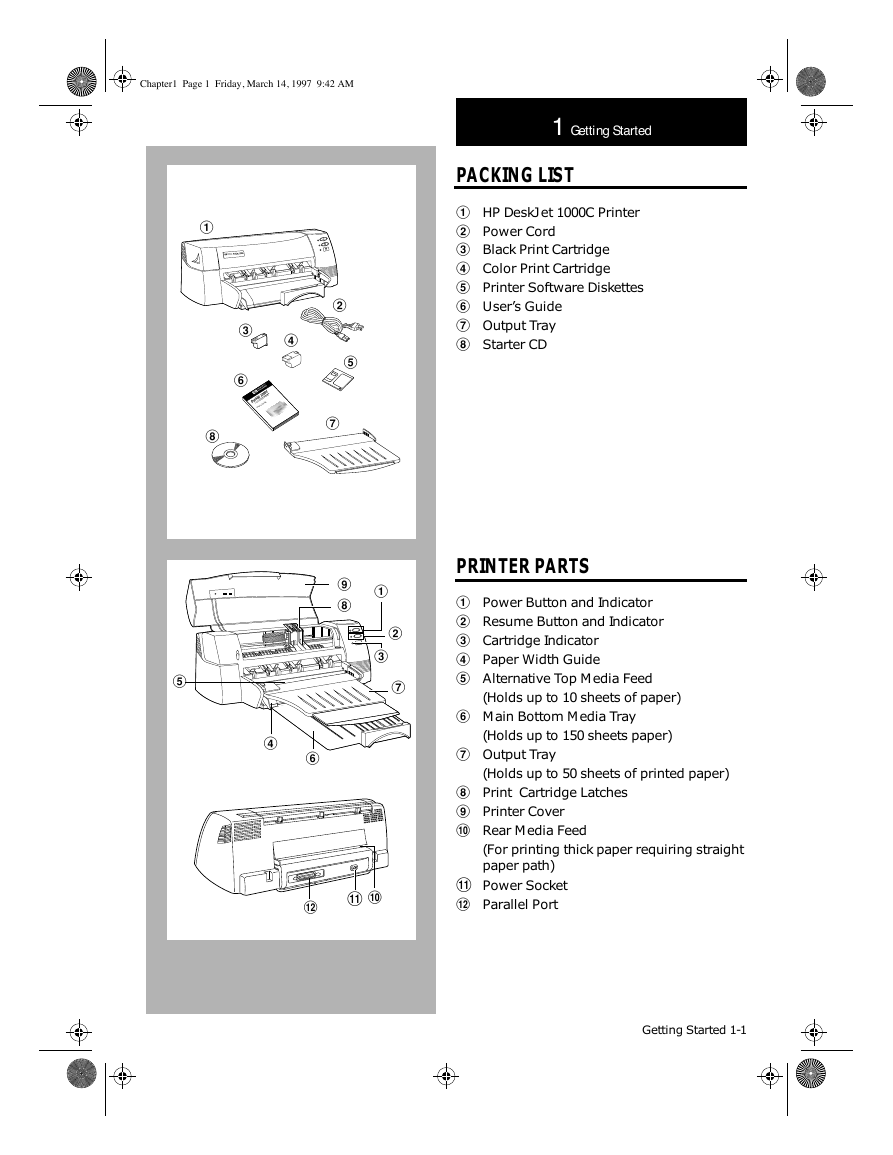
HP DeskJet 1000C Printer
Power Cord
Black Print Cartridge
Color Print Cartridge
Printer Software Diskettes
User’s Guide
Output Tray
Starter CD
PRINTER PARTS
9
8
1
2
3
7
5
4
6
1
2
3
4
5
6
7
8
9
!
"
!
#
"
#
Power Button and Indicator
Resume Button and Indicator
Cartridge Indicator
Paper Width Guide
Alternative Top Media Feed
(Holds up to 10 sheets of paper)
Main Bottom Media Tray
(Holds up to 150 sheets paper)
Output Tray
(Holds up to 50 sheets of printed paper)
Print Cartridge Latches
Printer Cover
Rear Media Feed
(For printing thick paper requiring straight
paper path)
Power Socket
Parallel Port
Getting Started 1-1
�
Chapter1 Page 2 Friday, March 14, 1997 9:42 AM
STEP 1
STEP 2
STEP 3
1
2
2
4
SETTING UP THE PRINTER
Remove the four tapes securing the printer (one is at
the back). Open the top cover and remove the fifth
tape and white packing material from the inside of
the printer.
P R O F E S S I O N A L SE R I E SH
2.
3.
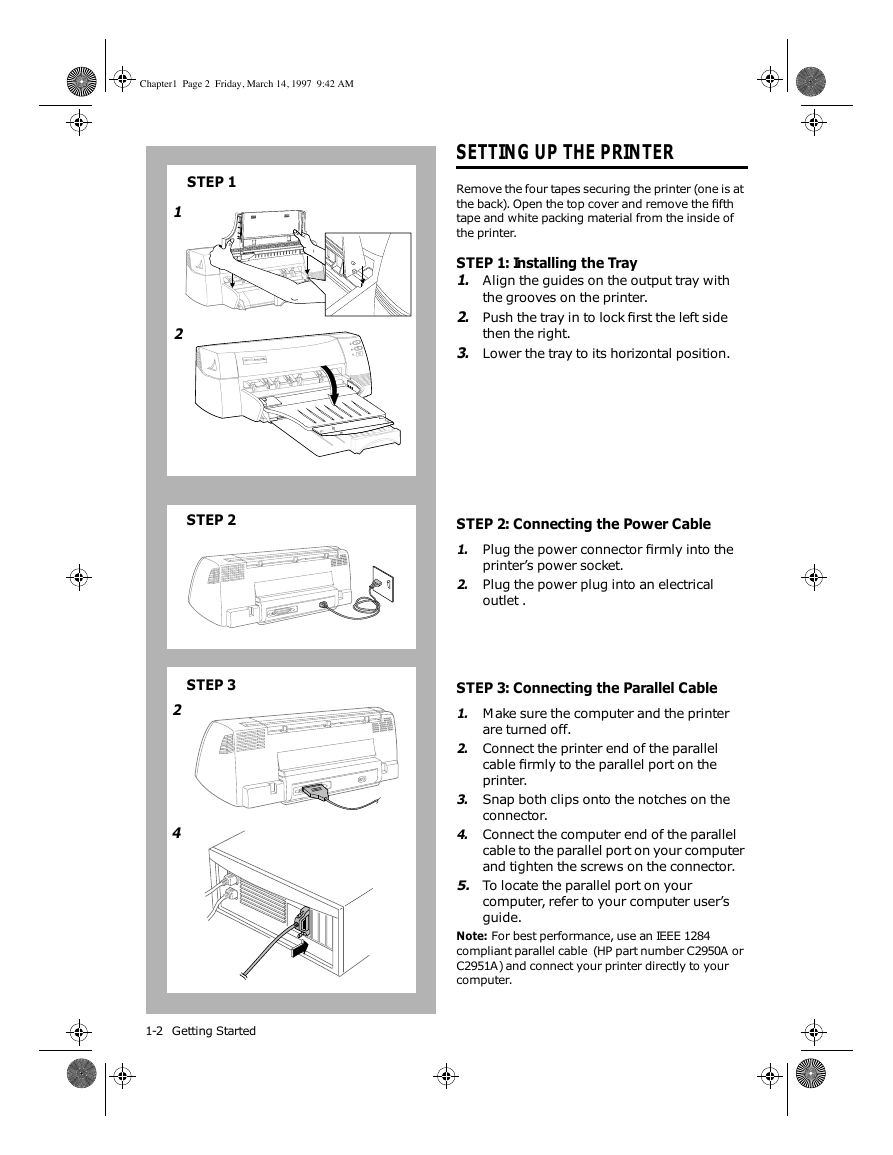
STEP 1: Installing the Tray
1.
Align the guides on the output tray with
the grooves on the printer.
Push the tray in to lock first the left side
then the right.
Lower the tray to its horizontal position.
STEP 2: Connecting the Power Cable
1.
2.
Plug the power connector firmly into the
printer’s power socket.
Plug the power plug into an electrical
outlet .
STEP 3: Connecting the Parallel Cable
1.
2.
3.
4.
5.
Make sure the computer and the printer
are turned off.
Connect the printer end of the parallel
cable firmly to the parallel port on the
printer.
Snap both clips onto the notches on the
connector.
Connect the computer end of the parallel
cable to the parallel port on your computer
and tighten the screws on the connector.
To locate the parallel port on your
computer, refer to your computer user’s
guide.
For best performance, use an IEEE 1284
Note:
compliant parallel cable (HP part number C2950A or
C2951A) and connect your printer directly to your
computer.
1-2 Getting Started
�
Chapter1 Page 3 Friday, March 14, 1997 9:42 AM
STEP 4
P R O F E S S I O N A L SE R I E SH
1
2
4
6
7
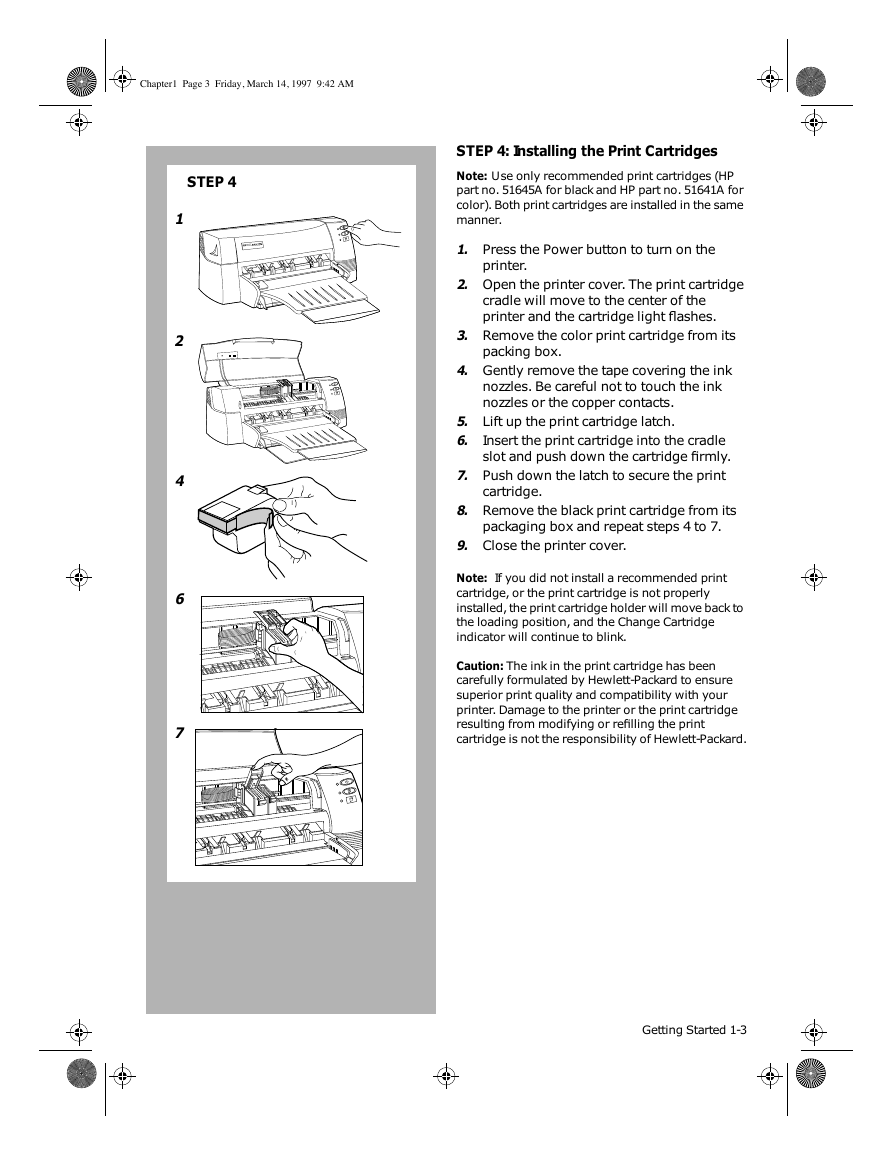
STEP 4: Installing the Print Cartridges
Use only recommended print cartridges (HP
Note:
part no. 51645A for black and HP part no. 51641A for
color). Both print cartridges are installed in the same
manner.
1.
2.
3.
4.
5.
6.
7.
8.
9.
Press the Power button to turn on the
printer.
Open the printer cover. The print cartridge
cradle will move to the center of the
printer and the cartridge light flashes.
Remove the color print cartridge from its
packing box.
Gently remove the tape covering the ink
nozzles. Be careful not to touch the ink
nozzles or the copper contacts.
Lift up the print cartridge latch.
Insert the print cartridge into the cradle
slot and push down the cartridge firmly.
Push down the latch to secure the print
cartridge.
Remove the black print cartridge from its
packaging box and repeat steps 4 to 7.
Close the printer cover.
If you did not install a recommended print
Note:
cartridge, or the print cartridge is not properly
installed, the print cartridge holder will move back to
the loading position, and the Change Cartridge
indicator will continue to blink.
The ink in the print cartridge has been
Caution:
carefully formulated by Hewlett-Packard to ensure
superior print quality and compatibility with your
printer. Damage to the printer or the print cartridge
resulting from modifying or refilling the print
cartridge is not the responsibility of Hewlett-Packard.
Getting Started 1-3
�
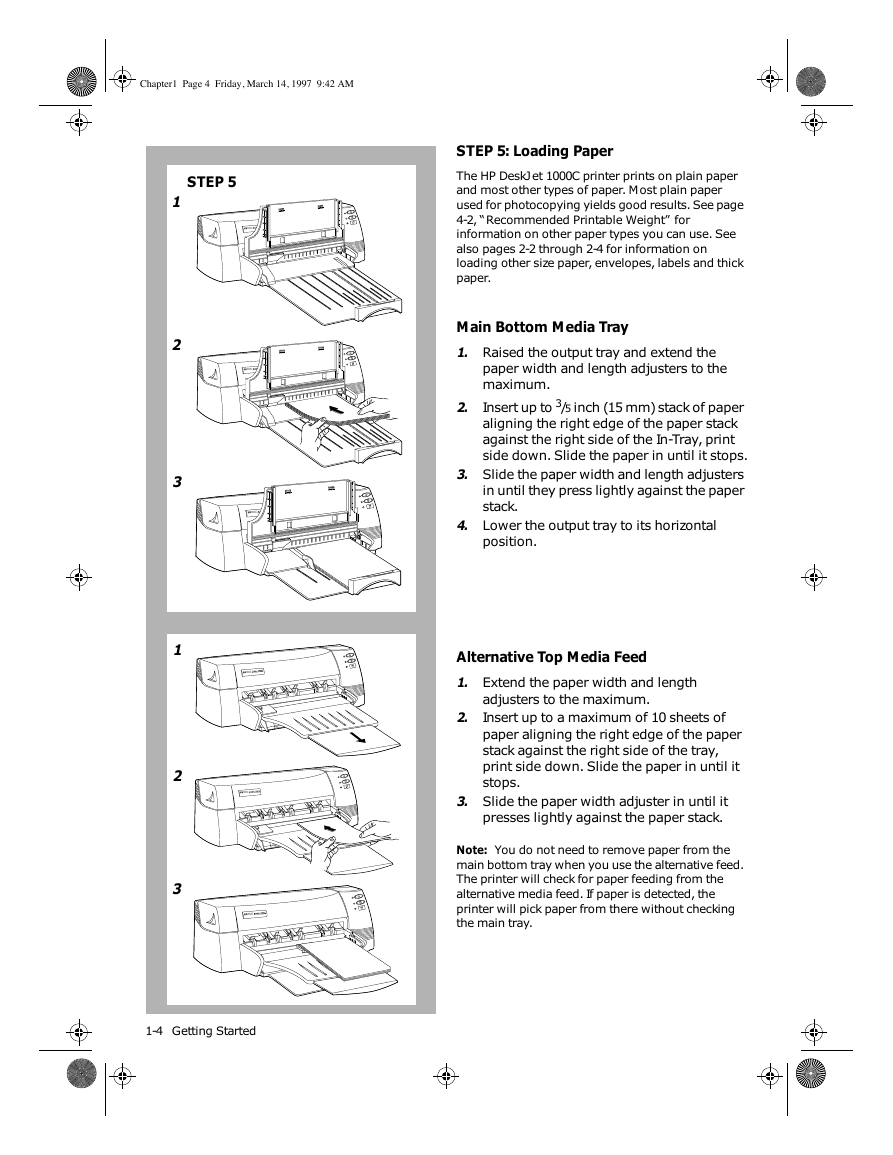
STEP 5: Loading Paper
The HP DeskJet 1000C printer prints on plain paper
and most other types of paper. Most plain paper
used for photocopying yields good results. See page
4-2, “Recommended Printable Weight” for
information on other paper types you can use. See
also pages 2-2 through 2-4 for information on
loading other size paper, envelopes, labels and thick
paper.
Main Bottom Media Tray
1.
2.
3.
4.
Raised the output tray and extend the
paper width and length adjusters to the
maximum.
3
/
Insert up to
inch (15 mm) stack of paper
5
aligning the right edge of the paper stack
against the right side of the In-Tray, print
side down. Slide the paper in until it stops.
Slide the paper width and length adjusters
in until they press lightly against the paper
stack.
Lower the output tray to its horizontal
position.
Alternative Top Media Feed
1.
2.
3.
Extend the paper width and length
adjusters to the maximum.
Insert up to a maximum of 10 sheets of
paper aligning the right edge of the paper
stack against the right side of the tray,
print side down. Slide the paper in until it
stops.
Slide the paper width adjuster in until it
presses lightly against the paper stack.
You do not need to remove paper from the
Note:
main bottom tray when you use the alternative feed.
The printer will check for paper feeding from the
alternative media feed. If paper is detected, the
printer will pick paper from there without checking
the main tray.
Chapter1 Page 4 Friday, March 14, 1997 9:42 AM
STEP 5
1
P R O F E S S I O N A L SE R I E SH
P R O F E S S I O N A L SE R I E SH
P R O F E S S I O N A L SE R I E SH
P R O F E S S I O N A L SE R I E SH
P R O F E S S I O N A L SE R I E SH
P R O F E S S I O N A L SE R I E SH
2
3
1
2
3
1-4 Getting Started
�




 2023年江西萍乡中考道德与法治真题及答案.doc
 2012年重庆南川中考生物真题及答案.doc
 2013年江西师范大学地理学综合及文艺理论基础考研真题.doc
 2020年四川甘孜小升初语文真题及答案I卷.doc
 2020年注册岩土工程师专业基础考试真题及答案.doc
 2023-2024学年福建省厦门市九年级上学期数学月考试题及答案.doc
 2021-2022学年辽宁省沈阳市大东区九年级上学期语文期末试题及答案.doc
 2022-2023学年北京东城区初三第一学期物理期末试卷及答案.doc
 2018上半年江西教师资格初中地理学科知识与教学能力真题及答案.doc
 2012年河北国家公务员申论考试真题及答案-省级.doc
 2020-2021学年江苏省扬州市江都区邵樊片九年级上学期数学第一次质量检测试题及答案.doc
 2022下半年黑龙江教师资格证中学综合素质真题及答案.doc