http://www.iteye.com - 做最棒的软件开发交流社区
跟我学Nginx+Lua开发
作者: jinnianshilongnian
http://jinnianshilongnian.iteye.com
跟我学Nginx+Lua开发
第 1 / 137 页
本书由ITeye提供的电子书DIY功能自动生成于 2016-09-30
�
http://jinnianshilongnian.iteye.com
目 录
1. 跟我学Nginx+Lua开发
1.1 第一章 安装Nginx+Lua开发环境 . . . . . . . . . . . . . . . . . . . . . . . . . . . . . . . . . . . . . . . . . . . . . . . . . . . . . . 3
1.2 第二章 Nginx+Lua开发入门 . . . . . . . . . . . . . . . . . . . . . . . . . . . . . . . . . . . . . . . . . . . . . . . . . . . . . . . . . 11
1.3 第三章 Redis/SSDB+Twemproxy安装与使用 . . . . . . . . . . . . . . . . . . . . . . . . . . . . . . . . . . . . . . . . . . 30
1.4 第五章 常用Lua开发库3-模板渲染 . . . . . . . . . . . . . . . . . . . . . . . . . . . . . . . . . . . . . . . . . . . . . . . . . . . . 47
1.5 第六章 Web开发实战1——HTTP服务 . . . . . . . . . . . . . . . . . . . . . . . . . . . . . . . . . . . . . . . . . . . . . . . . . 55
1.6 第七章 Web开发实战2——商品详情页 . . . . . . . . . . . . . . . . . . . . . . . . . . . . . . . . . . . . . . . . . . . . . . . . 80
1.7 第八章 流量复制/AB测试/协程 . . . . . . . . . . . . . . . . . . . . . . . . . . . . . . . . . . . . . . . . . . . . . . . . . . . . . .130
第 2 / 137 页
�
http://jinnianshilongnian.iteye.com
1.1 第一章 安装Nginx+Lua开发环境
1.1 第一章 安装Nginx+Lua开发环境
发表时间: 2015-02-17 关键字: nginx, lua, ngx_lua, openresty
首先我们选择使用OpenResty,其是由Nginx核心加很多第三方模块组成,其最大的亮点是默认集成了Lua开发环境,
使得Nginx可以作为一个Web Server使用。借助于Nginx的事件驱动模型和非阻塞IO,可以实现高性能的Web应用程
序。而且OpenResty提供了大量组件如Mysql、Redis、Memcached等等,使在Nginx上开发Web应用更方便更简
单。目前在京东如实时价格、秒杀、动态服务、单品页、列表页等都在使用Nginx+Lua架构,其他公司如淘宝、去哪儿
网等。
安装环境
安装步骤可以参考http://openresty.org/#Installation。
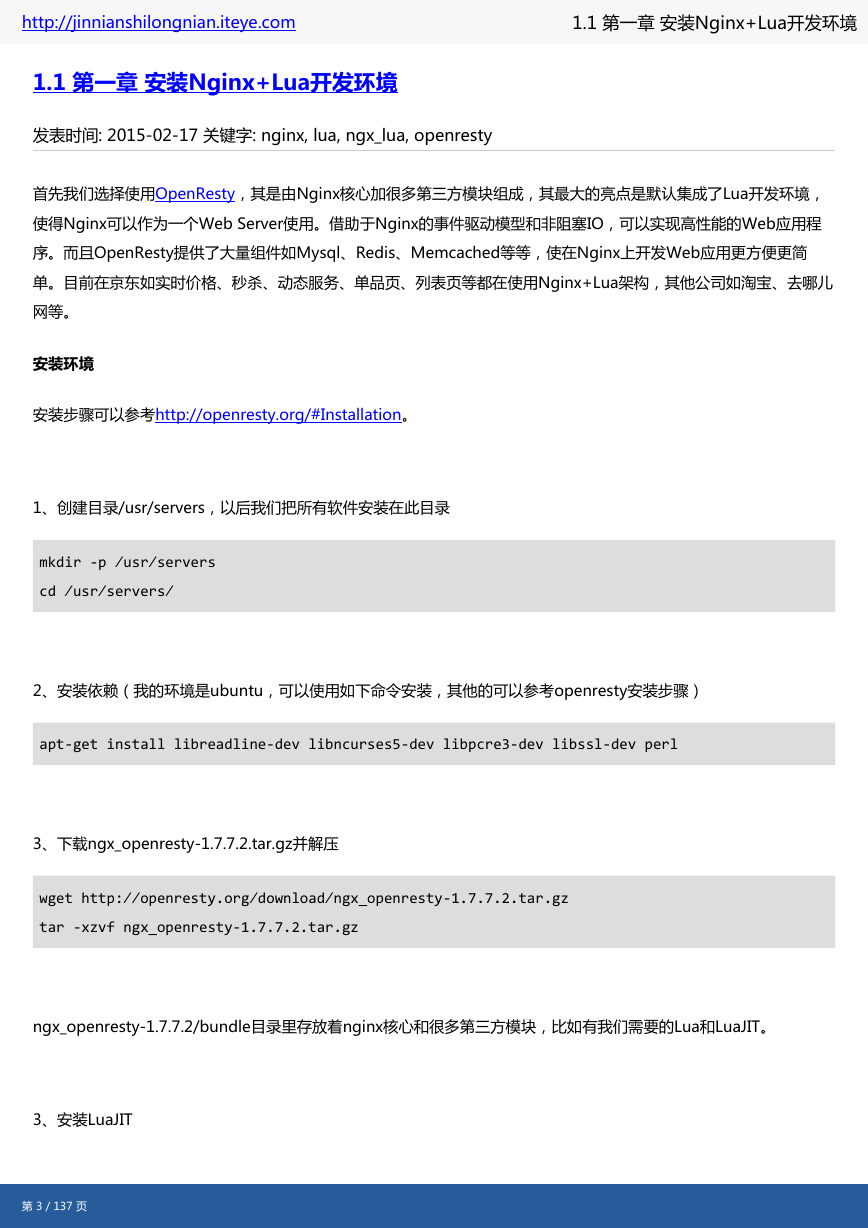
1、创建目录/usr/servers,以后我们把所有软件安装在此目录
mkdir -p /usr/servers
cd /usr/servers/
2、安装依赖(我的环境是ubuntu,可以使用如下命令安装,其他的可以参考openresty安装步骤)
apt-get install libreadline-dev libncurses5-dev libpcre3-dev libssl-dev perl
3、下载ngx_openresty-1.7.7.2.tar.gz并解压
wget http://openresty.org/download/ngx_openresty-1.7.7.2.tar.gz
tar -xzvf ngx_openresty-1.7.7.2.tar.gz
ngx_openresty-1.7.7.2/bundle目录里存放着nginx核心和很多第三方模块,比如有我们需要的Lua和LuaJIT。
3、安装LuaJIT
第 3 / 137 页
�
http://jinnianshilongnian.iteye.com
1.1 第一章 安装Nginx+Lua开发环境
cd bundle/LuaJIT-2.1-20150120/
make clean && make && make install
ln -sf luajit-2.1.0-alpha /usr/local/bin/luajit
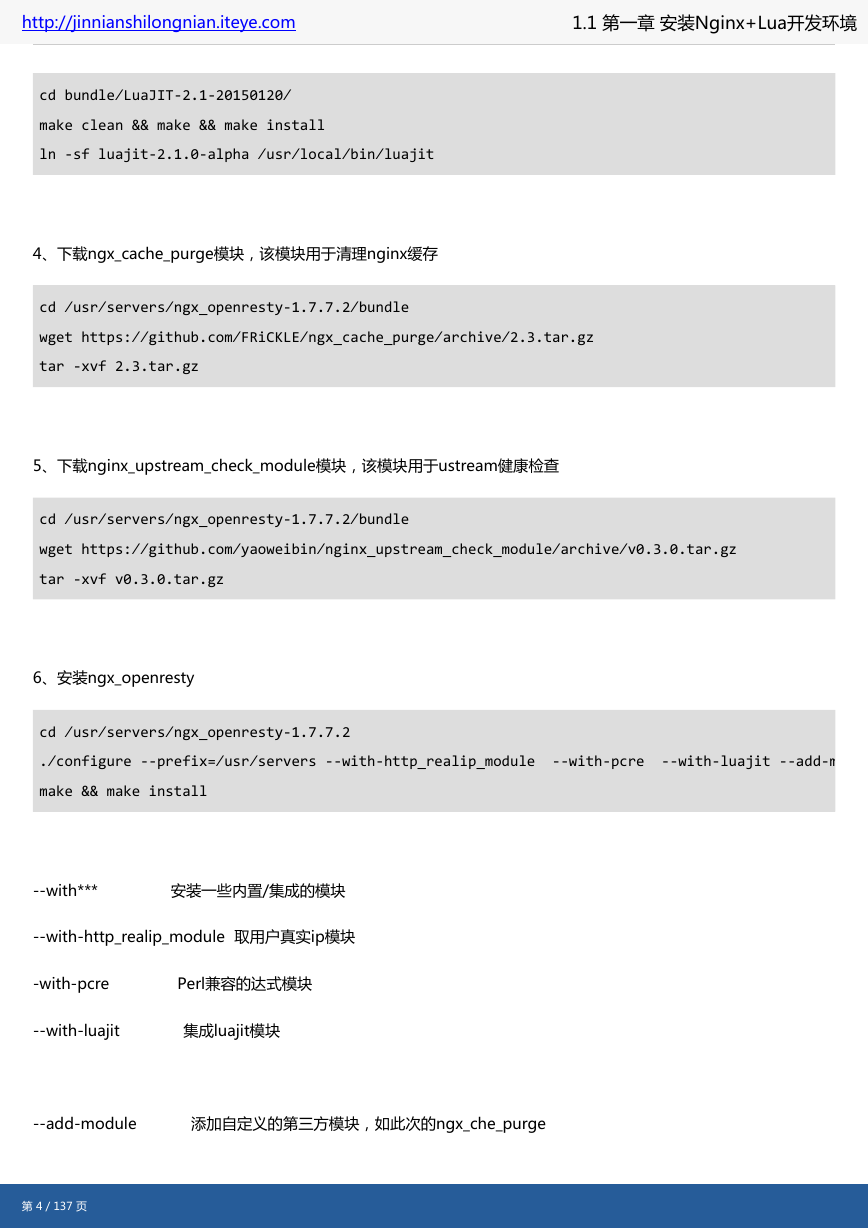
4、下载ngx_cache_purge模块,该模块用于清理nginx缓存
cd /usr/servers/ngx_openresty-1.7.7.2/bundle
wget https://github.com/FRiCKLE/ngx_cache_purge/archive/2.3.tar.gz
tar -xvf 2.3.tar.gz
5、下载nginx_upstream_check_module模块,该模块用于ustream健康检查
cd /usr/servers/ngx_openresty-1.7.7.2/bundle
wget https://github.com/yaoweibin/nginx_upstream_check_module/archive/v0.3.0.tar.gz
tar -xvf v0.3.0.tar.gz
6、安装ngx_openresty
cd /usr/servers/ngx_openresty-1.7.7.2
./configure --prefix=/usr/servers --with-http_realip_module --with-pcre --with-luajit --add-module=./bundle/ngx_cache_purge-2.3/ --add-module=./bundle/nginx_upstream_check_module-0.3.0/ -j2
make && make install
--with***
安装一些内置/集成的模块
--with-http_realip_module 取用户真实ip模块
-with-pcre
Perl兼容的达式模块
--with-luajit
集成luajit模块
--add-module
添加自定义的第三方模块,如此次的ngx_che_purge
第 4 / 137 页
�
http://jinnianshilongnian.iteye.com
1.1 第一章 安装Nginx+Lua开发环境
8、到/usr/servers目录下
cd /usr/servers/
ll
会发现多出来了如下目录,说明安装成功
/usr/servers/luajit :luajit环境,luajit类似于java的jit,即即时编译,lua是一种解释语言,通过luajit可以即时编译
lua代码到机器代码,得到很好的性能;
/usr/servers/lualib:要使用的lua库,里边提供了一些默认的lua库,如redis,json库等,也可以把一些自己开发的
或第三方的放在这;
/usr/servers/nginx :安装的nginx;
通过/usr/servers/nginx/sbin/nginx -V 查看nginx版本和安装的模块
7、启动nginx
/usr/servers/nginx/sbin/nginx
接下来该配置nginx+lua开发环境了
配置环境
配置及Nginx HttpLuaModule文档在可以查看http://wiki.nginx.org/HttpLuaModule。
1、编辑nginx.conf配置文件
第 5 / 137 页
�
http://jinnianshilongnian.iteye.com
1.1 第一章 安装Nginx+Lua开发环境
vim /usr/servers/nginx/conf/nginx.conf
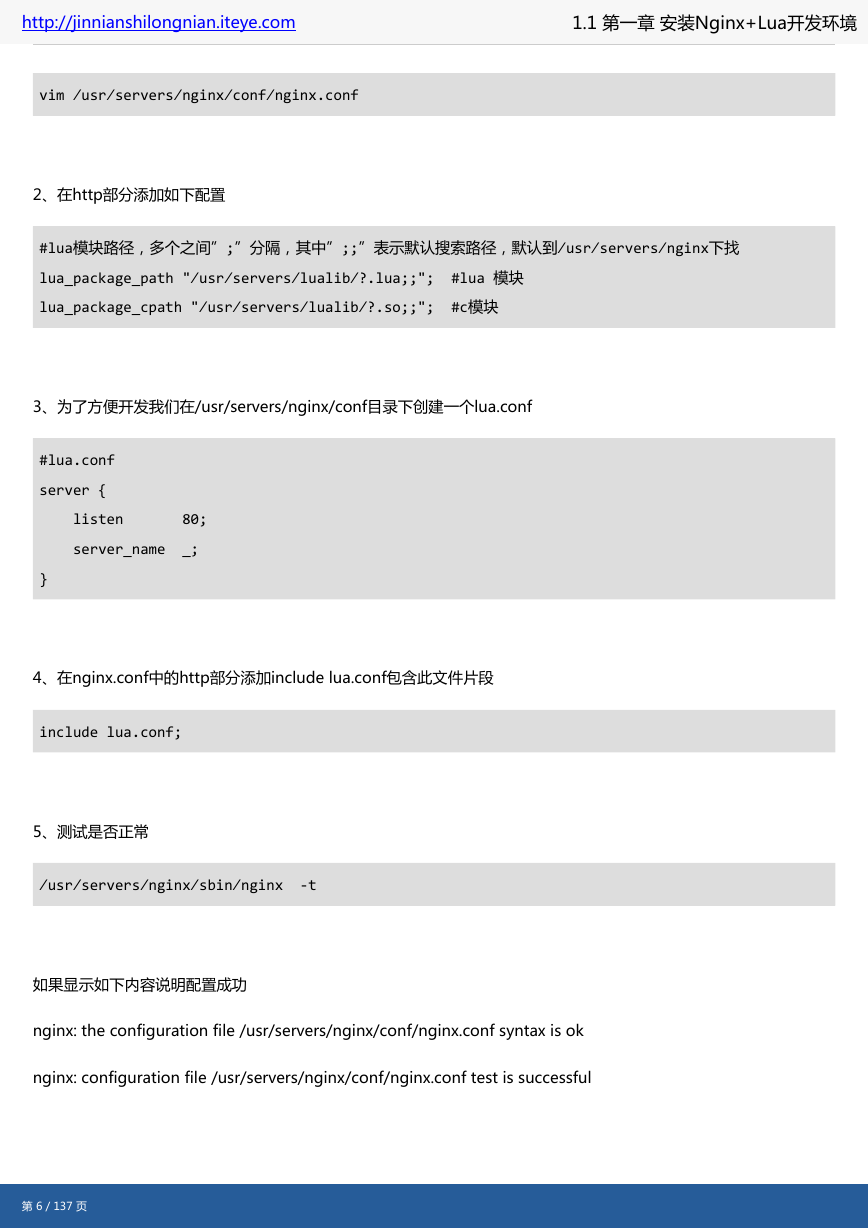
2、在http部分添加如下配置
#lua模块路径,多个之间”;”分隔,其中”;;”表示默认搜索路径,默认到/usr/servers/nginx下找
lua_package_path "/usr/servers/lualib/?.lua;;"; #lua 模块
lua_package_cpath "/usr/servers/lualib/?.so;;"; #c模块
3、为了方便开发我们在/usr/servers/nginx/conf目录下创建一个lua.conf
#lua.conf
server {
listen 80;
server_name _;
}
4、在nginx.conf中的http部分添加include lua.conf包含此文件片段
include lua.conf;
5、测试是否正常
/usr/servers/nginx/sbin/nginx -t
如果显示如下内容说明配置成功
nginx: the configuration file /usr/servers/nginx/conf/nginx.conf syntax is ok
nginx: configuration file /usr/servers/nginx/conf/nginx.conf test is successful
第 6 / 137 页
�
http://jinnianshilongnian.iteye.com
1.1 第一章 安装Nginx+Lua开发环境
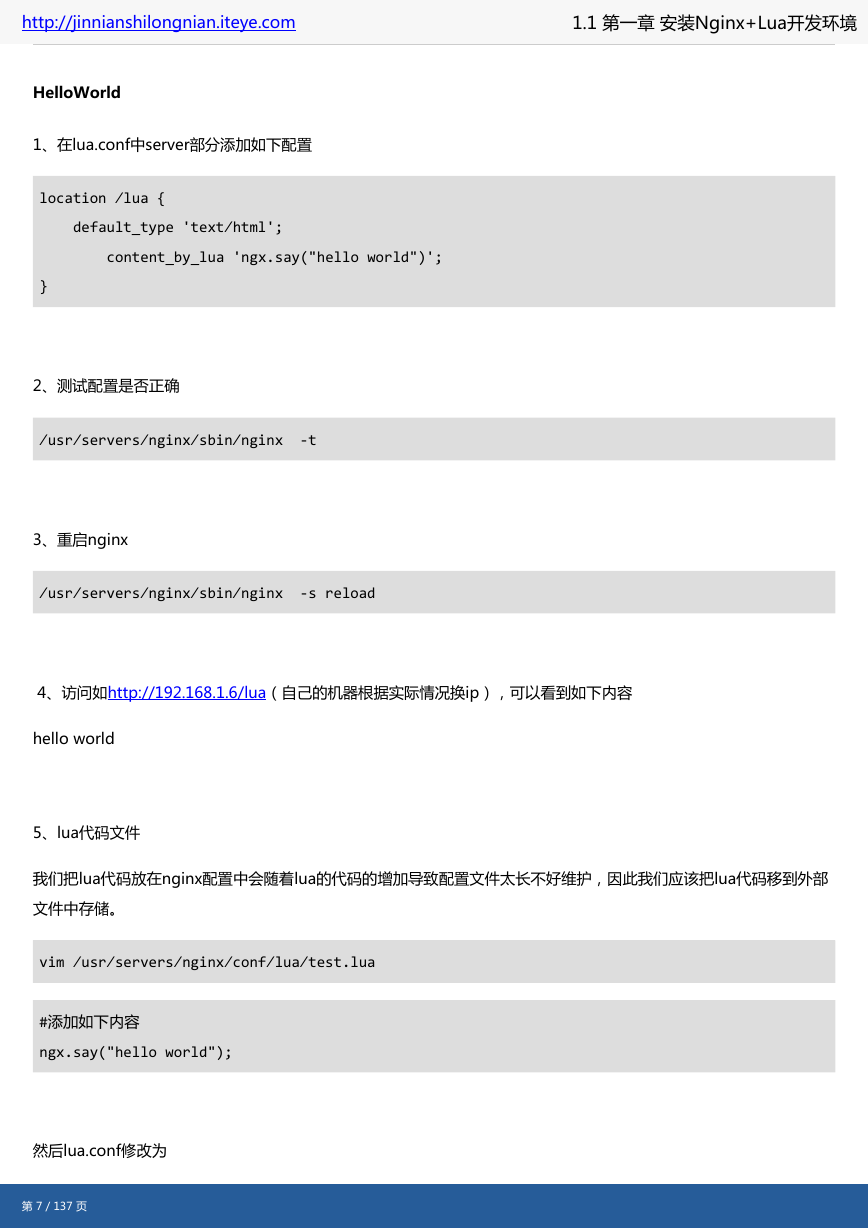
HelloWorld
1、在lua.conf中server部分添加如下配置
location /lua {
default_type 'text/html';
content_by_lua 'ngx.say("hello world")';
}
2、测试配置是否正确
/usr/servers/nginx/sbin/nginx -t
3、重启nginx
/usr/servers/nginx/sbin/nginx -s reload
4、访问如http://192.168.1.6/lua(自己的机器根据实际情况换ip),可以看到如下内容
hello world
5、lua代码文件
我们把lua代码放在nginx配置中会随着lua的代码的增加导致配置文件太长不好维护,因此我们应该把lua代码移到外部
文件中存储。
vim /usr/servers/nginx/conf/lua/test.lua
#添加如下内容
ngx.say("hello world");
然后lua.conf修改为
第 7 / 137 页
�
http://jinnianshilongnian.iteye.com
1.1 第一章 安装Nginx+Lua开发环境
location /lua {
default_type 'text/html';
content_by_lua_file conf/lua/test.lua; #相对于nginx安装目录
}
此处conf/lua/test.lua也可以使用绝对路径/usr/servers/nginx/conf/lua/test.lua。
6、lua_code_cache
默认情况下lua_code_cache 是开启的,即缓存lua代码,即每次lua代码变更必须reload nginx才生效,如果在开发阶
段可以通过lua_code_cache off;关闭缓存,这样调试时每次修改lua代码不需要reload nginx;但是正式环境一定记得
开启缓存。
location /lua {
default_type 'text/html';
lua_code_cache off;
content_by_lua_file conf/lua/test.lua;
}
开启后reload nginx会看到如下报警
nginx: [alert] lua_code_cache is off; this will hurt performance in /usr/servers/nginx/conf/lua.conf:8
7、错误日志
如果运行过程中出现错误,请不要忘记查看错误日志。
tail -f /usr/servers/nginx/logs/error.log
到此我们的基本环境搭建完毕。
第 8 / 137 页
�




 2023年江西萍乡中考道德与法治真题及答案.doc
 2012年重庆南川中考生物真题及答案.doc
 2013年江西师范大学地理学综合及文艺理论基础考研真题.doc
 2020年四川甘孜小升初语文真题及答案I卷.doc
 2020年注册岩土工程师专业基础考试真题及答案.doc
 2023-2024学年福建省厦门市九年级上学期数学月考试题及答案.doc
 2021-2022学年辽宁省沈阳市大东区九年级上学期语文期末试题及答案.doc
 2022-2023学年北京东城区初三第一学期物理期末试卷及答案.doc
 2018上半年江西教师资格初中地理学科知识与教学能力真题及答案.doc
 2012年河北国家公务员申论考试真题及答案-省级.doc
 2020-2021学年江苏省扬州市江都区邵樊片九年级上学期数学第一次质量检测试题及答案.doc
 2022下半年黑龙江教师资格证中学综合素质真题及答案.doc