TMS570LS31x Hercules Development Kit (HDK)
User's Guide
Literature Number: SPNU509A
September 2011–Revised September 2012
�
Contents
2
Preface ....................................................................................................................................... 4
Introduction ........................................................................................................................ 5
1
Scope of Document ......................................................................................................... 5
1.1
TMS570LS31 HERCULES Development Kit (HDK) Features ........................................................ 5
1.2
HDK Board Block Diagram ................................................................................................ 6
1.3
TMS570LS31 HDK Contents .............................................................................................. 6
1.4
HDK Specifications ......................................................................................................... 7
1.5
Basic Operation ............................................................................................................. 7
1.6
Memory Map ................................................................................................................. 7
1.7
Power Supply ................................................................................................................ 7
1.8
Physical Description ............................................................................................................ 8
Board Layout ................................................................................................................ 8
2.1
Connectors ................................................................................................................... 9
2.2
2.2.1 20-Pin ARM JTAG Header ...................................................................................... 10
2.2.2 Ethernet Interface ................................................................................................ 10
2.2.3 CAN Interface ..................................................................................................... 10
2.2.4 J19, MIPI ETM Connector ....................................................................................... 11
2.2.5 J7, XDS100V2 USB JTAG Interface ........................................................................... 12
2.2.6 P1, +5 V to +12 V Input .......................................................................................... 13
2.2.7 SCI Interface ...................................................................................................... 13
2.2.8 Daughter Card Interface ......................................................................................... 13
LEDs ........................................................................................................................ 16
2.3
S2 DIP Switch .............................................................................................................. 17
2.4
Jumpers ..................................................................................................................... 18
2.5
S4, Power On Reset Switch ............................................................................................. 18
2.6
S3, System Reset Switch ................................................................................................ 18
2.7
Operation Notices .............................................................................................................. 19
A
2
Contents
Copyright © 2011–2012, Texas Instruments Incorporated
SPNU509A–September 2011– Revised September 2012
Submit Documentation Feedback
�
www.ti.com
List of Figures
1-1.
2-1.
2-2.
2-3.
2-4.
2-5.
2-6.
2-7.
2-8.
TMS570LS31 HDK Board Block Diagram ............................................................................... 6
TMS570LS31 HDK Board, Interfaces Top Side ........................................................................ 8
Connectors on TMS570LS31 HDK ....................................................................................... 9
CAN Bus Termination..................................................................................................... 11
J2, J3 CAN Bus Interface (Screw Terminal) ........................................................................... 11
J19, 60 Pin MIPI ETM Header........................................................................................... 11
+12 V Input Jack........................................................................................................... 13
J9, J10, and J11 on HDK................................................................................................. 14
DIP Switch Settings ....................................................................................................... 17
List of Tables
TMS570LS31 Memory Map ............................................................................................... 7
1-1.
Power Test Points .......................................................................................................... 7
1-2.
Connectors on HDK Board ................................................................................................ 9
2-1.
20-Pin ARM JTAG Header ............................................................................................... 10
2-2.
J1, Ethernet Interface ..................................................................................................... 10
2-3.
J19, MIPI Connector Signal Mapping................................................................................... 12
2-4.
J7, XDS100V2 USB JTAG Interface.................................................................................... 12
2-5.
Expansion Connector P2 (J10, Right, TopView) ...................................................................... 14
2-6.
Expansion Connector P1 (J9, Left, TopView) ......................................................................... 15
2-7.
Expansion Connector P3 (J11, Bottom One, TopView) .............................................................. 16
2-8.
Demo LEDs ................................................................................................................ 17
2-9.
2-10. Other LEDs as Indicator .................................................................................................. 17
2-11. S2 DIP Switch Functions ................................................................................................. 18
Jumpers..................................................................................................................... 18
2-12.
SPNU509A–September 2011– Revised September 2012
Submit Documentation Feedback
Copyright © 2011–2012, Texas Instruments Incorporated
List of Figures
3
�
Preface
SPNU509A–September 2011–Revised September 2012
Read This First
About This Manual
This document describes the board level operations of the TMS570LS31 Hercules™ Development Kit
(HDK). The HDK is based on the Texas Instruments TMS570LS3137 Microcontroller. The TMS570LS31
HDK is a table top card that allows engineers and software developers to evaluate certain characteristics
of the TMS570LS3137 microcontroller to determine if the microcontroller meets the designer’s application
requirements as well as begin early application development. Evaluators can create software to execute
on board or expand the system in a variety of ways.
Notational Conventions
This document uses the following conventions.
The TMS570LS31 HDK will sometimes be referred to as the HDK.
Program listings, program examples, and interactive displays are shown in a special italic typeface. Here
is a sample program listing:
•
•
equations
!rd = !strobe&rw
Information About Cautions
This book may contain cautions.
This is an example of a caution statement.
A caution statement describes a situation that could potentially damage your software, or hardware, or
other equipment. The information in a caution is provided for your protection. Please read each caution
carefully.
Related Documentation From Texas Instruments
Information regarding this device can be found at the following Texas Instruments website:
http://www.ti.com/tms570
Hercules, Code Composer Studio are trademarks of Texas Instruments.
ARM is a registered trademark of ARM Limited.
All other trademarks are the property of their respective owners.
4
Read This First
Copyright © 2011–2012, Texas Instruments Incorporated
SPNU509A–September 2011– Revised September 2012
Submit Documentation Feedback
�
Chapter 1
SPNU509A–September 2011–Revised September 2012
Introduction
This development kit provides a product-ready hardware and software platform for evaluating the
functionality of the Texas Instruments TMS570LS31 microcontroller family. Schematics, list of materials,
and PCB layout are available to ease hardware development and reduce time to market.
1.1 Scope of Document
This user's guide lists the contents of the development kit, points out the features of the major
components, and provides the instructions necessary to verify your development kit is in working order.
Any additional usage instructions or details fall outside the scope of this document. Additional resources
will be listed at the end of this user's guide.
1.2
Integrated USB JTAG Emulator (XDS100v2)
TMS570LS31 HERCULES Development Kit (HDK) Features
The HDK comes with a full complement of on board devices that suit a wide variety of application
environments. Key features include:
• A Hercules TMS570LS3137 337-pin BGA microcontroller
•
• External JTAG Headers ( ARM® 20 pin and TI Compact 20-pin CTI)
•
• Two CAN transceivers (SN65HVDA541Q1) and screw terminal blocks
• One ambient light sensor
• One ambient temperature sensor
• Microcontroller’s serial communication interface (SCI) universal asynchronous receiver/transmitter
10/100 Mbps Ethernet interface
(UART) accessible through a USB virtual COM port
• One 8MB SDRAM
• Eight user programmable white LEDs around the MCU silicon
• One user programmable pushbutton
• Three expansion connectors for hardware prototyping
• Reset pushbuttons (nPORRST and nRST)
• One SD card slot (SPI mode)
• Embedded trace macrocell (ETM) debug interface via MIPI connector
• Configurable pin mux options
•
• Current measurement capability for 3.3 V IO, 1.2 V core, 1.2 V core, 1.2 V PLL, 3.3 V or 5 V ADC, and
5 V and 3.3 V analog-to-digital converter (ADC) option jumper
3.3 V VCCP
• Accepts an external power supply between +5V and +12V
SPNU509A–September 2011– Revised September 2012
Submit Documentation Feedback
Copyright © 2011–2012, Texas Instruments Incorporated
Introduction
5
�
HDK Board Block Diagram
1.3 HDK Board Block Diagram
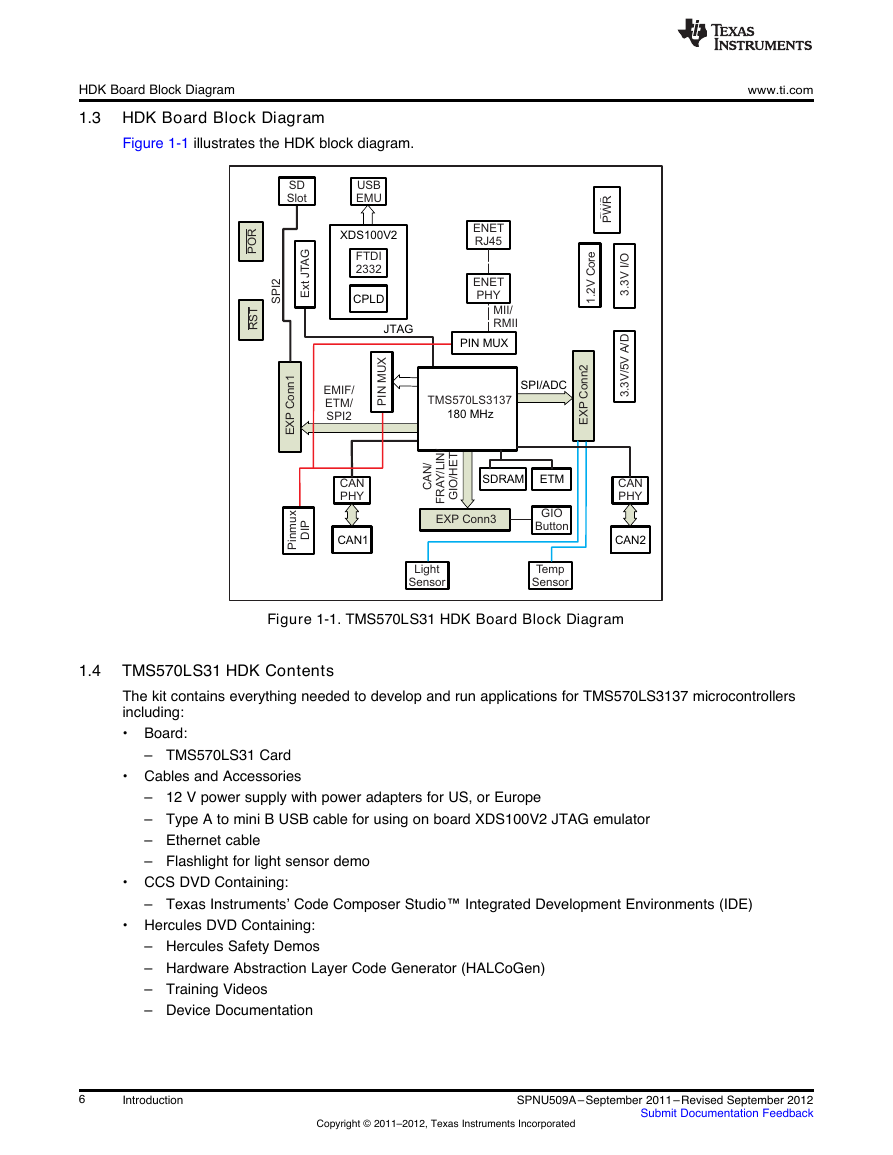
Figure 1-1 illustrates the HDK block diagram.
www.ti.com
Figure 1-1. TMS570LS31 HDK Board Block Diagram
1.4
TMS570LS31 HDK Contents
The kit contains everything needed to develop and run applications for TMS570LS3137 microcontrollers
including:
• Board:
– TMS570LS31 Card
• Cables and Accessories
– 12 V power supply with power adapters for US, or Europe
– Type A to mini B USB cable for using on board XDS100V2 JTAG emulator
– Ethernet cable
– Flashlight for light sensor demo
• CCS DVD Containing:
– Texas Instruments’ Code Composer Studio™ Integrated Development Environments (IDE)
• Hercules DVD Containing:
– Hercules Safety Demos
– Hardware Abstraction Layer Code Generator (HALCoGen)
– Training Videos
– Device Documentation
6
Introduction
Copyright © 2011–2012, Texas Instruments Incorporated
SPNU509A–September 2011– Revised September 2012
Submit Documentation Feedback
SDRAMCAN1ETMSPI/ADCJTAGPORRSTPWRUSBEMUEXPConn1SPI2SDSlotXDS100V2CPLDFTDI2332Ext JTAGEMIF/ETM/SPI2ENETRJ45ENETPHYMII/RMIICANPHYEXPConn2EXPConn3PinmuxDIPPIN MUXTMS570LS3137180MHzPINMUXCAN/FRAY/LIN/GIO/HETLightSensorTempSensorCAN2CANPHYGIOButton3.3V/5VA/D3.3V I/O1.2V Core�
www.ti.com
1.5 HDK Specifications
• Board supply voltage: 5 V–12 V Vdc
• Board supply current: 130 mA typ (fully active, CPU at 180 MHz)
• Dimensions: 4.90” x 4.30” x 0.85” (LxWxH)
1.6 Basic Operation
HDK Specifications
The HDK is designed to work with TI’s Code Composer Studio and other third party ARM IDEs. The IDE
communicates with the board through the embedded emulator or an external JTAG emulator. To start,
follow the instructions in the Quick Start Guide to install Hercules-specific software. This process will install
all of the necessary development tools, documentation and drivers.
1.7 Memory Map
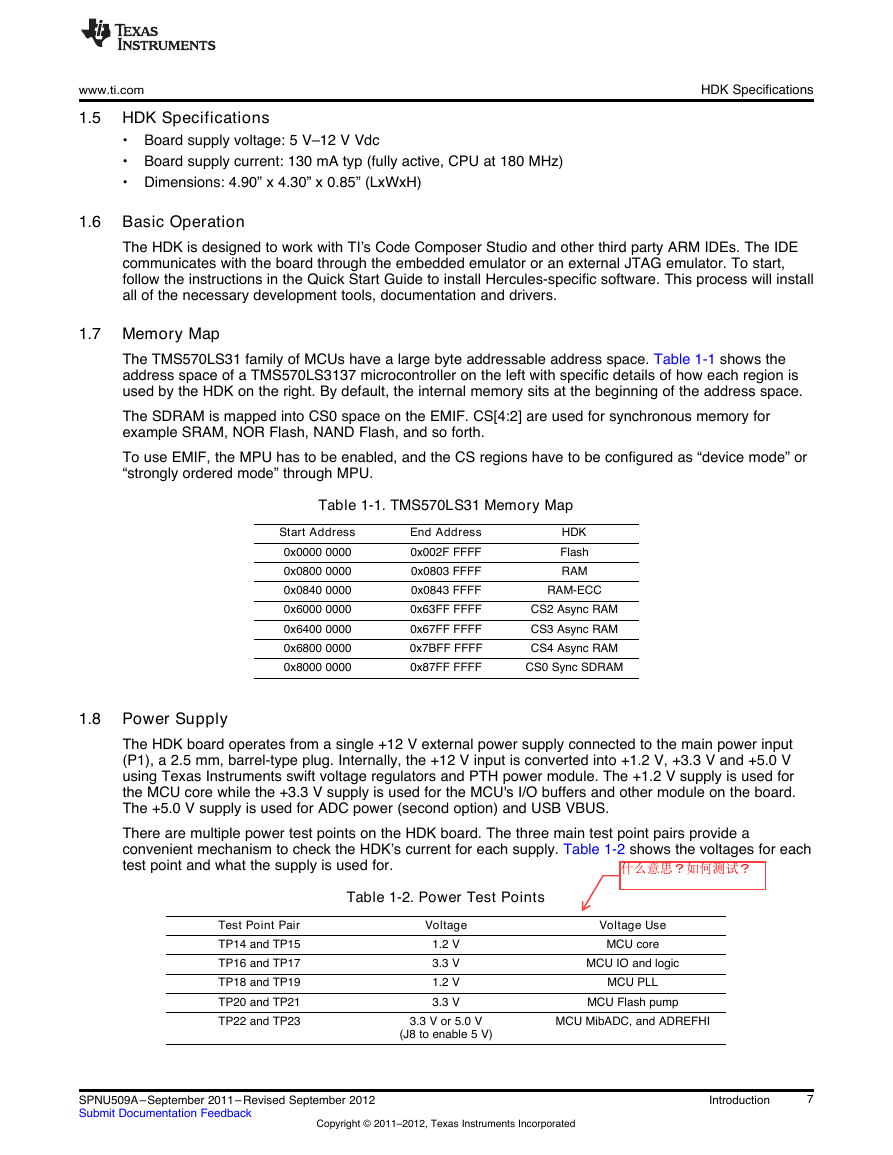
The TMS570LS31 family of MCUs have a large byte addressable address space. Table 1-1 shows the
address space of a TMS570LS3137 microcontroller on the left with specific details of how each region is
used by the HDK on the right. By default, the internal memory sits at the beginning of the address space.
The SDRAM is mapped into CS0 space on the EMIF. CS[4:2] are used for synchronous memory for
example SRAM, NOR Flash, NAND Flash, and so forth.
To use EMIF, the MPU has to be enabled, and the CS regions have to be configured as “device mode” or
“strongly ordered mode” through MPU.
Table 1-1. TMS570LS31 Memory Map
Start Address
0x0000 0000
0x0800 0000
0x0840 0000
0x6000 0000
0x6400 0000
0x6800 0000
0x8000 0000
End Address
0x002F FFFF
0x0803 FFFF
0x0843 FFFF
0x63FF FFFF
0x67FF FFFF
0x7BFF FFFF
0x87FF FFFF
HDK
Flash
RAM
RAM-ECC
CS2 Async RAM
CS3 Async RAM
CS4 Async RAM
CS0 Sync SDRAM
1.8 Power Supply
The HDK board operates from a single +12 V external power supply connected to the main power input
(P1), a 2.5 mm, barrel-type plug. Internally, the +12 V input is converted into +1.2 V, +3.3 V and +5.0 V
using Texas Instruments swift voltage regulators and PTH power module. The +1.2 V supply is used for
the MCU core while the +3.3 V supply is used for the MCU's I/O buffers and other module on the board.
The +5.0 V supply is used for ADC power (second option) and USB VBUS.
There are multiple power test points on the HDK board. The three main test point pairs provide a
convenient mechanism to check the HDK’s current for each supply. Table 1-2 shows the voltages for each
test point and what the supply is used for.
Table 1-2. Power Test Points
Test Point Pair
TP14 and TP15
TP16 and TP17
TP18 and TP19
TP20 and TP21
TP22 and TP23
Voltage
1.2 V
3.3 V
1.2 V
3.3 V
Voltage Use
MCU core
MCU IO and logic
MCU PLL
MCU Flash pump
3.3 V or 5.0 V
(J8 to enable 5 V)
MCU MibADC, and ADREFHI
SPNU509A–September 2011– Revised September 2012
Submit Documentation Feedback
Copyright © 2011–2012, Texas Instruments Incorporated
Introduction
7
�
Chapter 2
SPNU509A–September 2011–Revised September 2012
Physical Description
This section describes the physical layout of the TMS570LS31 HDK board and its interfaces.
2.1 Board Layout
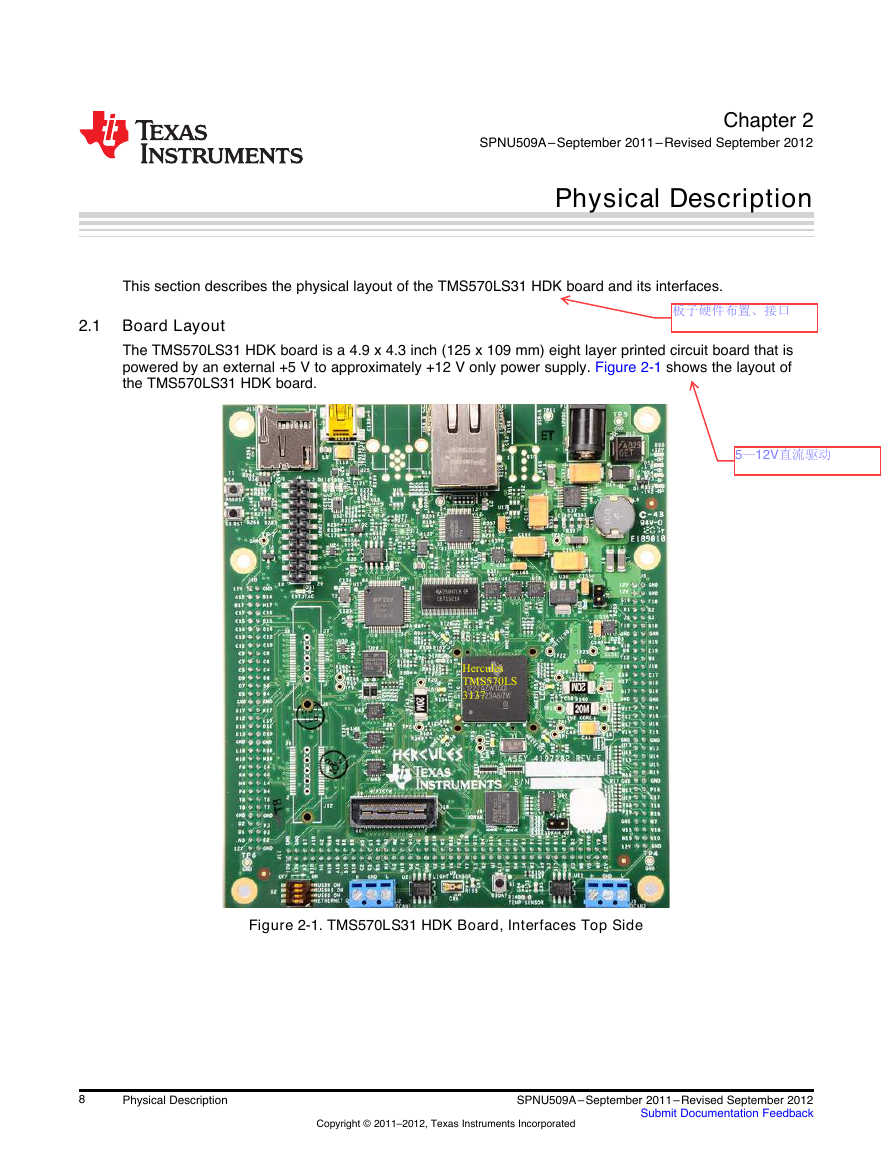
The TMS570LS31 HDK board is a 4.9 x 4.3 inch (125 x 109 mm) eight layer printed circuit board that is
powered by an external +5 V to approximately +12 V only power supply. Figure 2-1 shows the layout of
the TMS570LS31 HDK board.
Figure 2-1. TMS570LS31 HDK Board, Interfaces Top Side
8
Physical Description
Copyright © 2011–2012, Texas Instruments Incorporated
SPNU509A–September 2011– Revised September 2012
Submit Documentation Feedback
HerculesTMS570LS3137�




 2023年江西萍乡中考道德与法治真题及答案.doc
 2012年重庆南川中考生物真题及答案.doc
 2013年江西师范大学地理学综合及文艺理论基础考研真题.doc
 2020年四川甘孜小升初语文真题及答案I卷.doc
 2020年注册岩土工程师专业基础考试真题及答案.doc
 2023-2024学年福建省厦门市九年级上学期数学月考试题及答案.doc
 2021-2022学年辽宁省沈阳市大东区九年级上学期语文期末试题及答案.doc
 2022-2023学年北京东城区初三第一学期物理期末试卷及答案.doc
 2018上半年江西教师资格初中地理学科知识与教学能力真题及答案.doc
 2012年河北国家公务员申论考试真题及答案-省级.doc
 2020-2021学年江苏省扬州市江都区邵樊片九年级上学期数学第一次质量检测试题及答案.doc
 2022下半年黑龙江教师资格证中学综合素质真题及答案.doc