在在win10下进行下进行pytorch版本版本yolov3安装及训练
安装及训练
1.下载下载
代码网址:https://github.com/ultralytics/yolov3
权重文件:这个好久之前下载的了网址找不到了
2.代码环境
代码环境
Readme写的是python3.7,我用的是3.6
其他的根据requirements.txt安装可运行,可以先使用以下代码安装
pip install -U -r requirements.txt
安装列表中包含
numpy
opencv-python >= 4.1
torch >= 1.4
matplotlib
pycocotools
tqdm
pillow
你在安装中可能会遇到以下问题
你在安装中可能会遇到以下问题
提示torch版本不对
【解决方案】通过官网代码通过PIP安装CPU版本,如果你需要其他版本去这里:https://pytorch.org/get-started/locally/
pip install torch==1.4.0+cpu torchvision==0.5.0+cpu -f https://download.pytorch.org/whl/torch_stable.html
pycocotools安装失败
【解决方案】通过GIT指令安装
pip install git+https://github.com/philferriere/cocoapi.git#subdirectory=PythonAPI
git安装教程见博客:https://blog.csdn.net/Wanru_26/article/details/104895898
到这里想必你已经把所有库安装完毕,准备齐全就可以继续往下训练了
3.数据集预处理
数据集预处理
自己训练集的准备工作分两步:
在data文件下建立三个子文件夹(Annotations、images与ImageSets,labels后续使用脚本生成)其中Annotations存放xml文件,images图像,ImageSets新建Main文件存放train与
test文件(脚本生成),labels是标签文件
新建两个py文件,分别放入以下两段代码,并依次运行
import os
import random
trainval_percent = 0.2 #可自行进行调节
train_percent = 1
xmlfilepath = 'Annotations'
txtsavepath = 'ImageSets\Main'
total_xml = os.listdir(xmlfilepath)
num = len(total_xml)
list = range(num)
tv = int(num * trainval_percent)
tr = int(tv * train_percent)
trainval = random.sample(list, tv)
train = random.sample(trainval, tr)
#ftrainval = open('ImageSets/Main/trainval.txt', 'w')
ftest = open('ImageSets/Main/test.txt', 'w')
ftrain = open('ImageSets/Main/train.txt', 'w')
#fval = open('ImageSets/Main/val.txt', 'w')
for i in list:
name = total_xml[i][:-4] + '\n'
if i in trainval:
#ftrainval.write(name)
if i in train:
ftest.write(name)
#else:
#fval.write(name)
else:
ftrain.write(name)
#ftrainval.close()
ftrain.close()
#fval.close()
ftest.close()
生成labels标签文件
import xml.etree.ElementTree as ET
import pickle
import os
from os import listdir, getcwd
from os.path import join
sets = ['train', 'test']
classes = ['apple','orange'] #自己训练的类别
def convert(size, box):
dw = 1. / size[0] dh = 1. / size[1] x = (box[0] + box[1]) / 2.0
y = (box[2] + box[3]) / 2.0
w = box[1] - box[0] h = box[3] - box[2] x = x * dw
w = w * dw
y = y * dh
h = h * dh
return (x, y, w, h)
def convert_annotation(image_id):
�
in_file = open('data/Annotations/%s.xml' % (image_id))
out_file = open('data/labels/%s.txt' % (image_id), 'w')
tree = ET.parse(in_file)
root = tree.getroot()
size = root.find('size')
w = int(size.find('width').text)
h = int(size.find('height').text)
for obj in root.iter('object'):
difficult = obj.find('difficult').text
cls = obj.find('name').text
if cls not in classes or int(difficult) == 1:
continue
cls_id = classes.index(cls)
xmlbox = obj.find('bndbox')
b = (float(xmlbox.find('xmin').text), float(xmlbox.find('xmax').text), float(xmlbox.find('ymin').text),
float(xmlbox.find('ymax').text))
bb = convert((w, h), b)
out_file.write(str(cls_id) + " " + " ".join([str(a) for a in bb]) + '\n')
wd = getcwd()
for image_set in sets:
if not os.path.exists('data/labels/'):
os.makedirs('data/labels/')
image_ids = open('data/ImageSets/Main/%s.txt' % (image_set)).read().strip().split()
list_file = open('data/%s.txt' % (image_set), 'w')
for image_id in image_ids:
list_file.write('data/images/%s.jpg\n' % (image_id))
convert_annotation(image_id)
list_file.close()
4.配置文件修改
配置文件修改
data目录下新建cat.name写上预测的类别名字,不懂的可以参考coco.name
cat.data,文件内容如下,配置训练的数据,同理参考coco.data
classes=2
train=data/train.txt
valid=data/test.txt
names=data/fruit.names
cfg文件修改
主要修改3*3共9处,分别为最后的通道数、类别数、随机多尺度训练开关
[convolutional] size=1
stride=1
pad=1
filters=18 #3*(类别数+4+1)
activation=linear
[yolo] mask = 6,7,8
anchors = 10,13, 16,30, 33,23, 30,61, 62,45, 59,119, 116,90, 156,198, 373,326
classes=1 #类别数
num=9
jitter=.3
ignore_thresh = .7
truth_thresh = 1
random=0 # 1为打开随机多尺度训练,0为则关闭;根据自己电脑配置程度选择
关于cfg文件的详细注释可以查看博客:https://blog.csdn.net/qq_34795071/article/details/83507123
5.Train&Test
Train
python train.py --data data/cat.data --cfg cfg/yolov3-cat.cfg --weights weights/yolov3.weights --epochs 10
电脑不太行跑了3天才跑完340张图10个epochs,所以epoch建议别写太多
Test
python test.py --data-cfg data/cat.data --cfg cfg/yolov3-cat.cfg --weights weights/latest.pt
单图测试
python detect.py --data-cfg data/cat.data --cfg cfg/yolov3-cat.cfg --weights weights/best.pt
6.可视化可视化
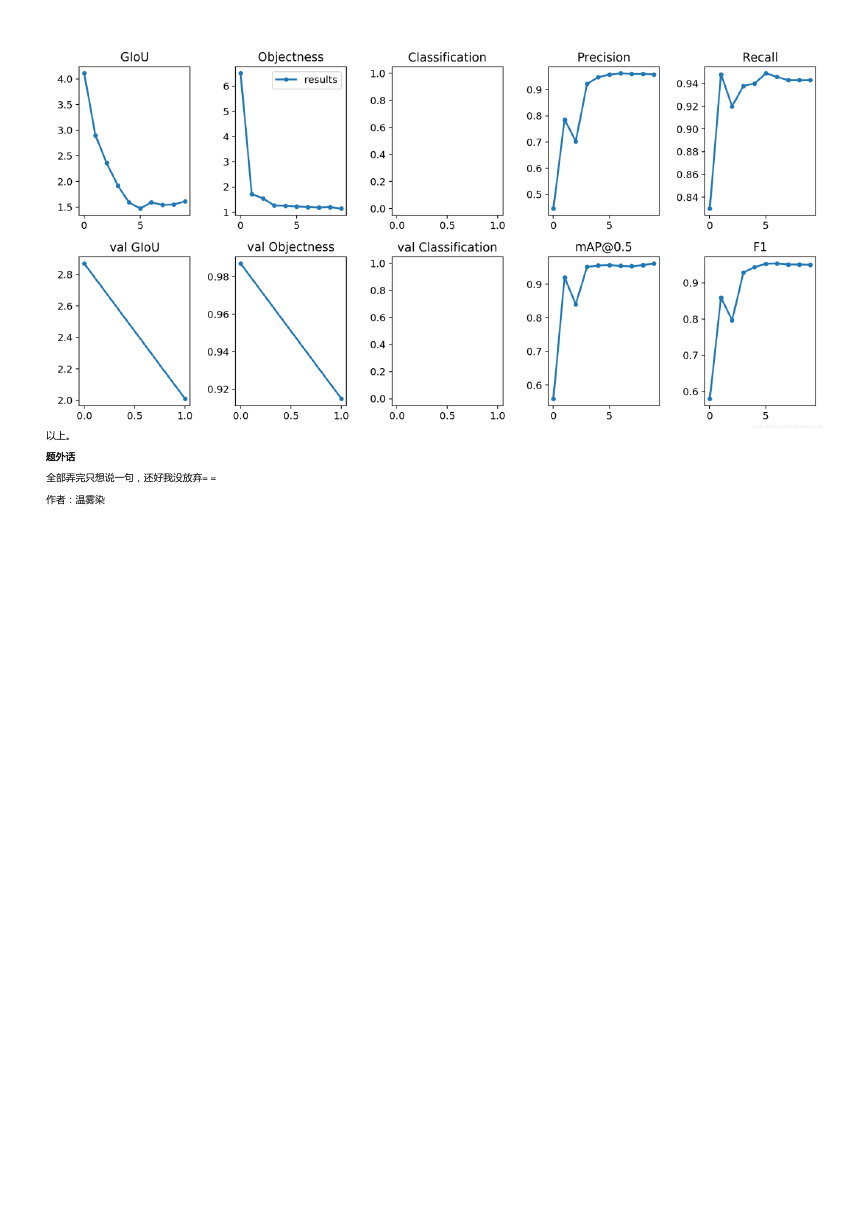
python -c "from utils import utils; utils.plot_results()"
运行完在主文件夹内会看到一张结果图result.png,由于我的数据集只有一类,所以cla没有数据。
�
以上。
题外话题外话
全部弄完只想说一句,还好我没放弃= =
作者:温雾染
�


 2023年江西萍乡中考道德与法治真题及答案.doc
 2012年重庆南川中考生物真题及答案.doc
 2013年江西师范大学地理学综合及文艺理论基础考研真题.doc
 2020年四川甘孜小升初语文真题及答案I卷.doc
 2020年注册岩土工程师专业基础考试真题及答案.doc
 2023-2024学年福建省厦门市九年级上学期数学月考试题及答案.doc
 2021-2022学年辽宁省沈阳市大东区九年级上学期语文期末试题及答案.doc
 2022-2023学年北京东城区初三第一学期物理期末试卷及答案.doc
 2018上半年江西教师资格初中地理学科知识与教学能力真题及答案.doc
 2012年河北国家公务员申论考试真题及答案-省级.doc
 2020-2021学年江苏省扬州市江都区邵樊片九年级上学期数学第一次质量检测试题及答案.doc
 2022下半年黑龙江教师资格证中学综合素质真题及答案.doc