810 Series Color Jetprinter™
1
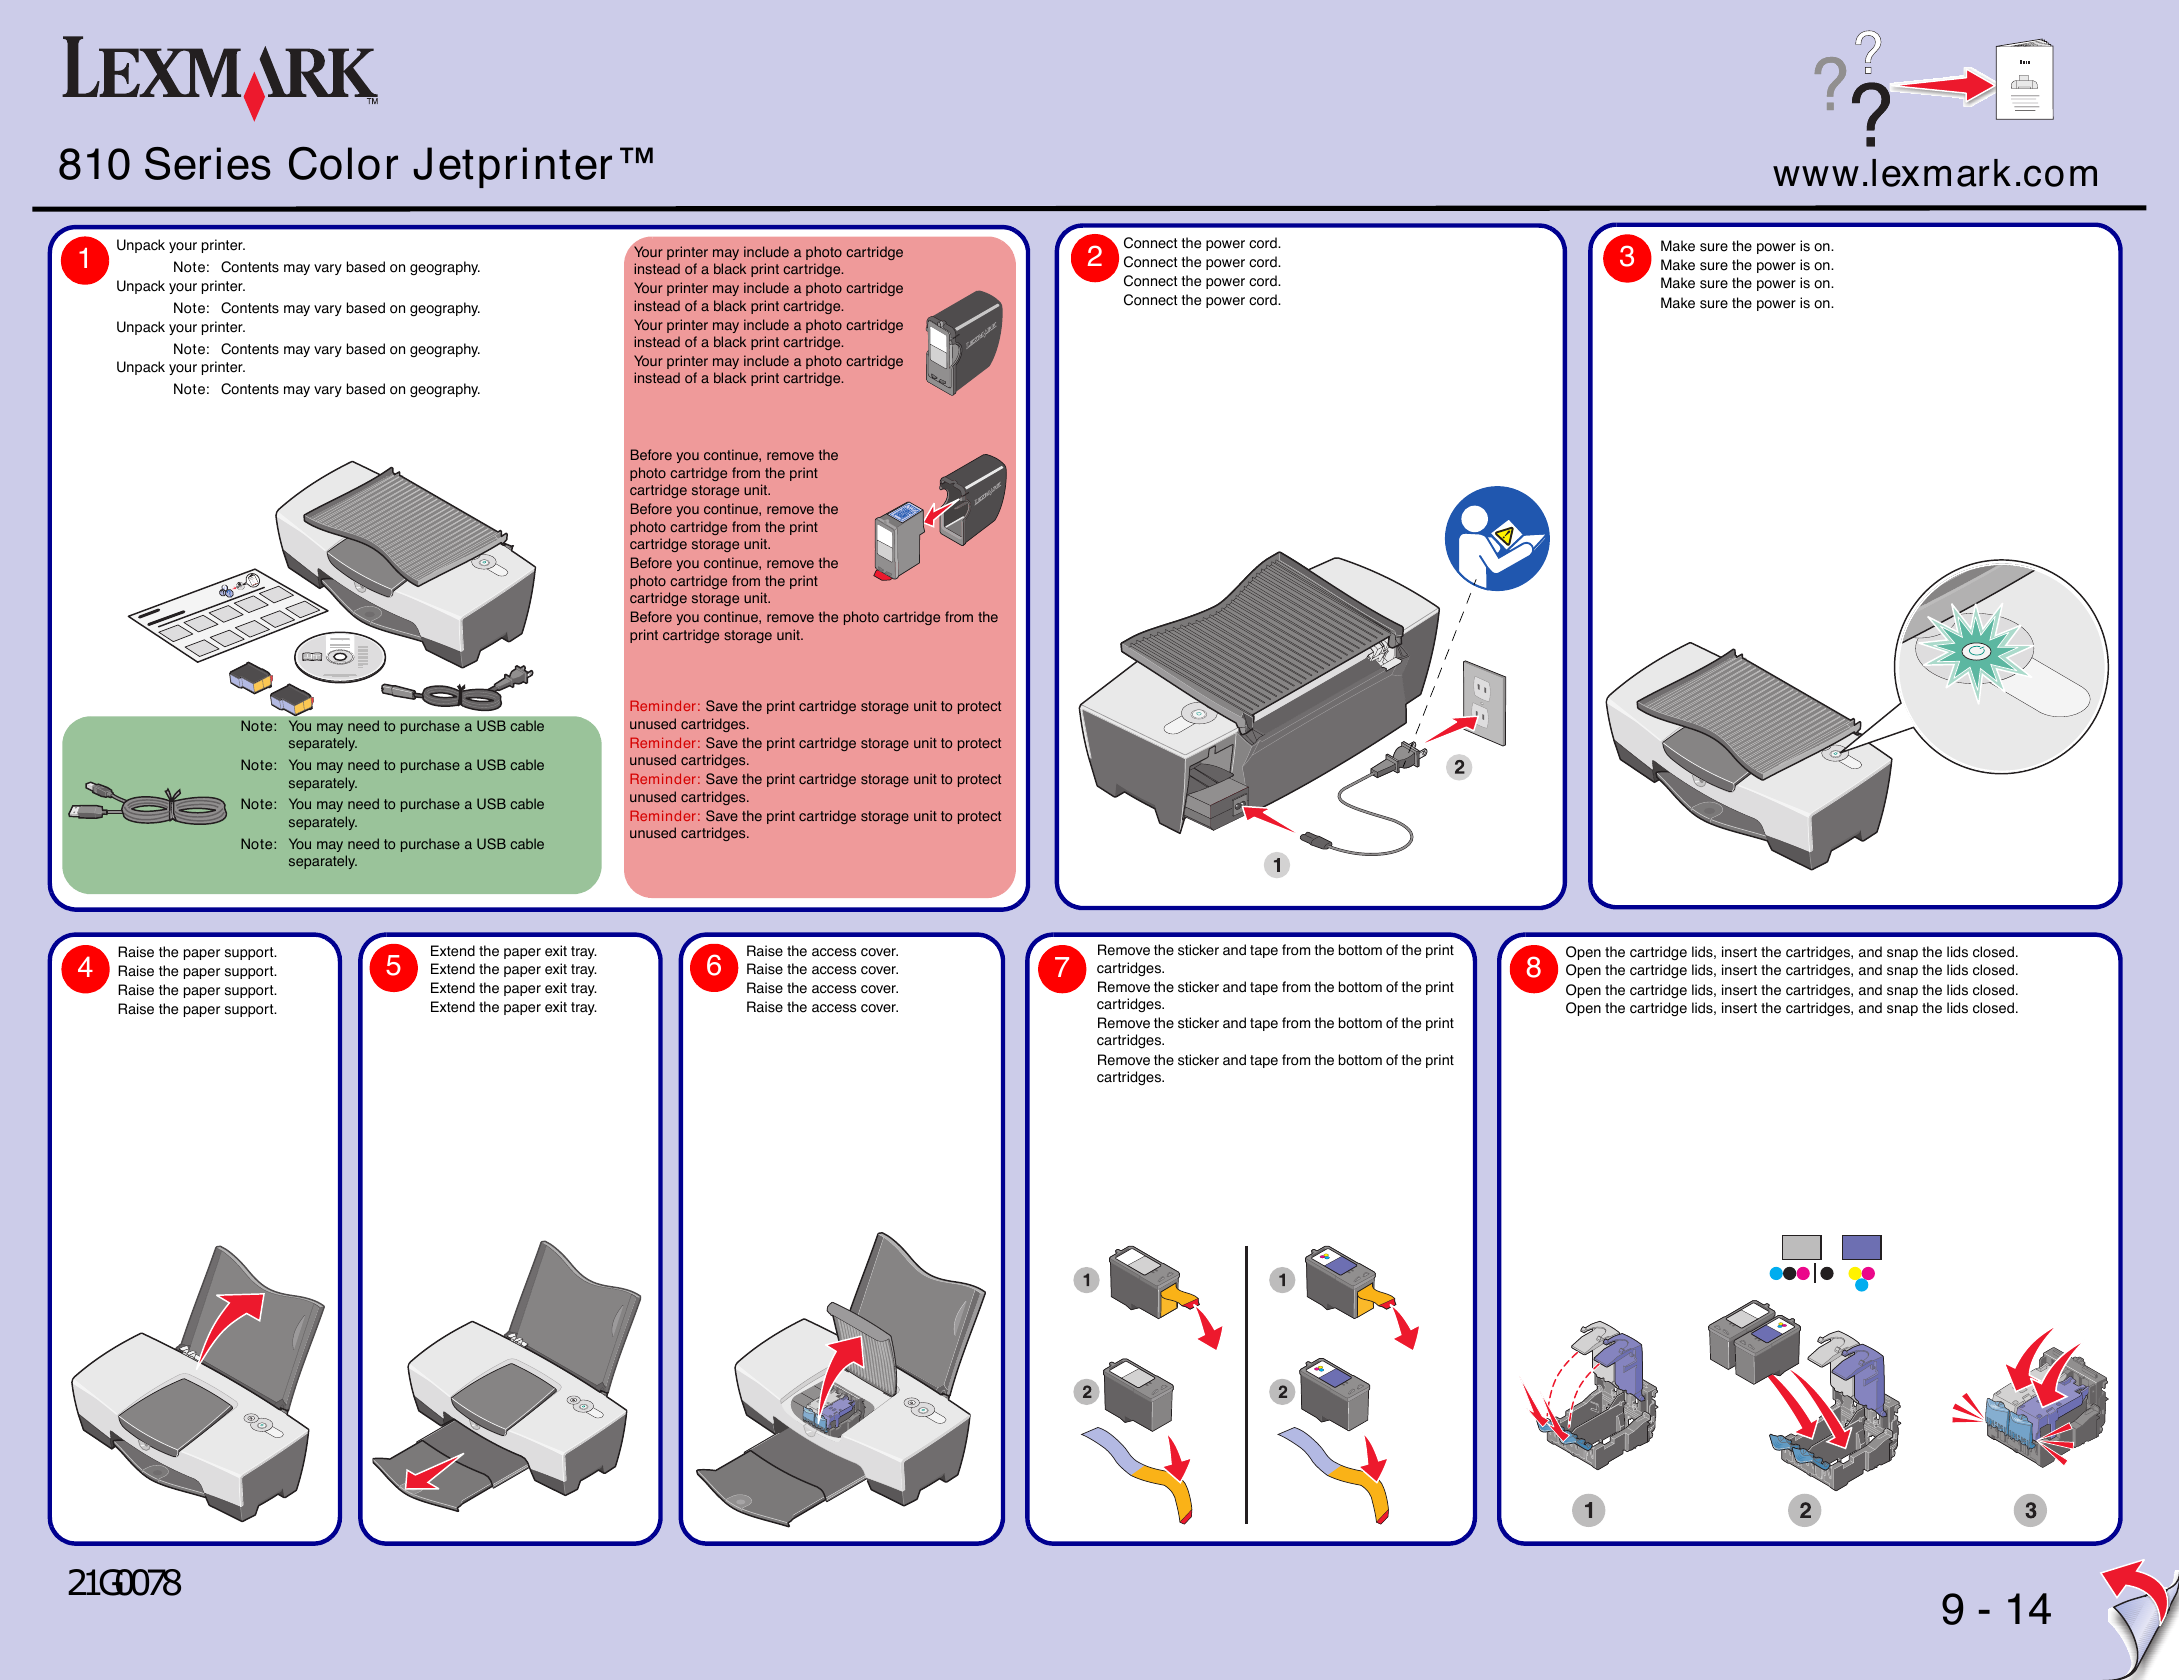
Unpack your printer.
Note: Contents may vary based on geography.
Unpack your printer.
Note: Contents may vary based on geography.
Unpack your printer.
Note: Contents may vary based on geography.
Unpack your printer.
Note: Contents may vary based on geography.
Your printer may include a photo cartridge
instead of a black print cartridge.
Your printer may include a photo cartridge
instead of a black print cartridge.
Your printer may include a photo cartridge
instead of a black print cartridge.
Your printer may include a photo cartridge
instead of a black print cartridge.
2
Connect the power cord.
Connect the power cord.
Connect the power cord.
Connect the power cord.
3
Make sure the power is on.
Make sure the power is on.
Make sure the power is on.
Make sure the power is on.
www.lexmark.com
Before you continue, remove the
photo cartridge from the print
cartridge storage unit.
Before you continue, remove the
photo cartridge from the print
cartridge storage unit.
Before you continue, remove the
photo cartridge from the print
cartridge storage unit.
Before you continue, remove the photo cartridge from the
print cartridge storage unit.
Reminder: Save the print cartridge storage unit to protect
unused cartridges.
Reminder: Save the print cartridge storage unit to protect
unused cartridges.
Reminder: Save the print cartridge storage unit to protect
unused cartridges.
Reminder: Save the print cartridge storage unit to protect
unused cartridges.
Note: You may need to purchase a USB cable
separately.
Note: You may need to purchase a USB cable
separately.
Note: You may need to purchase a USB cable
separately.
Note: You may need to purchase a USB cable
separately.
4
Raise the paper support.
Raise the paper support.
Raise the paper support.
Raise the paper support.
5
Extend the paper exit tray.
Extend the paper exit tray.
Extend the paper exit tray.
Extend the paper exit tray.
6
Raise the access cover.
Raise the access cover.
Raise the access cover.
Raise the access cover.
7
Remove the sticker and tape from the bottom of the print
cartridges.
Remove the sticker and tape from the bottom of the print
cartridges.
Remove the sticker and tape from the bottom of the print
cartridges.
Remove the sticker and tape from the bottom of the print
cartridges.
8
Open the cartridge lids, insert the cartridges, and snap the lids closed.
Open the cartridge lids, insert the cartridges, and snap the lids closed.
Open the cartridge lids, insert the cartridges, and snap the lids closed.
Open the cartridge lids, insert the cartridges, and snap the lids closed.
21G0078
9 - 14
�
9
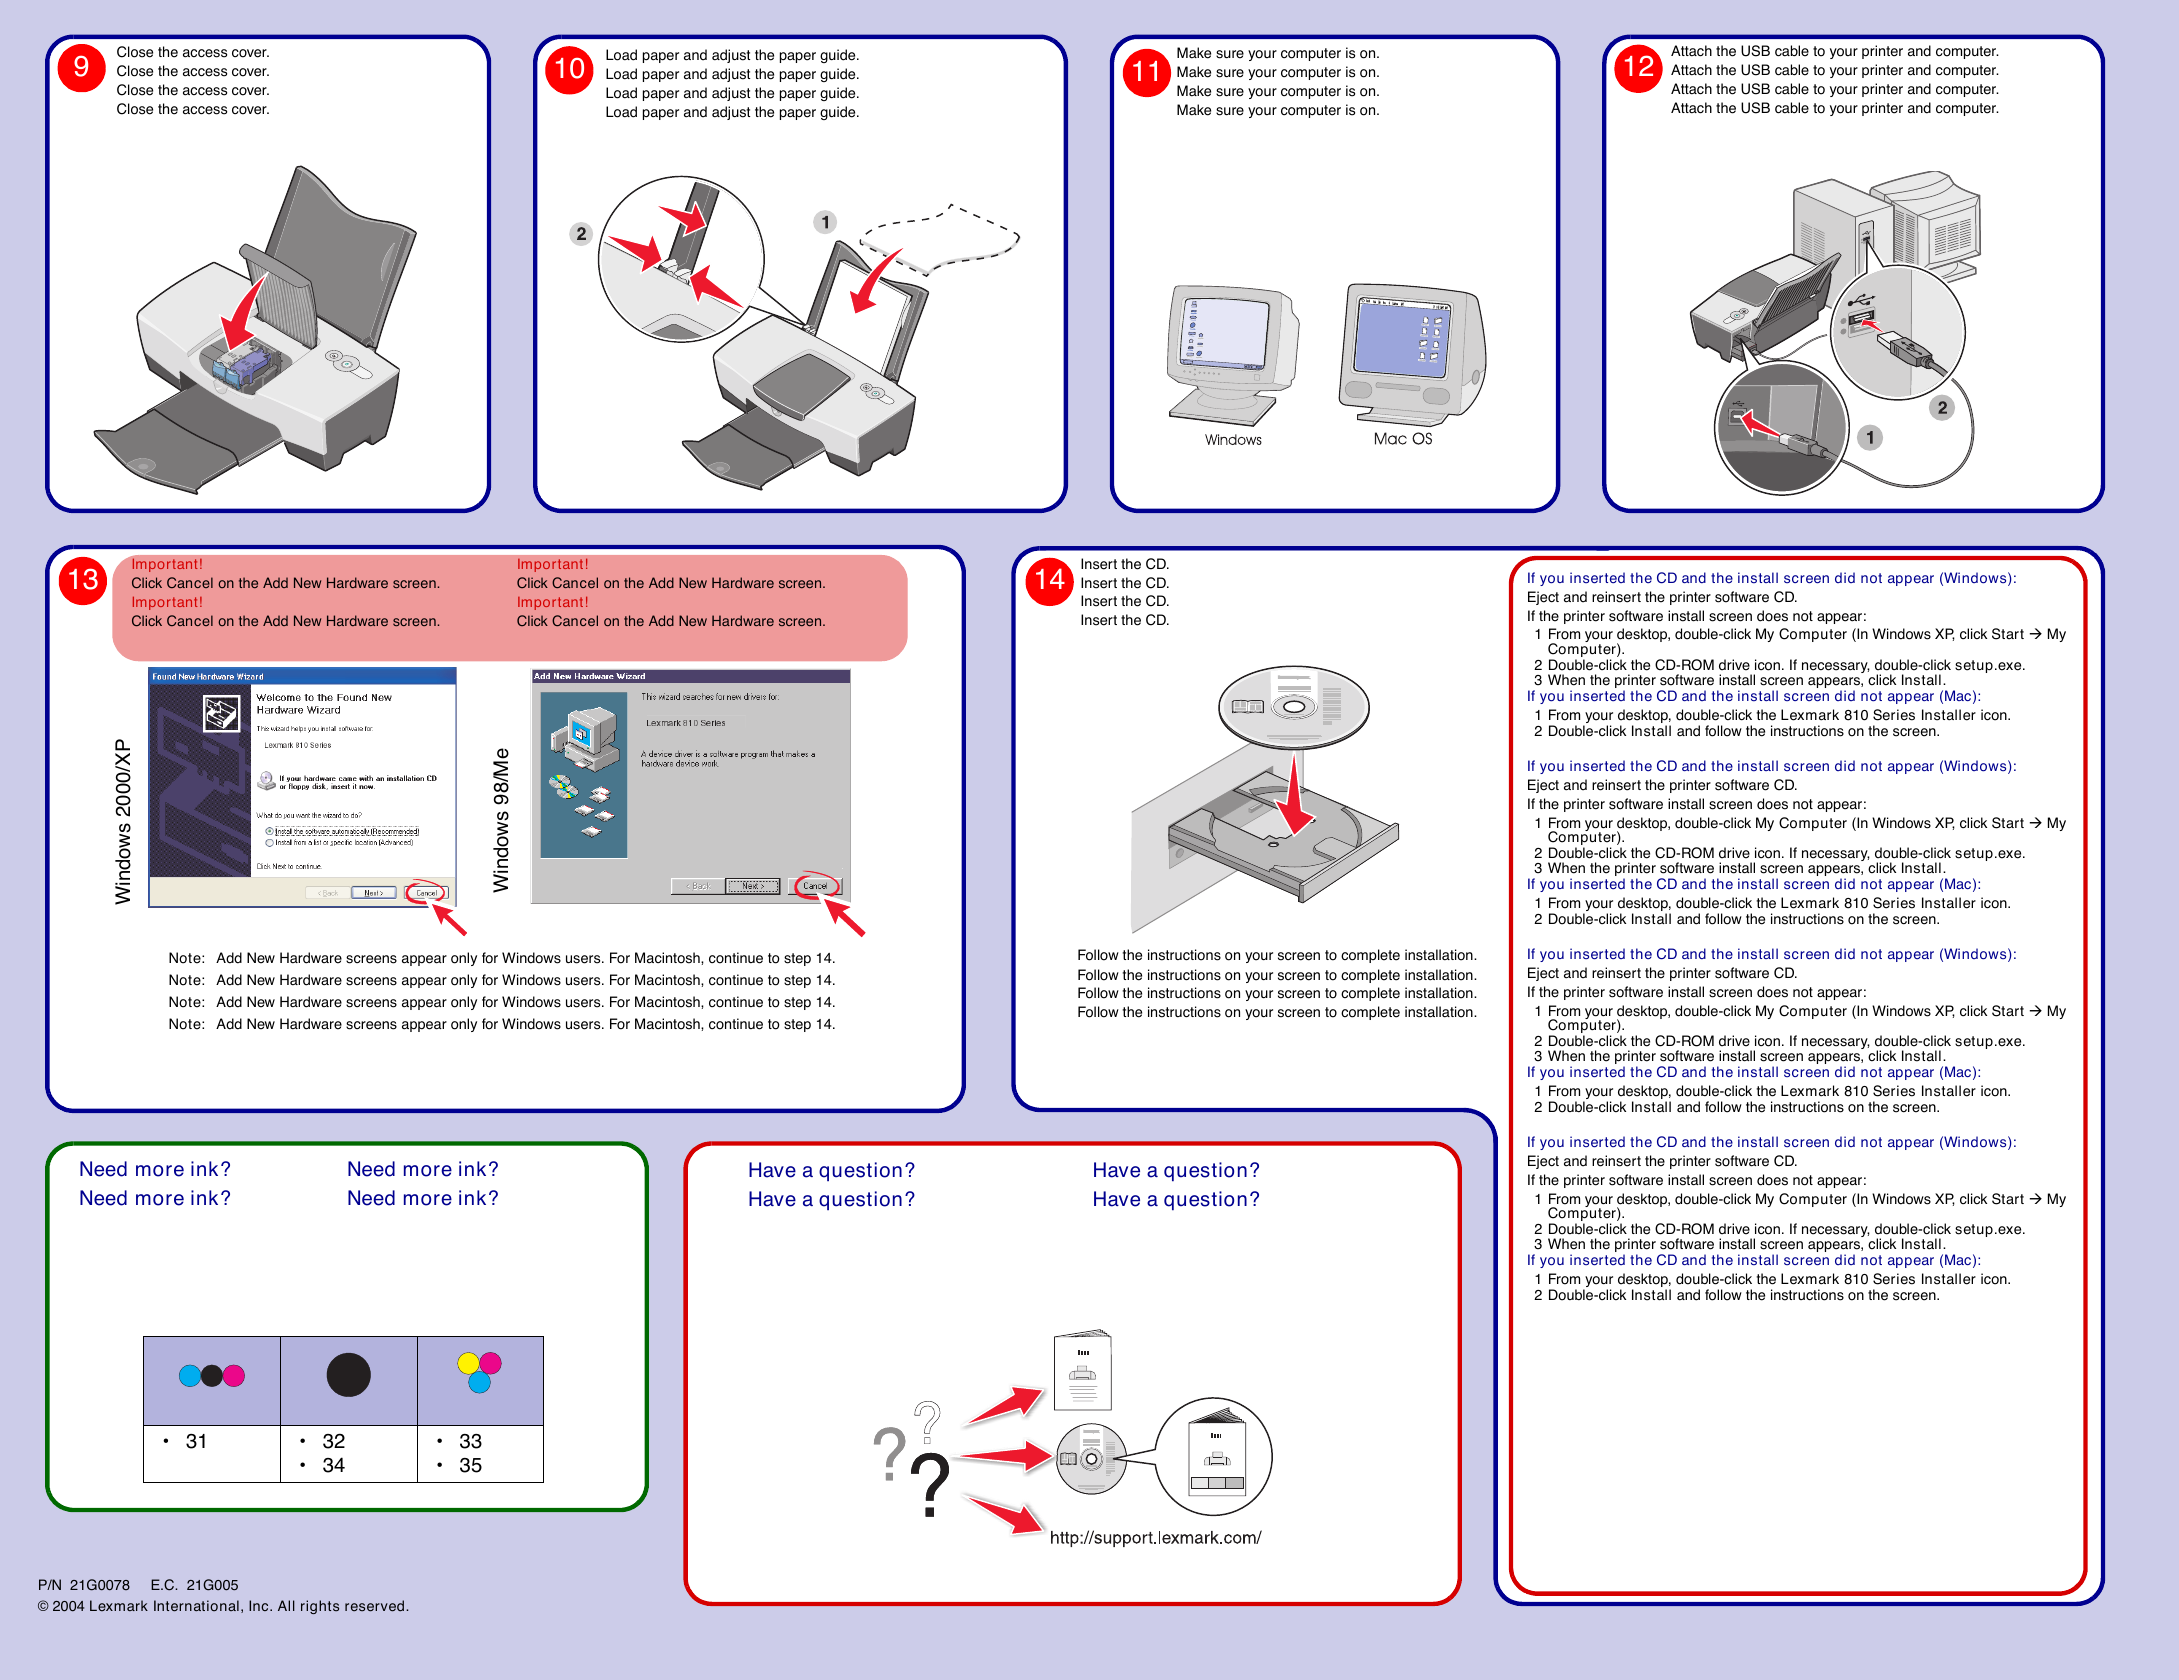
Close the access cover.
Close the access cover.
Close the access cover.
Close the access cover.
10
Load paper and adjust the paper guide.
Load paper and adjust the paper guide.
Load paper and adjust the paper guide.
Load paper and adjust the paper guide.
11 Make sure your computer is on.
Make sure your computer is on.
Make sure your computer is on.
Make sure your computer is on.
12
Attach the USB cable to your printer and computer.
Attach the USB cable to your printer and computer.
Attach the USB cable to your printer and computer.
Attach the USB cable to your printer and computer.
13
Important!
Click Cancel on the Add New Hardware screen.
Important!
Click Cancel on the Add New Hardware screen.
Important!
Click Cancel on the Add New Hardware screen.
Important!
Click Cancel on the Add New Hardware screen.
14 Insert the CD.
Insert the CD.
Insert the CD.
Insert the CD.
P
X
/
0
0
0
2
s
w
o
d
n
W
i
e
M
/
8
9
s
w
o
d
n
W
i
Note: Add New Hardware screens appear only for Windows users. For Macintosh, continue to step 14.
Note: Add New Hardware screens appear only for Windows users. For Macintosh, continue to step 14.
Note: Add New Hardware screens appear only for Windows users. For Macintosh, continue to step 14.
Note: Add New Hardware screens appear only for Windows users. For Macintosh, continue to step 14.
Follow the instructions on your screen to complete installation.
Follow the instructions on your screen to complete installation.
Follow the instructions on your screen to complete installation.
Follow the instructions on your screen to complete installation.
Need more ink?
Need more ink?
Need more ink?
Need more ink?
Have a question?
Have a question?
Have a question?
Have a question?
31
32
34
33
35
P/N 21G0078
© 2004 Lexmark International, Inc. All rights reserved.
E.C. 21G005
If you inserted the CD and the install screen did not appear (Windows):
Eject and reinsert the printer software CD.
If the printer software install screen does not appear:
1 From your desktop, double-click My Computer (In Windows XP, click Start � My
Computer).
2 Double-click the CD-ROM drive icon. If necessary, double-click setup.exe.
3 When the printer software install screen appears, click Install.
If you inserted the CD and the install screen did not appear (Mac):
1 From your desktop, double-click the Lexmark 810 Series Installer icon.
2 Double-click Install and follow the instructions on the screen.
�


 2023年江西萍乡中考道德与法治真题及答案.doc
 2012年重庆南川中考生物真题及答案.doc
 2013年江西师范大学地理学综合及文艺理论基础考研真题.doc
 2020年四川甘孜小升初语文真题及答案I卷.doc
 2020年注册岩土工程师专业基础考试真题及答案.doc
 2023-2024学年福建省厦门市九年级上学期数学月考试题及答案.doc
 2021-2022学年辽宁省沈阳市大东区九年级上学期语文期末试题及答案.doc
 2022-2023学年北京东城区初三第一学期物理期末试卷及答案.doc
 2018上半年江西教师资格初中地理学科知识与教学能力真题及答案.doc
 2012年河北国家公务员申论考试真题及答案-省级.doc
 2020-2021学年江苏省扬州市江都区邵樊片九年级上学期数学第一次质量检测试题及答案.doc
 2022下半年黑龙江教师资格证中学综合素质真题及答案.doc