HOW TO READ THIS MANUAL
QUICK SEARCH BY OPERATION
CHECKING THE INCLUDED ACCESSORIES
How to use the accessories
ABOUT THE CARD
Media cards that can be used with this camera
What “card” means in this manual
GETTING THE MOST OUT OF YOUR CAMERA
High-quality images with “Full High Definition*”
Includes SIMPLE mode for quick-and-easy operation (page 37)
Image stabilizer for sharp pictures (pages 50 and 91)
Capture clear images of the targeted subject (pages 52 and 96)
Eye-Fi smart
SYSTEM MAP
SETUP
PARTS NAMES
CHARGING THE BATTERY PACK
Charging the battery pack
INSTALLING THE CARD
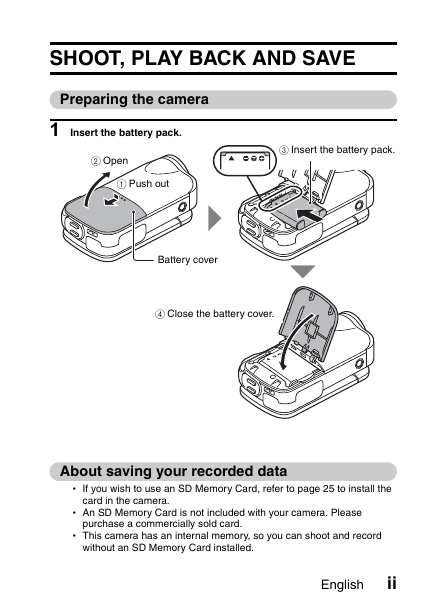
INSTALLING THE BATTERY PACK
About the temperature alert icon \
TURNING THE CAMERA ON AND OFF
Turning on the camera
Turning off the camera
Turning on the camera when the power save (sleep) mode is active
DATE AND TIME SETTING
SWITCHING BETWEEN THE RECORDING MODE AND PLAYBACK MODE
SWITCHING THE OPERATING MODE
Switching between the SIMPLE and NORMAL modes
Accessing/exiting the SIMPLE/NORMAL Mode Menu Screen
Overview of the SIMPLE Mode Setting Screen
Overview of the NORMAL Mode Setting Screen
SIMPLE
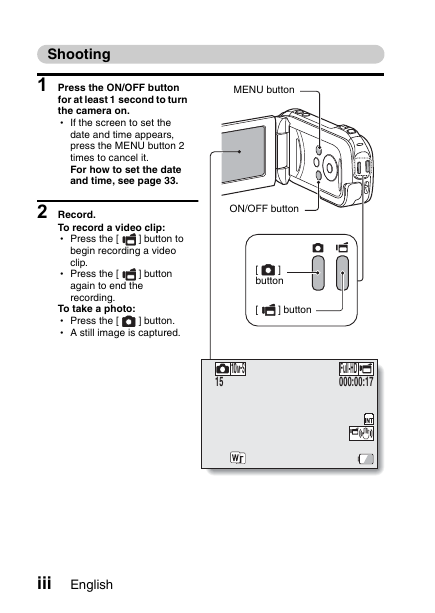
SHOOTING
BEFORE TAKING PICTURES
For best results
Using the autofocus
Select the recording size
Select the focus setting
Hints for taking pictures
VIDEO CLIP RECORDING
SHOOTING SINGLE SHOTS
Using the flash
SHOOT A STILL IMAGE WHILE RECORDING A VIDEO CLIP
MACRO-PHOTOGRAPHY (ZOOM)
PLAYBACK
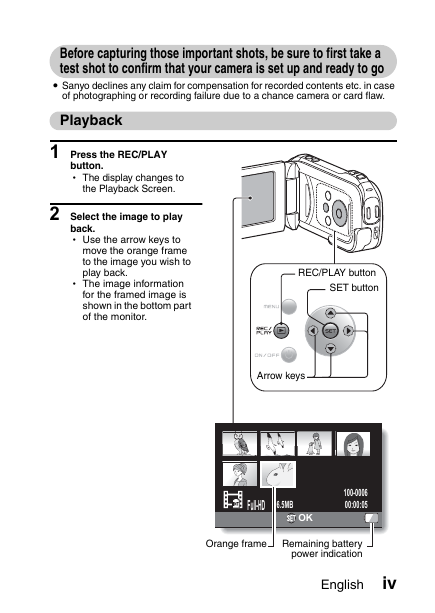
PLAYING BACK VIDEO CLIPS AND STILL IMAGES
How to save one frame from a video clip as a still image
SLIDESHOW PLAYBACK
PLAYBACK VOLUME
DELETING FILES
Delete single/delete all/delete folder
Delete selected
PLAYBACK MODES
21-image display playback
Selecting the playback folder
Magnifying (zooming in) the image
NORMAL
SHOOTING
RECORDING MENU 1
Video setting
Still image setting
Scene select setting
Filter setting
Self-timer setting
RECORDING MENU 2
Motion compensation (image stabilizer) setting
Focus range setting
Focus mode setting
Light-measuring mode setting
ISO sensitivity setting
RECORDING MENU 3
White balance setting
Subject chaser settings
High sensitivity mode setting
Digital zoom setting
Exposure compensation
Storage folder setting
PLAYBACK
PLAYBACK MENU 1
Slideshow settings
File protect setting
Resize
Rotate
PLAYBACK MENU 2
Correcting the image
Editing video clips
Printing instructions
FILE INFO DISPLAY
OPTION SETTINGS
DISPLAY THE OPTION SETTING MENU
INTRODUCTION TO THE OPTION SETTING MENU
Shortcut setting
TV output setting
File No. continued setting
Formatting (initializing)
CHECKING THE REMAINING CARD MEMORY
Checking the remaining number of images and video recording time
For audio recordings
CHECKING THE REMAINING BATTERY PACK CHARGE
OTHER DEVICES AND CONNECTIONS
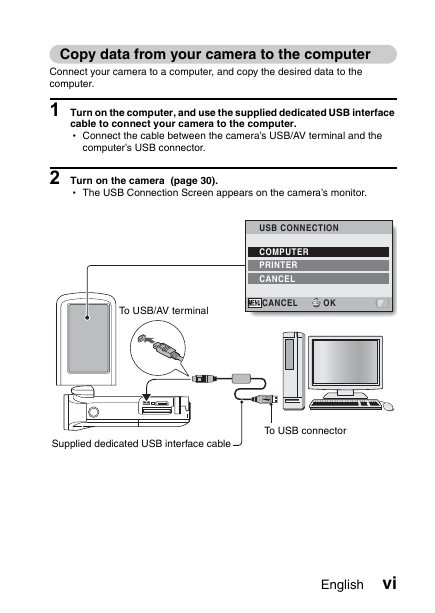
CONNECTING TO A COMPUTER
OPERATING ENVIRONMENT
When using as a card reader
To access the files in the internal memory
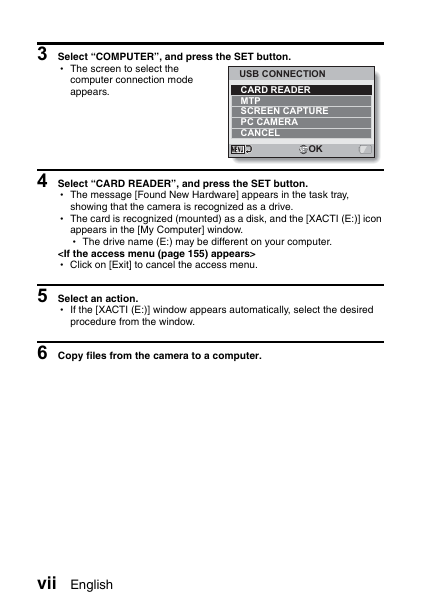
SETTING THE CONNECTION MODE
USING AS A CARD READER
For Windows Vista/XP/7 users
For Windows 2000 users (except for the SDXC card)
For Mac OS X users
ABOUT THE CONTENTS OF THE CARD
Configuration of directories in the card
File formats
Cautions when using as a card reader
USING AS A PC CAMERA
For Windows XP
Using as a PC camera
USING THE SOFTWARE
Obtaining the software
CONNECTING TO A TV
CONNECTING TO A TV
Connecting to a video input terminal
Connecting to the HDMI terminal
PLAYING BACK ON A TV
CONNECTING TO A PRINTER
PRINTING
OTHER CONNECTIONS
SCREEN CAPTURE
APPENDICES
COMMONLY ASKED QUESTIONS
TROUBLESHOOTING
Camera
Notes regarding the Scene Select feature and filters
SPECIFICATIONS
Camera
Camera connectors
Battery life
Possible No. of Images/Possible Shooting Time/ Possible Recording Time
Concerning the multi-indicator
Supplied battery pack charger
Supplied Li-ion battery pack
Others
Before capturing those important shots, be sure to first take a test shot to confirm that your camera is set up and ready to go
About the MPEG-4 Standard license
HINTS FOR TAKING PICTURES


 2023年江西萍乡中考道德与法治真题及答案.doc
 2012年重庆南川中考生物真题及答案.doc
 2013年江西师范大学地理学综合及文艺理论基础考研真题.doc
 2020年四川甘孜小升初语文真题及答案I卷.doc
 2020年注册岩土工程师专业基础考试真题及答案.doc
 2023-2024学年福建省厦门市九年级上学期数学月考试题及答案.doc
 2021-2022学年辽宁省沈阳市大东区九年级上学期语文期末试题及答案.doc
 2022-2023学年北京东城区初三第一学期物理期末试卷及答案.doc
 2018上半年江西教师资格初中地理学科知识与教学能力真题及答案.doc
 2012年河北国家公务员申论考试真题及答案-省级.doc
 2020-2021学年江苏省扬州市江都区邵樊片九年级上学期数学第一次质量检测试题及答案.doc
 2022下半年黑龙江教师资格证中学综合素质真题及答案.doc