7. Level 2 Repair
(VIETMOBILE.VN)
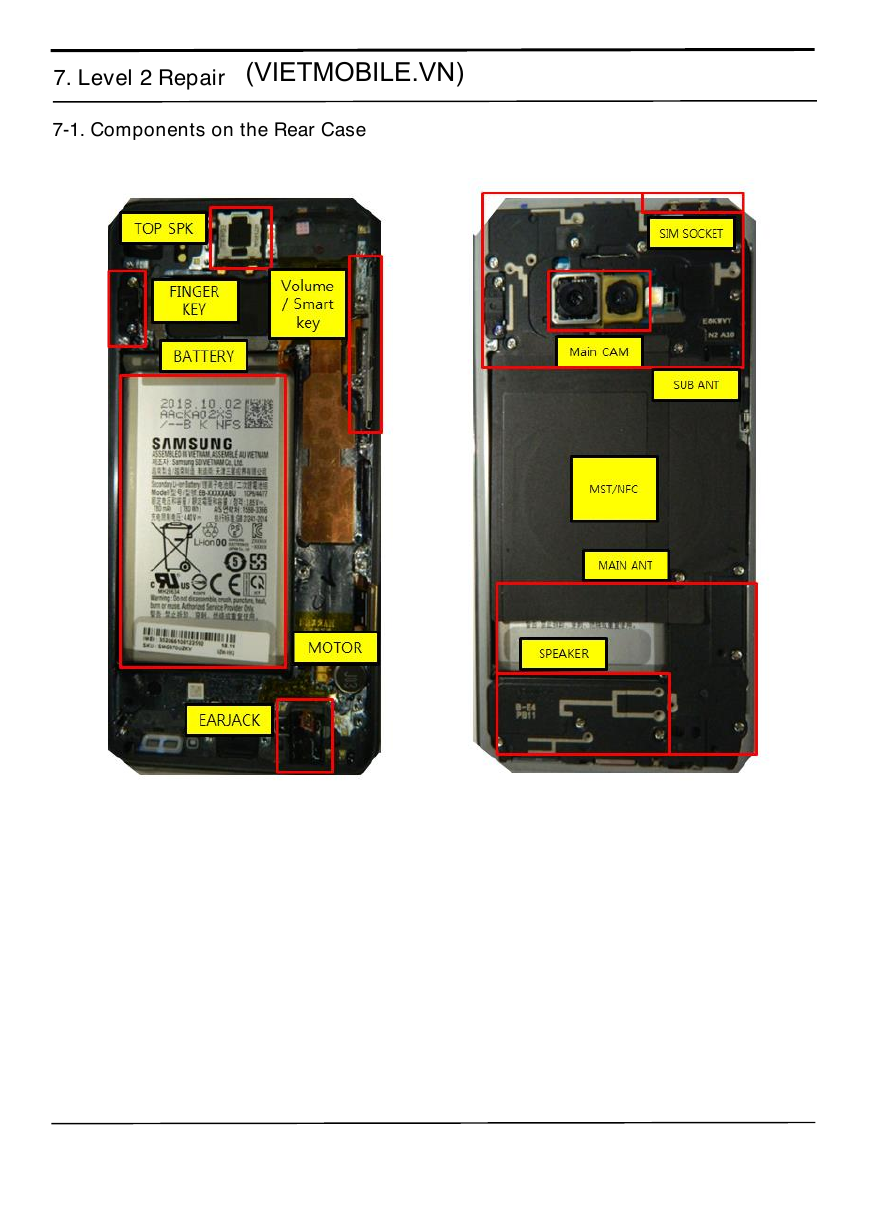
7-1. Components on the Rear Case
�
7. Level 2 Repair
7-2. Pre-requisite
Tweezers / Disass'y Stick / Screw Driver
Anti-static Gloves
Anti-static Mat
Hot Plate
A OCTA Disassembly Holder
OCTA Disassembly Upper
Ethyl Alcohol
Cotton Swab
�
7. Level 2 Repair
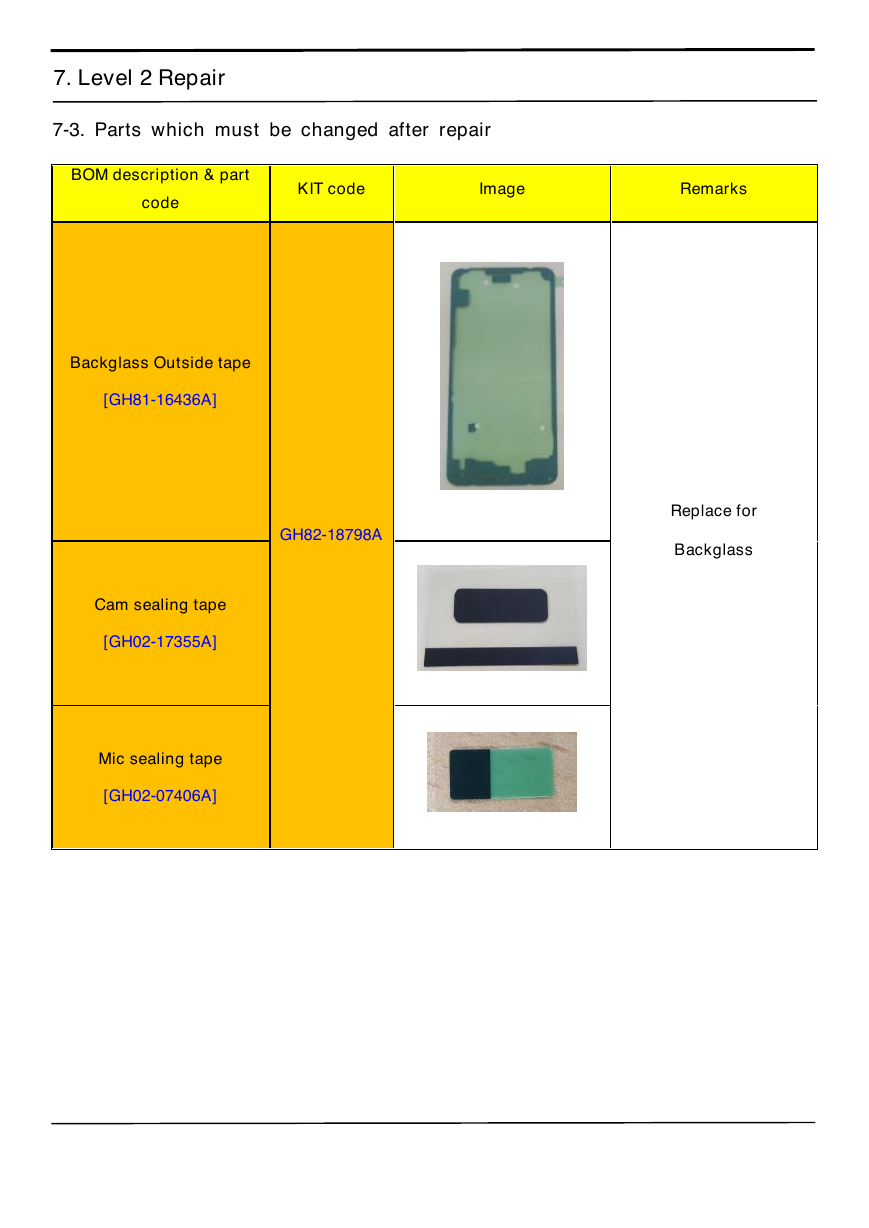
7-3. Parts which must be changed after repair
BOM description & part
code
KIT code
Image
Remarks
GH82-18798A
Backglass Outside tape
[GH81-16436A]
Cam sealing tape
[GH02-17355A]
Mic sealing tape
[GH02-07406A]
Replace for
Backglass
�
7. Level 2 Repair
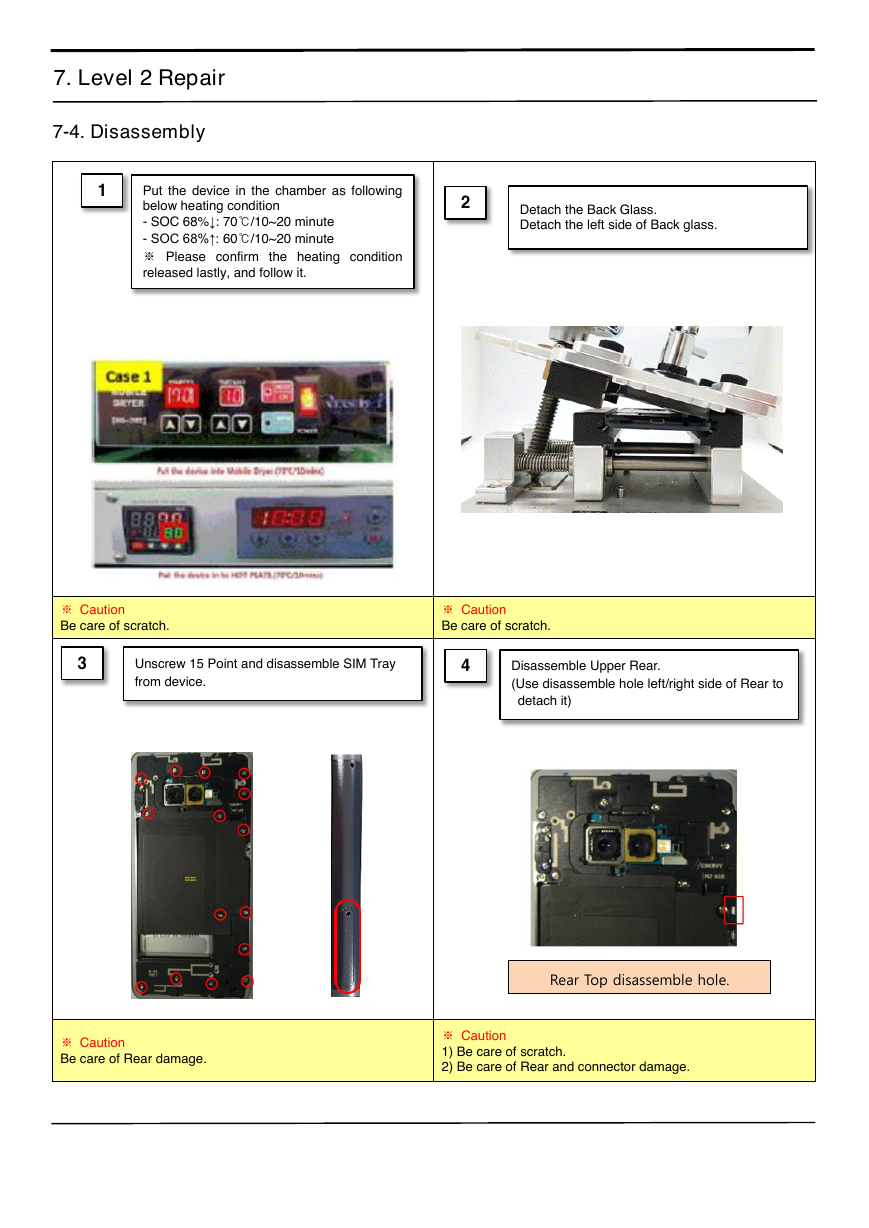
7-4. Disassembly
1
Put the device in the chamber as following
below heating condition
- SOC 68%↓: 70℃/10~20 minute
- SOC 68%↑: 60℃/10~20 minute
※ Please confirm the heating condition
released lastly, and follow it.
2
Detach the Back Glass.
Detach the left side of Back glass.
※ Caution
Be care of scratch.
※ Caution
Be care of scratch.
3
Unscrew 15 Point and disassemble SIM Tray
from device.
4
Disassemble Upper Rear.
(Use disassemble hole left/right side of Rear to
detach it)
※ Caution
Be care of Rear damage.
Rear Top disassemble hole.
※ Caution
1) Be care of scratch.
2) Be care of Rear and connector damage.
�
7. Level 2 Repair
5
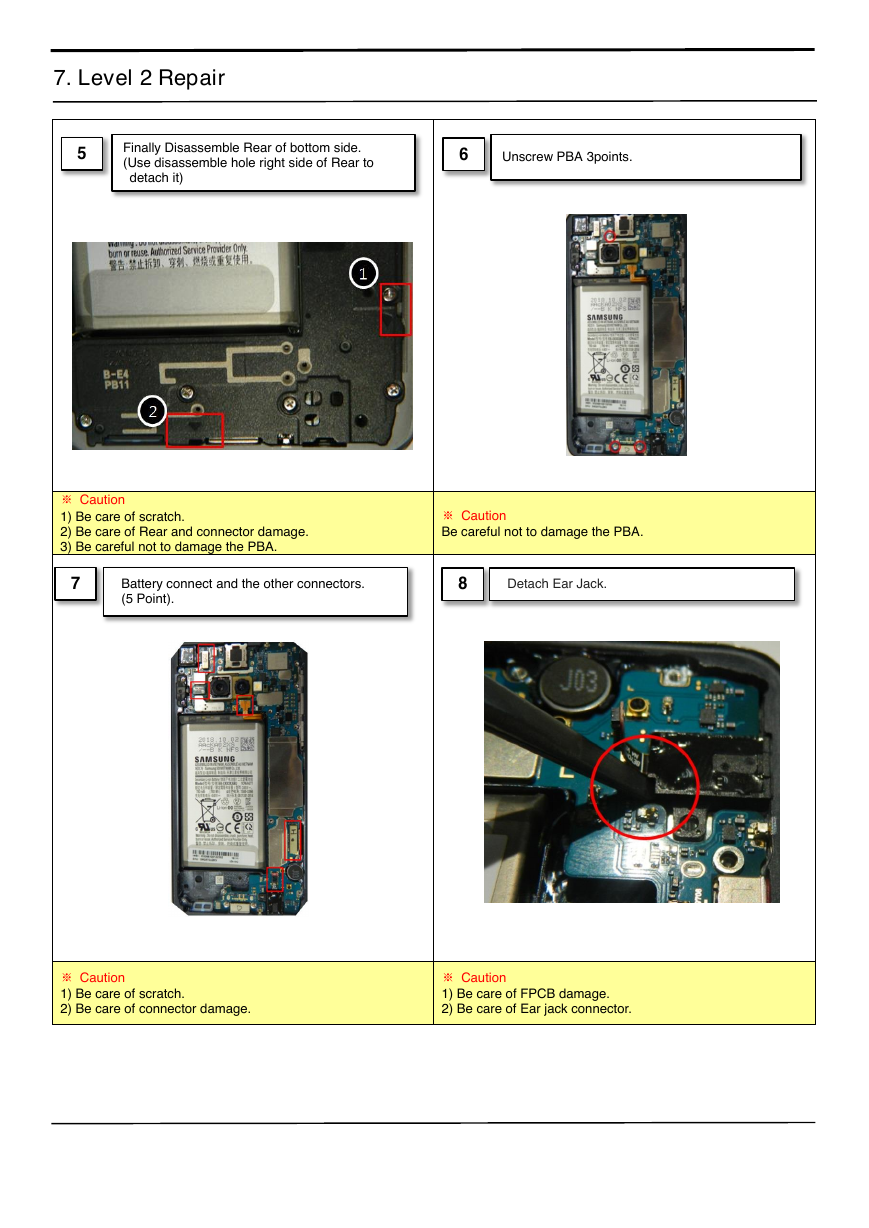
Finally Disassemble Rear of bottom side.
(Use disassemble hole right side of Rear to
detach it)
6
Unscrew PBA 3points.
※ Caution
1) Be care of scratch.
2) Be care of Rear and connector damage.
3) Be careful not to damage the PBA.
7
Battery connect and the other connectors.
(5 Point).
※ Caution
Be careful not to damage the PBA.
8
Detach Ear Jack.
※ Caution
1) Be care of scratch.
2) Be care of connector damage.
※ Caution
1) Be care of FPCB damage.
2) Be care of Ear jack connector.
�
7. Level 2 Repair
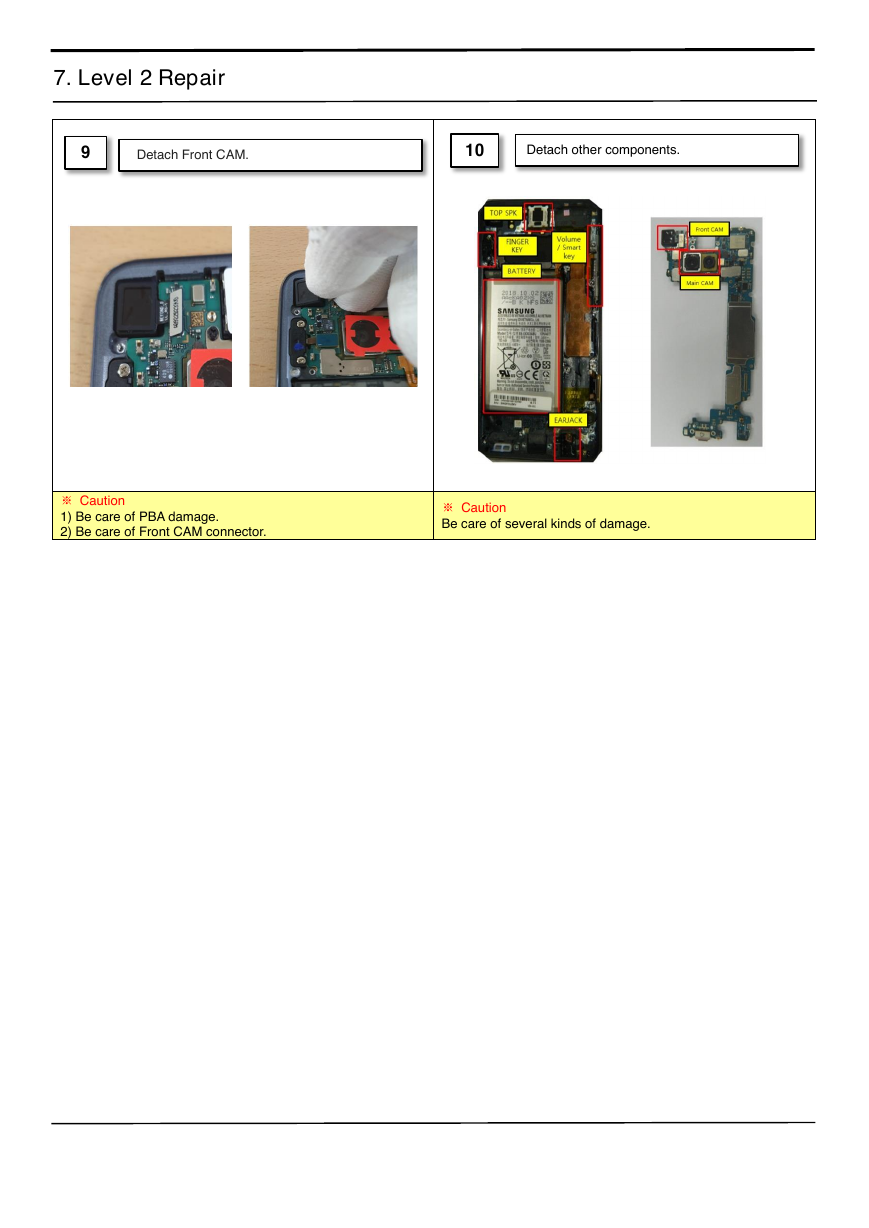
9
Detach Front CAM.
※ Caution
1) Be care of PBA damage.
2) Be care of Front CAM connector.
10
Detach other components.
※ Caution
Be care of several kinds of damage.
�
7. Level 2 Repair
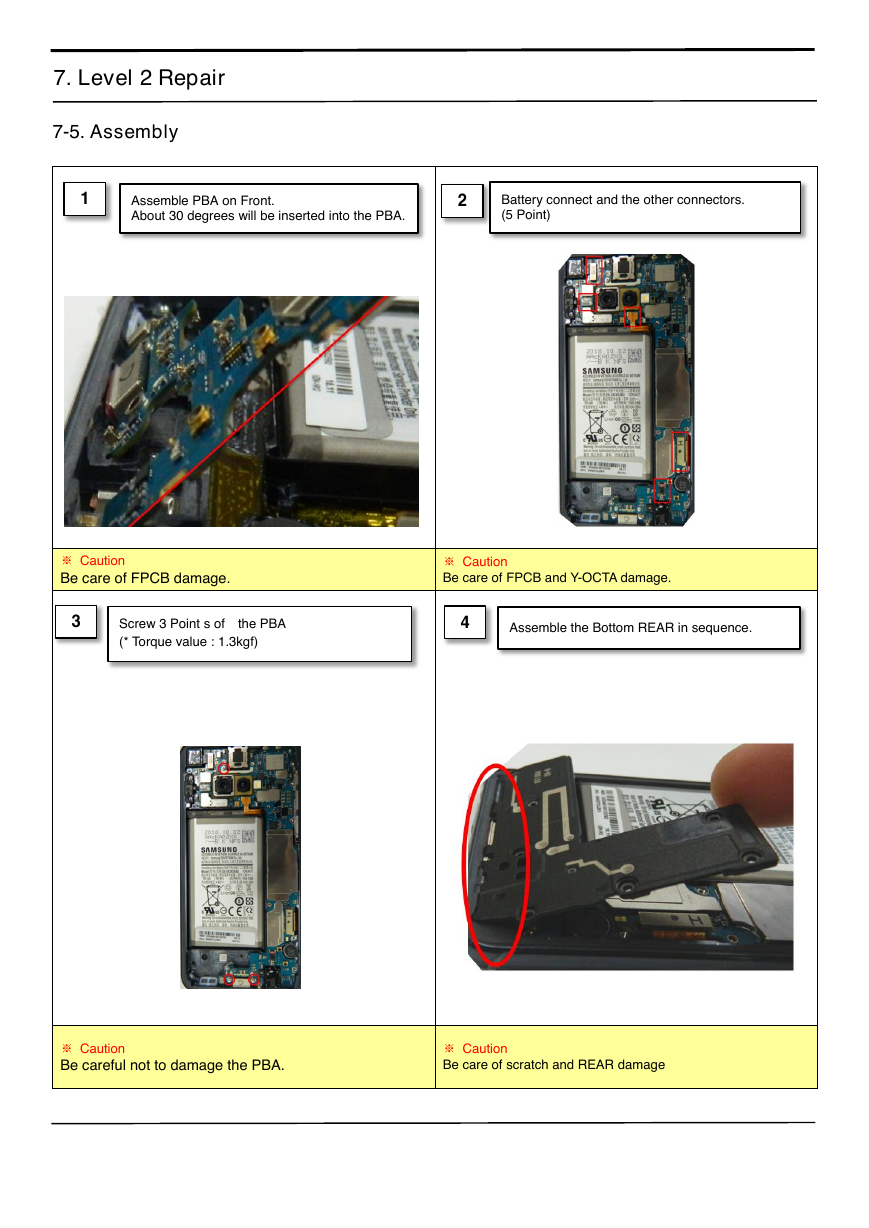
7-5. Assembly
1
Assemble PBA on Front.
About 30 degrees will be inserted into the PBA.
2
Battery connect and the other connectors.
(5 Point)
※ Caution
Be care of FPCB damage.
※ Caution
Be care of FPCB and Y-OCTA damage.
Screw 3 Point s of the PBA
(* Torque value : 1.3kgf)
4
Assemble the Bottom REAR in sequence.
3
※ Caution
Be careful not to damage the PBA.
※ Caution
Be care of scratch and REAR damage
�
7. Level 2 Repair
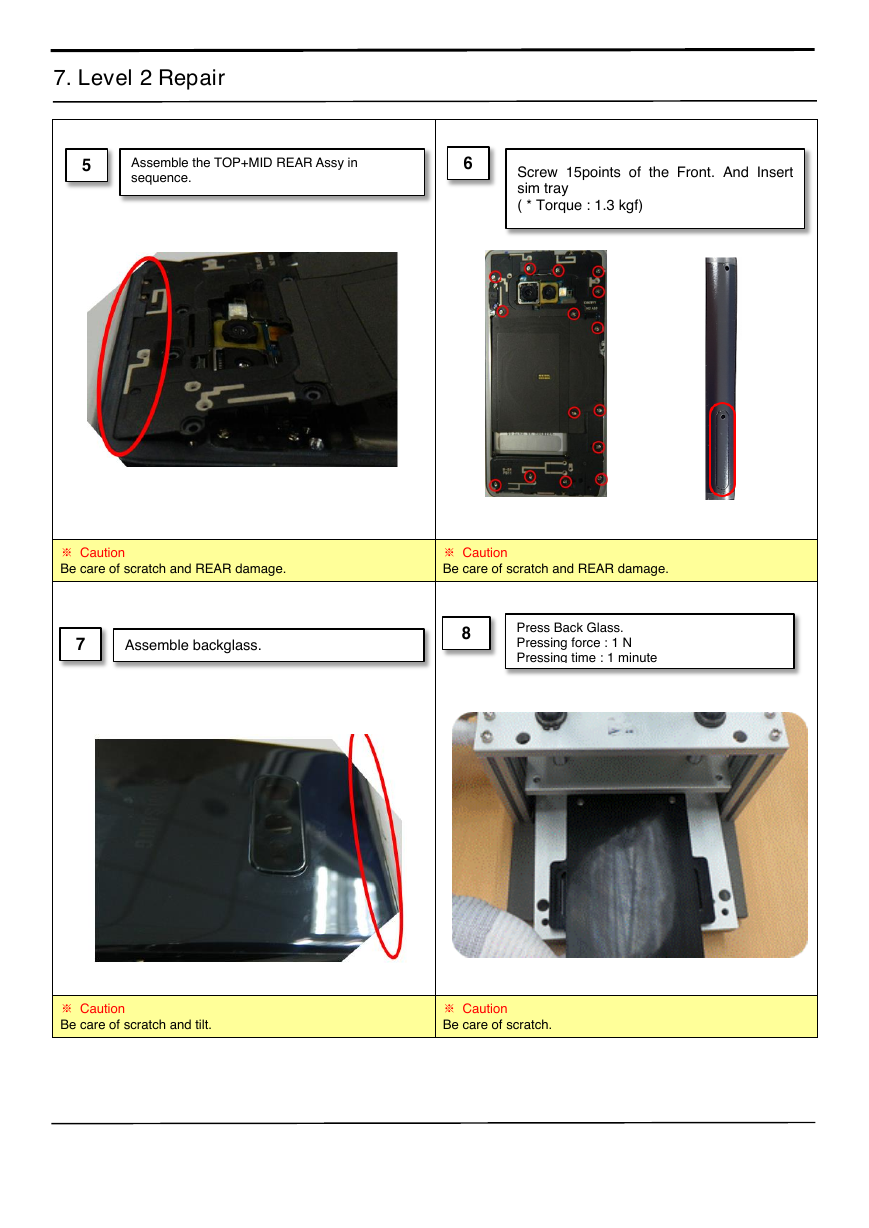
5
Assemble the TOP+MID REAR Assy in
sequence.
6
Screw 15points of the Front. And Insert
sim tray
( * Torque : 1.3 kgf)
※ Caution
Be care of scratch and REAR damage.
※ Caution
Be care of scratch and REAR damage.
7
Assemble backglass.
8
Press Back Glass.
Pressing force : 1 N
Pressing time : 1 minute
※ Caution
Be care of scratch and tilt.
※ Caution
Be care of scratch.
�



 2023年江西萍乡中考道德与法治真题及答案.doc
 2012年重庆南川中考生物真题及答案.doc
 2013年江西师范大学地理学综合及文艺理论基础考研真题.doc
 2020年四川甘孜小升初语文真题及答案I卷.doc
 2020年注册岩土工程师专业基础考试真题及答案.doc
 2023-2024学年福建省厦门市九年级上学期数学月考试题及答案.doc
 2021-2022学年辽宁省沈阳市大东区九年级上学期语文期末试题及答案.doc
 2022-2023学年北京东城区初三第一学期物理期末试卷及答案.doc
 2018上半年江西教师资格初中地理学科知识与教学能力真题及答案.doc
 2012年河北国家公务员申论考试真题及答案-省级.doc
 2020-2021学年江苏省扬州市江都区邵樊片九年级上学期数学第一次质量检测试题及答案.doc
 2022下半年黑龙江教师资格证中学综合素质真题及答案.doc