Gearbox Noise and Vibration Prediction
and Control
Jiri Tuma
VSB-Technical University of Ostrava, Ostrava, Czech Republic
(Received 30 April 2009; accepted 14 May 2009)
This paper will review practical techniques and procedures employed to quiet gearboxes and transmission units.
The author prefers solving the gear noise problem at the very source to introduce an enclosure as a means to
reduce radiated noise, which seems to be easy but its effect on the sound pressure level is small. The gearbox noise
problem solution is focused on the improvement of gear design; on the verification of its effect on the radiated noise
and the determination of the gears’ contribution to the truck’s or car’s overall noise levels and on the analytical
and/or numerical computer-based tools needed to perform the signal processing and diagnostics of geared axis
systems. All of the analytical methods are based on the time and frequency domain approach. Special care is
addressed to the smoothness of the drive resulting from the transmission error variation during a mesh cycle. This
paper will review the progress in technique of the gear angular vibration analysis and its effect on gear noise due to
the self excited vibration. This presentation will include some examples of the use of such approaches in practical
engineering problems.
1. INTRODUCTION
The major functions of a gearbox are to transform speed and
torque in a given ratio and to change the axis of rotation. The
main parts of the gearbox are the gears, shafts, bearings, hous-
ing, and the outside of the gearbox clutches and couplings. The
gears are machine elements that transmit motion by means of
successively engaging teeth. The transformation of speed is
without slip and loss of synchronization. Thus, the relation-
ship between the angular velocities of the driving gear to the
driven gear, or the velocity ratio, of a pair of mating teeth re-
sults from the number of teeth of the driving and driven gear. A
gear train consists of two or more gears (a pinion and wheels),
which serve to transmit motion from one axis to another. The
gear train operational condition depends on the drive systems.
Some gearboxes work with the steady-state rotational speed
while the rotational speed of the others varies in a certain
range. Independently on the rotational speed, the transmitted
power can be constant or variable.
The gearbox is a source of vibration and, consequently, noise.
Except for bearing fatal defects or extreme structure-resonance
amplification, gears are the main sources of high frequency vi-
bration and noise, even in newly built units. The gearbox’s
overall sound pressure level (SPL), compared to the SPL as-
sociated with the meshing gears, is only by some 5 dB higher
at maximum. There are two possible solutions for keeping a
transmission unit quiet. Introducing an enclosure to prevent
noise radiation — with the consequences of low efficiency and
difficult maintenance — is the easiest one. The more sophisti-
cated and much more efficient solution is based on solving the
noise problem at the very source. It means to introduce im-
provement aimed at the gear design and manufacturing, which
results in the greatest reduction of the SPL.
2. HISTORICAL NOTES
The author of this paper was a member of the team for gear-
box noise reduction at TATRA, a Czech company that pro-
duces off-road and on-road trucks. TATRA trucks are used
to carry goods and have a maximum authorized total mass
exceeding 12 tonnes.
In the past, TATRA truck gearboxes
were noted for a very robust design. Their only disadvan-
tage was that they were “a little noisy.” The introduction
of the 80 dB limit for the peak pass-by noise level of on-road
trucks in Europe in 1994 created a challenge to start research
works on gearbox noise reduction. It should be noted that the
pass-by noise measurements shall be made using the time F-
weighting and the fre-quency A-weighting on the dB scale at
a distance of 7.5 m from the centre of the test track. In the
USA, the SPL is measured at the distance of 50 feet (doubled
in comparison to the European test method), therefore 6 dB
has to be added to the USA limit to make it correspond to
the European level. The truck’s operational condition during
pass-by noise measurements is based on the full accel-eration
test specified in the International Standard, ISO R362-1982
(E) “Acoustic-Measurement of Noise Emitted by Accelerat-
ing Road Vehicles-Engineering Methods” or SAE J366 Sur-
face Vehicle standard — (R) “Exterior Sound Level for Heavy
Trucks and Buses (Issued 1969-07, Reaffirmed 1987-02).” The
test requires the vehicle to be driven through a test track at full
acceleration.
The noise level of road vehicles was decreased in intervals as
it was possible to fulfil the requirements given by the vehicle
noise legislation. The peak SPL of the mentioned category
of trucks was set to 84 dB before 1994. The 84 dB trucks
were easy to produce but the last decrease of the SPL by 4 dB
required fundamental improvements. The truck engine is the
noisiest unit. Engine noise reduction for TATRA trucks of the
T 815-2 type, introduced in production in 1989, was reached
by using covers and shields that fit over the engine compart-
ment and, also, by reducing the rate of the rise in cylinder pres-
sure. the reduction of the SPL to reach the last 4 dB was not
easy. To solve the gearbox noise problem it was necessary
to decide if the special enclosure should be extended over the
gear-box or not. As mentioned before, the designers decided to
International Journal of Acoustics and Vibration, Vol. 14, No. 2, 2009
(pp. 111)
1
�
Tuma, J.: GEARBOX NOISE AND VIBRATION PREDICTION AND CONTROL
solve the gearbox noise problem at the very source. The exper-
iments show that the effect of the enclosure, having an opening
for the Cardan drive shafts, on the SPL is less than the 3 dB re-
duction at a distance of 1 m. The TATRA truck power train
has the gearbox separated from the engine and these units are
connected to it by the Cardan shaft, therefore, it is not easy to
design the enclosure protecting noise radiation of the gearbox.
This paper describes the research work on quieting the truck
gearbox. As previously stated, the tuck gearbox is without en-
closure and their operating rotational speed and load are not
steady but are variables. The experience gained from research
work on the truck gearbox noise reduction can be applied, gen-
erally, to any other transmission.
3. VEHICLE PASS-BY NOISE MEASURE-
MENTS
Transmission noise should be assessed in terms of external
vehicle noise.
In order to analyze the contributions of each
individual simple-gear train to the overall noise level, it is
preferable to measure the time history of sound pressure and
engine revolutions per minute (RPM) during the pass-by test.
The vehicle transmission units contain multiple shafts that may
run coherently through fixed transmissions, or partially re-
lated through torque converter slippage, or independently, as
for instance a cooling fan in an engine compartment. The
emitted tonal noise consists of harmonic components whose
frequency is a multiple of the corresponding part’s rotational
speed (RPM). It is supposed that the instantaneous rotational
speed is measured in the form of a pulse train and is then trans-
mitted via a radio transmitter to be recorded together with the
noise and threshold signals. The overall pass-by vehicle noise
level is almost given by the contributions of the mentioned
tonal components. Therefore, it is possible to analyse con-
tributions of each individual simple gear train as well as the
engine firing noise and the tire noise to the overall noise level.
The noise spectrum analysis requires extending the measure-
ment instrumentation by introducing methods to evaluate the
instantaneous engine RPM during pass-by tests. In contrast to
the measurement with a stationary vehicle, during a pass-by
noise test, the effect of the relative speed of the noise source
and the microphones is translated into a Doppler phenomenon
and causes positive (approaching) or negative (receding) fre-
quency shifts (typically from 2 to 5%) in the signals received
by the microphones. The frequency f0 of sound waves that
are emitted by a source moving at velocity vR relative to the
stationary microphone receiving it, shifts the sound waves fre-
quency to the value of f1:
f1 = c
c + vr
f0;
(1)
where c is the sound velocity. The Doppler frequency shift
can lead to considerable errors for order tracking using a nar-
row-band pass filter.
The analysis of the truck pass-by noise sources based on
the frequency spectra decomposition was introduced at the
TATRA company in 1994 (first published in 19962).1 An ex-
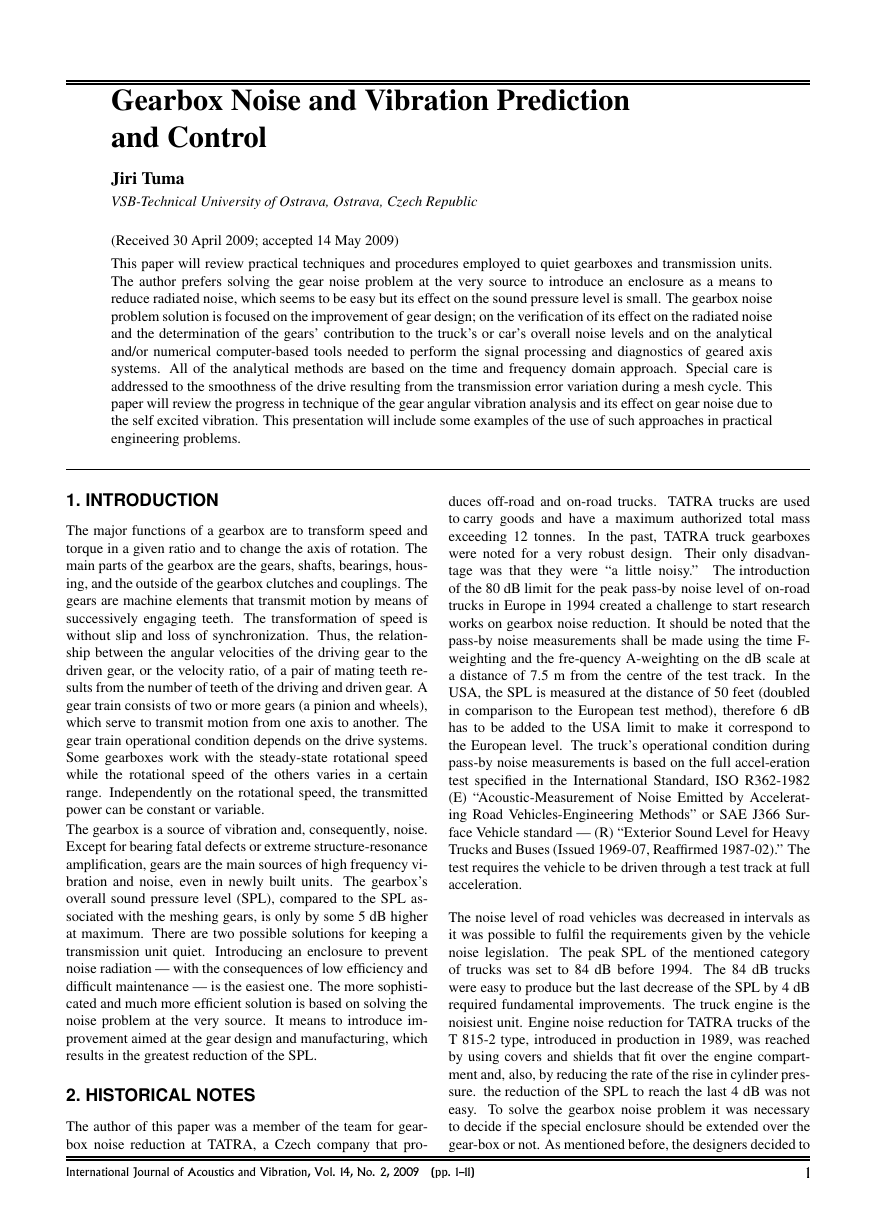
ample of the results is shown in Fig. 1 and contains a plot of the
relative sound power contributions (root mean square (RMS)
squared) versus time elapsed from the moment when the truck
crosses the test track entry point. The data corresponds to
2
gearbox improvements discussed later. It is assumed that all
the shafts run coherently through fixed transmissions. Each
power contribution is the sum of 5 partial contributions asso-
ciated to corresponding harmonics of a base frequency. The
base frequency and five of its harmonics of the sound waves
excited by the truck’s 8-cylinder, 4-stroke engine divided into
the engine firing (E1) and timing gears (E2 through E5), gear-
box gears (gear trains designated by N, 3, and SG), axle gears
(Axles), and eventually tire profile were evaluated using the en-
gine rotational speed measurement (RPM) after correction ac-
cording to Eq. (1) and prediction of the truck’s instantaneous
velocity and position (Dist) on the track, taking into account
the Doppler shift and the 1% relative passband width around
the centre frequency. Note the cursor values at the peak value
(Max) of the sound pressure. The phase modulation effect in
the noise signal during pass-by tests was analysed by Kubena.3
Figure 1. Truck noise sources contribution to overall pass-by noise level.
Regardless of these previous successful results, software was
later developed for pass-by noise analysis based on the Vold-
Kalman order-tracking filtration4–6, which included a math-
ematical model of the tire slip as a function of the lon-
gitudinal and normal force acting on the tire by the road
surface.1 Assuming that the tire slip and the vehicle position
at
track end is corrected by less than
1 m, then it is negligible compared to the truck dimensions.
the end of the test
4. FACTORY LIMIT FOR THE GEARBOX SPL
To fulfil the pass-by noise level limit for the truck tests accord-
ing to the aforementioned International Standard, the factory
internal limit for the gearbox noise level measured on a test
stand by microphones located aside at a distance of 1 m was
proposed by technicians having experience with noise prob-
lems. This limit level was used to check gearbox quality and
as a criterion for improving gearbox design. The gearbox noise
was measured on the test stand at the gearbox operational con-
dition, simulating the vehicle pass-by noise test. The SPL limit
was setup according to the comparison of the result of the
many pass-by and test stand measurements. The mentioned
SPL limit for gearboxes is a maximum of the overall SPL in
the RPM range at the gearbox input shaft corresponding to the
engine RPM range during acceleration on the test track (where
the pass-by noise tests take place). The reason for this is that
International Journal of Acoustics and Vibration, Vol. 14, No. 2, 2009
�
Tuma, J.: GEARBOX NOISE AND VIBRATION PREDICTION AND CONTROL
the peak vehicle SPL should be less than the required limit for
all the tested gears.
There are two possible arrangements of the test stand, an
open-loop test stand and a back-to-back test rig. In contrast to
the open-loop test stand, the back-to-back test rig configuration
saves drive energy. The torque to be transmitted by the gearbox
is induced by a planetary gearbox. The gearbox under testing
is enclosed in a semi-anechoic room. The quality of the semi-
anechoic room is of great importance for the reliability of the
results at engineering accuracy. According to ISO 3744, the
reverberation time should satisfy a condition required for the
ratio of the room absorption to the measurement surface area
(greater than 6) in the frequency range from at least 200 Hz to
3 kHz. The input shaft speed is slowly increased from minimal
to maximal RPM while the gearbox is under a load correspond-
ing to full vehicle “acceleration” during the pass-by tests.
In the TATRA company, noise is measured by two micro-
phones located by the side of the gearbox under a test at a
distance of 1 m. Accelerometers that are attached on the sur-
face of the gearbox housing, near the shaft bearings, can extend
information about the noise sources. A tacho probe, that gen-
erates a string of pulses, is usually employed to measure the
gearbox’s primary-shaft (input shaft) rotational speed.
The effect of the gearbox improvement has to be demon-
strated statistically.
The gearbox design, namely the
gear design parameters, and the production quality before
the introduction of the noise reduction improvements in 1994
can be described by the empirical distribution function of the
tested gearbox noise level. As it was explained before, the
gearbox SPL is detected during the run-up tests on the test
stand as a maximum of overall SPL in the RPM range cor-
responding to the engine RPM during the pass-by tests. The
characteristic gearbox noise level is considered the result of
the measurement of the noisiest gears at the noisiest side of the
gearbox.
Figure 2. Experimental distribution functions of the gearbox SPL equipped
with gears produced before 1994.
In 1993, a total number of 397 newly built units were tested
and the measurement results are shown in Fig. 2 in the form
of the normal distribution probability plot, which is a graphi-
cal technique for assessing whether a data set is approximately
normally distributed.
In fact, the probability plot presents
an experimental distribution function (cumulative histogram)
International Journal of Acoustics and Vibration, Vol. 14, No. 2, 2009
in transformed coordinates. The data are plotted against a
theoretical normal distribution in such a way that the points
should form an approximate straight line. Deviations from
this straight line indicate deviations from normality. The nor-
mal probability plot is formed by the vertical axis (probability)
and horizontal axis with equally probable ordered values. A
mean value which is identical with the median for normally
distributed data corresponds to the 50% probability. The stan-
dard deviation is indicated by σ in Fig. 2.
The empirical distribution function for 397 units is a broken-
line (I and II sections), which indicates two subsets of the nor-
mally distributed data differing in the mean value and the stan-
dard deviation.
It may be guessed that these subsets proba-
bly differ significantly in quality. When discussion about the
strategy for quieting gearboxes started, one of the suggestions
recommended avoiding the extreme values of the gear devia-
tions. The measurement result of the gearboxes with gear de-
viations within the allowed limits is shown in Fig. 2, as well.
As it is evident, the improvement of production quality is not
sufficient for considerable noise reduction. The SPL median
of the checked gearboxes is less than the median of the oth-
ers by approximately 0.8 dB. The only effect of selecting the
gearbox is a reduction of the standard deviation of the SPL
level values.
5. DESCRIPTION OF THE TATRA TRUCK
POWERTRAIN SYSTEM
The truck powertrain system consists of the engine, gearbox,
differentials, and axles. All these units contain gears. Due
to the high rotational speed and transferred torque, gears in a
gearbox and axles play the key role in emitting noise. All gears
in the TATRA gearbox are of the helical type and the gears in
the axles are of the spiral bevel type. The problem of the axle
noise will be noted marginally. The main interest is focused
on the transmission, which consists of the main and secondary
gearbox. The secondary gearbox is sometimes called the drop
gearbox due to the fact that this gearbox reduces the rotational
speed.
In the case of the TATRA trucks, the drop gearbox
transfers power to the level of the central tube, which is the
backbone of the chassis structure. The main gearbox is two
stages and has five basic gears and reverse. As all the basic
gears are split (R, N) the number of the basic gears is extended
to ten forward and two reverse gears. The gears are designated
by a combination of the number character (1 through 5 or 6)
and letter (R or N), for example ’3N’. According to the EEC
regulations valid at the beginning of the 1990s, the basic gears
selected for the pass-by tests are No.s 3, 4, and 5. The drop
gearbox is either the compound gear train with an idler gear
or the two-stage gearbox, extending the number of gears to 12.
TATRA does not use a planetary gearbox as the drop gearbox.
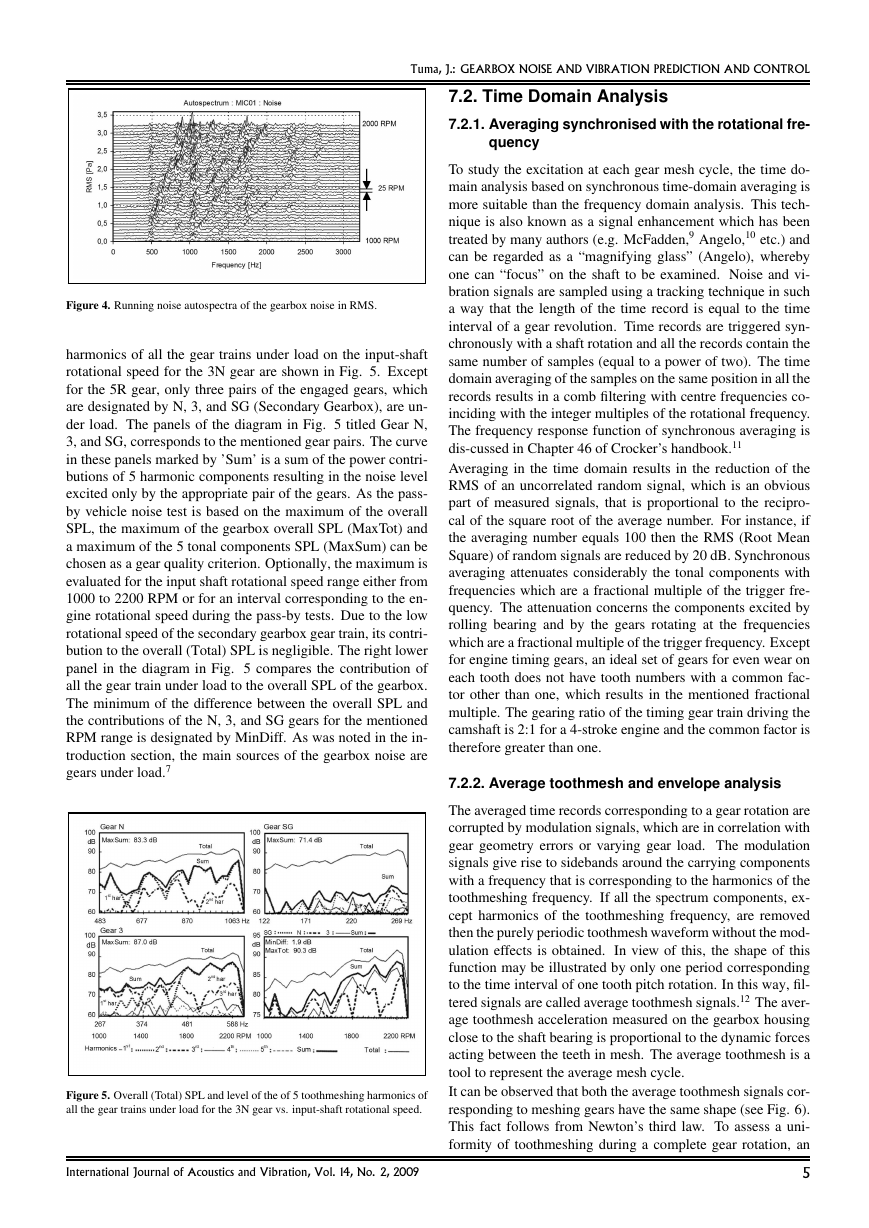
The kinematic model of gear arrangement as well as the gear-
box housing are shown in Fig. 3.
6. SOURCES OF GEARBOX NOISE AND VI-
BRATION
Gearbox noise is tonal. This means that the noise frequency
spectrum consists of sinusoidal components at discrete fre-
quencies with low-level random background noise. The fre-
quency that is the product of the gear rotational speed in Hz
3
�
Tuma, J.: GEARBOX NOISE AND VIBRATION PREDICTION AND CONTROL
produce the idle gear rattle. The dominating components in
the frequency spectrum can be identified after averaging either
in the time or frequency domain.
7. TOOLS FOR GEARBOX NOISE AND VI-
BRATION ANALYSIS
Analytical methods for gearbox noise and vibration are de-
scribed in Crocker’s handbook.7
Instrumentation of the test
stands is of the Br¨uel & Kjær origin, namely the signal analyz-
ers of the BK 2034 and 3550 type.
7.1. Frequency Domain Analysis
The basic tool for signal processing in diagnostics is the
Fourier Transform of signals. The base frequency of all the
exciting forces is related to the gearbox shaft rotation fre-
quency. The gearbox is tested during steady-state rotation or
run-up/coast-down. Clear information about the origin of ex-
tensive vibrations cannot be given by a single frequency spec-
trum. Extensive vibration is excited when the toothmeshing
frequency or its harmonics meet the structural resonance fre-
quency of the gearbox structure. It should be mentioned that
any driven unit does not rotate at a purely constant speed but
its speed slowly varies around an average value. Spectrum
components of the diagnostic signal result from the simulta-
neous amplitude and phase modulation of the so-called carry-
ing harmonic components that correspond to the excitation at a
purely steady-state rotation. An amplitude modulation of har-
monic signals arises from the non-uniform periodic load while
a phase modulation is due to non-uniform rotational speed.
Rotational speed variations at fixed-signal sampling frequency
cause the smearing of the dominating components in the fre-
quency spectra.
Analysis of signals from machines running in cyclic fashion is
preferred in terms of order spectra rather than frequency spec-
tra. The order spectra are evaluated using the Fourier Trans-
form of time records that are measured in dimensionless rev-
olutions rather than seconds and the corresponding spectrum
components are associated with dimensionless orders rather
than frequency in Hz. This technique is called order analysis or
tracking analysis, as the rotation frequency is being tracked and
used for analysis. The resolution of the order spectrum is equal
to the reciprocal value of the revolution number per record that
is an input data vector of the length, equal to a power of two,
for the Fast Fourier Transform (FFT).
The signal/noise ratio is improved by averaging in both the fre-
quency and time domains. Signal resampling to a fixed number
of samples per revolution is employed in order to eliminate the
phase modulation effect at the tacho pulse frequency.
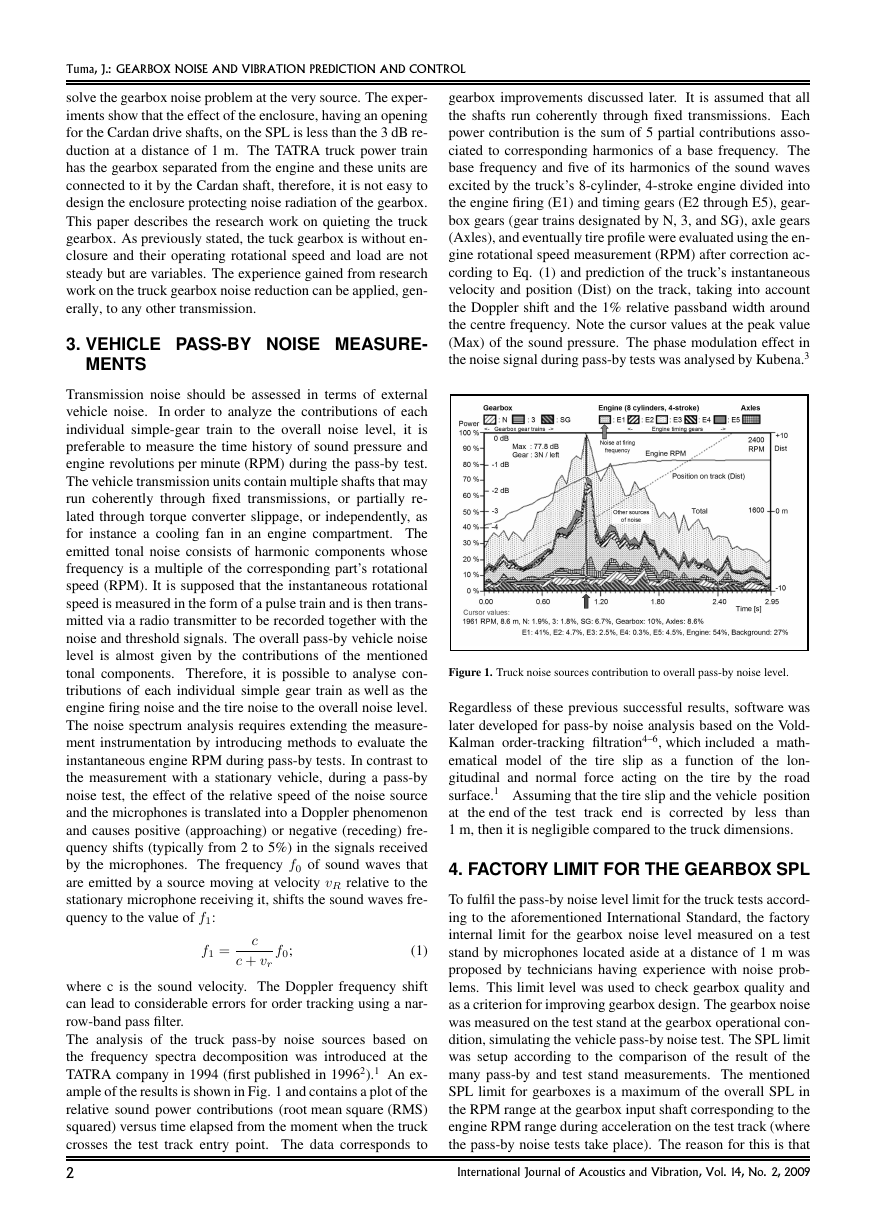
An example of gearbox noise spectra in dB (Hanning time
window and A-weighting) during the run-up test under load
is shown in Fig. 4. The input shaft rotational speed was slowly
increased from 1000 RPM to 2200 RPM. The spectral map il-
lustrates how the various harmonics fall along radial lines and
can, thus, be separated from the constant frequency compo-
nents due to excessive amplification by a structural resonance.
The first five harmonics of the toothmeshing frequency is usu-
ally sufficient to set up the frequency range for measurements.
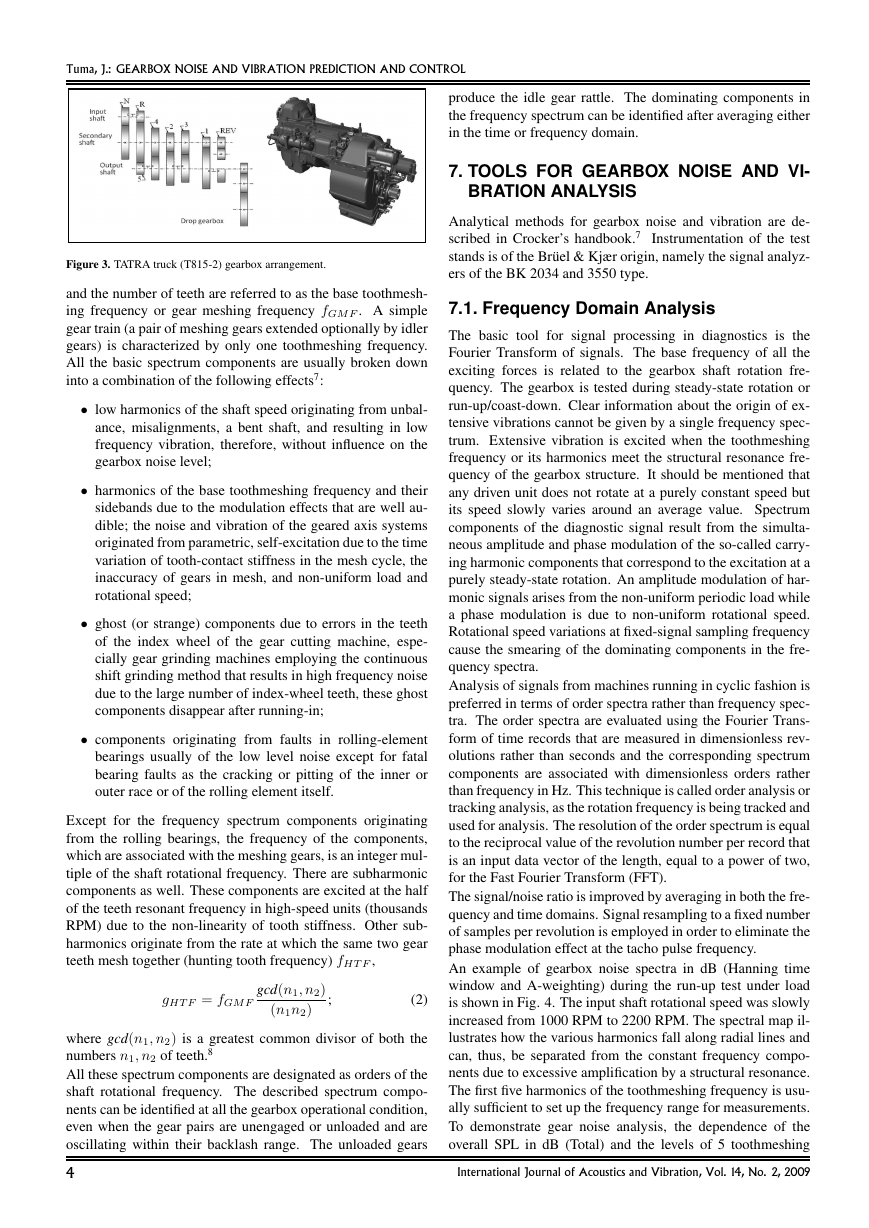
To demonstrate gear noise analysis, the dependence of the
overall SPL in dB (Total) and the levels of 5 toothmeshing
International Journal of Acoustics and Vibration, Vol. 14, No. 2, 2009
Figure 3. TATRA truck (T815-2) gearbox arrangement.
and the number of teeth are referred to as the base toothmesh-
ing frequency or gear meshing frequency fGM F . A simple
gear train (a pair of meshing gears extended optionally by idler
gears) is characterized by only one toothmeshing frequency.
All the basic spectrum components are usually broken down
into a combination of the following effects7:
• low harmonics of the shaft speed originating from unbal-
ance, misalignments, a bent shaft, and resulting in low
frequency vibration, therefore, without influence on the
gearbox noise level;
• harmonics of the base toothmeshing frequency and their
sidebands due to the modulation effects that are well au-
dible; the noise and vibration of the geared axis systems
originated from parametric, self-excitation due to the time
variation of tooth-contact stiffness in the mesh cycle, the
inaccuracy of gears in mesh, and non-uniform load and
rotational speed;
• ghost (or strange) components due to errors in the teeth
of the index wheel of the gear cutting machine, espe-
cially gear grinding machines employing the continuous
shift grinding method that results in high frequency noise
due to the large number of index-wheel teeth, these ghost
components disappear after running-in;
• components originating from faults in rolling-element
bearings usually of the low level noise except for fatal
bearing faults as the cracking or pitting of the inner or
outer race or of the rolling element itself.
Except for the frequency spectrum components originating
from the rolling bearings, the frequency of the components,
which are associated with the meshing gears, is an integer mul-
tiple of the shaft rotational frequency. There are subharmonic
components as well. These components are excited at the half
of the teeth resonant frequency in high-speed units (thousands
RPM) due to the non-linearity of tooth stiffness. Other sub-
harmonics originate from the rate at which the same two gear
teeth mesh together (hunting tooth frequency) fHT F ,
gHT F = fGM F
gcd(n1, n2)
(n1n2)
;
(2)
where gcd(n1, n2) is a greatest common divisor of both the
numbers n1, n2 of teeth.8
All these spectrum components are designated as orders of the
shaft rotational frequency. The described spectrum compo-
nents can be identified at all the gearbox operational condition,
even when the gear pairs are unengaged or unloaded and are
oscillating within their backlash range. The unloaded gears
4
�
Tuma, J.: GEARBOX NOISE AND VIBRATION PREDICTION AND CONTROL
7.2. Time Domain Analysis
7.2.1. Averaging synchronised with the rotational fre-
quency
To study the excitation at each gear mesh cycle, the time do-
main analysis based on synchronous time-domain averaging is
more suitable than the frequency domain analysis. This tech-
nique is also known as a signal enhancement which has been
treated by many authors (e.g. McFadden,9 Angelo,10 etc.) and
can be regarded as a “magnifying glass” (Angelo), whereby
one can “focus” on the shaft to be examined. Noise and vi-
bration signals are sampled using a tracking technique in such
a way that the length of the time record is equal to the time
interval of a gear revolution. Time records are triggered syn-
chronously with a shaft rotation and all the records contain the
same number of samples (equal to a power of two). The time
domain averaging of the samples on the same position in all the
records results in a comb filtering with centre frequencies co-
inciding with the integer multiples of the rotational frequency.
The frequency response function of synchronous averaging is
dis-cussed in Chapter 46 of Crocker’s handbook.11
Averaging in the time domain results in the reduction of the
RMS of an uncorrelated random signal, which is an obvious
part of measured signals, that is proportional to the recipro-
cal of the square root of the average number. For instance, if
the averaging number equals 100 then the RMS (Root Mean
Square) of random signals are reduced by 20 dB. Synchronous
averaging attenuates considerably the tonal components with
frequencies which are a fractional multiple of the trigger fre-
quency. The attenuation concerns the components excited by
rolling bearing and by the gears rotating at the frequencies
which are a fractional multiple of the trigger frequency. Except
for engine timing gears, an ideal set of gears for even wear on
each tooth does not have tooth numbers with a common fac-
tor other than one, which results in the mentioned fractional
multiple. The gearing ratio of the timing gear train driving the
camshaft is 2:1 for a 4-stroke engine and the common factor is
therefore greater than one.
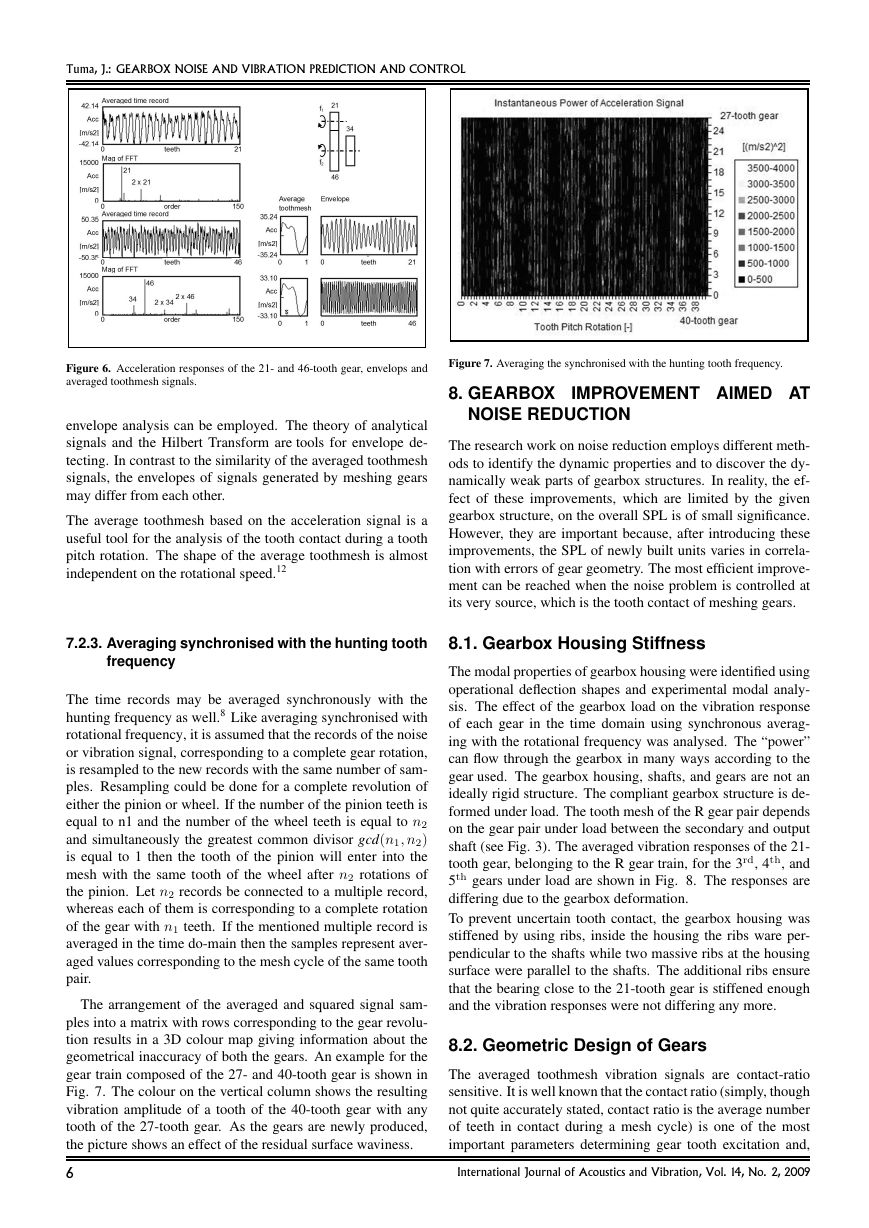
7.2.2. Average toothmesh and envelope analysis
The averaged time records corresponding to a gear rotation are
corrupted by modulation signals, which are in correlation with
gear geometry errors or varying gear load. The modulation
signals give rise to sidebands around the carrying components
with a frequency that is corresponding to the harmonics of the
toothmeshing frequency. If all the spectrum components, ex-
cept harmonics of the toothmeshing frequency, are removed
then the purely periodic toothmesh waveform without the mod-
ulation effects is obtained. In view of this, the shape of this
function may be illustrated by only one period corresponding
to the time interval of one tooth pitch rotation. In this way, fil-
tered signals are called average toothmesh signals.12 The aver-
age toothmesh acceleration measured on the gearbox housing
close to the shaft bearing is proportional to the dynamic forces
acting between the teeth in mesh. The average toothmesh is a
tool to represent the average mesh cycle.
It can be observed that both the average toothmesh signals cor-
responding to meshing gears have the same shape (see Fig. 6).
This fact follows from Newton’s third law. To assess a uni-
formity of toothmeshing during a complete gear rotation, an
Figure 4. Running noise autospectra of the gearbox noise in RMS.
harmonics of all the gear trains under load on the input-shaft
rotational speed for the 3N gear are shown in Fig. 5. Except
for the 5R gear, only three pairs of the engaged gears, which
are designated by N, 3, and SG (Secondary Gearbox), are un-
der load. The panels of the diagram in Fig. 5 titled Gear N,
3, and SG, corresponds to the mentioned gear pairs. The curve
in these panels marked by ’Sum’ is a sum of the power contri-
butions of 5 harmonic components resulting in the noise level
excited only by the appropriate pair of the gears. As the pass-
by vehicle noise test is based on the maximum of the overall
SPL, the maximum of the gearbox overall SPL (MaxTot) and
a maximum of the 5 tonal components SPL (MaxSum) can be
chosen as a gear quality criterion. Optionally, the maximum is
evaluated for the input shaft rotational speed range either from
1000 to 2200 RPM or for an interval corresponding to the en-
gine rotational speed during the pass-by tests. Due to the low
rotational speed of the secondary gearbox gear train, its contri-
bution to the overall (Total) SPL is negligible. The right lower
panel in the diagram in Fig. 5 compares the contribution of
all the gear train under load to the overall SPL of the gearbox.
The minimum of the difference between the overall SPL and
the contributions of the N, 3, and SG gears for the mentioned
RPM range is designated by MinDiff. As was noted in the in-
troduction section, the main sources of the gearbox noise are
gears under load.7
Figure 5. Overall (Total) SPL and level of the of 5 toothmeshing harmonics of
all the gear trains under load for the 3N gear vs. input-shaft rotational speed.
International Journal of Acoustics and Vibration, Vol. 14, No. 2, 2009
5
�
Tuma, J.: GEARBOX NOISE AND VIBRATION PREDICTION AND CONTROL
Figure 6. Acceleration responses of the 21- and 46-tooth gear, envelops and
averaged toothmesh signals.
envelope analysis can be employed. The theory of analytical
signals and the Hilbert Transform are tools for envelope de-
tecting. In contrast to the similarity of the averaged toothmesh
signals, the envelopes of signals generated by meshing gears
may differ from each other.
The average toothmesh based on the acceleration signal is a
useful tool for the analysis of the tooth contact during a tooth
pitch rotation. The shape of the average toothmesh is almost
independent on the rotational speed.12
7.2.3. Averaging synchronised with the hunting tooth
frequency
The time records may be averaged synchronously with the
hunting frequency as well.8 Like averaging synchronised with
rotational frequency, it is assumed that the records of the noise
or vibration signal, corresponding to a complete gear rotation,
is resampled to the new records with the same number of sam-
ples. Resampling could be done for a complete revolution of
either the pinion or wheel. If the number of the pinion teeth is
equal to n1 and the number of the wheel teeth is equal to n2
and simultaneously the greatest common divisor gcd(n1, n2)
is equal to 1 then the tooth of the pinion will enter into the
mesh with the same tooth of the wheel after n2 rotations of
the pinion. Let n2 records be connected to a multiple record,
whereas each of them is corresponding to a complete rotation
of the gear with n1 teeth. If the mentioned multiple record is
averaged in the time do-main then the samples represent aver-
aged values corresponding to the mesh cycle of the same tooth
pair.
The arrangement of the averaged and squared signal sam-
ples into a matrix with rows corresponding to the gear revolu-
tion results in a 3D colour map giving information about the
geometrical inaccuracy of both the gears. An example for the
gear train composed of the 27- and 40-tooth gear is shown in
Fig. 7. The colour on the vertical column shows the resulting
vibration amplitude of a tooth of the 40-tooth gear with any
tooth of the 27-tooth gear. As the gears are newly produced,
the picture shows an effect of the residual surface waviness.
6
Figure 7. Averaging the synchronised with the hunting tooth frequency.
8. GEARBOX IMPROVEMENT AIMED AT
NOISE REDUCTION
The research work on noise reduction employs different meth-
ods to identify the dynamic properties and to discover the dy-
namically weak parts of gearbox structures. In reality, the ef-
fect of these improvements, which are limited by the given
gearbox structure, on the overall SPL is of small significance.
However, they are important because, after introducing these
improvements, the SPL of newly built units varies in correla-
tion with errors of gear geometry. The most efficient improve-
ment can be reached when the noise problem is controlled at
its very source, which is the tooth contact of meshing gears.
8.1. Gearbox Housing Stiffness
The modal properties of gearbox housing were identified using
operational deflection shapes and experimental modal analy-
sis. The effect of the gearbox load on the vibration response
of each gear in the time domain using synchronous averag-
ing with the rotational frequency was analysed. The “power”
can flow through the gearbox in many ways according to the
gear used. The gearbox housing, shafts, and gears are not an
ideally rigid structure. The compliant gearbox structure is de-
formed under load. The tooth mesh of the R gear pair depends
on the gear pair under load between the secondary and output
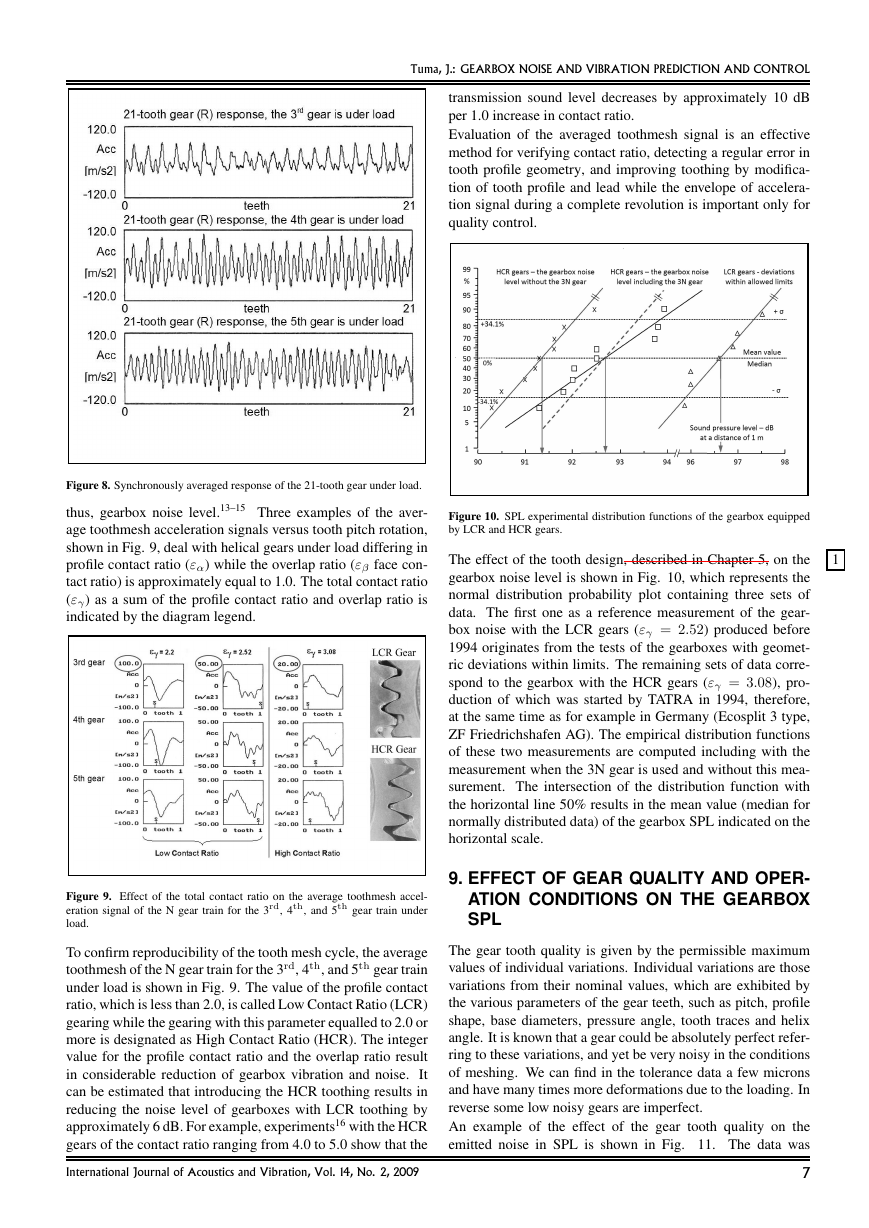
shaft (see Fig. 3). The averaged vibration responses of the 21-
tooth gear, belonging to the R gear train, for the 3rd, 4th, and
5th gears under load are shown in Fig. 8. The responses are
differing due to the gearbox deformation.
To prevent uncertain tooth contact, the gearbox housing was
stiffened by using ribs, inside the housing the ribs ware per-
pendicular to the shafts while two massive ribs at the housing
surface were parallel to the shafts. The additional ribs ensure
that the bearing close to the 21-tooth gear is stiffened enough
and the vibration responses were not differing any more.
8.2. Geometric Design of Gears
The averaged toothmesh vibration signals are contact-ratio
sensitive. It is well known that the contact ratio (simply, though
not quite accurately stated, contact ratio is the average number
of teeth in contact during a mesh cycle) is one of the most
important parameters determining gear tooth excitation and,
International Journal of Acoustics and Vibration, Vol. 14, No. 2, 2009
�
Tuma, J.: GEARBOX NOISE AND VIBRATION PREDICTION AND CONTROL
transmission sound level decreases by approximately 10 dB
per 1.0 increase in contact ratio.
Evaluation of the averaged toothmesh signal is an effective
method for verifying contact ratio, detecting a regular error in
tooth profile geometry, and improving toothing by modifica-
tion of tooth profile and lead while the envelope of accelera-
tion signal during a complete revolution is important only for
quality control.
Figure 8. Synchronously averaged response of the 21-tooth gear under load.
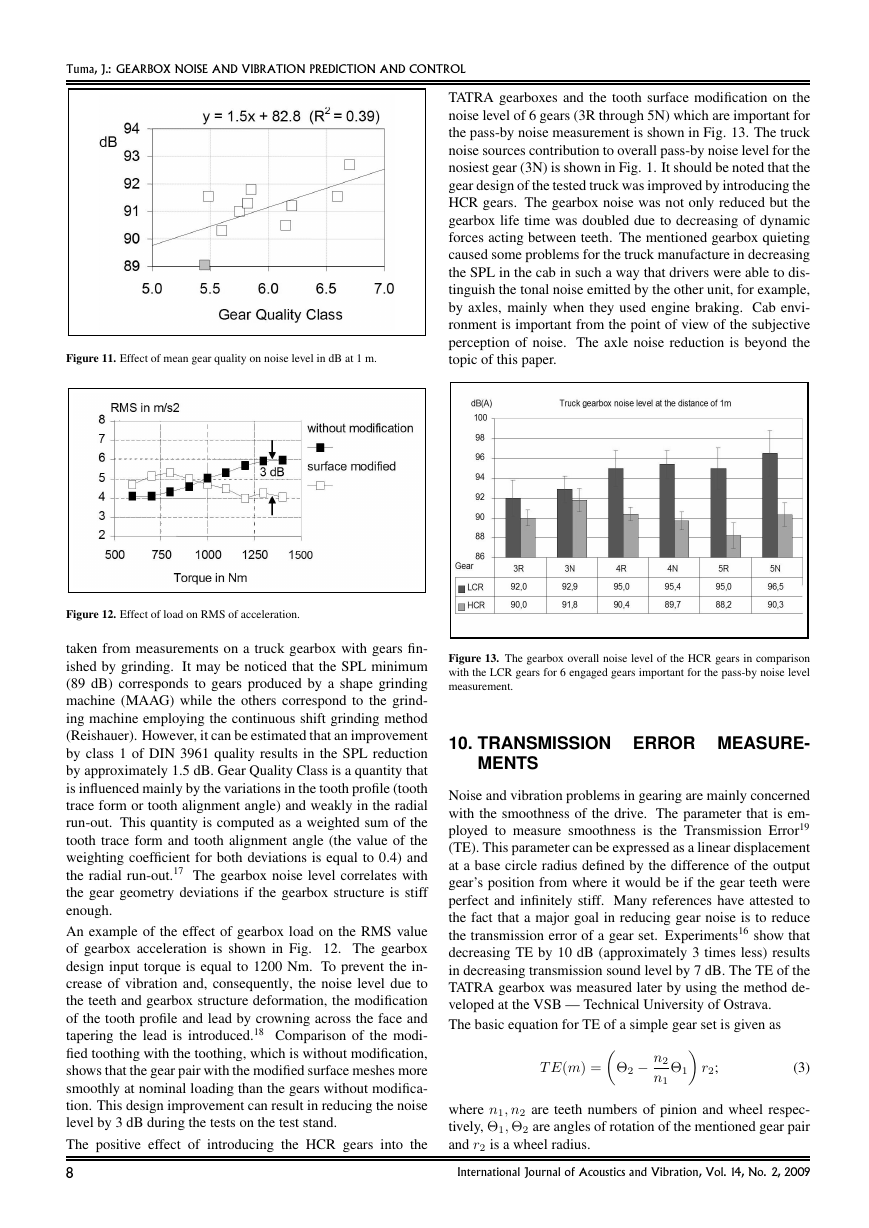
thus, gearbox noise level.13–15 Three examples of the aver-
age toothmesh acceleration signals versus tooth pitch rotation,
shown in Fig. 9, deal with helical gears under load differing in
profile contact ratio (εα) while the overlap ratio (εβ face con-
tact ratio) is approximately equal to 1.0. The total contact ratio
(εγ) as a sum of the profile contact ratio and overlap ratio is
indicated by the diagram legend.
Figure 9. Effect of the total contact ratio on the average toothmesh accel-
eration signal of the N gear train for the 3rd, 4th, and 5th gear train under
load.
To confirm reproducibility of the tooth mesh cycle, the average
toothmesh of the N gear train for the 3rd, 4th, and 5th gear train
under load is shown in Fig. 9. The value of the profile contact
ratio, which is less than 2.0, is called Low Contact Ratio (LCR)
gearing while the gearing with this parameter equalled to 2.0 or
more is designated as High Contact Ratio (HCR). The integer
value for the profile contact ratio and the overlap ratio result
in considerable reduction of gearbox vibration and noise. It
can be estimated that introducing the HCR toothing results in
reducing the noise level of gearboxes with LCR toothing by
approximately 6 dB. For example, experiments16 with the HCR
gears of the contact ratio ranging from 4.0 to 5.0 show that the
International Journal of Acoustics and Vibration, Vol. 14, No. 2, 2009
1
Figure 10. SPL experimental distribution functions of the gearbox equipped
by LCR and HCR gears.
The effect of the tooth design, described in Chapter 5, on the
gearbox noise level is shown in Fig. 10, which represents the
normal distribution probability plot containing three sets of
data. The first one as a reference measurement of the gear-
box noise with the LCR gears (εγ = 2.52) produced before
1994 originates from the tests of the gearboxes with geomet-
ric deviations within limits. The remaining sets of data corre-
spond to the gearbox with the HCR gears (εγ = 3.08), pro-
duction of which was started by TATRA in 1994, therefore,
at the same time as for example in Germany (Ecosplit 3 type,
ZF Friedrichshafen AG). The empirical distribution functions
of these two measurements are computed including with the
measurement when the 3N gear is used and without this mea-
surement. The intersection of the distribution function with
the horizontal line 50% results in the mean value (median for
normally distributed data) of the gearbox SPL indicated on the
horizontal scale.
9. EFFECT OF GEAR QUALITY AND OPER-
ATION CONDITIONS ON THE GEARBOX
SPL
The gear tooth quality is given by the permissible maximum
values of individual variations. Individual variations are those
variations from their nominal values, which are exhibited by
the various parameters of the gear teeth, such as pitch, profile
shape, base diameters, pressure angle, tooth traces and helix
angle. It is known that a gear could be absolutely perfect refer-
ring to these variations, and yet be very noisy in the conditions
of meshing. We can find in the tolerance data a few microns
and have many times more deformations due to the loading. In
reverse some low noisy gears are imperfect.
An example of the effect of the gear tooth quality on the
emitted noise in SPL is shown in Fig. 11. The data was
7
�
Tuma, J.: GEARBOX NOISE AND VIBRATION PREDICTION AND CONTROL
TATRA gearboxes and the tooth surface modification on the
noise level of 6 gears (3R through 5N) which are important for
the pass-by noise measurement is shown in Fig. 13. The truck
noise sources contribution to overall pass-by noise level for the
nosiest gear (3N) is shown in Fig. 1. It should be noted that the
gear design of the tested truck was improved by introducing the
HCR gears. The gearbox noise was not only reduced but the
gearbox life time was doubled due to decreasing of dynamic
forces acting between teeth. The mentioned gearbox quieting
caused some problems for the truck manufacture in decreasing
the SPL in the cab in such a way that drivers were able to dis-
tinguish the tonal noise emitted by the other unit, for example,
by axles, mainly when they used engine braking. Cab envi-
ronment is important from the point of view of the subjective
perception of noise. The axle noise reduction is beyond the
topic of this paper.
Figure 13. The gearbox overall noise level of the HCR gears in comparison
with the LCR gears for 6 engaged gears important for the pass-by noise level
measurement.
10. TRANSMISSION ERROR MEASURE-
MENTS
Noise and vibration problems in gearing are mainly concerned
with the smoothness of the drive. The parameter that is em-
ployed to measure smoothness is the Transmission Error19
(TE). This parameter can be expressed as a linear displacement
at a base circle radius defined by the difference of the output
gear’s position from where it would be if the gear teeth were
perfect and infinitely stiff. Many references have attested to
the fact that a major goal in reducing gear noise is to reduce
the transmission error of a gear set. Experiments16 show that
decreasing TE by 10 dB (approximately 3 times less) results
in decreasing transmission sound level by 7 dB. The TE of the
TATRA gearbox was measured later by using the method de-
veloped at the VSB — Technical University of Ostrava.
The basic equation for TE of a simple gear set is given as
T E(m) =
Θ2 − n2
n1
Θ1
r2;
(3)
where n1, n2 are teeth numbers of pinion and wheel respec-
tively, Θ1, Θ2 are angles of rotation of the mentioned gear pair
and r2 is a wheel radius.
International Journal of Acoustics and Vibration, Vol. 14, No. 2, 2009
Figure 11. Effect of mean gear quality on noise level in dB at 1 m.
Figure 12. Effect of load on RMS of acceleration.
taken from measurements on a truck gearbox with gears fin-
ished by grinding. It may be noticed that the SPL minimum
(89 dB) corresponds to gears produced by a shape grinding
machine (MAAG) while the others correspond to the grind-
ing machine employing the continuous shift grinding method
(Reishauer). However, it can be estimated that an improvement
by class 1 of DIN 3961 quality results in the SPL reduction
by approximately 1.5 dB. Gear Quality Class is a quantity that
is influenced mainly by the variations in the tooth profile (tooth
trace form or tooth alignment angle) and weakly in the radial
run-out. This quantity is computed as a weighted sum of the
tooth trace form and tooth alignment angle (the value of the
weighting coefficient for both deviations is equal to 0.4) and
the radial run-out.17 The gearbox noise level correlates with
the gear geometry deviations if the gearbox structure is stiff
enough.
An example of the effect of gearbox load on the RMS value
of gearbox acceleration is shown in Fig. 12. The gearbox
design input torque is equal to 1200 Nm. To prevent the in-
crease of vibration and, consequently, the noise level due to
the teeth and gearbox structure deformation, the modification
of the tooth profile and lead by crowning across the face and
tapering the lead is introduced.18 Comparison of the modi-
fied toothing with the toothing, which is without modification,
shows that the gear pair with the modified surface meshes more
smoothly at nominal loading than the gears without modifica-
tion. This design improvement can result in reducing the noise
level by 3 dB during the tests on the test stand.
The positive effect of introducing the HCR gears into the
8
�



 2023年江西萍乡中考道德与法治真题及答案.doc
 2012年重庆南川中考生物真题及答案.doc
 2013年江西师范大学地理学综合及文艺理论基础考研真题.doc
 2020年四川甘孜小升初语文真题及答案I卷.doc
 2020年注册岩土工程师专业基础考试真题及答案.doc
 2023-2024学年福建省厦门市九年级上学期数学月考试题及答案.doc
 2021-2022学年辽宁省沈阳市大东区九年级上学期语文期末试题及答案.doc
 2022-2023学年北京东城区初三第一学期物理期末试卷及答案.doc
 2018上半年江西教师资格初中地理学科知识与教学能力真题及答案.doc
 2012年河北国家公务员申论考试真题及答案-省级.doc
 2020-2021学年江苏省扬州市江都区邵樊片九年级上学期数学第一次质量检测试题及答案.doc
 2022下半年黑龙江教师资格证中学综合素质真题及答案.doc