Transition Title
内容
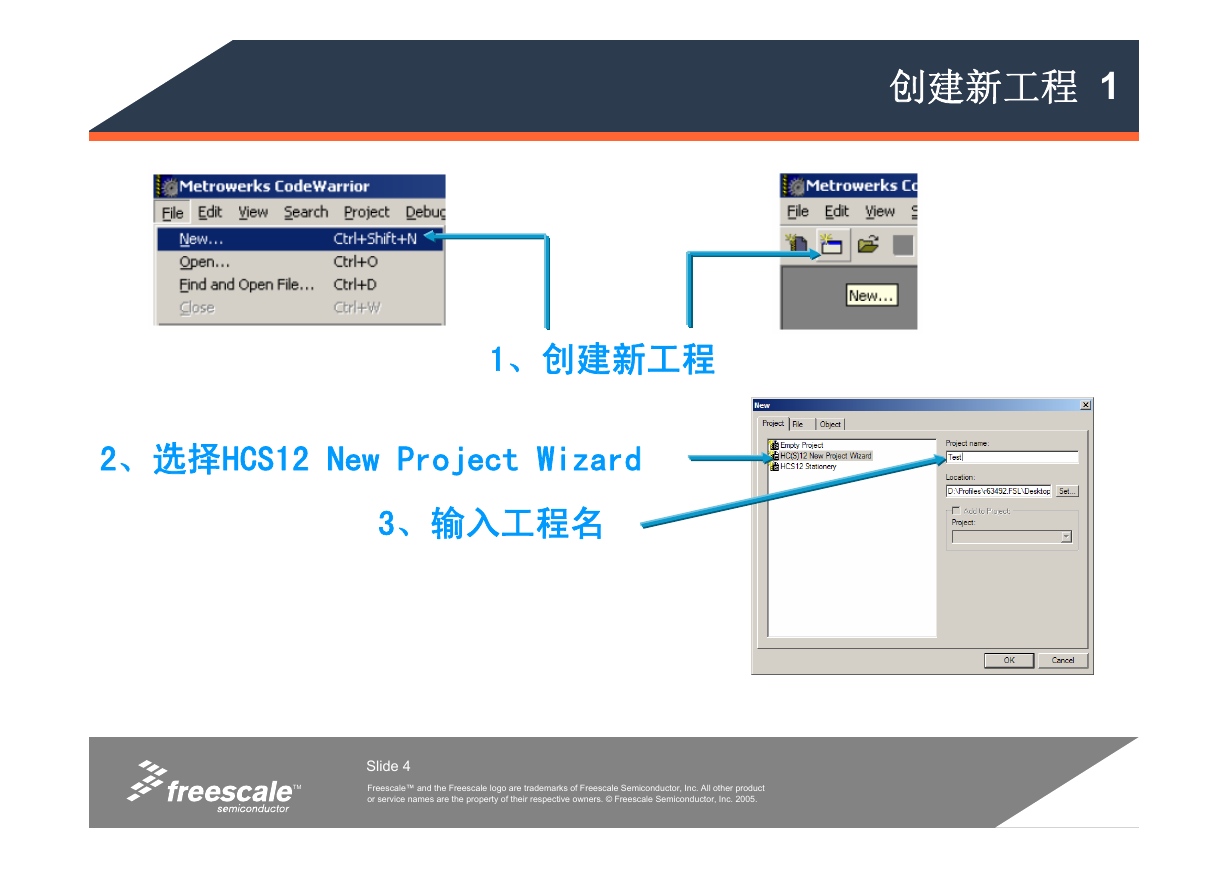
创建新工程 1
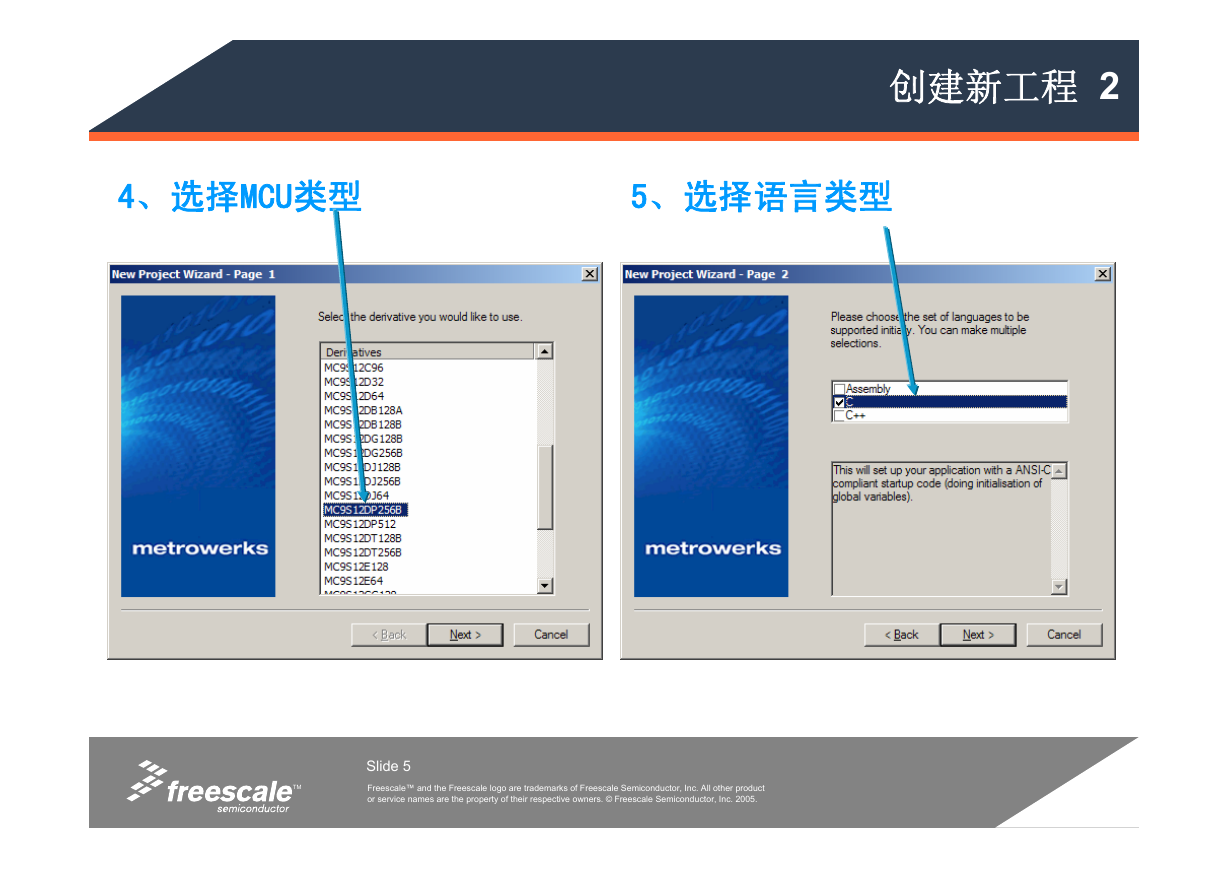
创建新工程 2
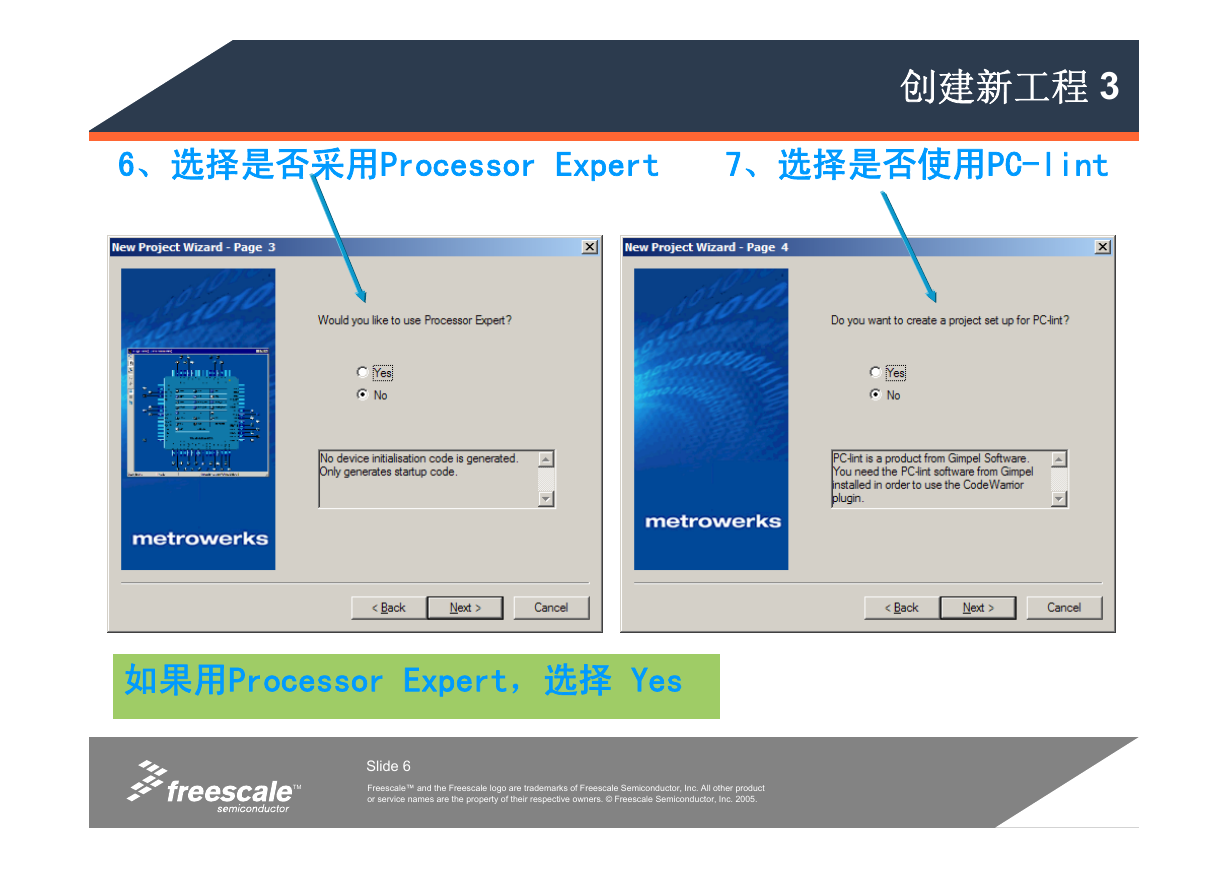
创建新工程 3
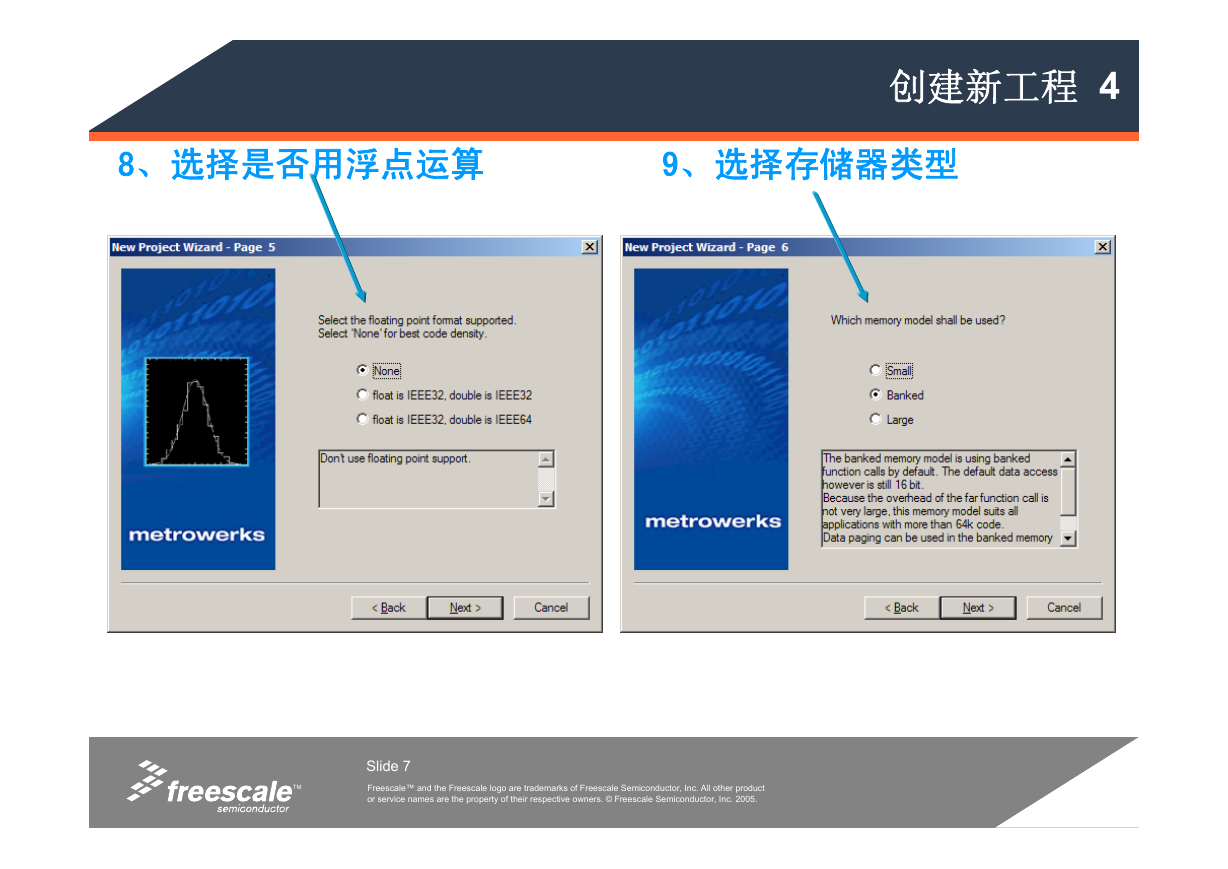
创建新工程 4
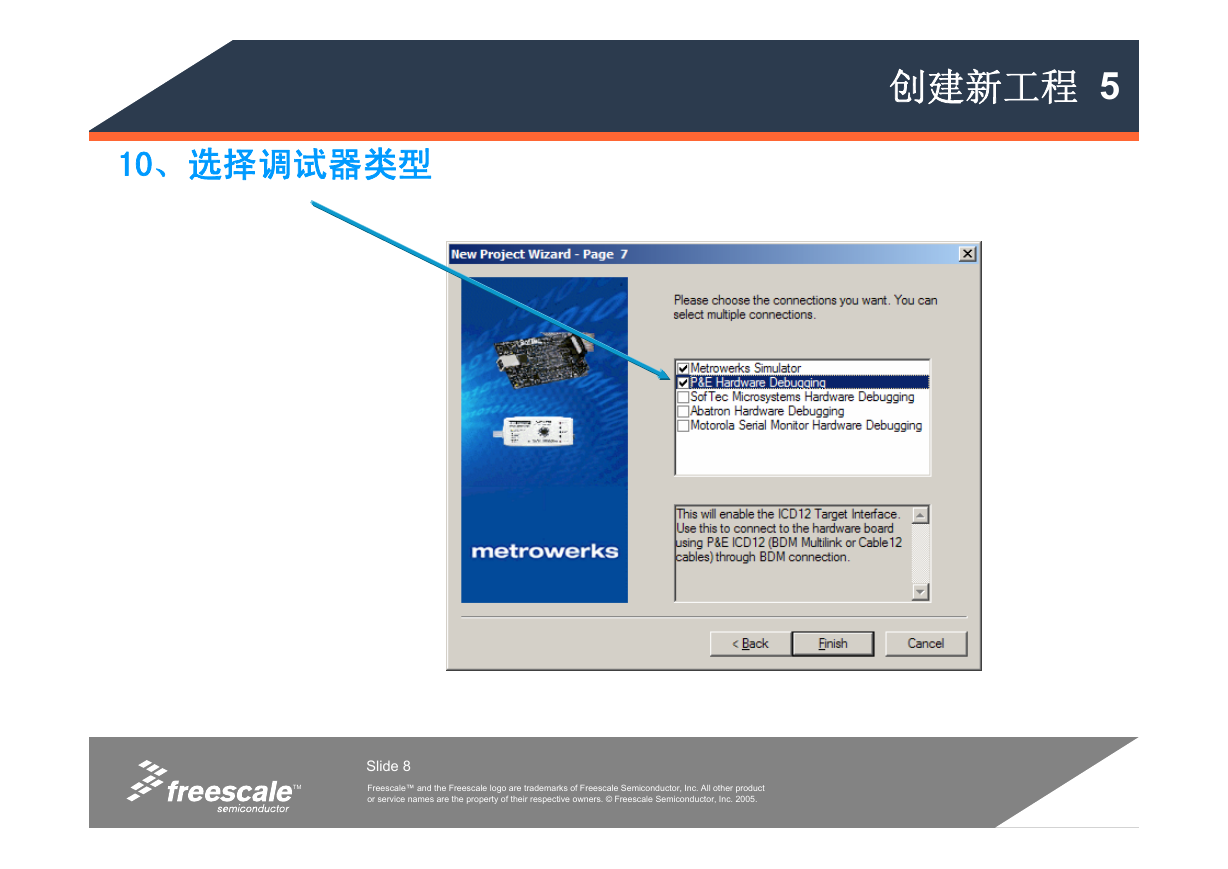
创建新工程 5
参考文献
在新项目中加入或删除文件
无限循环
编译器优化
编译器优化 – 强度减弱
编译器优化 –死代码消除
编译器优化–消除死赋值
Codewarrior HC08 Compiler Options Settings
编译器优化 –循环解开
示例(没有循环解开):
示例(有循环解开):
更多的优化选项:
更多的优化选项: :
条件编译
模拟调试器界面
模拟调试器: 特点
模拟调试器: 界面
模拟调试器: 界面
模拟调试器: 界面
模拟调试器: 界面
启动程序
代码放在哪里?
代码放在哪里?
如何对IO进行操作?
访问固定内存位置
访问CPU寄存器
方法1:利用关键字 ‘interrupt’:
方法2:在PRM文件中声明
方法3:在向量表中初始化
如何使用汇编和C语言混合编程
在C中访问汇编变量
在汇编中访问C变量
在C中调用汇编函数
在汇编中调用C函数
嵌入式编程 vs. PC编程
数据类型
HC08的数据类型
默认CodeWarrior 的数据类型
数据类型选择
修饰符
静态变量
静态变量示例
静态函数
Volatile变量
volatile的变量从不会被编译器优化
Volatile 变量示例
Const 变量
Const修饰符
Const volatile 变量
栈指针与函数参数
堆栈指针寻址
堆栈帧
函数指针
定义指向函数的指针
Example:
Example:
HC08QL 示例
Debug (1):
Debug(2):
Debug(3)
When to use pointers:
Processor Expert处理器专家
开发人员面临的挑战
嵌入式应用系统设计
嵌入式应用系统设计 (2)
项目开发的主要难点
项目开发的主要难点(2)
怎样迎接挑战
阅读上百页的资料
问题和风险
开发过程中遇到的困难
开发过程中遇到的问题 (2)
正确迎接挑战
Processor Expert处理器专家
比如: CPU
比如:通用 I/O
比如: A/D converter
Processor Expert “内嵌式Beans”
Processor Expert “内嵌式Beans”
优点
Processor Expert 处理器专家将会提供更多功能
1st Scenario
Double click on the BitIO bean in the Bean Selector in order to add the bean to the project
Enter name of the Bean in the Bean Inspector window - RedLED
Select pin for the RedLED in the Bean Inspector window - PTB0_ATD0
Select Pin Direction in the Bean Inspector window - Output
Click on the TAB Methods in the Bean Inspector window - in order to set generated methods
Set all methods "don't generate" instead of the NegVal method - set the method "generate code"
Double click on the BitIO bean in the Bean Selector in order to add the second bean
Click on the "Properties" TAB in the Bean Inspector window in order to set the bean
Enter name of the Bean in the Bean Inspector window - GreenLED
Select pin for the GreenLED in the Bean Inspector window - PTB1_ATD1
Select Pin Direction in the Bean Inspector window - Output
Click on the TAB Methods in the Bean Inspector window - in order to set generated methods
Set all methods "don't generate" instead of the NegVal method - set the method "generate code"
Double click on the "ExtInt" bean in the Bean Selector in order to add the 3rd bean to the project
Click on the "Properties" TAB in the Bean Inspector window in order to set the bean
Enter name of the Bean in the Bean Inspector window - Button
Select pin for the Button in the Bean Inspector window - PTG0_KBD0
Select item "Generate interrupt on" to the "falling edge" in the Bean Inspector window
Click on the TAB Methods in the Bean Inspector window - in order to set generated methods
Set the following methods "generate code": Enable, Disable - other set to "don't generate"
Click in the "Code Design LED.mcp" command in the Processor Expert menu
Code design process...
Double click on the "OnInterrupt" item in the folder "Beans|Button: ExtInt"
Find the place "Button_OnInterrupt" for entering the code
Enter the code to invert the two LEDs:� RedLED_NegVal();� GreenLED_NegVal();
The user modules can be found in the folder "User Modules" in the Project panel window.
Click on the button "Make" in the project panel in order to compile the project
The project building process
Check the window if the process was successful
Click on the button “Debug" in the project panel in order to start the debugger
The external debugger is started now. It is configured to load the P&E Full Chip Simulator.�Click on the button “Debug" to sta
Program execution stopped because inputs on port B are undefined
Open the “Simulated Port Inputs” Dialog and define values at port B
Run the program again – now it will continue running
Click on the “Halt’ button to stop the program
Open with the right mouse button the menu, choose “Open Source File…” and select “Events.C”
Scroll the Source windows to the function “Button_OnInterrupt” and set a breakpoint -> click with the right mouse button o
The statement is now marked with the breakpoint symbol�Run the program again
Enter these commands in the Command window to stimulate input on port G:�inputg 1 // puts a high signal on PTG0_KBD0�input
This caused an interrupt that than hits the breakpoint�The output port are visible in the Memory window
Close and restart debugger - This will restart a new debug session.�Create a new Visualization Component
Add a “LED” instrument:�Click with the right mouse button in the Visualizationtool and select from the popup menu the “Add New
Drag the new LED instrument into the visible area of the window�Click with the right mouse button on the instrument to open th
Change the properties accordingly (change the view and map to the correct I/O port and bit)
Copy (Cut & Paste) the LED instrument and update the properties of the new LED instrumant accordingly
Click with the left mouse button beside the LEDs into the Visualizationtool windows to get the properties of the tool and sele
When toggling the port G as previously, both LED will show the state graphically�Add an additional “Command” instrument to sti
Change the properties accordingly.�The Command field specifies to run the command file “toggleG.cmd”.
Switch back focus on the COdeWarrior IDE�Create the new file “ToggleG.cmd”
Add the commands to the file:�inputg 1�inputg 0
Add the file “toggleG.cmd” to the current build target:�From the “Project” menu choose “Add toggleG.cmd to Project…�Select the
Switch focus back to the debugger�Click the right button to get the menu and switch off “Edit Mode” of the Visualizationtool
Clicking on the “Toggle G” button will now generate an interrupt that toggles the LEDs
Save this configuration for later use in future sessions:�Select “Save Configuration” from the “File” menu





 2023年江西萍乡中考道德与法治真题及答案.doc
 2012年重庆南川中考生物真题及答案.doc
 2013年江西师范大学地理学综合及文艺理论基础考研真题.doc
 2020年四川甘孜小升初语文真题及答案I卷.doc
 2020年注册岩土工程师专业基础考试真题及答案.doc
 2023-2024学年福建省厦门市九年级上学期数学月考试题及答案.doc
 2021-2022学年辽宁省沈阳市大东区九年级上学期语文期末试题及答案.doc
 2022-2023学年北京东城区初三第一学期物理期末试卷及答案.doc
 2018上半年江西教师资格初中地理学科知识与教学能力真题及答案.doc
 2012年河北国家公务员申论考试真题及答案-省级.doc
 2020-2021学年江苏省扬州市江都区邵樊片九年级上学期数学第一次质量检测试题及答案.doc
 2022下半年黑龙江教师资格证中学综合素质真题及答案.doc