EN
Table of contents
2
Package contents..........................................................................................................
3
Description of the phone...........................................................................................
6
Inserting the SIM card..................................................................................................
8
Getting started...............................................................................................................
10
3G & WiFi connection...................................................................................................
12
Google account & Contacts........................................................................................
14
Hints & tips with AndroidTM.........................................................................................
16
Troubleshooting.............................................................................................................
For more information, please consult the FAQs on www.archos.com.
Make sure to read them before considering any product return. As we
are often updating and improving our products, your device’s software
may have a slightly different appearance or modified functionality than
presented in this Quick Start Guide.
�
Package Contents
Check your product box for the following items:
- ARCHOS 50 Oxygen
- Headset
- USB cable
- USB host cable
- Charger
- Quick start guide
- Warranty Legal & Safety notices
The items supplied with your device and available accessories may vary
depending on your region or service provider.
The supplied items are designed only for your device and may not be
compatible with other devices.
Unapproved accessories may cause your device to malfunction.
2
�
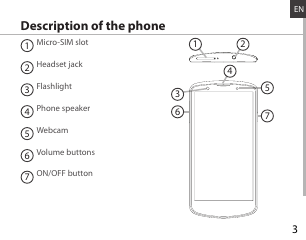
Description of the phone
1 Micro-SIM slot
Headset jack
Flashlight
Phone speaker
Webcam
Volume buttons
ON/OFF button
2
3
4
5
6
7
1
2
4
3
6
5
7
EN
3
Enlever le cache en utilisant un bout pointu que vous insérer dans le trou.1Soulever le cache pour l’enlever complètement.2Insérer la carte micro-SIM en suivant le sens d’insertion indiqué.3Utiliser un objet comme un cure-dents afin de l’enfoncer. Lorsque la carte est bien insérée, un clic se produit et elle reste fixe.4Remettre le cache en place. Un système aimanté maintient le cache en place.5Enlever le cache en utilisant un bout pointu que vous insérer dans le trou.1Soulever le cache pour l’enlever complètement.2Insérer la carte micro-SIM en suivant le sens d’insertion indiqué.3Utiliser un objet comme un cure-dents afin de l’enfoncer. Lorsque la carte est bien insérée, un clic se produit et elle reste fixe.4Remettre le cache en place. Un système aimanté maintient le cache en place.5�
9
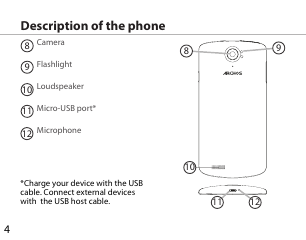
Description of the phone
8 Camera
Flashlight
Loudspeaker
Micro-USB port*
Microphone
9
10
11
12
8
10
*Charge your device with the USB
cable. Connect external devices
with the USB host cable.
11
12
4
Enlever le cache en utilisant un bout pointu que vous insérer dans le trou.1Soulever le cache pour l’enlever complètement.2Insérer la carte micro-SIM en suivant le sens d’insertion indiqué.3Utiliser un objet comme un cure-dents afin de l’enfoncer. Lorsque la carte est bien insérée, un clic se produit et elle reste fixe.4Remettre le cache en place. Un système aimanté maintient le cache en place.5Enlever le cache en utilisant un bout pointu que vous insérer dans le trou.1Soulever le cache pour l’enlever complètement.2Insérer la carte micro-SIM en suivant le sens d’insertion indiqué.3Utiliser un objet comme un cure-dents afin de l’enfoncer. Lorsque la carte est bien insérée, un clic se produit et elle reste fixe.4Remettre le cache en place. Un système aimanté maintient le cache en place.5�
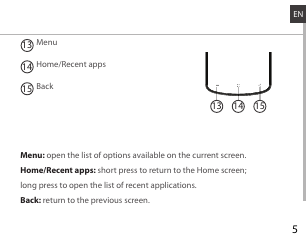
Menu
Home/Recent apps
Back
13
14
15
13
14
15
Menu: open the list of options available on the current screen.
Home/Recent apps: short press to return to the Home screen;
long press to open the list of recent applications.
Back: return to the previous screen.
EN
5
30-08-2013last modification:AC50OXCONFIDENTIALDRAWINGRev2scale 1:1mm�
Inserting the SIM card
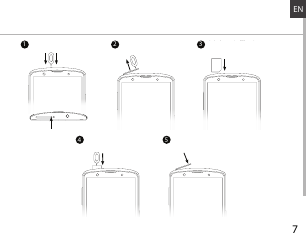
1. Remove the cover by using the provided tool that you insert in the
cover hole.
2. Lift up the cover to remove it completely.
3. Insert the micro-SIM according to the direction shown.
4. Use the provided tool to press it in. When the SIM card is well inserted,
a click happens and the SIM card stays fixed.
5. Replace the cover. A magnetic system holds the cover into place.
Tip:
Before using your device for the first time, charge completely its battery.
6
�
1
Enlever le cache en utilisant un bout
pointu que vous insérer dans le trou.
2
Soulever le cache pour l’enlever
complètement.
3
Insérer la carte micro-SIM en suivant
le sens d’insertion indiqué.
Insérer la carte micro-SIM en suivant
le sens d’insertion indiqué.
4
Utiliser un objet comme un cure-
dents afin de l’enfoncer. Lorsque la
carte est bien insérée, un clic se
produit et elle reste fixe.
5
Remettre le cache en place. Un
système aimanté maintient le cache
en place.
EN
4
Utiliser un objet comme un cure-
dents afin de l’enfoncer. Lorsque la
carte est bien insérée, un clic se
produit et elle reste fixe.
7
�
Getting started
Turn ON
1. Press and hold the ON/OFF button to turn on the device.
When you turn on your device, a PIN code may be requested.
2. Type the PIN code supplied with your SIM card.
Beware of typing a wrong PIN code.
3. Select ‘OK’.
Turn OFF
To turn off your device, press and hold the ON/OFF button, and then
select Power off > OK.
Sound & Notification profiles
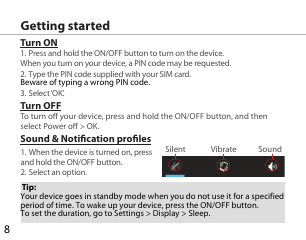
1. When the device is turned on, press
and hold the ON/OFF button.
2. Select an option.
Tip:
Your device goes in standby mode when you do not use it for a specified
period of time. To wake up your device, press the ON/OFF button.
To set the duration, go to Settings > Display > Sleep.
Vibrate
Silent
Sound
8
�



 2023年江西萍乡中考道德与法治真题及答案.doc
 2012年重庆南川中考生物真题及答案.doc
 2013年江西师范大学地理学综合及文艺理论基础考研真题.doc
 2020年四川甘孜小升初语文真题及答案I卷.doc
 2020年注册岩土工程师专业基础考试真题及答案.doc
 2023-2024学年福建省厦门市九年级上学期数学月考试题及答案.doc
 2021-2022学年辽宁省沈阳市大东区九年级上学期语文期末试题及答案.doc
 2022-2023学年北京东城区初三第一学期物理期末试卷及答案.doc
 2018上半年江西教师资格初中地理学科知识与教学能力真题及答案.doc
 2012年河北国家公务员申论考试真题及答案-省级.doc
 2020-2021学年江苏省扬州市江都区邵樊片九年级上学期数学第一次质量检测试题及答案.doc
 2022下半年黑龙江教师资格证中学综合素质真题及答案.doc