There are many projects in Head First C# where you build
Windows Store apps that require Windows 8. In this appendix,
you'll use WPF to build them as desktop apps instead.
appendix ii: Windows Presentation Foundation
WPF Learner’s Guide
to Head First C#
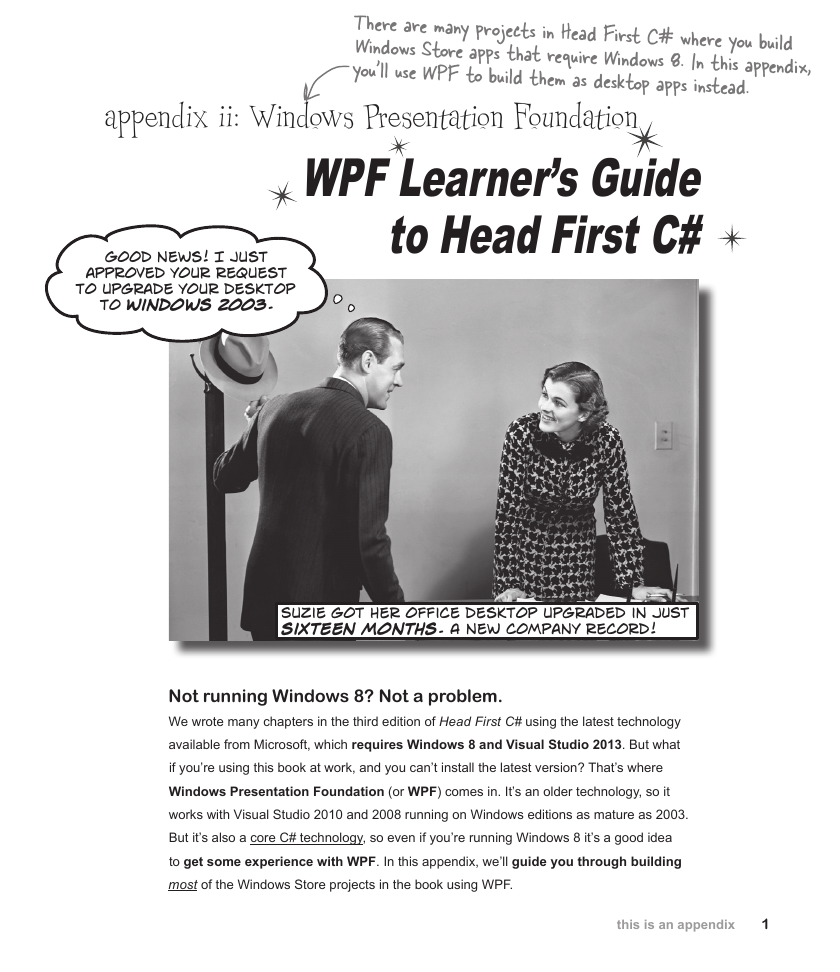
Good news! I just
approved your request
to upgrade your desktop
to Windows 2003.
Suzie got her office desktop upgraded in JUST
sixteen months. A new company record!
Not running Windows 8? Not a problem.
We wrote many chapters in the third edition of Head First C# using the latest technology
available from Microsoft, which requires Windows 8 and Visual Studio 2013. But what
if you’re using this book at work, and you can’t install the latest version? That’s where
Windows Presentation Foundation (or WPF) comes in. It’s an older technology, so it
works with Visual Studio 2010 and 2008 running on Windows editions as mature as 2003.
But it’s also a core C# technology, so even if you’re running Windows 8 it’s a good idea
to get some experience with WPF. In this appendix, we’ll guide you through building
most of the Windows Store projects in the book using WPF.
this is an appendix
1
�
same programs new technology
Why you should learn WPF
Windows Presentation Foundation, or WPF, is a technology
that’s used to build user interfaces for programs written in .NET.
WPF programs typically run on the Windows desktop and display
their user interfaces in windows. WPF is one of the most popular
technologies for developing Windows software, and familiarity
with WPF is considered by many employers to be a required skill
for professional C# and .NET developers.
WPF programs use XAML (Extensible Application Markup
Language) to lay out their UIs. This is great news for Head First
C# readers who have been reading about Windows Store apps.
Most of the Windows Store projects in the book can be built for
WPF with few or no modifications to the XAML code.
I’m running Windows 8
and Visual Studio 2013, so I
don’t care about WPF... right?
Some things, like
app bars and
page navigation,
are specific to
Windows Store
apps. In this
appendix, we
show you WPF
alternatives
wherever possible.
Every C# developer should work with WPF.
Almost every programming language can be used in lots of different
environments and operating systems, and C# is no exception. If
your goal is to improve as a C# developer, you should go out of
your way to work with as many different technologies as possible.
And WPF in particular is especially important for C# developers,
because there are many programs that use WPF in companies,
and this will continue for a long time. If your goal is to use C# in a
professional environment, WPF is technology you’ll want to list on
your resumé.
Learning WPF is also great for a hobby programmer who’s using
Windows 8 and can build all of the code in Head First C#. One of
the most effective learning tools you have as a developer is seeing
the same problem solved in different ways. This appendix
will guide you through building many of the projects in Head First
C# using WPF. Seeing those projects built in WPF and Windows 8
will give you valuable perspective, and that’s one of the things that
helps turn good programmers into great developers.
You can download the code for all of the projects in this appendix. Go to the Head First
Labs website for more information: http://www.headfirstlabs.com/hfcsharp
2
Appendix ii
�
windows presentation foundation
Build WPF projects in Visual Studio
Creating a new WPF application in Visual Studio works just like creating other kinds of
desktop applications. If you’re using Visual Studio Express 2013, make sure you’re using
Visual Studio 2013 Express for Desktop (the edition for Windows 8 will not create WPF
projects). You can also create programs using Visual Studio 2013 Professional, Premium,
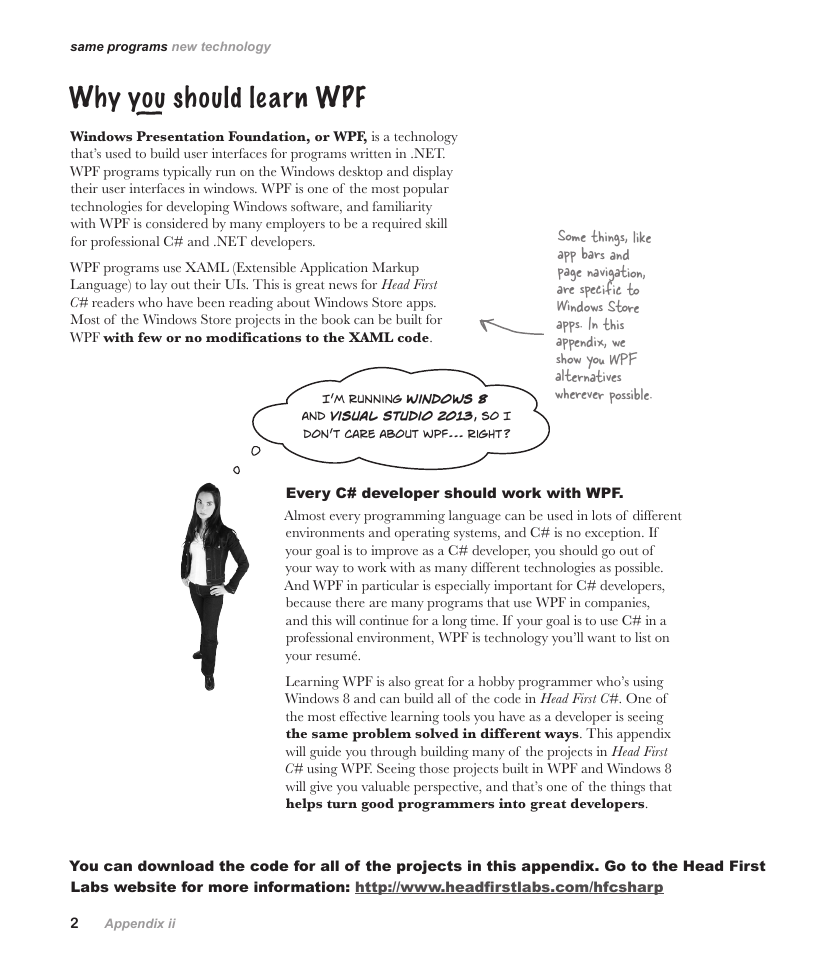
or Ultimate. When you create a new project, Visual Studio displays a “New Project” dialog.
Make sure you select Visual C#, and then choose
:
You can also create C# WPF applications using all editions of Visual Studio 2010, Visual C#
2010 Express, and Visual Studio 2008. Note that if you use the Express editions of Visual Studio
2010 or 2008, the project files are initially created in a temporary folder and are not saved to the
location specified in the New Project dialog until you use Save or Save All to save your files.
WPF can also be used to build XAML browser applications that run inside Internet
Explorer and other browsers. We won’t be covering it in this appendix, but you can
learn more about it here: http://msdn.microsoft.com/en-us/library/aa970060.aspx
Microsoft has yet another technology that also uses XAML. It’s called Silverlight,
and you can read about it here: http://www.microsoft.com/silverlight/
Did you find an error in this appendix? Please submit it using the Errata page for Head
First C# (3rd edition) so we can fix it as quickly as possible!
http://www.oreilly.com/catalog/errata.csp?isbn=0636920027812
you are here 4
3
�
let’s get started
How to use this appendix
This appendix contains complete replacements for pages in Head First C# (3rd edition). We’ve divided
this appendix up into individual guides for each chapter, starting with an overview page that has
specific instructions for how to work through that chapter: what pages to replace in the chapter, what
to read in it, and any specific instructions to help you get the best learning experience.
If you’re using an old version of Visual Studio, you’ll be able to do these
projects... but things will be a little harder for you.
The team at Microsoft did a really good job of improving the user interface of Visual Studio 2013,
especially when it comes to editing XAML. One important feature of Head First C# is its use of the
Visual Studio IDE as a tool for teaching, learning, and exploration. This is why we strongly recommend
that you use the latest version of Visual Studio if possible.
However, we do understand that some readers cannot install Visual Studio 2013. (For example, a lot of
our readers are using a computer provided by an employer, and do not have administrative privileges
to install new software.) We still want you to be able to use our book, even if you’re stuck using an old
version of Visual Studio! We’ll do our best to give you as much guidance as we can. But we also need to
strike a balance here, because we’re being careful not to compromise the learning for the majority of our
readers who are using the latest version of Visual Studio.
If you’re using Visual Studio 2010 or earlier, and you find yourself stuck because the IDE’s user interface
doesn’t look right or menu options aren’t where you expect them to be, we recommend that you
enter the XAML and C# code by hand—or even better, copy it and paste it into Visual Studio.
Once the XAML is correct, it’s often easier to track down the feature in the IDE that generated it.
We’ve made all of the source code in the book available for download, and
we encourage you to copy and paste it into your programs anytime you get
stuck. Go to the book’s website(http://www.headfirstlabs.com/hfcsharp) for
more details and links to the source code.
You can download the source code directly from http://hfcsharp.codeplex.
com/ — but for the replacement chapters in this appendix, make sure that you
sure you download the code from the WPF folder. If you try to use the Windows
Store code in a WPF project, you'll get frustrating errors.
One more thing. This appendix has replacements for pages that you’ll find
in the printed or PDF version this book, and you can find those pages using
their page numbers. However, if you’re using a Kindle or another eBook
reader, you might not be able to use the page numbers. Instead, just use the
section heading to look up the section to replace. For example, this appendix
has replacements for pages 72 and 73 section called Build an app from the
ground up, which you can find in your eBook reader’s Table of Contents
underneath Chapter 2. (Exercises like the one on page 83 and the solution on
page 85 might not show up in your reader’s Table of Contents, but you’ll get
to the exercises as you go through each chapter.) This will be much easier
for you if you download the PDF of this appendix from the book’s website.
4
Appendix ii
�
windows presentation foundation
Chapter 1
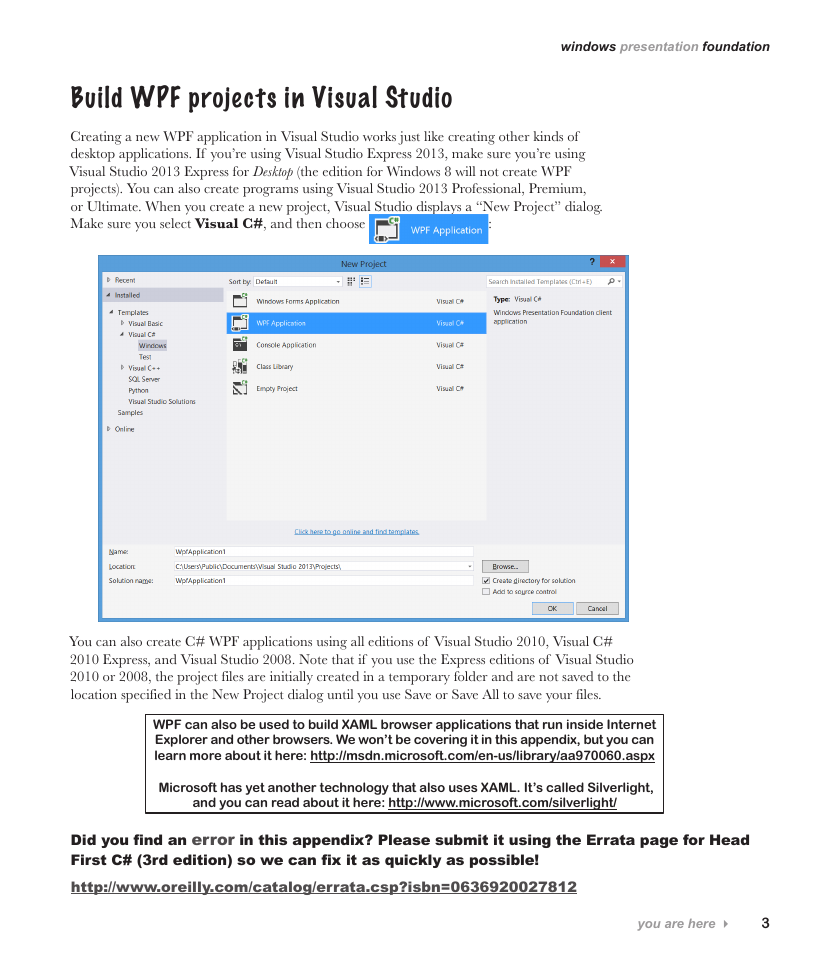
You can build the entire
Save the humanS game in WPF
using these replacements for
pages 12-47.
Build a game, and get a feel for the IDE.
The first project in the book walks you through building a
complete—and fun!—video game. The goal of the project
is to help you get used to creating user interfaces and
writing C# code using the Visual Studio IDE.
We recommend that you read through page 11 in the main
part of the book, and then flip to the next page in this
appendix. We designed pages 12–47 in this appendix so
that they can be 100% replacements for the corresponding
pages in the book. Once you’ve finished building the WPF
version of Save the Humans, you can go on to Chapter 2 in
the book.
The screenshots in this chapter are from Visual Studio 2013 for
Windows Desktop, the latest version of Visual Studio available at this
time. If you’re using Visual Studio 2010, some of the menu options
and windows in the IDE will be different. We’ll give you guidance to
help you find the right menu options.
We worked really hard to keep the page flipping to a minimum, because by reducing
distractions we make it easier for you to learn important C# concepts. After you read
the first 11 pages of Chapter 1, you won't have to flip back to the main part of the
book at all for the rest of the chapter. Then there are just five pages that you need
in this appendix for Chapter 2. After that, the book concentrates on building desktop
applications, which you can build with any version of Windows. You won't need this
appendix again until you get to Chapter 10.
you are here 4
5
�
fill in the blanks
Start with a blank application
Every great app starts with a new project. Choose New Project from the
File menu. Make sure you have Visual C#→Windows selected and choose
WPF Application as the project type. Type “Save the Humans” as the
project name.
If your code filenames don’t end in “.cs”
you may have accidentally created a
JavaScript, Visual Basic, or Visual C++
program. You can fix this by closing the
solution and starting over. If you want
to keep the project name “Save the
Humans,” then you’ll need to delete the
previous project folder.
1
Your starting point is the Designer window. Double-click on MainWindow.xaml in the Solution
Explorer to bring it up (if it's not already displayed). Find the zoom drop-down in the lower-left
corner of the designer and choose “Fit all” to zoom it out.
The designer shows you a
preview of the window that
you’re working on. It looks
like a blank window with a
default white background.
You won’t see these buttons in
older versions of Visual Studio,
only in 2013 (and 2012).
Use these three buttons to turn on the
grid lines, turn on snapping (which
automatically lines up your controls to
each other), and turn on snapping to grid
lines (which aligns them with the grid).
12
Appendix ii
�
You are here!
windows presentation foundation
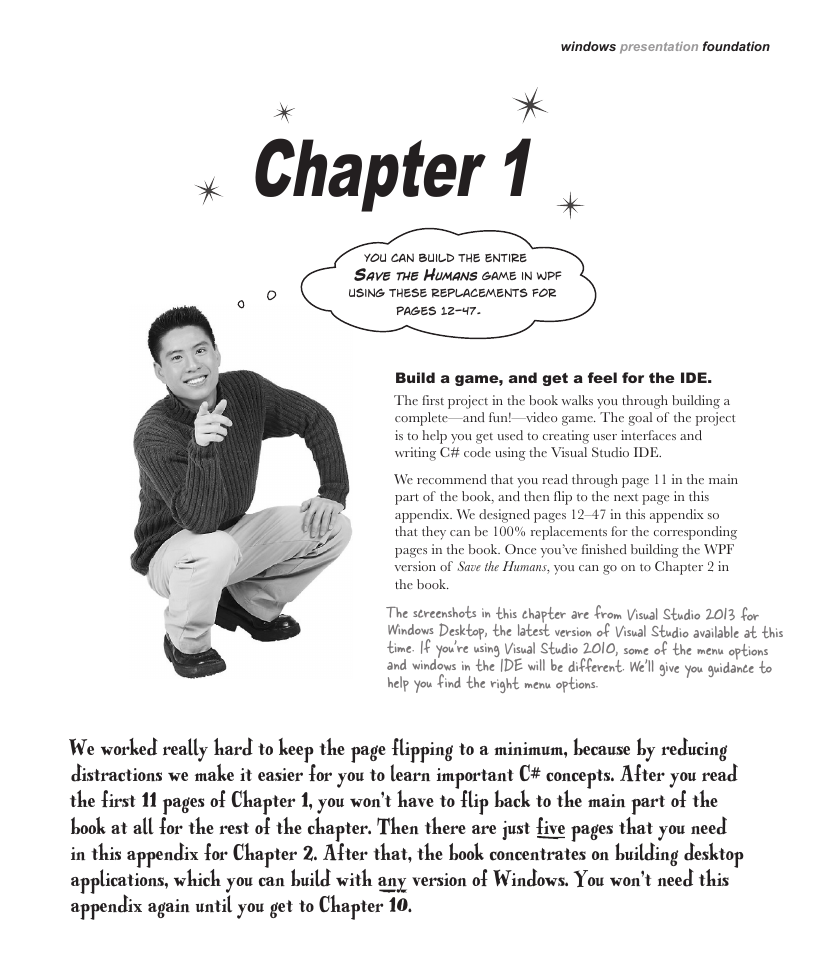
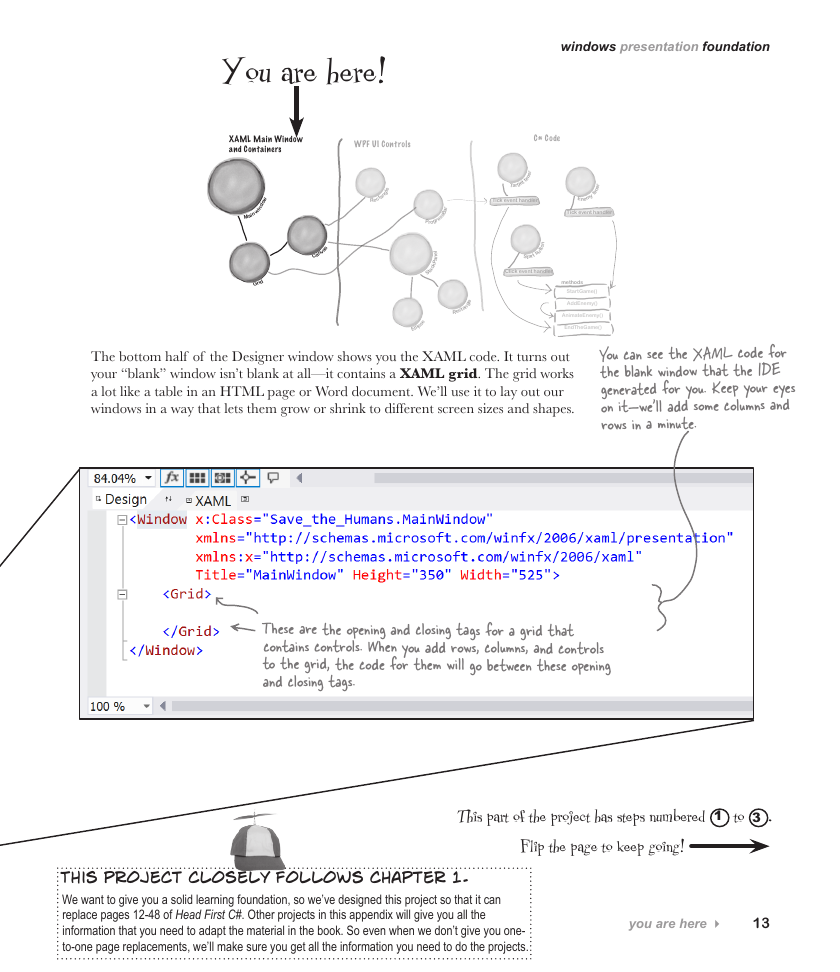
The bottom half of the Designer window shows you the XAML code. It turns out
your “blank” window isn’t blank at all—it contains a XAML grid. The grid works
a lot like a table in an HTML page or Word document. We’ll use it to lay out our
windows in a way that lets them grow or shrink to different screen sizes and shapes.
You can see the XAML code for
the blank window that the IDE
generated for you. Keep your eyes
on it—we’ll add some columns and
rows in a minute.
These are the opening and closing tags for a grid that
contains controls. When you add rows, columns, and controls
to the grid, the code for them will go between these opening
and closing tags.
This part of the project has steps numbered 1 to 3 .
Flip the page to keep going!
This project closely follows chapter 1.
We want to give you a solid learning foundation, so we’ve designed this project so that it can
replace pages 12-48 of Head First C#. Other projects in this appendix will give you all the
information that you need to adapt the material in the book. So even when we don’t give you one-
to-one page replacements, we’ll make sure you get all the information you need to do the projects.
you are here 4
13
StartGame()AddEnemy()EllipseXAML Main Window and ContainersWPF UI ControlsC# CodeMain windowGridCanvasRectangleStackPanelRectangleProgressBarTarget timerEnemy timerTick event handlerTick event handlerClick event handlerStart buttonmethodsAnimateEnemy()EndTheGame()�
Over the next few pages
you’ll explore a lot of
different features in
the Visual Studio IDE,
because we’ll be using
the IDE as a powerful
tool for learning and
teaching. You’ll use the
IDE throughout the book
to explore C#. That’s a
really effective way to
get it into your brain!
not so blank after all
2
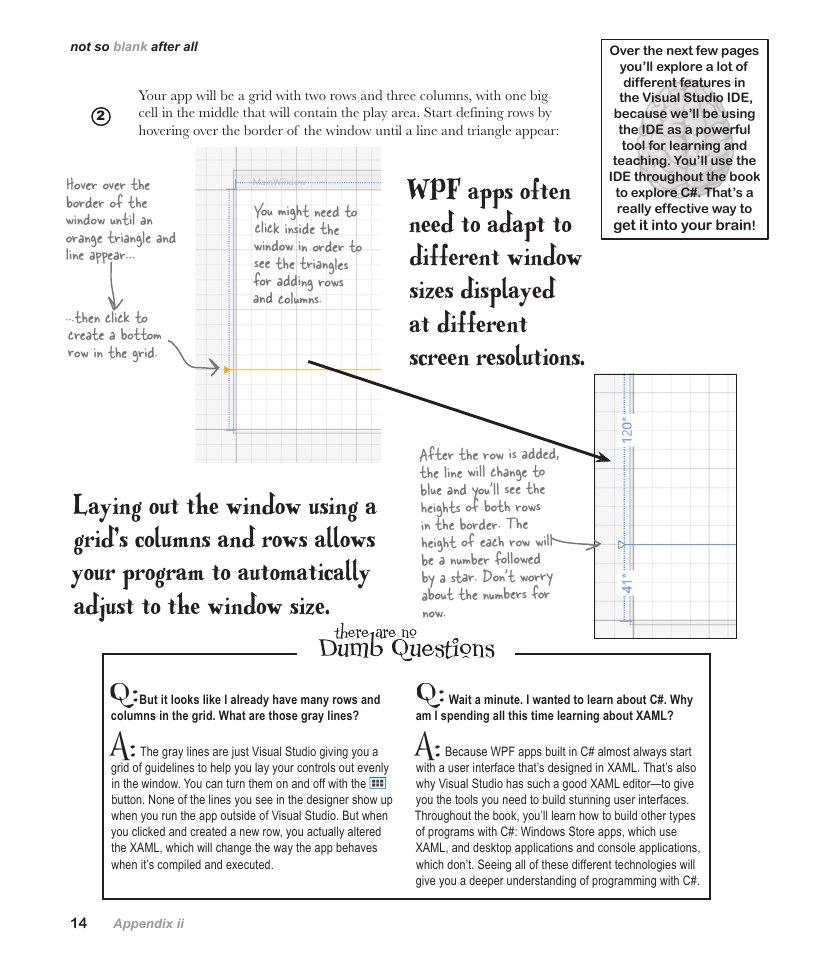
Your app will be a grid with two rows and three columns, with one big
cell in the middle that will contain the play area. Start defining rows by
hovering over the border of the window until a line and triangle appear:
Hover over the
border of the
window until an
orange triangle and
line appear...
...then click to
create a bottom
row in the grid.
You might need to
click inside the
window in order to
see the triangles
for adding rows
and columns.
Laying out the window using a
grid’s columns and rows allows
your program to automatically
adjust to the window size.
WPF apps often
need to adapt to
different window
sizes displayed
at different
screen resolutions.
After the row is added,
the line will change to
blue and you’ll see the
heights of both rows
in the border. The
height of each row will
be a number followed
by a star. Don’t worry
about the numbers for
now.
columns in the grid. What are those gray lines?
Q:But it looks like I already have many rows and
A: The gray lines are just Visual Studio giving you a
grid of guidelines to help you lay your controls out evenly
in the window. You can turn them on and off with the
button. None of the lines you see in the designer show up
when you run the app outside of Visual Studio. But when
you clicked and created a new row, you actually altered
the XAML, which will change the way the app behaves
when it’s compiled and executed.
am I spending all this time learning about XAML?
Q: Wait a minute. I wanted to learn about C#. Why
A: Because WPF apps built in C# almost always start
with a user interface that’s designed in XAML. That’s also
why Visual Studio has such a good XAML editor—to give
you the tools you need to build stunning user interfaces.
Throughout the book, you’ll learn how to build other types
of programs with C#: Windows Store apps, which use
XAML, and desktop applications and console applications,
which don’t. Seeing all of these different technologies will
give you a deeper understanding of programming with C#.
14
Appendix ii
�




 2023年江西萍乡中考道德与法治真题及答案.doc
 2012年重庆南川中考生物真题及答案.doc
 2013年江西师范大学地理学综合及文艺理论基础考研真题.doc
 2020年四川甘孜小升初语文真题及答案I卷.doc
 2020年注册岩土工程师专业基础考试真题及答案.doc
 2023-2024学年福建省厦门市九年级上学期数学月考试题及答案.doc
 2021-2022学年辽宁省沈阳市大东区九年级上学期语文期末试题及答案.doc
 2022-2023学年北京东城区初三第一学期物理期末试卷及答案.doc
 2018上半年江西教师资格初中地理学科知识与教学能力真题及答案.doc
 2012年河北国家公务员申论考试真题及答案-省级.doc
 2020-2021学年江苏省扬州市江都区邵樊片九年级上学期数学第一次质量检测试题及答案.doc
 2022下半年黑龙江教师资格证中学综合素质真题及答案.doc