糗世界
欢迎来到糗糗的世界
程序员
Circos系列教程(一)安装
About
Circos教程 R/Bioconductor 序列比对与NGS
« 遭遇document.write空白页问题
Circos系列教程(二)染色体示意图ideograms »
Circos系列教程(一)安装
2 十一 2011 | 程序员
Tags: 教程 · 生物信息学
搜索
日历
2 0 1 3 年 一 月
一 二 三 四 五 六 日
7
14
21
28
1
8
15
22
29
« 十二
2
9
16
23
30
3
10
17
24
31
4
11
18
25
6
13
20
27
5
12
19
26
error
error
引子
闲来无事,翻看CELL杂志,发现很多基因组的图都使用circos来作图,于是就
去circos.ca网上看了一眼,发现果然是个基因组研究绘图强大工具,应该为生物信息员掌
握。于是花了点时间,来试验它的每一个设置。上网搜索发现,它的中文资料少得可怜,于
是将心得体会做一总结,形成这一系列教程。希望能对急于掌握circos又不擅长阅读英语
的人有所帮助。--糗世界之糗糗
下载与安装
下载地址:http://circos.ca/software/download/circos/
circos是基于perl的脚本程序。它的安装难度在于安装好perl以及它所需要的模块。对于
windows用户,可以试着安装Strawberry Perl或者ActiveState Perl。这两者都是不错
的选择。对于Unix/linux/MacOS用户,很可能你已经安装了perl,否则,你可以到
http://www.perl.org/get.html去下载安装。
我们需要测试一下perl的环境, UNIX/Linux/MacOS用户
> which perl
/usr/bin/perl
> perl -v
This is perl, v5.10.0 built for ...
Windows用户
> perl -v
This is perl, v5.10.0 built for ...
接着,我们将下载下来的circos程序解压,假设它的目录是circos-x.xx
> cd circos-x.xx
> bin/circos -man
你可能得到一个帮助页面,那么你安装circos已经成功。也可能得到是出错信息。
常见错误1:
-bash: /bin/env: No such file or directory
对于MacOS用户或者遇到这一提示的用户的问题是,env的安装目录并非典型的/bin/env,
而是/usr/bin/env。我们需要将env文件的位置设置正确。
> which env
/usr/bin/env
标签
原创 幻灯片 摄影 教程 服务器
生物信息学 编程 网络 观点
设计 软件
�
近期评论
› motif搜索的两个工具介绍 ← 糗世界 发
表在《DNA motif 搜索算法总结》
› admin 发表在《使用TopHat分析RNA-Seq结
果》
› Joey 发表在《使用TopHat分析RNA-Seq结
果》
› admin 发表在《使用TopHat分析RNA-Seq结
果》
› Joey 发表在《使用TopHat分析RNA-Seq结
果》
功能
› 登录
› 文章 RSS
› 评论 RSS
› WordPress.org
现在有两个解决办法,第一个是将所有bin/*或者tools/*/bin文件中第一行写有
#!/bin/env perl
改成
#!/usr/bin/env perl
第二个办法(可能更方便)是在bin下建立一个env文件的链接。
> cd /bin
> sudo ln -s /usr/bin/env env
常见错误2:
Can't locate Config/General.pm in @INC ...
无论是什么pm文件,如果出现这类错误,那就说明相应的模块没有安装。Circos需要以下
模块
Config::General (v2.50 or later)
GD
GD::Polyline
List::MoreUtils
Math::Bezier
Math::Round
Math::VecStat
Params::Validate
Readonly
Regexp::Common
Set::IntSpan (v1.16 or later)
如果是Window用户,Strawberry Perl和ActiveState Perl都有安装包管理程序,你可以
很轻松的从CPAN安装上面的这些模块。如果是UNIX/Linux/MacOS用户,需要使用CPAN
shell安装。
对于UNIX/Linux/MacOS用户,可以使用circos包中bin/test.modules来测试需要安装那
些包
> cd bin
> ./test.modules
对提示有failed模块,我们进入shell安装。
> sudo perl -MCPAN -e shell #这里需要root权限,否则你有可能得到permission denied error
> install Config::General #缺少什么模块就install什么模块,这里的Config::General只是个示例
或者你可以直接去CPAN上下载安装包,在本地解压并安装。比如Set::IntSpan
# download module
> wget http://search.cpan.org/CPAN/authors/id/S/SW/SWMCD/Set-IntSpan-1.16.tar.gz
# unpack archive
> tar xvfz Set-IntSpan-1.16.tar.gz
> cd Set-IntSpan-1.16
# configure and compile
> perl Makefile.PL
Checking if your kit is complete...
Looks good
Writing Makefile for Set::IntSpan
> make
cp IntSpan.pm blib/lib/Set/IntSpan.pm
Manifying blib/man3/Set::IntSpan.3
> make test
» make test
PERL_DL_NONLAZY=1 /home/martink/perl/5.10.0/bin/perl "-MExtUtils::Command::MM"
"-e" "test_harness(0, 'blib/lib', 'blib/arch')" t/*.t
t/binary.t .... ok
t/bsearch.t ... ok
...
t/spans.t ..... ok
t/subclass.t .. ok
t/unary.t ..... ok
All tests successful.
Files=18, Tests=1931, 0 wallclock secs ( 0.28 usr 0.03 sys + 0.36 cusr 0.06 csys = 0.73 CPU)
Result: PASS
# install (keep in mind file permission requirements, as described below)
> make install
对于Params::Validate,是使用Build system,
# download module
�
> wget http://search.cpan.org/CPAN/authors/id/D/DR/DROLSKY/Params-Validate-0.95.tar.gz
# unpack archive
> tar xvfz Params-Validate-0.95.tar.gz
> cd Params-Validate-0.95
# configure and compile
> perl Build.PL
Creating new 'MYMETA.yml' with configuration results
Creating new 'Build' script for 'Params-Validate' version '0.95'
> ./Build
Building Params-Validate
cc -Ic -I/home/martink/perl/5.10.0/lib/5.10.0/x86_64-linux/CORE -DXS_VERSION="0.95"
-DVERSION="0.95" -fPIC -c -fno-strict-aliasing -pipe -D_LARGEFILE_SOURCE
-D_FILE_OFFSET_BITS=64 -I/usr/include/gdbm -O2 -o lib/Params/Validate.o lib/Params/Validate.c
ExtUtils::Mkbootstrap::Mkbootstrap('blib/arch/auto/Params/Validate/Validate.bs')
cc -shared -O2 -o blib/arch/auto/Params/Validate/Validate.so lib/Params/Validate.o
> ./Build test
t/01-validate.t ............ ok
t/02-noop.t ................ ok
t/03-attribute.t ........... ok
...
t/30-hashref-alteration.t .. ok
t/kwalitee.t ............... skipped: This test is only run for the module author
t/pod-coverage.t ........... skipped: This test is only run for the module author
t/pod.t .................... skipped: This test is only run for the module author
All tests successful.
Files=32, Tests=497, 1 wallclock secs ( 0.10 usr 0.04 sys + 0.78 cusr 0.13 csys = 1.05 CPU)
Result: PASS
# install (keep in mind file permission requirements, as described below)
> ./Build install
对于MacOS用户,如果提示
bash: make command not found
那么你需要下载并安装Xcode
> which make
/usr/bin/make
对于MacOS用户,如果安装包的过程中出现困难,有些包怎么都无法安装,比如gd库,可以
转换思想,使用port安装。
在下载安装好port之后,可以使用
> sudo port selfupdate
> sudo port install perl5
> sudo port install p5.12-gd #注意现在的perl5是5.12版本,将来可能会变化,需要使用perl5 -v来确认
...
因为port安装是全新的版本,并没有替换掉之前的perl。所以需要对circos文件做出修
改,所有bin/*或者tools/*/bin文件中第一行写有
#!/usr/bin/env perl
改成
#!/usr/bin/env perl5
至此,你将成功地运行circus
qiuworld$ /path/to/circos/bin/circos -man
CIRCOS(1) User Contributed Perl Documentation CIRCOS(1)
NAME
____ _
/ ___(_)_ __ ___ ___ ___
| | | | '__/ __/ _ \/ __|
| |___| | | | (_| (_) \__ \
\____|_|_| \___\___/|___/
round is good
circos - generate publication-quality, circularly-composited plots
of data and annotations layered on chromosome ideograms
SYNOPSIS
circos -conf circos.conf [-silent] [-debug] [-help] [-man]
DESCRIPTION
This is a command line interface to Circos. Most settings are meant to
be passed using a configuration file.
All command line options listed below can be defined in the
�
configuration file. Defining them on the command line is useful when
using a configuration template for many images.
OPTIONS
Configuration
-configfile FILE
Name of configuration file. This is required.
Ideograms
-chromosomes STRING
-chromosomes_order STRING
-chromosomes_scale STRING
-chromosomes_radius STRING
Defines list, order, scale and radius of ideograms.
Output Format
-png
-24bit
-svg
Toggles output of PNG and SVG files.
When using transparency, make sure that PNG output is 24-bit.
Output Paths
-outputdir DIR
-outputfile FILE
Change the output directory and filename.
Input Format
-file_delim DELIMITER
Specify the file delimiter for all input data files. By default
this is a space. Use a tab if you want to have multi-word records
in the data files (e.g. multi word labels).
Custom Fields
:
Leave a Reply
Author (required)
Email (will not be published)(required)
Website
b
i
link
b-quote
code 关闭标签
Post Comment
« 遭遇document.write空白页问题
Circos系列教程(二)染色体示意图ideograms »
© 2013 糗世界 — All Rights Reserved.
�
糗世界
欢迎来到糗糗的世界
About
Circos教程 R/Bioconductor 序列比对与NGS
程序员
Circos系列教程(二)染色体示意图ideograms
« Circos系列教程(一)安装
在centOS 5上安装HTSeq »
Circos系列教程(二)染色体
示意图ideograms
4 十一 2011 | 程序员
Tags: 教程 · 生物信息学 · 软件
本节的目标就是画出如下的图
搜索
日历
2 0 1 3 年 一 月
一 二 三 四 五 六 日
7
14
21
28
1
8
15
22
29
« 十二
2
9
16
23
30
3
10
17
24
31
4
11
18
25
6
13
20
27
5
12
19
26
circos绘制简单的ideogram
基础:circos作业流程
标签
原创 幻灯片 摄影 教程 服务器
生物信息学 编程 网络 观点
设计 软件
�
近期评论
› motif搜索的两个工具介绍 ← 糗世界 发
表在《DNA motif 搜索算法总结》
› admin 发表在《使用TopHat分析RNA-Seq结
果》
› Joey 发表在《使用TopHat分析RNA-Seq结
果》
› admin 发表在《使用TopHat分析RNA-Seq结
果》
› Joey 发表在《使用TopHat分析RNA-Seq结
果》
功能
› 登录
› 文章 RSS
› 评论 RSS
› WordPress.org
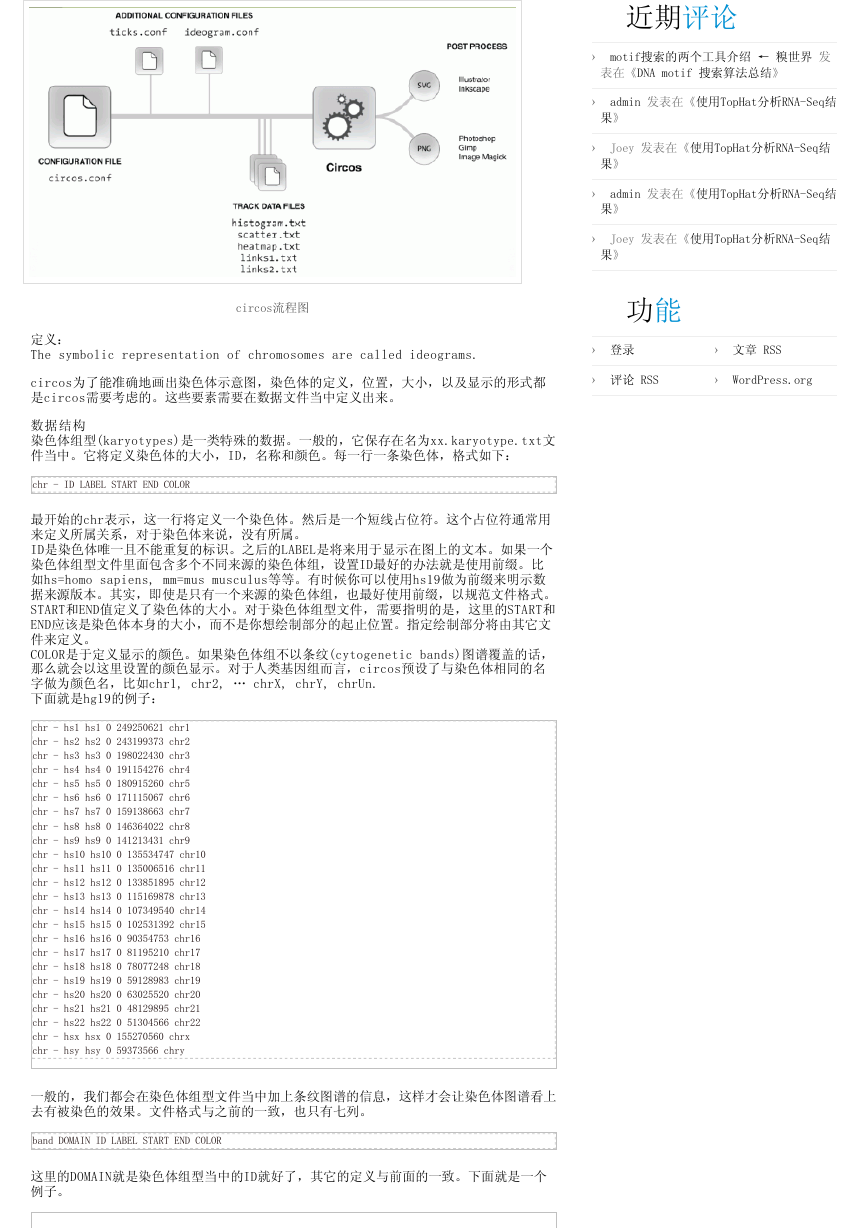
circos流程图
定义:
The symbolic representation of chromosomes are called ideograms.
circos为了能准确地画出染色体示意图,染色体的定义,位置,大小,以及显示的形式都
是circos需要考虑的。这些要素需要在数据文件当中定义出来。
数据结构
染色体组型(karyotypes)是一类特殊的数据。一般的,它保存在名为xx.karyotype.txt文
件当中。它将定义染色体的大小,ID,名称和颜色。每一行一条染色体,格式如下:
chr - ID LABEL START END COLOR
最开始的chr表示,这一行将定义一个染色体。然后是一个短线占位符。这个占位符通常用
来定义所属关系,对于染色体来说,没有所属。
ID是染色体唯一且不能重复的标识。之后的LABEL是将来用于显示在图上的文本。如果一个
染色体组型文件里面包含多个不同来源的染色体组,设置ID最好的办法就是使用前缀。比
如hs=homo sapiens, mm=mus musculus等等。有时候你可以使用hs19做为前缀来明示数
据来源版本。其实,即使是只有一个来源的染色体组,也最好使用前缀,以规范文件格式。
START和END值定义了染色体的大小。对于染色体组型文件,需要指明的是,这里的START和
END应该是染色体本身的大小,而不是你想绘制部分的起止位置。指定绘制部分将由其它文
件来定义。
COLOR是于定义显示的颜色。如果染色体组不以条纹(cytogenetic bands)图谱覆盖的话,
那么就会以这里设置的颜色显示。对于人类基因组而言,circos预设了与染色体相同的名
字做为颜色名,比如chr1, chr2, … chrX, chrY, chrUn.
下面就是hg19的例子:
chr - hs1 hs1 0 249250621 chr1
chr - hs2 hs2 0 243199373 chr2
chr - hs3 hs3 0 198022430 chr3
chr - hs4 hs4 0 191154276 chr4
chr - hs5 hs5 0 180915260 chr5
chr - hs6 hs6 0 171115067 chr6
chr - hs7 hs7 0 159138663 chr7
chr - hs8 hs8 0 146364022 chr8
chr - hs9 hs9 0 141213431 chr9
chr - hs10 hs10 0 135534747 chr10
chr - hs11 hs11 0 135006516 chr11
chr - hs12 hs12 0 133851895 chr12
chr - hs13 hs13 0 115169878 chr13
chr - hs14 hs14 0 107349540 chr14
chr - hs15 hs15 0 102531392 chr15
chr - hs16 hs16 0 90354753 chr16
chr - hs17 hs17 0 81195210 chr17
chr - hs18 hs18 0 78077248 chr18
chr - hs19 hs19 0 59128983 chr19
chr - hs20 hs20 0 63025520 chr20
chr - hs21 hs21 0 48129895 chr21
chr - hs22 hs22 0 51304566 chr22
chr - hsx hsx 0 155270560 chrx
chr - hsy hsy 0 59373566 chry
一般的,我们都会在染色体组型文件当中加上条纹图谱的信息,这样才会让染色体图谱看上
去有被染色的效果。文件格式与之前的一致,也只有七列。
band DOMAIN ID LABEL START END COLOR
这里的DOMAIN就是染色体组型当中的ID就好了,其它的定义与前面的一致。下面就是一个
例子。
�
band hs1 p36.33 p36.33 0 2300000 gneg
band hs1 p36.32 p36.32 2300000 5400000 gpos25
band hs1 p36.31 p36.31 5400000 7200000 gneg
band hs1 p36.23 p36.23 7200000 9200000 gpos25
band hs1 p36.22 p36.22 9200000 12700000 gneg
band hs1 p36.21 p36.21 12700000 16200000 gpos50
band hs1 p36.13 p36.13 16200000 20400000 gneg
band hs1 p36.12 p36.12 20400000 23900000 gpos25
band hs1 p36.11 p36.11 23900000 28000000 gneg
band hs1 p35.3 p35.3 28000000 30200000 gpos25
band hs1 p35.2 p35.2 30200000 32400000 gneg
band hs1 p35.1 p35.1 32400000 34600000 gpos25
band hs1 p34.3 p34.3 34600000 40100000 gneg
band hs1 p34.2 p34.2 40100000 44100000 gpos25
band hs1 p34.1 p34.1 44100000 46800000 gneg
band hs1 p33 p33 46800000 50700000 gpos75
band hs1 p32.3 p32.3 50700000 56100000 gneg
band hs1 p32.2 p32.2 56100000 59000000 gpos50
band hs1 p32.1 p32.1 59000000 61300000 gneg
band hs1 p31.3 p31.3 61300000 68900000 gpos50
band hs1 p31.2 p31.2 68900000 69700000 gneg
band hs1 p31.1 p31.1 69700000 84900000 gpos100
band hs1 p22.3 p22.3 84900000 88400000 gneg
band hs1 p22.2 p22.2 88400000 92000000 gpos75
...
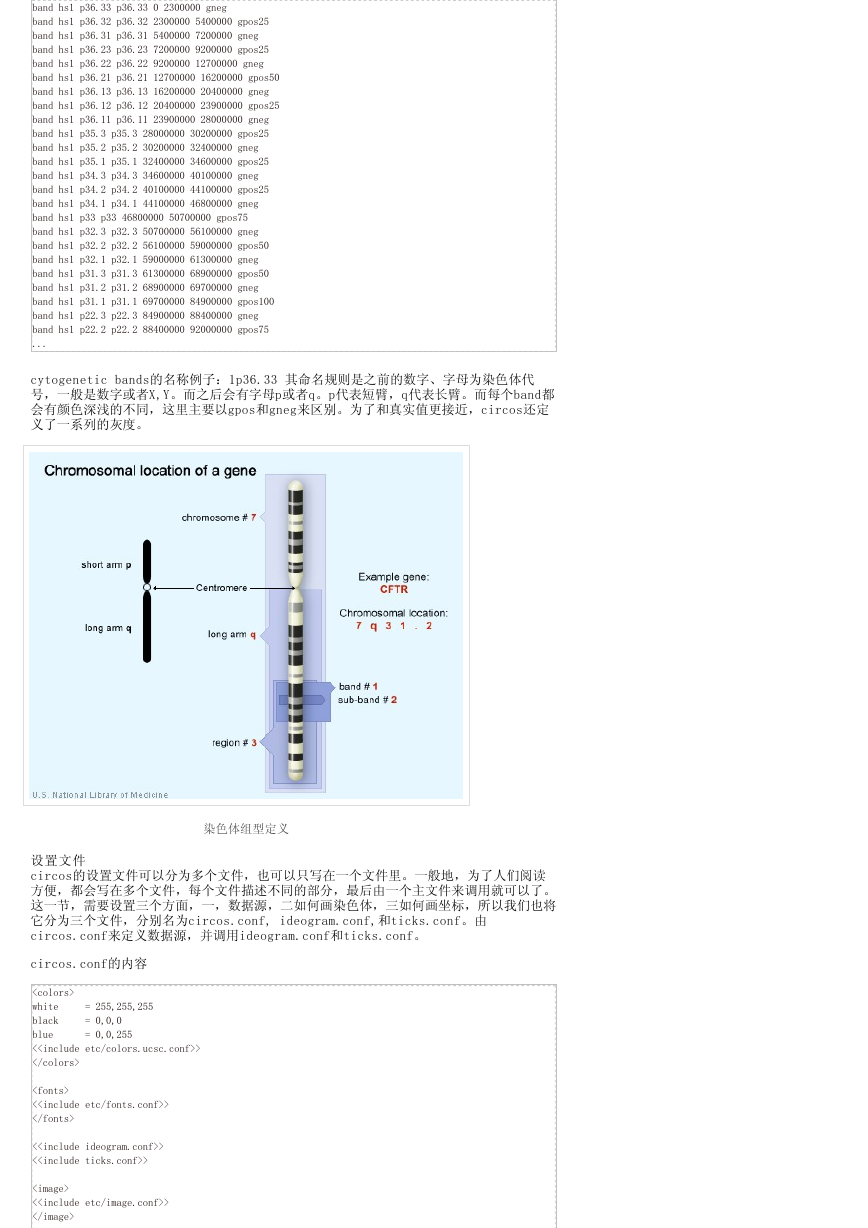
cytogenetic bands的名称例子:1p36.33 其命名规则是之前的数字、字母为染色体代
号,一般是数字或者X,Y。而之后会有字母p或者q。p代表短臂,q代表长臂。而每个band都
会有颜色深浅的不同,这里主要以gpos和gneg来区别。为了和真实值更接近,circos还定
义了一系列的灰度。
染色体组型定义
设置文件
circos的设置文件可以分为多个文件,也可以只写在一个文件里。一般地,为了人们阅读
方便,都会写在多个文件,每个文件描述不同的部分,最后由一个主文件来调用就可以了。
这一节,需要设置三个方面,一,数据源,二如何画染色体,三如何画坐标,所以我们也将
它分为三个文件,分别名为circos.conf, ideogram.conf,和ticks.conf。由
circos.conf来定义数据源,并调用ideogram.conf和ticks.conf。
circos.conf的内容
white = 255,255,255
black = 0,0,0
blue = 0,0,255
<>
<>
<>
<>
<>
�
# specify the karyotype file here
karyotype = karyotype.human.hg19.txt
chromosomes_units = 1000000
chromosomes_display_default = yes
<>
这里可以注意到它引入其它文件时使用的是<>的方式。注意,这里include会从circos所在
的目录开始寻找,而不是当前目录。我们可以在circos的安装目录当中找到一个名为etc的
目录,可以点击查看其中的colors.ucsc.conf,image.conf,以及housekeeping.conf的
内容。
在circos当中使用karyotype=xxx语句来定义了karyotype的数据来源。
chromosomes_units=1000000定义了基准单位。可以试着把这个值扩大10倍。
接下来我们看ideogram.conf。在ideogram.conf文件中,定义了如何显示染色体组型。
default = 0.005r
break = 5u
#position configuration
radius = 0.90r
thickness = 100p
fill = yes
fill_color = black
stroke_thickness = 2
stroke_color = black
#label configuration
show_label = yes
label_font = bold
label_radius = dims(ideogram,radius) + 0.07r
label_with_tag = yes
label_size = 36
label_parallel = no
#band configuration
show_bands = yes
fill_bands = yes
band_stroke_thickness = 2
band_stroke_color = white
band_transparency = 0
在ticks.conf当中定义了如何来绘制刻度。
show_ticks = yes
show_tick_labels = yes
skip_first_label = no
skip_last_label = no
radius = dims(ideogram,radius_outer)
tick_separation = 3p
label_separation = 1p
multiplier = 1e-6
color = black
thickness = 4p
size = 20p
spacing = 1u
show_label = no
thickness = 2p
color = dgrey
spacing = 5u
show_label = no
thickness = 3p
color = vdgrey
spacing = 10u
show_label = yes
label_size = 20p
�




 2023年江西萍乡中考道德与法治真题及答案.doc
 2012年重庆南川中考生物真题及答案.doc
 2013年江西师范大学地理学综合及文艺理论基础考研真题.doc
 2020年四川甘孜小升初语文真题及答案I卷.doc
 2020年注册岩土工程师专业基础考试真题及答案.doc
 2023-2024学年福建省厦门市九年级上学期数学月考试题及答案.doc
 2021-2022学年辽宁省沈阳市大东区九年级上学期语文期末试题及答案.doc
 2022-2023学年北京东城区初三第一学期物理期末试卷及答案.doc
 2018上半年江西教师资格初中地理学科知识与教学能力真题及答案.doc
 2012年河北国家公务员申论考试真题及答案-省级.doc
 2020-2021学年江苏省扬州市江都区邵樊片九年级上学期数学第一次质量检测试题及答案.doc
 2022下半年黑龙江教师资格证中学综合素质真题及答案.doc